

If you're following along, choose the New project option to create a new, blank story file. This option is best when you want to create an original story file with your own design. When New project is selected from the Storyline launch screen, the initial view you see looks the same as the following screenshot and contains just a single, blank slide:
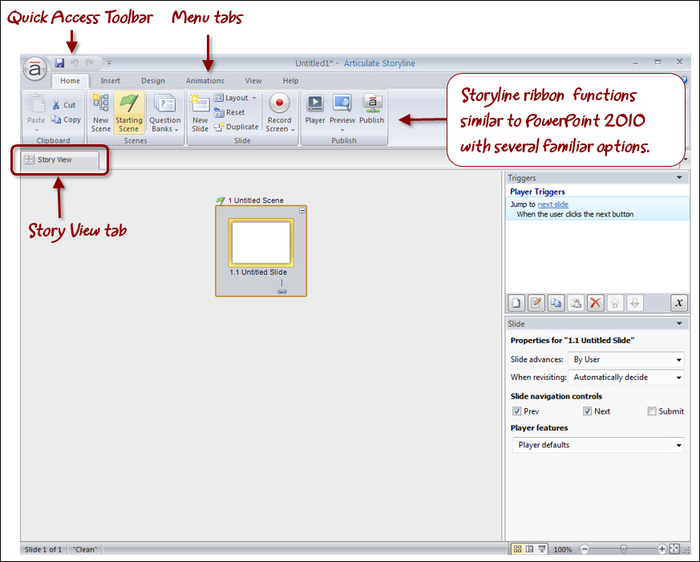
This view is called Story View and it's the default view.
Tip
You can hide the ribbon by right-clicking anywhere in the ribbon and choosing Minimize the Ribbon. You can reveal it again by repeating this. Any item on the ribbon can be included on the quick access toolbar by right-clicking on a ribbon option and choosing Add to Quick Access Toolbar.
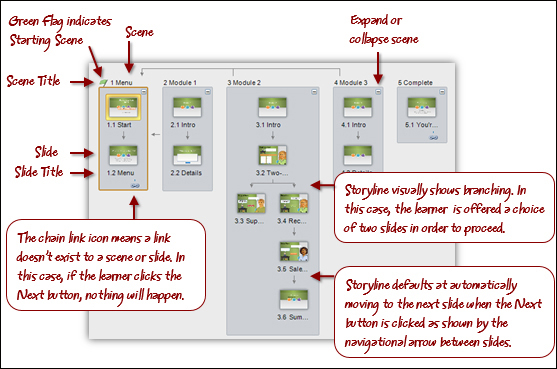
Story View is a new concept for those transitioning from Articulate Studio and one that you're likely to grow quite fond of. Story View, similar to the Slide Sorter View in PowerPoint, shows all the slides in your project, providing a big picture view of the entire project.
The following screenshot is a sample course in a Story View. You can see the slides are organized into groups. The groups are called scenes. Scenes help to visually organize content into logical segments similar to chapters in a book. There are no hard and fast rules of when and how to use scenes other than logical breakpoints. You could have all of your content on slides within a single scene; but as you start working with Storyline, you will appreciate the ability to group topics together.
Outside of visual organization, scenes also play a role in the menus of a project as each scene by default becomes a submenu in the navigational structure. This can be overridden of course, but by default it offers another compelling reason to use scenes; to expedite navigational refinement that is part of the publishing process.
You can clearly see from this vantage point how content flows from one slide to another. As projects become larger and more complex, you will find Story View indispensable for organizing and managing project content.
When working on an individual slide, you'll most often use the Normal View. This view is quite similar to PowerPoint and will be familiar to Articulate Studio users.
Normal View can be accessed in a few different ways, including the following:
The easiest method is to double-click on the slide while in Story View
You can switch to Normal View using the Slide button in the lower-right corner of the screen
From the ribbon, you can click on the View tab and then choose Normal

Once in Normal View, you can toggle back to Story View by clicking on the Story View tab, clicking on the Story View button, or choosing View | Story View from the ribbon as shown in the following screenshot:
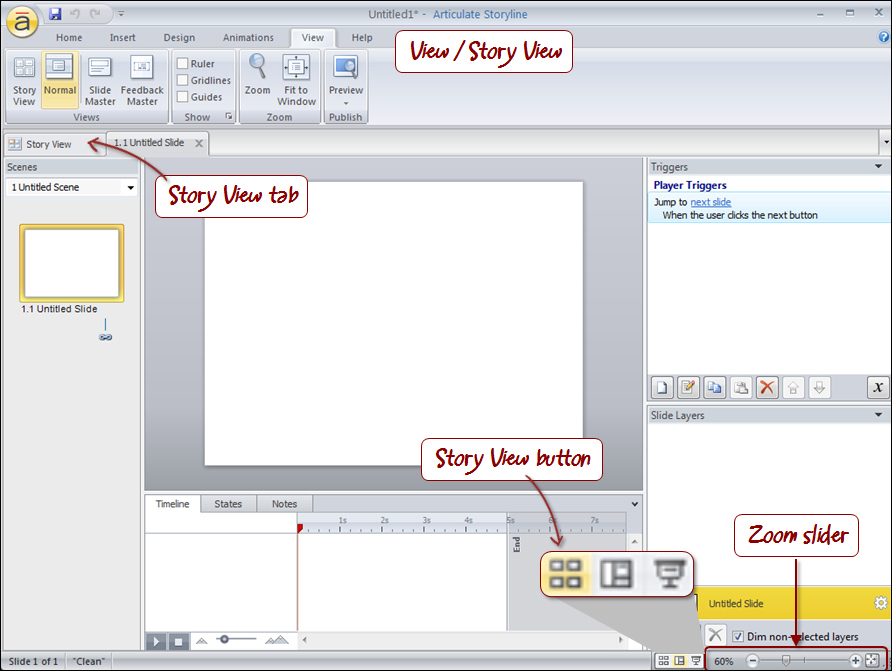
In both views, you will notice a zoom slider in the lower-right corner. You can use this to adjust the viewing size of the slide or the viewing size of the scenes and slides, depending on if you are in Normal or Story View.
The far right side of the slider displays a fit to window button that you may find useful to quickly fit the slide or Story View content back into the available screen space.
The slider is a quick method of controlling zoom levels. You can also do this by holding the Ctrl key and moving the track wheel up or down (using a mouse that has a track wheel).