

In this section, we will introduce some of the new and exciting features of the Swift programming language. So, let's get started.
Our next step is to familiarize ourselves with the differences between variables, constants, strings, and semicolons in a bit more detail. We will work with and use Xcode playgrounds to put each of these into practice.
A variable is a value that can change. Every variable contains a name, called the variable name, and must contain a data type. The data type indicates what sort of value the variable represents, such as whether it is an integer, a floating point number, or a string.
Let's take a look at how we can put this into practice and create a variable in Swift.
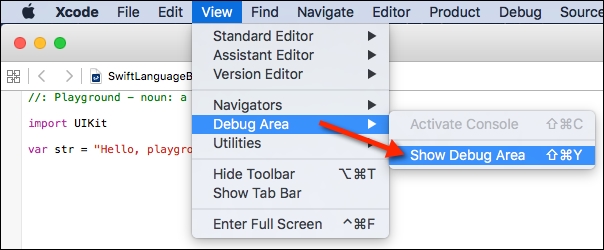
First, let's start by revealing the console output window by navigating to View | Debug Area | Show Debug Area.
Next, clear the contents of the playground template and replace them with the following code snippet:
/*:
# Swift Language Basics – Variables
: Created by Steven F. Daniel
: Copyright © 2015 GENIESOFT STUDIOS. All Rights Reserved.
*/

var myGreeting = "Welcome to Learning the basics of Swift Programming"
print(myGreeting, terminator: "")
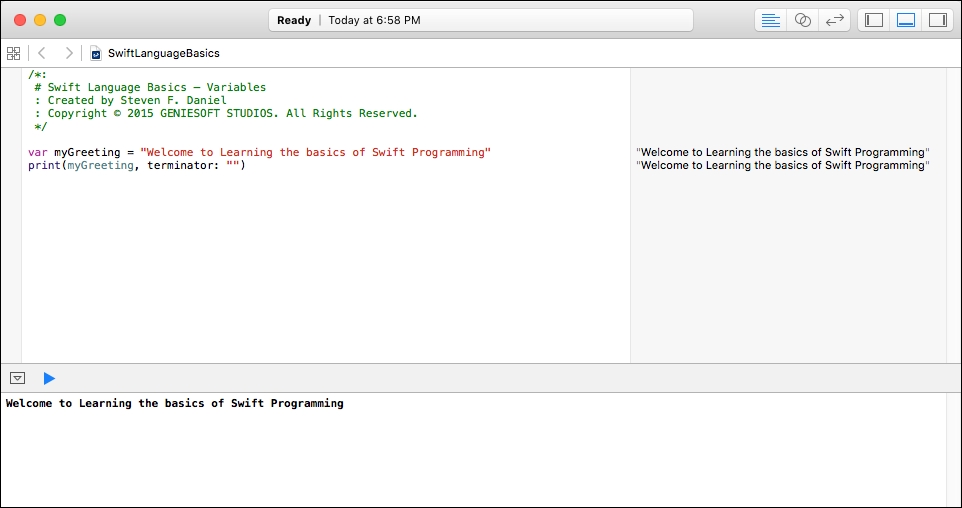
As you begin to type in the code, you should immediately see the Welcome to Learning the basics of Swift text magically appear in the right-hand pane in which the assignment takes place and it appears once more for the print statement.
The right-hand pane is great for showing you smaller output, but for longer debugging output, you would normally take a look at the Xcode console.
A constant is basically a value that cannot be changed. Creating these constant variables prevents you from performing accidental assignments and can even improve performance.
Let's take a look at how we can put this into practice and create a constant variable in Swift.
Clear the contents of the playground template and replace them with the following code snippet:
/*:
# Swift Language Basics – Constants
: Created by Steven F. Daniel
: Copyright © 2015 GENIESOFT STUDIOS. All Rights Reserved.
*/

let myGreeting = "Welcome to Learning the basics"
print(myGreeting, terminator: "")

myGreeting += " of Swift Programming"
Take a look at the screenshot now:
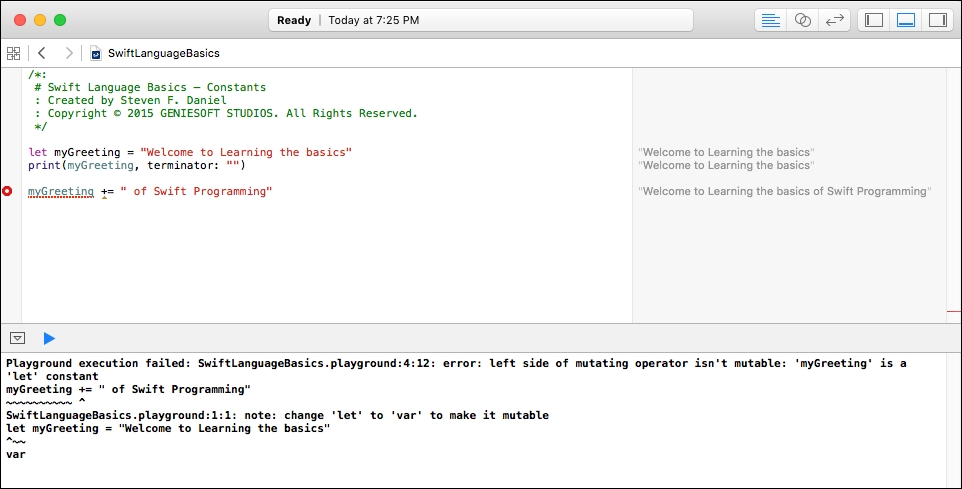
As you begin to type in the code, you will immediately receive an error message stating that you cannot assign myGreeting to our let value because the object is not mutable. In Swift, you can control the mutability of the built-in Swift types by using either the let or var keywords during declaration.
A string is basically an ordered collection of characters, for example, "hello, world". In Swift, strings are represented by the String data type, which represents a collection of values of the char data type.
You can use strings to insert constants, variables, literals, and expressions into longer strings in a process known as string interpolation, which we will cover later on this in chapter. This makes it easy to create custom string values for display, storage, and printing.
Let's take a look at how we can put this into practice, create a String variable in Swift, and utilize some of the string methods.
Clear the contents of the playground template and replace them with the following code snippet:
/*:
# Swift Language Basics – Strings
: Created by Steven F. Daniel
: Copyright © 2015 GENIESOFT STUDIOS. All Rights Reserved.
*/

import Foundation

let myGreeting = "Welcome to Swift Language Basics, working with Strings"

// Make our String uppercase
print(myGreeting.uppercaseString)

// Append exclamation mark at the end of the string
var newGreeting = myGreeting.stringByAppendingString("!!!")
print(newGreeting)
Take a look at the screenshot now:
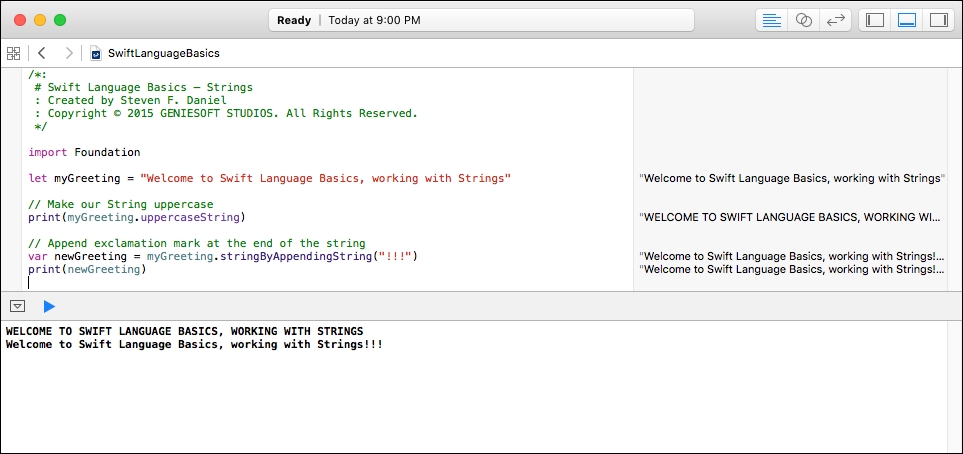
As you can see in the preceding code snippet, we began by importing the Foundation framework class, which contains several APIs to deal with objects such as strings and dates. Next, we declared our myGreeting constant variable and then assigned a default string. We then used the uppercaseString method of the string object to perform a function to make all of the characters within our string uppercase. In our next step, we will declare a new variable called newGreeting and call the stringByAppendingString method to append additional characters at the end of our string.
Note
For more information on using the String class, you can consult the Swift programming language documentation at https://developer.apple.com/library/ios/documentation/Swift/Conceptual/Swift_Programming_Language/StringsAndCharacters.html.
As you would have probably noticed so far, the code you wrote doesn't contain any semicolons. This is because in Swift, these are only required if you want to write multiple statements on a single line.
Let's take a look at a code example to see how we can put this into practice.
Delete the contents of the playground template and replace them with the following code snippet:
/*:
# Swift Language Basics – Semicolons
: Created by Steven F. Daniel
: Copyright © 2015 GENIESOFT STUDIOS. All Rights Reserved.
*/

import Foundation

var myGreeting = "Welcome to Swift Language"
let newString = myGreeting + " Basics, ".uppercaseString + "working with semicolons"; print(newString)
Take a look the following screenshot now:
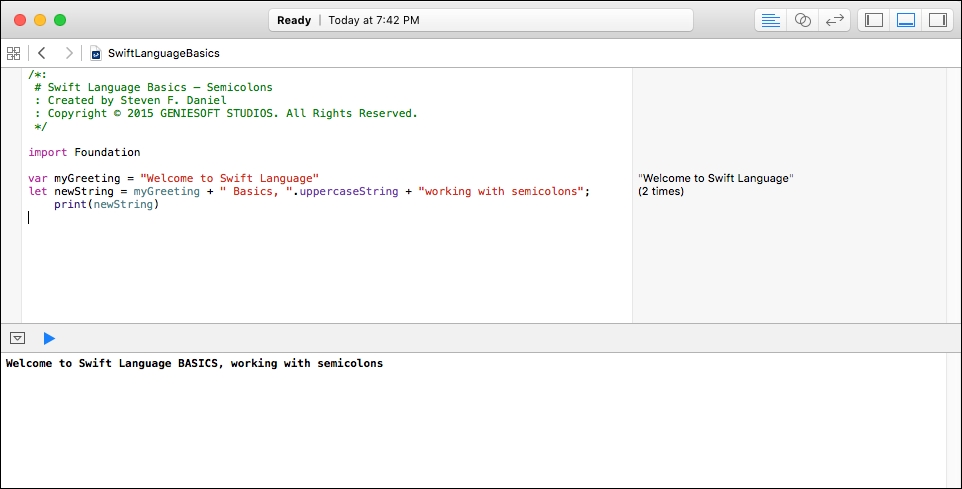
As you can see in the preceding code snippet, we began by declaring our myGreeting variable and then assigned a default string. In our next step, we declared a new variable called newString, concatenated the details from our myGreeting string, and used the uppercaseString method, which cycles through each character within our string, making our characters uppercase.
Next, we appended the additional working with semicolons string to the end of our string and finally used the print statement to output the contents of our newString variable to the console window. As you must have noticed, we included a semicolon at the end of the statement; this is because in Swift, you are required to include semicolons if you want to write multiple statements on a single line.
In this section, we will take a look at how we can perform arithmetic operations on our Swift variables. In this example, we will look at how to calculate the area of a triangle, given a base and height value.
Let's take a look at a code example to see how we can put this into practice.
Clear the contents of the playground template and replace them with the following code snippet:
/*:
# Swift Language Basics - Numeric Types and Conversion
: Created by Steven F. Daniel
: Copyright © 2015 GENIESOFT STUDIOS. All Rights Reserved.
*/

import Foundation

// method to calculate the area of a triangle
func calcTriangleArea(triBase: Double, triHeight: Double) -> Double {
    return (triBase * triHeight) / 2
}

// Declare our base and height of our triangle
let base = 20.0
let height = 120.0

// Calculate and display the area of the triangle and
print ("The calculated Area is: " + String(calcTriangleArea(base, triHeight: height)));
Take a look at the following screenshot now:
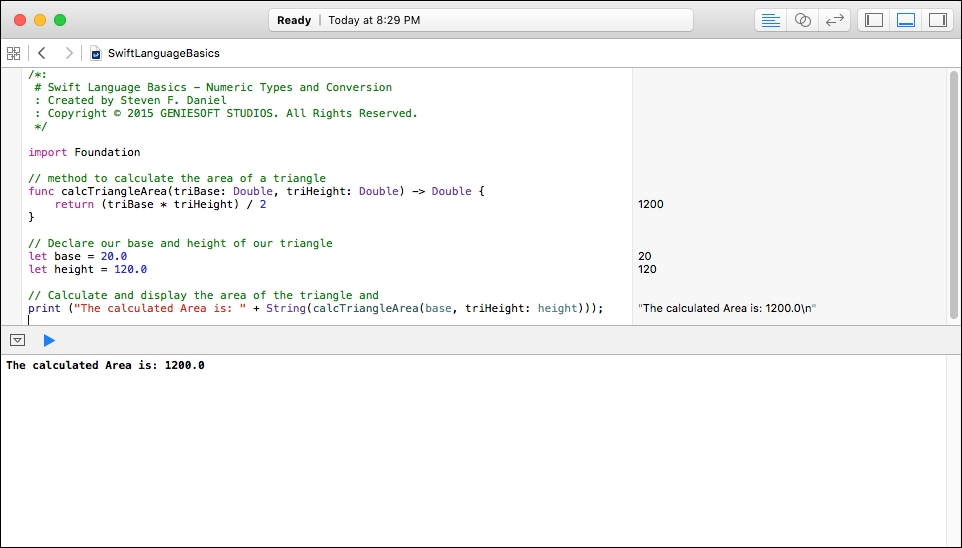
As you can see in the preceding code snippet, we started by creating our calcTriangleArea function method, which accepts a base and a height parameter value in order to calculate the area of the triangle. In our next step, we declared two variables, base and height, which contain the assigned values that will be used to calculate the base and the height of our triangle. Next, we made a call to our calcTriangleArea method, passing in the values for our base and height before finally using the print statement to output the calculated area of our triangle to the console window.
An important feature of the Swift programming language is that all numeric data type conversions must be explicit, regardless of whether you want to convert to a data type containing more or less precision.
In this section, we will look at the various features that come with the Swift programming language. We will look at the improvements that Swift has over Objective-C when it comes to using Booleans and string interpolation before finally discussing how we can use tuples to access elements from a string.
Boolean
variables in Swift are basically defined using the Bool data type. This data type can only hold values containing either true or false.
Let's take a look at a code example to see how we can put this into practice.
Clear the contents of the playground template and replace them with the following code snippet:
/*:
# Swift Language Basics – Booleans
: Created by Steven F. Daniel
: Copyright © 2015 GENIESOFT STUDIOS. All Rights Reserved.
*/

import Foundation

let displaySettings : Bool = true
print("Display Settings is: " + (displaySettings ? "ON" : "OFF"))
Take a look at the following screenshot now:
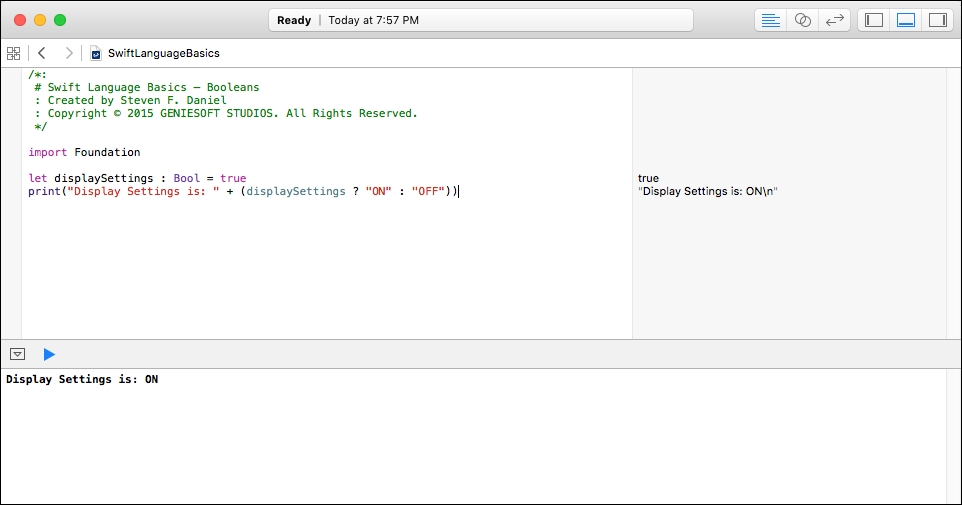
As you can see from the preceding code snippet, we started by declaring our constant variable called displaySettings and assigned it a default Boolean value of true. Next, we performed a check to see whether the value of our displaySettings variable is set to true and called our print statement to output the Display Settings is: ON value to the console window.
In Objective-C, you would assign values of 1 and 0 to denote true and false; this is no longer the case with Swift because Swift doesn't treat 1 as true and 0 as false. You need to explicitly use the actual Boolean values to stay within Swift's data type system.
Let's replace the existing playground code with the following code snippet to take a look at what would happen if we changed our value from true to 1:
 /*:
# Swift Language Basics – Booleans
: Created by Steven F. Daniel
: Copyright © 2015 GENIESOFT STUDIOS. All Rights Reserved.
*/

import Foundation

let displaySettings : Bool = 1 // This will cause an error!!!
print("Display Settings is: " + (displaySettings ? "ON" : "OFF"))
Take a look at the following screenshot now:
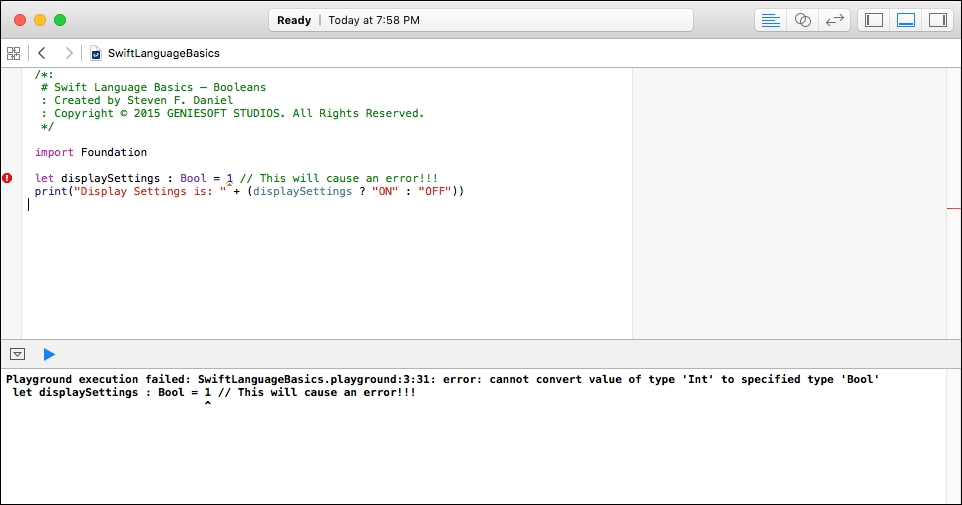
As you can see from the previous screenshot, Swift detected that we were assigning an integer value to our Boolean data type and threw an error message.
Tuples provide you with the ability to group multiple values into a single compound value. The values contained within a tuple can be any data type, and therefore are not required to be of the same type.
Let's take a look at a code example, to see how we can put this into practice.
Clear the contents of the playground template and replace them with the following code snippet:
/*:
# Swift Language Basics – Tuples
: Created by Steven F. Daniel
: Copyright © 2015 GENIESOFT STUDIOS. All Rights Reserved.
*/

import Foundation

// Define our Address Details
var addressDetails = ("Apple Inc.", "1 Infinite Loop", "Cupertino, California", "United States");

print(addressDetails.0) // Get the Name
print(addressDetails.1) // Address
print(addressDetails.2) // State
print(addressDetails.3) // Country
Take a look at the following screenshot now:
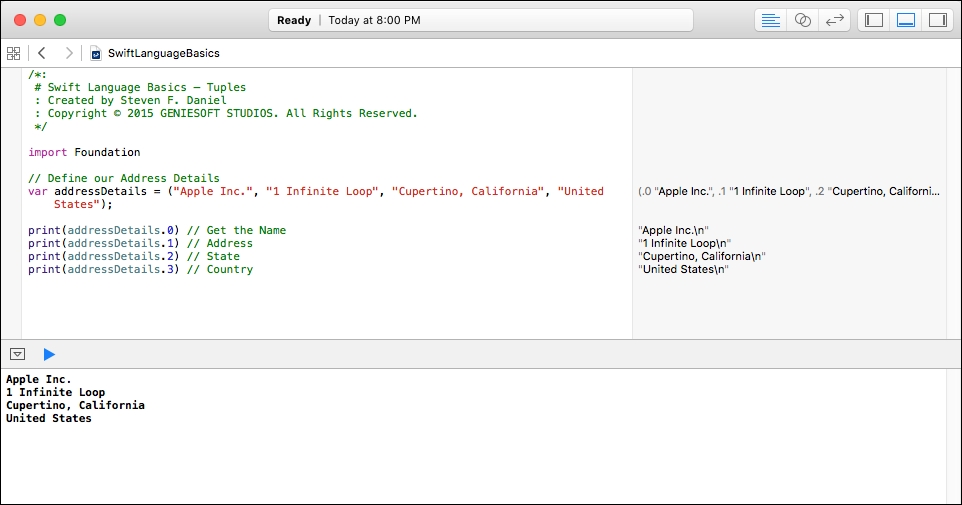
As you can see from the preceding code snippet, we started by declaring a tuple variable called addressDetails that contains a combination of strings. Next, we accessed each of the tuple elements by referencing their index values and displayed each of these elements in the console window.
Let's say that you want to modify the contents of the first element within your tuple. Add the following code snippet after your var addressDetails variable:
// Modify the element within our String
addressDetails.0 = "Apple Computers, Inc."
Take a look at the following screenshot now:
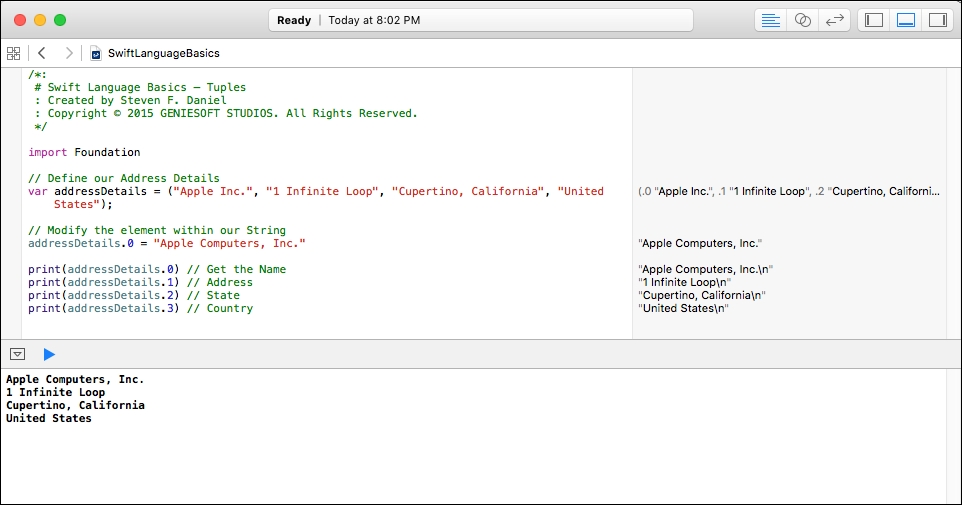
As you can see from the preceding screenshot, we modified our first component within our tuple to the Apple Computers, Inc value. If you do not want modifications to be made to your variable, you can just change the var keyword to let, and the assignment would result in a compilation error.
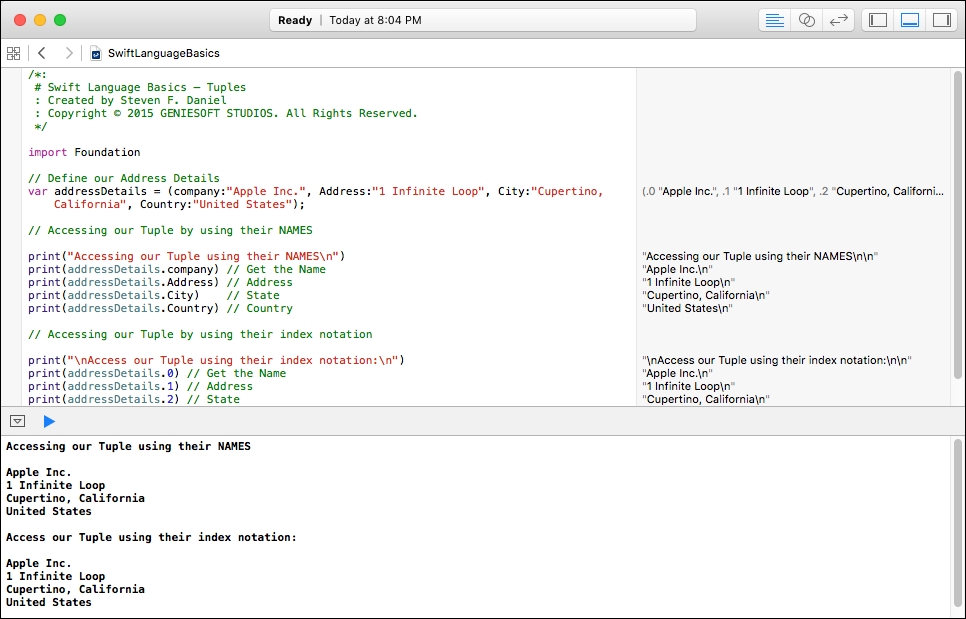
You can also express your tuples by referencing them using their named elements. This makes it really useful as you can ensure that your users know exactly what the element refers to. If you express your tuples using their named elements, you will still be able to access your elements using their index notation, as can be seen in the following highlighted code snippet:
/*:
# Swift Language Basics – Tuples
: Created by Steven F. Daniel
: Copyright © 2015 GENIESOFT STUDIOS. All Rights Reserved.
*/

import Foundation

// Define our Address Details
var addressDetails = (company:"Apple Inc.", Address:"1 Infinite Loop", City:"Cupertino, California", Country:"United States");

// Accessing our Tuple by using their NAMES

print("Accessing our Tuple using their NAMES\n")
print(addressDetails.company) // Get the Name
print(addressDetails.Address) // Address
print(addressDetails.City)    // State
print(addressDetails.Country) // Country

// Accessing our Tuple by using their index notation

print("\nAccess our Tuple using their index notation:\n")
print(addressDetails.0) // Get the Name
print(addressDetails.1) // Address
print(addressDetails.2) // State
print(addressDetails.3) // Country
Take a look at the following screenshot now:
As you can see from what we covered so far about tuples, these are really cool and are basically just like any other data type in Swift; they can be really powerful to use within your own programs. As we progress through this book, you will see tuples being used more frequently.
String interpolation means embedding constants, variables, as well as expressions within your string literals. In this section, we will take a look at an example of how you can use this.
Clear the contents of the playground template and replace them with the following code snippet:
/*:
# Swift Language Basics - String Interpolation
: Created by Steven F. Daniel
: Copyright © 2015 GENIESOFT STUDIOS. All Rights Reserved.
*/

import Foundation

// Define our Address Details
var addressDetails = (company:"Apple Inc.", Address:"1 Infinite Loop", City:"Cupertino, California", Country:"United States");

// Use String Interpolation to format output
print("Apple Headquarters are located at: \n\n" + addressDetails.company + ",\n"
    + addressDetails.Address + "\n" + addressDetails.City + "\n"
    + addressDetails.Country);
Take a look at the following screenshot now:
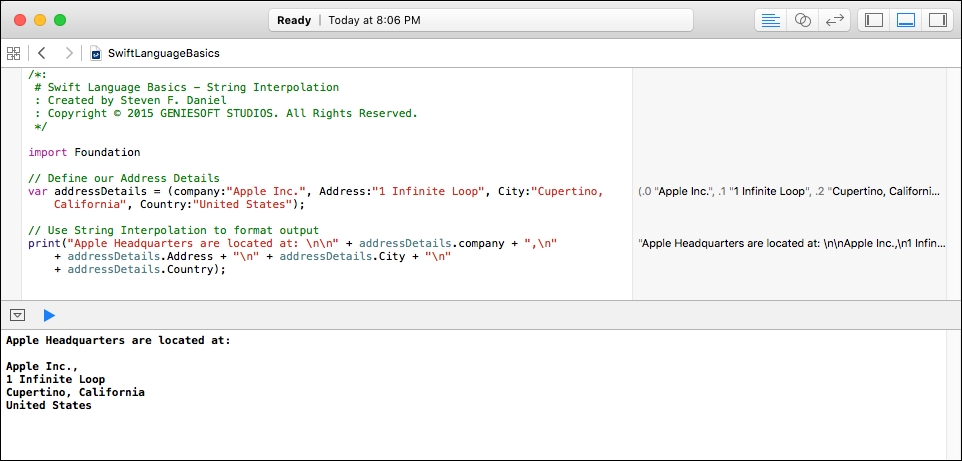
As you can see from the preceding code snippet, we started by declaring a tuple variable called addressDetails that contains a combination of strings. Next, we performed a string concatenation to generate our output in the format that we want by accessing each of the tuple elements using their index values and displaying each of these elements in the console window.
Let's take this a step further and use string interpolation to place our address detail information into string variables. The result will still be the same, but I just want to show you the power of using tuples with the Swift programming language.
Clear the contents of the playground template and replace them with the following highlighted code snippet:
/*:
# Swift Language Basics - String Interpolation
: Created by Steven F. Daniel
: Copyright © 2015 GENIESOFT STUDIOS. All Rights Reserved.
*/

import Foundation

// Use String Interpolation to place elements into string initializers
var addressDetails = ("Apple Inc.", "1 Infinite Loop", "Cupertino, California", "United States");
let (Company, Address, City, Country) = addressDetails


print("Apple Headquarters are located at: \n\n" + Company + ",\n" + Address + "\n" + City + "\n" + Country);
Take a look at the following screenshot now:
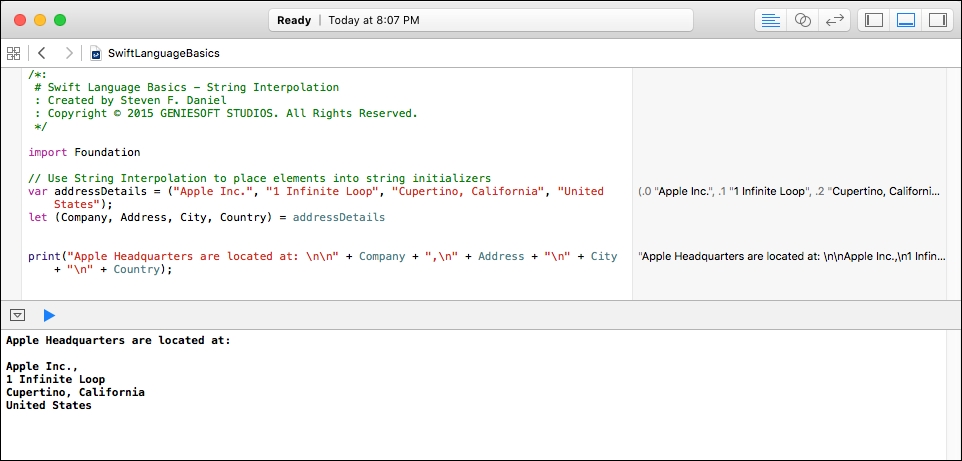
As you can note from the preceding code snippet, we removed the named types from our addressDetails string contents, created a new type using the let keyword, and assigned placeholders for each of our tuple elements. This is very handy as it not only makes your code a lot more readable but you can also continue to create additional placeholders for the additional fields that you create.
In this section, we will take a look at how to use the for…in loop to iterate over a set of statements within the body of the loop until a specific condition is met.
The for…in loops basically perform a set of statements over a certain number of times until a specific condition is met, which is typically handled by incrementing a counter each time until the loop ends.
Let's take a look at a code example to see how we can put this into practice.
Clear the contents of the playground template and replace them with the following code snippet:
/*:
# Swift Language Basics - Control Flow
: Created by Steven F. Daniel
: Copyright © 2015 GENIESOFT STUDIOS. All Rights Reserved.
*/

import Foundation

// Perform a fibonacci loop using the For-In Loop
var fibonacci = 0
var iTemp = 1
var jTemp = 0

for iterator in 0...19 {
    jTemp = fibonacci
    fibonacci += iTemp
    iTemp = jTemp
    print("Fibonacci: " + String(fibonacci), terminator: "\n")
}
Take a look at the following screenshot now:
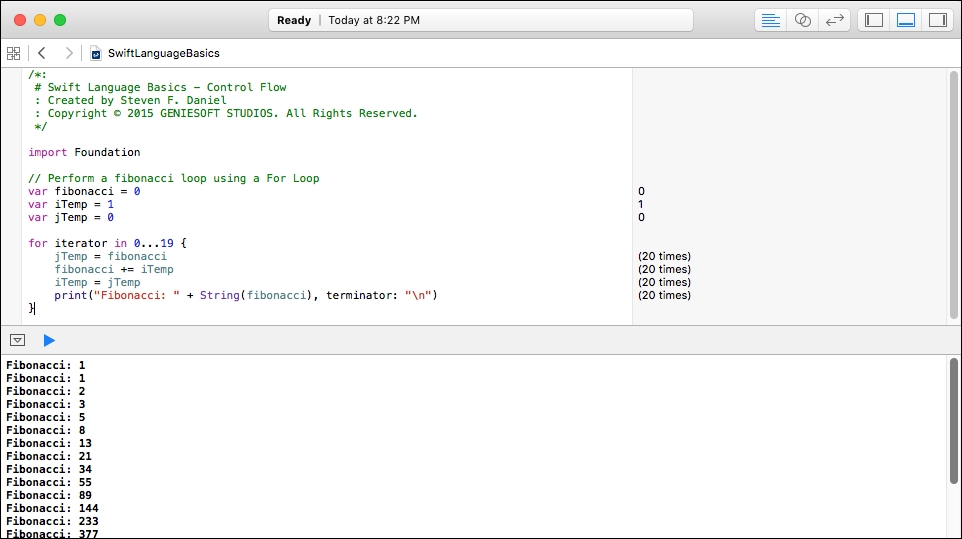
The preceding code demonstrates the for…in loop and the closed range operator (...). These are often used together, but they are entirely independent.
As you can see from the preceding code snippet, we declared the exact same variables: fibonacci, iTemp, and jTemp. Next, we used the for…in loop to iterate over our range, which is from 0 to 19, while displaying the current Fibonacci value in the console window.