In this section, we'll dive right in and talk about what WiX is, where to get it, and why you'd want to use it when building an installation package for your software. We'll follow up with a quick description of the WiX tools and the new project types made available in Visual Studio.
Creating a Windows Installer, or MSI package, has always been a challenging task. The package is actually a relational database that describes how the various components of an application should be unpacked and copied to the end user's computer.
In the past you had two options:
You could try to author the database yourself—a path that requires a thorough knowledge of the Windows Installer API.
You could buy a commercial product such as InstallShield to do it for you. These software products will take care of the details, but you'll forever be dependent on them. There will always be parts of the process that are hidden from you.
WiX offers a route that exists somewhere in the middle. Abstracting away the low-level function calls while still allowing you to write much of the code by hand, WiX is a framework for building an installer in ways that mere mortals can grasp. Best of all, it's free. As an open source product, it has quickly garnered a wide user base and a dedicated community of developers. Much of this has to do not only with its price tag but also with its simplicity. It can be authored in a simple text editor (such as Notepad) and compiled with the tools provided by WiX. As it's a flavor of XML, it can be read by humans, edited without expensive software, and lends itself to being stored in source control where it can be easily merged and compared.
The examples in this first chapter will show how to create a simple installer with WiX using Visual Studio. However, later chapters will show how you can build your project from the command line using the compiler and linker from the WiX toolset. The WiX source code is available for download, so you can be assured that nothing about the process will be hidden if you truly need to know more about it.
It's fairly simple to copy files to an end user's computer. If that's all your product needs, then the Windows Installer technology might be overkill. However, there are many benefits to creating an installable package for your customers, some of which might be overlooked. The following is a list of features that you get when you author a Windows Installer package with WiX:
All of your executable files can be packaged into one convenient bundle, simplifying deployment
Your software is automatically registered with Programs and Features
Windows takes care of uninstalling all of the components that make up your product when the user chooses to do so
If files for your software are accidently removed, they can be replaced by right-clicking on the MSI file and selecting Repair
You can create different versions of your installer and detect which version has been installed
You can create patches to update only specific areas of your application
If something goes wrong while installing your software, the end user's computer can be rolled back to a previous state
You can create Wizard-style dialogs to guide the user through the installation
Many people today simply expect that your installer will have these features. Not having them could be seen as a real deficit. For example, what is a user supposed to do when they want to uninstall your product but can't find it in the Programs and Features list and there isn't an uninstall shortcut? They're likely to remove files in a haphazard manner and wonder why you didn't make things easy for them.
Maybe you've already figured that Windows Installer is the way to go, but why WiX? One of my favorite reasons is that it gives you greater control over how things work. You get a much finer level of control over the development process. Commercial software that does this for you also produces an MSI file but hides the details about how it was done. It's analogous to crafting a website. You get much more control when you write the HTML yourself as opposed to using a WYSIWYG software.
Even though WiX gives you more control, it doesn't make things overly complex. You'll find that making a simple installer is very straightforward. For more complicated projects, the parts can be split up into multiple XML source files to make it easier to work with. Going further, if your product is made up of multiple applications that will be installed together as a suite, you can compile the different chunks into libraries that can be merged together into a single MSI file. This allows each team to isolate and manage its part of the installation package.
WiX is a stable technology, having been first released to the public in 2004, so you don't have to worry about it disappearing. It's also had a steady progression of version releases. These are just some of the reasons why you might choose to use WiX.
You can find the latest version of WiX at http://wixtoolset.org/, which has both stable releases and weekly builds. The current release is Version 3.6. Once you've downloaded the WiX installer package, double-click on it to launch it. It relies on having an Internet connection to download the .NET 4.0 platform, if it's not already installed.
If you want to install on a computer that isn't connected to the Internet, first download the installer on a computer that is and then open a command prompt and run the WiX executable with the following command wix36.exe /layout LayoutDirectory. The layout option takes the name of a target directory where the WiX files will be downloaded to. You can then take these files (which include a new installer) to the computer that doesn't have an Internet connection and use them there.
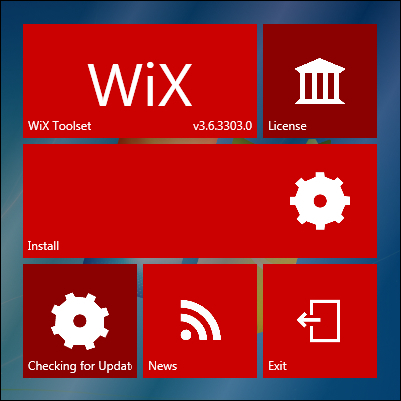
This installs all of the necessary files needed to build WiX projects. You'll also get the WiX SDK documentation and the settings for Visual Studio IntelliSense and project templates. Version 3.6 supports Visual Studio versions 2005 through 2012, although not the Express editions.
WiX comes with the tools outlined in the following table:
|
Tool |
What it does |
|---|---|
|
Compiles WiX source files ( | |
|
Links and binds | |
|
Creates WiX libraries ( | |
|
Decompiles an MSI file into WiX code | |
|
Creates a WiX source file that specifies components from various inputs | |
|
Inscribes an MSI with the digital signatures that its external CAB files are signed with | |
|
Converts a merge module ( | |
|
Generates a transform file used to apply changes to an in-progress installation or to create a patch file | |
|
Creates a DGML diagram from an MSI | |
|
Runs validation checks on an MSI or MSM file | |
|
Creates a patch file ( | |
|
Converts Version 2 WiX files to Version 3 | |
|
Validates WiX source files | |
|
Authors and runs unit tests on custom actions |
In order to use some of the functionality in WiX, you may need to download a more recent version of Windows Installer. You can check your current version by viewing the help file for msiexec.exe, which is the Windows Installer service. Open a Windows command prompt and then type msiexec /? to bring up a window, as shown in the following screenshot:
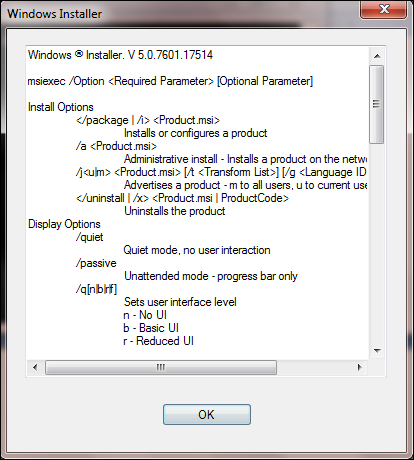
If you'd like to install a newer version of Windows Installer, you can get it from the Microsoft Download Center website. Go to:
http://www.microsoft.com/downloads/en/default.aspx
Search for Windows Installer. The current version for Windows XP, Vista, Server 2003, and Server 2008 is 4.5. Windows 7, Windows Server 2008 R2, and Windows 8 can support Version 5.0. Each new version is backwards compatible and includes the features from earlier editions.
The WiX toolset provides files that update Visual Studio to provide new WiX IntelliSense and project templates. Together these features, which are installed for you along with the other WiX tools, are called Votive. You must have Visual Studio 2005 or newer. Votive won't work on the Express versions. Refer to the WiX site for more information:
http://wix.sourceforge.net/votive.html
After you've installed WiX, you should see a new category of project types in Visual Studio labeled under the title Windows Installer XML, as shown in the following screenshot:
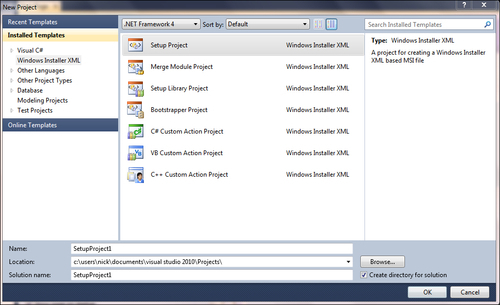
There are seven new project templates:
Setup Project: Creates a Windows Installer package from one or more WiX source files
Merge Module Project: Creates a merge module (MSM) file
Setup Library Project: Creates a .
wixliblibraryBootstrapper Project: Creates a prerequisite bootstrapper
C# Custom Action Project: Creates a .NET custom action in C#
C++ Custom Action Project: Creates an unmanaged C++ custom action
VB Custom Action Project: Creates a VB.NET custom action
Using these templates is certainly easier than creating the files on your own with a text editor. To start creating your own MSI installer, select the template Setup Project. This will create a new .wxs (WiX source file) for you to add XML markup to. Once we've added the necessary markup, you'll be able to build the solution by selecting Build Solution from the Build menu or by right-clicking on the project in the Solution Explorer and selecting Build. Visual Studio will take care of calling candle.exe and light.exe to compile and link your project files.
If you right-click on your WiX project in Solution Explorer and select Properties, you'll see several screens where you can tweak the build process. One thing you'll want to do is set the amount of information that you'd like to see when compiling and linking the project, and how non-critical messages are treated. Refer to the following screenshot:
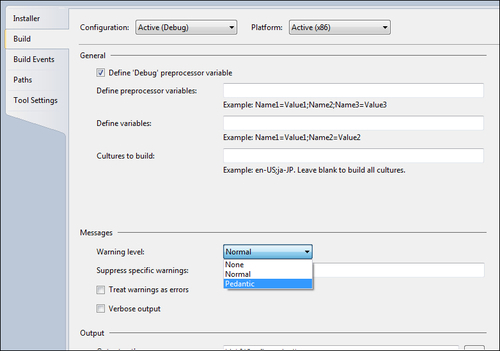
Here we're selecting the level of messages that we'd like to see. To see all warnings and messages, set Warning Level to Pedantic. You can also check the Verbose output checkbox to get even more information. Checking Treat warnings as errors will cause warning messages that normally would not stop the build to be treated as fatal errors.
You can also choose to suppress certain warnings. You'll need to know the specific warning message number though. If you get a build-time warning, you'll see the warning message, but not the number. One way to get it is to open the WiX source code (available at http://wix.codeplex.com/releases/view/93929) and view the messages.xml
file in the src\wix\Data folder. Search the file for the warning and from there you'll see its number. Note that you can suppress warnings but not errors.
Another feature of WiX is its ability to run validity checks on the MSI package. Windows Installer uses a suite of tests called Internal Consistency Evaluators (ICEs) for this. These checks ensure that the database as a whole makes sense and that the keys on each table join correctly. Through Votive, you can choose to suppress specific ICE tests. Use the Tools Setting page of the project's properties as shown in the following screenshot:
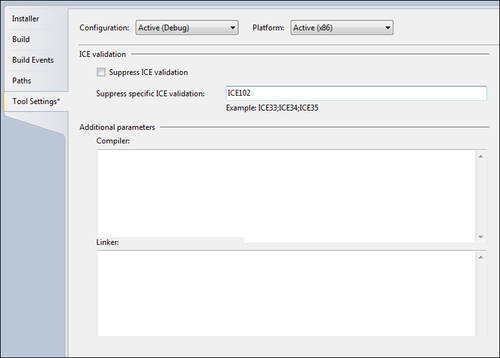
In this example, ICE test 102 is being suppressed. You can specify more than one test by separating them with semicolons. To find a full list of ICE tests, go to MSDN's ICE Reference web page at:
http://msdn.microsoft.com/en-us/library/aa369206%28VS.85%29.aspx
The Tool Settings screen also gives you the ability to add compiler or linker command-line flags. Simply add them to the textboxes at the bottom of the screen. We will discuss command-line arguments for Candle and Light later in the book.
In various places throughout WiX, you'll be asked to provide a GUID, which is a Globally Unique Identifier. This is so that when your product is installed on the end user's computer, references to it can be stored in the Windows Registry without the chance of having name conflicts. By using GUIDs, Windows Installer can be sure that every software application, and even every component of that software, has a unique identity on the system.
Each GUID that you create on your computer is guaranteed to be different from a GUID that someone else would make. Using this, even if two pieces of software, both called "Amazing Software", are installed on the same computer, Windows will be able to tell them apart.
Visual Studio 2010 provides a way to create a GUID. Go to Tools | Create GUID and copy a new GUID using Registry Format. WiX can accept a GUID with or without curly brackets around it, as 01234567-89AB-CDEF-0123-456789ABCDEF or {01234567-89AB-CDEF-0123-456789ABCDEF}. In this book, I'll display real GUIDs, but you should not re-use them as then your components will not be guaranteed to be unique.


