In this section, we will find out how to create a simple process in Bonita Studio and deploy it.
First, launch Bonita Open Solution. At the start screen, you will have the option to create a new process or open an existing process, along with documentation and resources. For now, we will begin with creating a new process.
Click on New Process and Bonita opens a workflow with the predefined Start1 and Step1. The whiteboard is where we create our process and link various steps together. This view gives an overall picture of the workflow at a glance.
The black rectangle surrounding Start1 and Step1 is called the pool. Pools are akin to functions of any programming language, but can be run independently depending on their contents.
The left-hand panel is a palette consisting of various design elements, used to create steps, events, and triggers. The palette view can be changed to simple, detailed, or advanced depending on personal liking.
The bottom-left hand panel is an overview of the entire workflow and also has a search option in the tree view of all the processes and steps.
The bottom-right panel, dubbed the detail panel, contains the properties and data to define the processes, customize the appearance of the forms, and has options for defining dependencies and connectors. In addition, individual tasks and user forms can also be created and simulated from this panel.
As it is always a good practice to name all steps and variables according to their needs rather than the default names, let us get down to that first.
Click on the pool and click on the Edit... button next to the Name to change the name of the pool. Let us call this Demo. The version number is useful in case we want to create different versions of the same pool.
Next, click on the Step1 process and change its name to Welcome. We will create a human task now.
A human task is a process that is visible to the end user. A service task or an abstract task isn't visible to the user. Follow the given steps for creating a human task:
Click on the human task icon from the palette and drag it to the whiteboard, placing it next to the Welcome step. Change its name to Exit. You will find a red cross at the top-right corner of the step. This is due to the fact that an actor hasn't been defined for this new step.
An actor is a user or a group of users who are allowed to perform that step. To define an actor for the Exit step, click on the Actors tab after selecting the step. Click on the Choose... button and the available option is the Initiator. The initiator is the user who has initiated this pool. But let us create a new user who performs the Exit step.
Click on Cancel and select Create.... A dialog box opens up with a prompt to choose the type of actor selector. We will use the selector method already provided by Bonita. Hence, click on the arrow next to Bonita and choose User List -- Enter individuals manually option. This is a way of mentioning manually the users who are allowed to perform this task.
Choose a name for the list being created, for example ExitActors, and you can give an optional description in the description box.
After clicking on Next, enter the words jack, john in the Names or variable box. Click on Finish. The users jack and john are already present in Bonita by default. Now, only jack and john will be able to access the Exit step.
Even though we have defined the Exit step, it is not connected to the Welcome step yet. We do this by defining a transition from the Welcome step to the Exit step.
Click on the Welcome step. Thereafter, drag the arrow from the Welcome step to the Exit step. Thus, we have now connected the two steps and we have also defined the direction of transition.
Next, we need to end the workflow. For this, click on the Exit step and drag the circle icon at the bottom-right corner of the step towards its right. After you leave the mouse click, a box appears to choose the type of event. Click on the bottom most red icon, called Terminate End Event. A transition from the Exit step now appears to the Terminate End Event step.
Tip
Alternatively, we could have dragged the Terminate End Event icon from the palette and placed it next to the Exit step. Then we would have had to create the transition from the Exit step to the Terminate End Event step.
Next, let us create a simple text field that saves its value in a text variable. Select the pool and click on the Data tab. As we haven't defined any variables yet, this tab does not hold any values. On clicking on Add..., a dialog box opens up where we define the variable we want to create. A quick thing to notice is that you can name your variable even with spaces, but Bonita internally references it by the name that appears in the parentheses beneath the name you enter. Hence, it is a good practice to name the variables as you would do in a programming language, such as Java. Let us call this variable sampleText. The checkbox Auto Generate Form implies that this variable will be available in the entry page that is automatically generated by Bonita for each step. Leave the Data type as Text, because we want this to be a text variable. We can leave the Default value as blank. All the variables that are defined in the pool are initialized when the pool is launched. Hence, when the Demo pool is launched, the variable sampleText will be initialized to null as it is a Java String object.
We have thus created an extremely simple workflow with no web forms. Later, we will learn to create a fully-fledged application with web forms and business rules. We will now have a look at how to run this application that we have created and the elements of the UserXP window.
Select the pool Demo and click on Run in the menu option. Here we have different options for running the application. Each pool is deployed as a web application and you can run individual instances of each pool. Each such instance is called a case in Bonita.
Clicking on Run will deploy the Demo pool and start a case. Clicking on Deploy Web Applications will deploy all pools as processes, but will not instantiate any process. Proceed to click on Run.
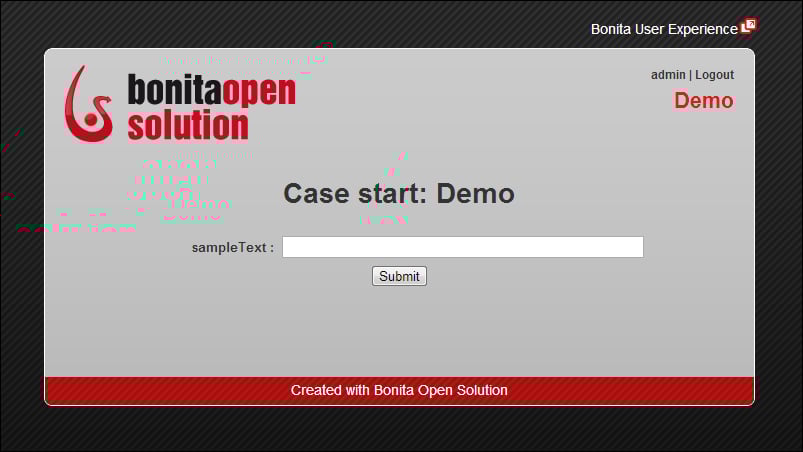
The Web application launches in the default browser. The local web application is hosted on the jetty server that is integrated with Bonita. If you close the browser window, you can once again open up the User Experience by navigating to http://localhost:9090/bonita. This is the default port on which the User XP is launched. You will see a screen similar to the following screenshot:
This form is the entry page form for the pool and we can initialize all the pool variables using this form. Type Hello World in the text area and click on Submit. This initializes the pool variable sampleText.
Now, the next screen that appears is the Welcome step. We have not created a web form for any of the steps. But Bonita creates an automatic form based on the number of variables that are relevant at that particular step. This is one of the good features of Bonita, as this form is updated whenever the number of variables changes. As sampleText is a pool variable, it will be shown in all the steps of the pool. Notice that the value of sampleText: is already initialized to Hello World, as we had defined it at the starting of the pool.
The Welcome step also contains the priority of that step, which can be changed in the step properties. At the top-right hand corner, we can see the user who is logged in and also the option to log out. By default, when an application is run, it is run via the admin user. Click on the Submit button. After the form is submitted successfully, a message appears that says that the form has been successfully submitted, and to continue we have to open our inbox.
The inbox can be opened by clicking on the Bonita User Experience link at the top-right hand corner of the form. The inbox is blank right now, as there are no cases waiting for the admin to be performed. Normally, all the cases that require the user to perform the next step appear in the inbox of the user. This inbox is like any normal inbox of a mailbox, with each line item in the inbox corresponding to a to-do list for the user. All the cases that are pending for some action by the user appear in the inbox and he can also see a list of tasks he has worked on in another tab.
We created the Exit step, too, but we had chosen its actors as jack and john. Hence, the Exit step will only be performed by either of the two users. Click on Logout at the top-right corner of the Bonita User Experience view.
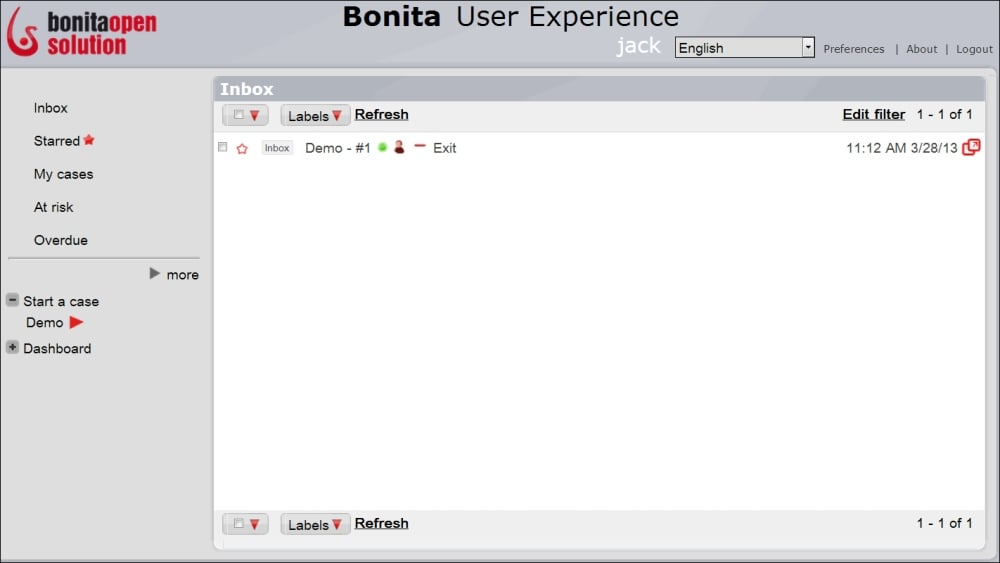
Bonita opens up a login screen, where you can log in with the username jack or john. The password for the default users is bpm. After logging in, the inbox view of Jack is similar to the following screenshot:
We can see that there is one item lying in Jack's inbox, which means that one case is waiting for him to take action on. If we look at the one row in the inbox, we can see that the process name is Demo, because that was the name of the pool in our workflow and the step name is Exit. Thus, Jack has sufficient information to garner that the Exit step in the Demo pool needs to be acted upon by him.
In the left hand panel, we can check out that there are various inbox options. In addition, it has the option to start a case, in this case, the case Demo. As we haven't specified who can start the case Demo, by default every user can start a new case. The first time we deployed the application, we created the case to be started by the admin user. Now, let's create a new case to be started by the user jack.
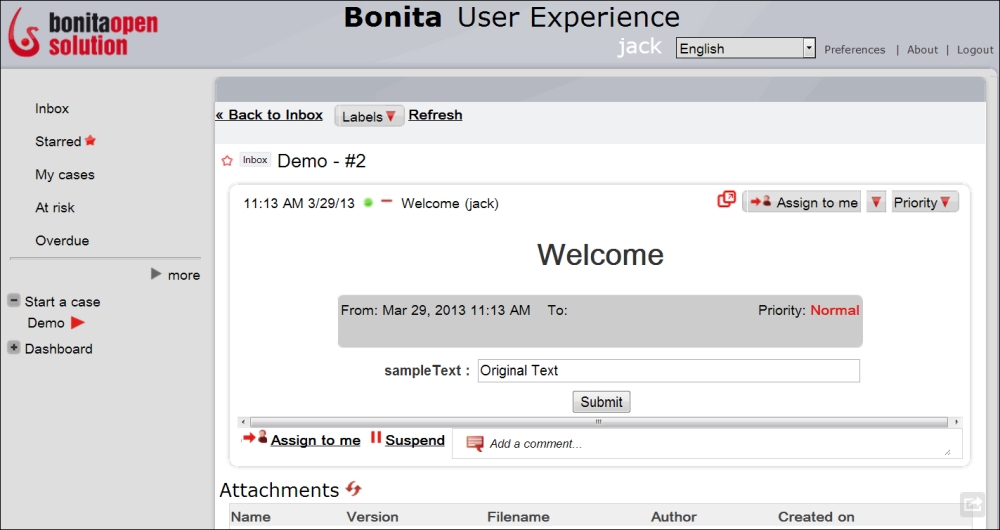
Click on Demo and we are greeted by the same entry page of the pool where we have to enter the value of sampleText:. Enter Original Text in the text field and click on Submit. The view that appears is similar to the following screenshot:
This view is obtained when you click on a particular row in the User Inbox view. In this case, the title of the row, along with the word Demo, has #2, which is the case number that Bonita assigns by default to each and every instance of a particular process. As this is the second instance of Demo that we are creating, Bonita assigns the value 2 as the case number. Beneath that is the entry form that Bonita creates for each step by default. We can either view this form as it is in the inbox, or open up the form in a new window by clicking on the red rectangle beside the button Assign to me.
Let's see what happens if we change the text of sampleText:. Change the text from Original Text to Modified Text and click on Submit.
As jack is the actor for the Exit step, the Exit step for the second case pops up and the text of sampleText: is Modified Text. This is due to the fact that the variable sampleText is a pool variable and as it is changed in the Welcome step, it is reflected in the subsequent steps too. Before filling in any form, click on the Inbox tab on the left-hand panel.
The inbox now contains two items, both on the Exit step, one with case number 1 and the other with case number 2. The items in the inbox are arranged according to a normal mailbox with the most recent item appearing at the top. Let us complete the two items that are pending in jack's inbox.
Click on the red rectangle in the row corresponding to case 1. This opens the form in a new window. The value of sampleText: is Hello World in this case. Click on Submit to submit the form. A confirmation message appears informing us that the form has been submitted. You can go back to the inbox by clicking on the link Bonita User Experience at the top-right corner of the window. Now, the inbox shows only one item as we have successfully completed the first item. For this item, change the value of sampleText: to Modified Again and click on the Submit button of the form and return back to the inbox.
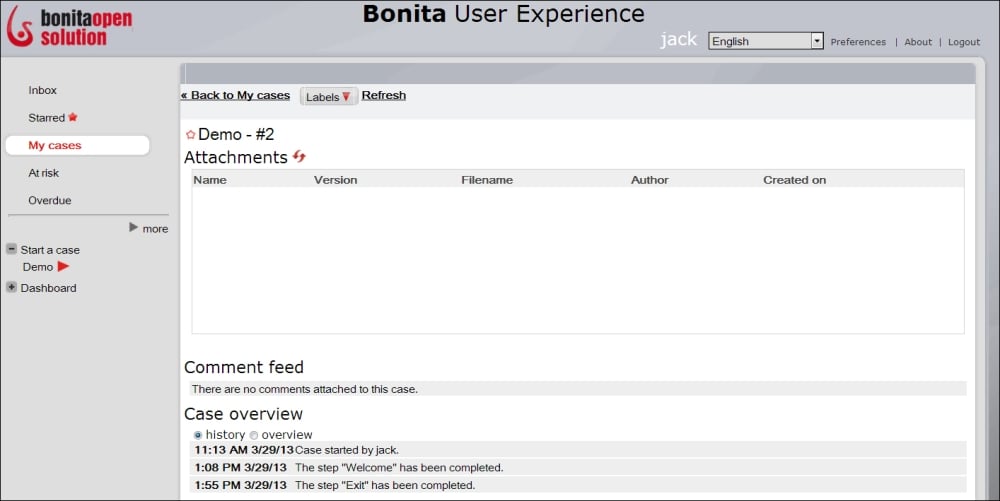
We can have a look at the history of a process, which details the users who modified the process at each step and the value of all the variables at each and every step. Let us look at the process history of the second case we created. To bring up that particular case, click on the My cases tab on the left hand panel. The central pane is still blank. This is due to the fact that only open cases are shown at the moment. The user jack has no open cases at present as he has completed all the cases that were waiting for him to perform some action. Click on the drop down menu at the top-right corner of the User Experience and select Show archived cases only. Now, we can see the second case that we started. Notice the grey dot next to the case, which indicates that the particular case is archived. If the dot is green in color, it indicates that the case is still open. Click on the row corresponding to the second case.
At the bottom of the screen, we can see a section called Case overview, and beneath that the history radio button is preselected. This is the complete history of the process Demo.
It details who started the case and the timestamp when a particular step was completed. If we want to have a look at the value of the variables at each step, we need to click on each row of the history to display additional information. If we click on each row of the history one by one, we can check that the value of sampleText: has been changed from Original Text to Modified Text to Modified Again.
Labels can be applied to any of the inbox items for ease of use. These labels are similar to the labels in Gmail and work in the same way. Let us create a new label called Demo. Click on the arrow with the text more in the left hand panel. Select New label and enter the name Demo as the label name and click on OK. Demo now appears in the left hand panel. We can customize the properties of this label by clicking on the white box next to the label and selecting a different color for it. Now, let's create a new case by clicking on Start a case. Next, go to the Inbox tab. Select the checkbox next to the case and select Labels in the top bar of the inbox. Select Demo and click on Apply. We have labeled this case Demo. Now, if we have to filter multiple cases in the inbox, we can tag some of the inbox items with labels and we can access these cases by clicking on the label name in the left hand panel. We can also customize the visibility of these labels by clicking on Manage labels.
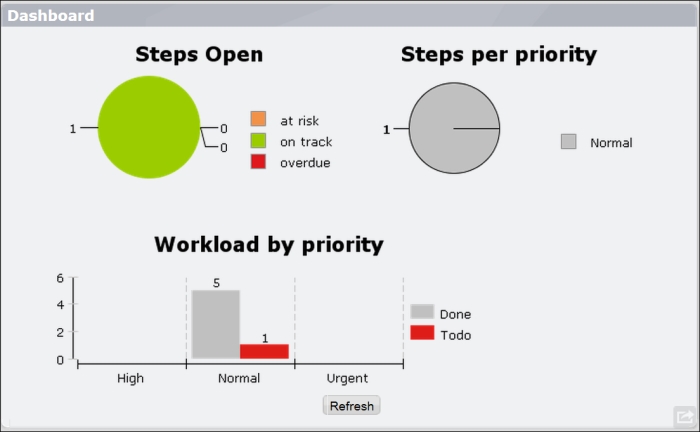
By clicking on the Dashboard option, the user can look at the number of cases he has completed, the number of cases to do, and some other statistics in a graphical format.
The admin has special privileges, which gives him the ability of a super user for the application. Log in to the UserXP with the username admin and password bpm. The user view of the admin is the normal view as if the admin is a normal user. To check out the super user privileges of the admin, click on the Administration link at the top-right corner of the screen.
We can now see a variety of options that are available only to the admin. In the Cases subtab inside the Processes tab, the admin can view all the cases that have been started. In the previous section, when we were creating labels, we had created a new case. Open this case in the admin view and click on the Submit button at the Welcome step. We can still see the Exit step in the Cases tab even though the admin is not an actor for this step. The admin has the ability to complete the steps that he's not a part of.
If we click on the Processes tab, we find the description of all the processes that are currently installed. We can also install new processes from this section. In addition, if we click the checkbox next to the Demo process and click on the More Actions tab in the top menu bar, there are a variety of options here: Open design will open up the workflow as it was designed in the Bonita Studio, and Delete all cases will delete all the cases of this particular process. Then there are the other options of disabling the process, deleting it, and archiving it. Also, if we click on a particular process, it shows options for creating PDF templates, how the case number is indexed, and so on.
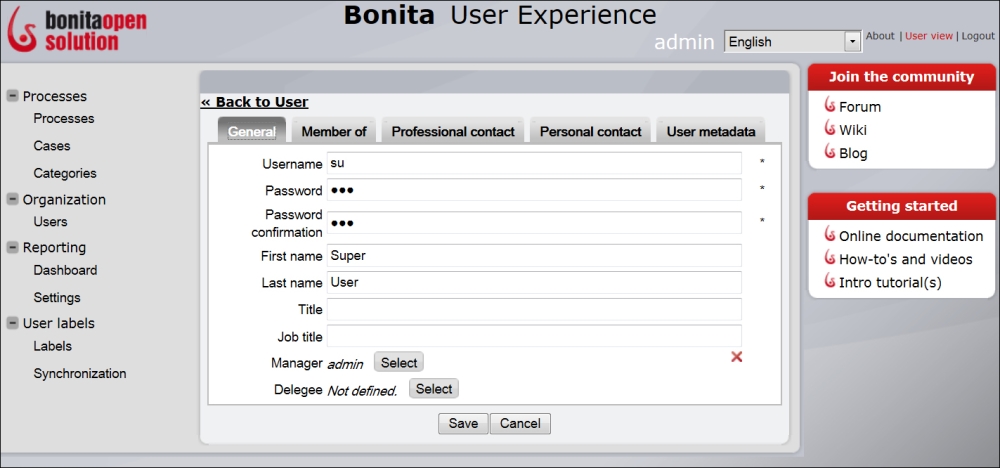
If we click on the Users subtab under the Organization tab, we can check out all the users that are currently present in the Bonita Workflow Engine. Here, we can also add users who have a role and belong to a particular group. Let us create a new user with the name su, having a new role called superuser. For adding a new user, we must first create the role. Hence, click on the Roles file menu and select Add. Create a role with the name superuser and label it SuperUser.
Go back to the Users file menu, click on the Add button, and fill in the Username and Password as su and bpm, respectively. Let us assign the Manager of this user as admin. Next, click on the Member of menu option. Here, we shall define the new role. Click on Add and we get a dialog box to choose the group and the role. Choose platform and SuperUser, respectively. Save the user.
We can change the privileges of other users and also the privileges of a process under the Privileges tab. The Privileges tab is present only for the subscription version of Bonita Open Solution and is not present in the community edition.
Under the Configuration tab, click on the Look'n'Feels subtab. Here, we can see the default Bonitasoft theme applied. We can delete this theme and add our own theme, too.
There are some other options that can be explored using the admin view, some of which will be explained in later chapters.


 Free Chapter