

If we're creating an application in Bonita that many users will use, then these users need to be created in Bonita and entered in the internal database. Often, it is quite possible that the user information is stored in a separate database. Manually adding those users into Bonita is a tedious task. Hence, we can create a separate application for this purpose that will be run only once: to input users into Bonita's internal database. For this purpose, we will leverage the Bonita APIs, which are useful in performing tasks with the Bonita Execution Engine. The Bonita APIs are Java-based and have extensive documentation here at http://www.bonitasoft.org/docs/javadoc/bpm_engine/5.10/.
Let us create a new process in Bonita Studio and use the Groovy editor to leverage these APIs. Let us have only two steps in the process, one to add roles and the other to add users to the database. The workflow should look like the following screenshot when completed:
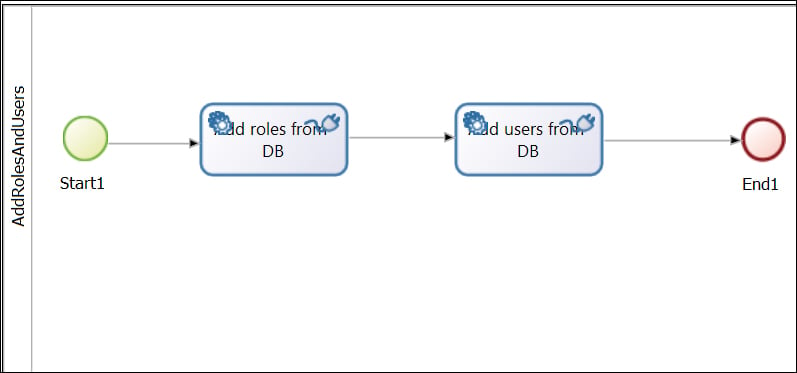
Figure 8.5: New process for adding roles and users
In the Add roles from DB step, create a database connector, such as MySQL, enter the required information for connecting to it, and thereafter, enter the SQL query for selecting the role names.
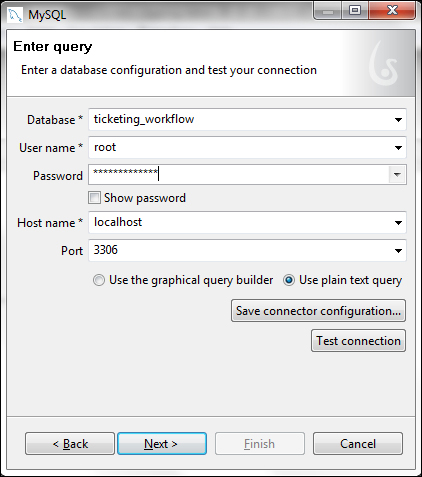
Figure 8.6: MySQL connection properties
The SQL query might look something like this:
Select name
 from TICKETING_WORKFLOW.role
In the next step of the connector, where the connection output is meant to go to a destination variable, select Edit expression... in the connector output to bring up the Groovy editor.
Here, let us write the following piece of code to add a role with a particular name into Bonita:
import org.ow2.bonita.facade.IdentityAPI;
IdentityAPI identityAPI = apiAccessor.getIdentityAPI();
i=0;
// We have to iterate over each value that rowSet contains
rowSet.getValues().each {
  try {
    // We had selected the name of the role in the SQL Query
    // Hence, we call the toList method of rowSet to get this value
    identityAPI.addRole(rowSet.toList("NAME").get(i));
  } catch(Exception E) {
    // The Exception may be caused due to the same role being added twice
    // We don't catch any exception here, but it is generally recommended
  }
  i=i+1;
}
try {
  identityAPI.addGroup("ticketingworkflow", "Ticketing Workflow", "This is the group for the application Ticketing Workflow", null);
} catch (Exception E) {
}
Here, we get the identity API from the apiAccessor method. This API has the method to add a role based on a name. We iterate through the values of rowSet, which contains all the role names, and we keep adding these roles via the identity API. Thus, at the end of this connector, we would have added all the roles returned by the SQL query into our Bonita database. In addition, we are also adding a group called ticketingworkflow. We are doing this just to group all the users under multiple roles into a single group.
In the next step, we have to add users to the database. Now, there are specific pieces of information related to every user, such as his/her role and group and also his/her user information. Let us assume that we have all the necessary information in three tables in our database, called users, role, and user_role_mapper. The users table has information such as user_id, username, first name, and last name, and the role table has information such as role_name and description. The user_role_mapper table maps users to their roles.
Now create a connector in the next service step and insert the following SQL query:
Select
u.username as USERNAME, u.password as PASSWORD, u.firstname as FIRSTNAME,
u.lastname as LASTNAME,  u.email as EMAIL, r.name as NAME
from TICKETING_WORKFLOW.user_role ur
join TICKETING_WORKFLOW.users u on ur.user_id= u.user_id
join TICKETING_WORKFLOW.role r on ur.role_id = r.role_id
Thus, we get all the required fields using this SQL query. Now, in the next step of the connector, we need to save the connector output. Here, let us enter the following code in the Groovy editor:
import org.ow2.bonita.facade.IdentityAPI;
import org.ow2.bonita.facade.identity.Group;
import org.ow2.bonita.facade.identity.Membership;
import org.ow2.bonita.facade.identity.Role;
import org.ow2.bonita.facade.identity.User;
import org.ow2.bonita.facade.exception.UserAlreadyExistsException

IdentityAPI identityAPI = apiAccessor.getIdentityAPI();

// getGroupUsingPath method expects a list of String
ArrayList<String> groupList = new ArrayList<String>();
list.add("ticketingworkflow");
i=0;
rowSet.getValues().each {
  if(rowSet.toList("USERNAME").get(i)!=null) {
    try {
      User user;
      // We try to add the user, but if the user already exists, then in the catch block, we just find the user
      try {
        // We give the default password as bpm. The individual users can change their passwords later on
        user = identityAPI.addUser(rowSet.toList("USERNAME").get(i),"bpm", rowSet.toList("FIRSTNAME").get(i),rowSet.toList("LASTNAME").get(i), rowSet.toList("EMAIL"));
      } catch (UserAlreadyExistsException e) {
        user =identityAPI.findUserByUserName(rowSet.toList("USERNAME"));
      }
      Role role = identityAPI.findRoleByName(rowSet.toList("NAME").get(i));
      Group group = identityAPI.getGroupUsingPath(groupList);
      // We define a membership with a specific role and group
      Membership membership = identityAPI.getMembershipForRoleAndGroup(role.getUUID(),group.getUUID());
      identityAPI.addMembershipToUser(user.getUUID(),membership.getUUID());
    } catch (Exception e) {
    }
  }
  i=i+1;
}
We have to package the entire process diagram into a business archive file for Bonita Execution Engine to run the workflow. You can export both the process definition and the Web application in a single BAR (Business Archive) file. After exporting the bar file, we can install it using the User Experience. Refer to Chapter 1, Installing and Getting Started with Bonita for knowing how to install BAR files. Click on the menu item Process and select Export. Choose the folder you want the BAR file to be created in and click on OK. We've already seen how to install a process in Chapter 1, Installing and Getting Started with Bonita through the administrative view.
Thus, we have seen how to deploy Bonita Open Solution on a Tomcat server. The other parameters can be tweaked and played around with for optimal performance and troubleshooting. We can also host external applications on the same Tomcat server and use the redirect to external URL option inside Bonita Studio instead of the inbuilt web form. Thus, we can customize things according to our need.