Sign In Start Free Trial
Account

Add to playlist

Create a Playlist

Modal Close icon
You need to login to use this feature.
  • Book Overview & Buying Force.com Enterprise Architecture
  • Table Of Contents Toc
Force.com Enterprise Architecture

Force.com Enterprise Architecture - Second Edition

By : Andrew Fawcett
4.5 (6)
close
close
Force.com Enterprise Architecture

Force.com Enterprise Architecture

4.5 (6)
By: Andrew Fawcett

Overview of this book

Companies of all sizes have seen the need for Force.com's architectural strategy focused on enabling their business objectives. Successful enterprise applications require planning, commitment, and investment in the best tools, processes, and features available. This book will teach you how to architect and support enduring applications for enterprise clients with Salesforce by exploring how to identify architecture needs and design solutions based on industry standard patterns. There are several ways to build solutions on Force.com, and this book will guide you through a logical path and show you the steps and considerations required to build packaged solutions from start to finish. It covers all aspects, from engineering to getting your application into the hands of your customers, and ensuring that they get the best value possible from your Force.com application. You will get acquainted with extending tools such as Lightning App Builder, Process Builder, and Flow with your own application logic. In addition to building your own application API, you will learn the techniques required to leverage the latest Lightning technologies on desktop and mobile platforms.
Table of Contents (15 chapters)
close
close
14
Index

Creating your first managed package

Packages are created in your packaging org. There can be only one managed package being developed in your packaging org (though additional unmanaged packages are supported, it is not recommended to mix your packaging org with them). You can also install other dependent managed packages and reference their components from your application. The steps to be performed are discussed in the following sections:

  • Setting your package namespace
  • Creating the package and assigning it to the namespace
  • Adding components to the package

Setting your package namespace

An important decision when creating a managed package is the namespace; this is a prefix applied to all your components (Custom Objects, Visualforce pages, Lightning Components, and so on) and is used by developers in subscriber orgs to uniquely distinguish between your packaged components and others, even those from other packages. The namespace prefix is an important part of the branding of the application since it is implicitly attached to any Apex code or other components that you include in your package.

It can be up to 15 characters, though I personally recommend that you keep it to less than this, as it becomes hard to remember and leads to frustrating typos if you make it too complicated. I would also avoid underscore characters. It is a good idea to have a naming convention if you are likely to create more managed packages in the future (in different packaging orgs). The following is the format of an example naming convention:

[company acronym - 1 to 4 characters][package prefix 1 to 4 characters]

For example, the ACME Corporation's Road Runner application might be named acmerr.

When the namespace has not been set, the Packages page (accessed under the Setup menu under the Create submenu) indicates that only unmanaged packages can be created. Click on the Edit button to begin a small wizard to enter your desired namespace. This can only be done once and must be globally unique (meaning it cannot be set in any other org), much like a website domain name.

Tip

Assigning namespaces

For the purposes of following this book, please feel free to make up any namespace you desire, for example, fforce{yourinitials}. Do not use one that you may plan to use in the future, since once it has been assigned, it cannot be changed or reused.

The following screenshot shows the Packages page:

Setting your package namespace

Once you have set the namespace, the preceding page should look like the following screenshot, with the difference being that it is now showing the namespace prefix that you have used and that managed packages can now also be created. You are now ready to create a managed package and assign it to the namespace.

Setting your package namespace

Creating the package and assigning it to the namespace

Click on the New button on the Packages page and give your package a name (it can be changed later). Be sure to tick the Managed checkbox as well. Click on Save and return to the Packages page, which should now look like the following:

Creating the package and assigning it to the namespace

Adding components to the package

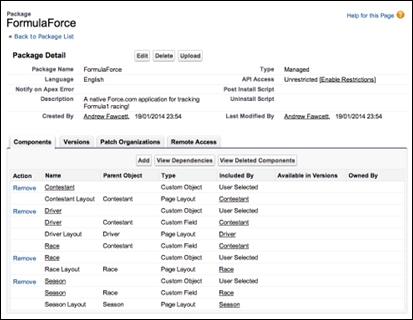
In the Packages page, click on the link to your package in order to view its details. From this page, you can manage the contents of your package and upload it. Click on the Add button to add the Custom Objects created earlier in this chapter. Note that you do not need to add any custom fields—these are added automatically.

The following screenshot shows broadly what your Package Detail page should look like at this stage:

Adding components to the package

When you review the components added to the package, you will see that some components can be removed while other components cannot be removed. This is because the platform implicitly adds some components for you, as they are dependencies. As we progress through this book, adding different component types, you will see this list automatically grow in some cases, and in others, we must explicitly add them.

Extension packages

As the name suggests, extension packages extend or add to the functionality delivered by the existing packages they are based on, though they cannot change the base package contents. They can extend one or more base packages, and you can even have several layers of extension packages, though you may want to keep an eye on how extensively you use this feature, as managing inter-package dependency can get quite complex, especially during development.

Extension packages are created in pretty much the same way as the process you've just completed (including requiring their own packaging org), except that the packaging org must also have the dependent packages installed in it.

As code and Visualforce pages contained within extension packages make reference to other Custom Objects, fields, Apex code, and Visualforce pages present in base package, the platform tracks these dependencies and the version of the base package present at the time the reference was made.

When an extension package is installed, this dependency information ensures that the subscriber org has the correct version (minimum) of the base packages installed before permitting the installation to complete.

You can also manage the dependencies between extension packages and base packages yourself through the Versions tab or XML metadata for applicable components (we will revisit versioning in Apex in a later chapter when discussing API integration).

CONTINUE READING
83
Tech Concepts
36
Programming languages
73
Tech Tools
Icon Unlimited access to the largest independent learning library in tech of over 8,000 expert-authored tech books and videos.
Icon Innovative learning tools, including AI book assistants, code context explainers, and text-to-speech.
Icon 50+ new titles added per month and exclusive early access to books as they are being written.
Force.com Enterprise Architecture
notes
bookmark Notes and Bookmarks search Search in title playlist Add to playlist font-size Font size

Change the font size

margin-width Margin width

Change margin width

day-mode Day/Sepia/Night Modes

Change background colour

Close icon Search
Country selected

Close icon Your notes and bookmarks

Confirmation

Modal Close icon
claim successful

Buy this book with your credits?

Modal Close icon
Are you sure you want to buy this book with one of your credits?
Close
YES, BUY

Submit Your Feedback

Modal Close icon
Modal Close icon
Modal Close icon