Book Image

QGIS Quick Start Guide

By : Andrew Cutts
Book Image

QGIS Quick Start Guide

By: Andrew Cutts

Overview of this book

QGIS is a user friendly, open source geographic information system (GIS). The popularity of open source GIS and QGIS, in particular, has been growing rapidly over the last few years. This book is designed to help beginners learn about all the tools required to use QGIS 3.4. This book will provide you with clear, step-by-step instructions to help you apply your GIS knowledge to QGIS. You begin with an overview of QGIS 3.4 and its installation. You will learn how to load existing spatial data and create vector data from scratch. You will then be creating styles and labels for maps. The final two chapters demonstrate the Processing toolbox and include a brief investigation on how to extend QGIS. Throughout this book, we will be using the GeoPackage format, and we will also discuss how QGIS can support many different types of data. Finally, you will learn where to get help and how to become engaged with the GIS community.
Table of Contents (9 chapters)

Using QGIS

Open QGIS from the installation location. If you followed the OSGeo4W installation on Windows, you should find it in under the OSGeo4W Shell folder in the Start menu. On loading, QGIS will appear similar to the following screenshot which I have annotated:

Overview of QGIS 3 annotated

The biggest area is reserved for the map.

Toolbar and panel overview

In this section, we will look at the panels and toolbars in QGIS and how to turn them on and off.

Panels

All panels are dockable; this means you can move them around as needed. To the left of the map, there are the Layers and Browser panels and to the right is Processing Toolbox. The Browser panel allows you find data in folders on your computer. From the Browser panel, you can drag data into the map. The Layers panel shows the data and its drawing order. Right-clicking on a layer in the Layers panel opens a context menu that lets you interact with that layer. We will be working with the Layers panel throughout this book. At the bottom of the QGIS project, we can see Status Bar. Status Bar is useful for quickly finding out what projection you are working in or the scale of the map. Finally, at the top of QGIS there is the window title (as yet unnamed project), menu options, and toolbars.

Toolbars

A toolbar is the place where tools are found! You can customize the toolbars to suit your work. These settings can be found via Settings | Interface Customizaton. In the previous screenshot, the toolbars were docked under the menu. Many of the tools can also be found via the menus as well. Hover the mouse cursor over a tool to find out more about it. It is also possible to build your own tools in QGIS using plugins.

Customizing

If you right-click near where I have annotated Menu in the previous screenshot, you can access Panels and Toolbars. If you accidentally turn a panel or toolbar off, then this is the place to turn it back on. You can also find these options via the View menu:

Customizing the panels and toolbars

In the next section, we will briefly look at some of the main toolbars.

The main toolbars

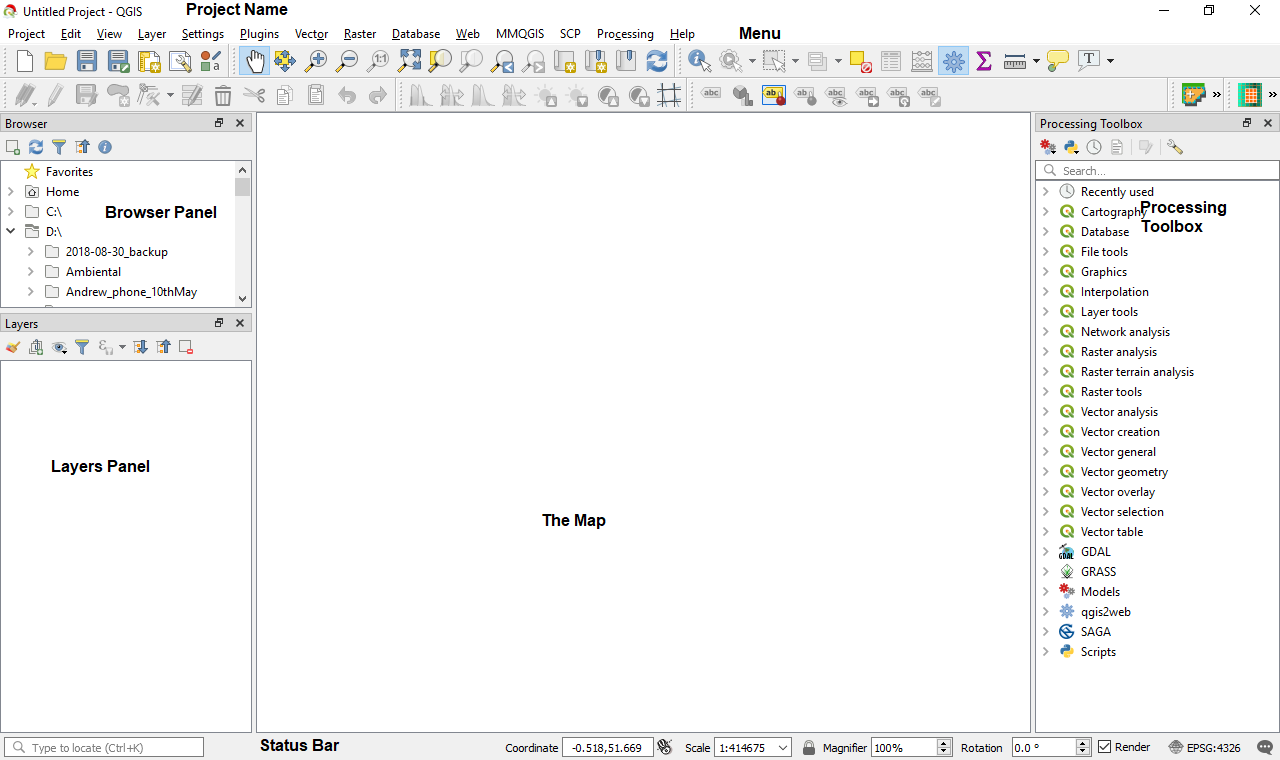
The map navigation toolbar is shown in the following screenshot:

Map navigation toolbar

These tools are all about moving around the map. Panning (the hand icon), zooming (magnifying glass), creating a new canvas view (fourth icon from the right), and bookmarking locations (third and second icons from the right) are all part of this toolbar. These tools should be similar to any map-based application. You can also use the scroll wheel on your mouse to zoom in and out of your map.

The attribute toolbar is all about interacting with data. It is shown in the following screenshots:

Attribute toolbar

These tools allow you to identify the attributes of vector layers or values of raster layers (the blue i). Select and deselect features (third, fourth, and fifth icons from the left), then open the attribute table (the table icon), the field calculator (the abacus icon), measure tool (the ruler icon), and the text annotations button (the final icon on the bar). These tools are very commonly used and will become part of your standard interaction with GIS data in QGIS.

The project toolbar is about saving and creating new projects in QGIS. A project is what contains links to all your files, the order they are in, how they are styled, any print layout— basically everything about your project. It is shown in the following screenshot:

Project toolbar

These tools allow you to create a new project (paper icon), open a project (folder icon), save project and save project as (disk icons), create and manage print layouts (two icons), and finally use the style manager. We will look at the print layout in more detail in Chapter 5, Creating Maps.

If you click on Project from the menu bar, you will see the same icons appearing. This is generally true for all the menus and corresponding toolbars. It is sometimes easier to keep frequently used toolbars, such as editing toolbars, open, and keep the other ones that are not so frequently used hidden to save on screen space.

We will look at other toolbars in more detail as we progress through this book.