Sign In Start Free Trial
Account

Add to playlist

Create a Playlist

Modal Close icon
You need to login to use this feature.
  • Book Overview & Buying Developing Multi-Platform Apps with Visual Studio Code
  • Table Of Contents Toc
Developing Multi-Platform Apps with Visual Studio Code

Developing Multi-Platform Apps with Visual Studio Code

By : Mehboob Ahmed Khan, Habib
4.9 (7)
close
close
Developing Multi-Platform Apps with Visual Studio Code

Developing Multi-Platform Apps with Visual Studio Code

4.9 (7)
By: Mehboob Ahmed Khan, Habib

Overview of this book

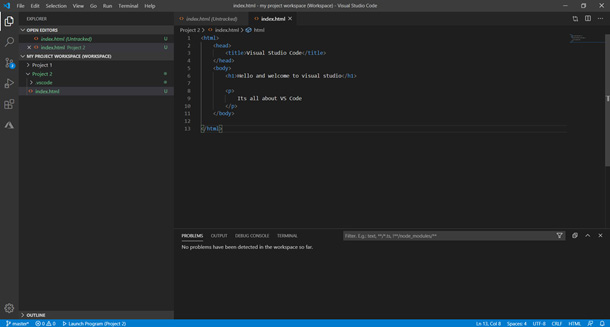
Microsoft Visual Studio Code is a powerful, lightweight code editor for modern web and cloud development. It is a source code editor that can be used with a variety of programming languages, which works on multiple platforms such as Linux, Windows, and macOS. This book provides extensive coverage of the tools, functionalities, and extensions available within the VS Code environment that will help you build multi-platform apps with ease. You’ll start with the installation of VS Code and learn about various tools and features that are essential for development. Progressing through the chapters, you'll explore the user interface while understanding tips and tricks for increasing productivity. Next, you’ll delve into VS Code extensions and discover how they can make life easier for developers. Later, the book shows you how to develop a sample application with different programming languages, tools, and runtimes to display how VS code can be used effectively for development, before helping you get to grips with source code version management and deployment on Azure with VS Code. Finally, you’ll build on your skills by focusing on remote development with VS Code. By the end of this book, you’ll have the knowledge you need to use Visual Studio Code as your primary tool for software development.
Table of Contents (15 chapters)
close
close
1
Section 1: Introduction to Visual Studio Code
4
Section 2: Developing Microservices-Based Applications in Visual Studio Code
11
Section 3: Advanced Topics on Visual Studio Code

Launching VS Code

By now, you should have downloaded your copy of VS Code and followed the guided installation wizard to set up your environment. Next, let's start off by looking into different ways of launching VS Code and explore some command-line options.

The simplest way of starting VS Code is by running the code . command.

This will open up a new instance of VS Code. If this command does not work in your macOS installation, you can follow the next steps. For Linux, you can visit https://code.visualstudio.com and look for Setup | Linux.

Setting up the command line for macOS

If you already have a Bash profile, please skip Steps 1 and 2. Otherwise, proceed as follows:

  1. Write the cd ~/ command to go to your home folder.
  2. Write the touch .bash_profile command to create a new file.
  3. Then, on the terminal window, write the following commands:
    cat << EOF >> ~/.bash_profile
    #Add Visual Studio Code (code)
    Export PATH=''\$PATH:/Applications/Visual Studio Code.app/Contents/Resources/app/bin
    EOF
  4. Close the terminal window and reopen to check whether the code . command works.

Now that your command line is set up and working, let's look at some different ways of launching VS Code.

The following command launches the code and opens the directory in VS Code where this is run:

code .

The –r variant allows you to open the specified workspace file in an already loaded VS Code instance; you can replace the workspace file with any file you would like to edit, as illustrated in the following code snippet:

code -r ''c:\My VS Code Projects\my project workspace.code-workspace'' 

The –n addition allows you to open a new instance of VS Code, as illustrated in the following code snippet:

code -n ''c:\My VS Code Projects\Project 1''

If you would like to open a particular file and go to a specific row and column, use the –g addition. The following command will launch a new instance of VS Code; open the launch.json file and place the cursor on row 5 and column 10:

code -n -g ''c:\My VS Code Projects\Project 1\.vscode\launch.json'':5:10Exploring VS Code Layout

In this section, we will explore the editor's layout and the different panes. To get you familiar with the editor, we will go through the different sections of the editor and explain their utility. The layout of the editor can be seen in the following screenshot:

Figure 1.12 – VS Code editor layout

Figure 1.12 – VS Code editor layout

The most prominent section of the editor is the big pane on the right. This is the place where you edit code. Files selected from the EXPLORER are opened in this pane. You can open multiple files for editing at the same time.

Activity Bar

The toolbar on the left is called the Activity Bar. The Activity Bar provides quick access to important features of the tool.

The first button, , is the explorer, where you see the folders and files loaded in VS Code, as illustrated in the following screenshot:

Figure 1.13 – Explorer

Figure 1.13 – Explorer

The number on the button shows the number of files changed and not saved. If Auto Save is enabled from File | Auto Save then this will not be shown, as every time a change is made, VS Code automatically saves it.

The search button allows you to search in files and folders. It searches the text inside a file. As you type, VS Code will filter the list of files containing the entered text, as illustrated in the following screenshot:

Figure 1.14 – Search text in files and folders

Figure 1.14 – Search text in files and folders

The next button is for version control. Git is very well integrated in the tool and provides some handy features.

If you have already initialized a Git repository or cloned an existing one, the source control button shows the changes made. We will be discussing Git in more detail in Chapter 8, Git and Azure DevOps. The button is illustrated in the following screenshot:

Figure 1.15 – Changes made to Git

Figure 1.15 – Changes made to Git

To run and debug your code, use the debug button , which allows you to run the program and provides the usual debugging features. This is illustrated in the following screenshot:

Figure 1.16 – Debugger

Figure 1.16 – Debugger

To manage your extensions in VS Code, you can use the extension button , which is illustrated in the following screenshot:

Figure 1.17 – Extensions pane

Figure 1.17 – Extensions pane

In Chapter 2, Extensions in Visual Studio Code, we will explore extensions in more detail.

Status Bar

At the bottom is the Status Bar. It contains the Git branch you are working on and errors and warnings, with an option to directly drill down to them. On the right, VS Code will show the type of file you are working with, a feedback option, and a notification button.

Quick Links

On the top-right corner (Figure 1.12), you have an option to see the code changes by pressing the Open Changes button , and you will be able to edit two objects side by side by pressing the Split Editor button .

Panel

The panel displays errors and warnings and debug-related information, and integrates a terminal window, as illustrated in the following screenshot:

Figure 1.18 – VS Code panel

Figure 1.18 – VS Code panel

Integrated terminal

VS Code integrates a terminal window inside the editor. This is a very handy feature as you don't need to open a terminal window separately to run command-line instructions. Most of the frameworks and platforms provide command-line tooling, and this feature really comes in handy. One such example is while creating your Angular frontend using the Angular command-line interface (CLI).

VS Code provides an option to create several terminal windows for the same project. The shortcut key for creating a new terminal window is Ctrl + `; for adding a new terminal window, the shortcut key is Ctrl + Shift + `.

You can also select your default terminal window, as illustrated in the following screenshot:

Figure 1.19 – Option to select the default shell

Figure 1.19 – Option to select the default shell

Once you press the Select Default Shell option from the menu, VS Code will show a menu to change your default shell, as illustrated in the following screenshot:

Figure 1.20 – Command Palette with a list of options for the terminal shell

Figure 1.20 – Command Palette with a list of options for the terminal shell

Similarly, by pressing the button in Figure 1.19, you can create a new terminal window. VS Code will list the open project folders in the command palette to let you select which project you would like to create in the terminal window.

With Ctrl/Command + Shift + 5, you can split the bottom pane to show two terminal windows side by side. The same can be achieved by pressing the button in Figure 1.19. It is possible to open several terminal windows side by side. To switch focus between the terminals, use Alt/Option + Right Arrow Key or Alt/Option + Left Arrow Key.

Split Editor

We have talked about the option to edit two documents side by side. VS Code takes this feature to the next level and allows a developer to open several windows side by side, as follows:

  • Ctrl/Command + 2: This will open up the second editor.
  • Ctrl/Command + 3: This opens up the third editor, all side by side.

You can go up to Ctrl/Command + 8. Each editor window is identified by the same keystroke, Ctrl/Command + <number>, which will allow you to switch between the editors.

Use Ctrl/Command + W to close the editor window; the one currently selected is closed.

Command palette

The command palette is one of the most important sections of the editor. VS Code is fast and focuses on keyboard-centric navigation; the command palette is the center piece of this editor.

You can quickly call the command palette by pressing Ctrl + Shift + P on Windows and Command + Shift + P on macOS.

On pressing this command, you will see a window pop up at the top of the editor initialized with a > sign, as illustrated in the following screenshot:

Figure 1.21 – Quick way to call a VS Code function using the command palette

Figure 1.21 – Quick way to call a VS Code function using the command palette

This is a quick way of calling most of the editor options.

Search option: After you have opened the command palette, remove the > sign. Then, you will be able to search for files in the project. This is illustrated in the following screenshot:

Figure 1.22 – Search for files using the command palette

Figure 1.22 – Search for files using the command palette

Help (?): After opening the command palette, type the question mark sign: you will see a list of commands you can run. This is illustrated in the following screenshot:

Figure 1.23 – List of commands

Figure 1.23 – List of commands

Caret (>) sign: This is the same as Ctrl/Command + Shift + P. From there, you can run any command (for example, running a task), as illustrated in the following screenshot:

Figure 1.24 – Command palette with default caret sign

Figure 1.24 – Command palette with default caret sign

debug: Use the debug command to launch the debugger or add a debug configuration, as illustrated in the following screenshot:

Figure 1.25 – Debugging options in the command palette

Figure 1.25 – Debugging options in the command palette

ext: This command helps you manage and install extensions, as illustrated in the following screenshot:

Figure 1.26 – Using the command palette to call extensions

Figure 1.26 – Using the command palette to call extensions

We are almost done with the layout options in VS Code—let's explore themes before we close out this section.

Themes

Another important customization feature of the tool is the ability to set themes. Some developers like a dark colored environment, while others prefer light colors. VS Code provides you with a list of themes to choose from.

You can set your preferred theme by calling the command palette. Press Ctrl/Command + Shift + P to call the command palette, type theme, and then select Preferences: Color Theme, as illustrated in the following screenshot:

Figure 1.27 – Calling theme settings from the command palette

Figure 1.27 – Calling theme settings from the command palette

Here is a sample screenshot of the list of themes you will get to choose from:

Figure 1.28 – List of themes to choose from in VS Code

Figure 1.28 – List of themes to choose from in VS Code

We are now familiar with the editor's layout. Next, let's look at some important editing features of VS Code.

CONTINUE READING
83
Tech Concepts
36
Programming languages
73
Tech Tools
Icon Unlimited access to the largest independent learning library in tech of over 8,000 expert-authored tech books and videos.
Icon Innovative learning tools, including AI book assistants, code context explainers, and text-to-speech.
Icon 50+ new titles added per month and exclusive early access to books as they are being written.
Developing Multi-Platform Apps with Visual Studio Code
notes
bookmark Notes and Bookmarks search Search in title playlist Add to playlist download Download options font-size Font size

Change the font size

margin-width Margin width

Change margin width

day-mode Day/Sepia/Night Modes

Change background colour

Close icon Search
Country selected

Close icon Your notes and bookmarks

Confirmation

Modal Close icon
claim successful

Buy this book with your credits?

Modal Close icon
Are you sure you want to buy this book with one of your credits?
Close
YES, BUY

Submit Your Feedback

Modal Close icon
Modal Close icon
Modal Close icon