Book Image

OpenLayers Cookbook

Book Image

OpenLayers Cookbook

Overview of this book

Data visualization and analysis has become an important task for many companies. Understanding the basic concepts of GIS and knowing how to visualize data on a map is a required ability for many professionals today. OpenLayers is a JavaScript library to load, display, and render maps from multiple sources on web pages."OpenLayers Cookbook" teaches how to work with OpenLayers, one of the most important and complete open source JavaScript libraries.Through an extensive set of recipes, this book shows how to work with the main concepts required to build a GIS web applicationñ maps, raster and vector layers, styling, theming, and so on."OpenLayers Cookbook" includes problem solving and how-to recipes for the most common and important tasks. A wide range of topics are covered.The range of recipes includes: creating basic maps, working with raster and vector layers, understanding events and working with main controls, reading features from different data sources, styling features, and understanding the underlying architecture."OpenLayers Cookbook" describes solutions and optimizations to problems commonly found.
Table of Contents (15 chapters)
OpenLayers Cookbook
Credits
About the Author
About the Reviewers
www.PacktPub.com
Preface
Index

Placing controls outside the map


By default, all the controls are placed on the map. This way, controls such as the PanPanel, EditingToolbar, or MousePosition are rendered on top of the map and over any layer. This is the default behavior, but OpenLayers is flexible enough to allow us to put controls outside the map:

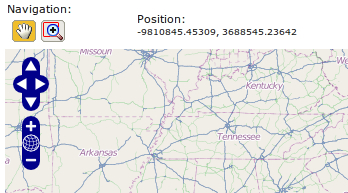
In this recipe we are going to create a map where the navigation toolbar and the mouse position controls are placed outside and above the map.

How to do it...

  1. Create an HTML file and add the OpenLayers dependencies. Add the following CSS code required to redefine some aspects of the controls we are going to use:

    <style>
        .olControlNavToolbar {
            top: 0px;
            left: 0px;
            float: left;
        }
        .olControlNavToolbar div {
            float: left;
        }
    </style>
  2. Now, add the HTML code to place the two controls above the map:

    <table>
        <tr>
            <td>
                Navigation: <div id="navigation" class="olControlNavToolbar"></div...