Book Image

Microsoft Identity Manager 2016 Handbook

By : David Steadman, Jeff Ingalls
Book Image

Microsoft Identity Manager 2016 Handbook

By: David Steadman, Jeff Ingalls

Overview of this book

Microsoft Identity Manager 2016 is Microsoft’s solution to identity management. When fully installed, the product utilizes SQL, SharePoint, IIS, web services, the .NET Framework, and SCSM to name a few, allowing it to be customized to meet nearly every business requirement. The book is divided into 15 chapters and begins with an overview of the product, what it does, and what it does not do. To better understand the concepts in MIM, we introduce a fictitious company and their problems and goals, then build an identity solutions to fit those goals. Over the course of this book, we cover topics such as MIM installation and configuration, user and group management options, self-service solutions, role-based access control, reducing security threats, and finally operational troubleshooting and best practices. By the end of this book, you will have gained the necessary skills to deploy, manage and operate Microsoft Identity Manager 2016 to meet your business requirements and solve real-world customer problems.
Table of Contents (22 chapters)
Microsoft Identity Manager 2016 Handbook
Credits
About the Authors
About the Reviewers
www.PacktPub.com
Preface
Index

The sample PAM portal


A sample demonstration of a custom PAM portal can be downloaded at http://bit.ly/CustomPAMPortal.
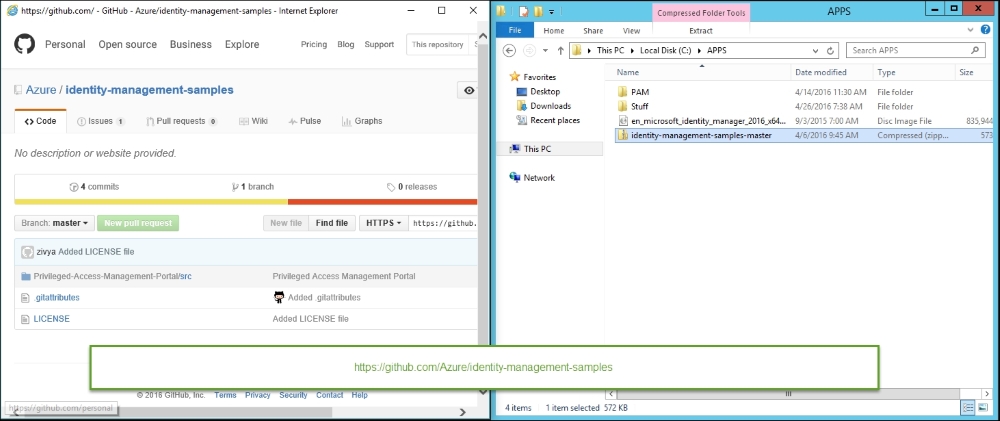
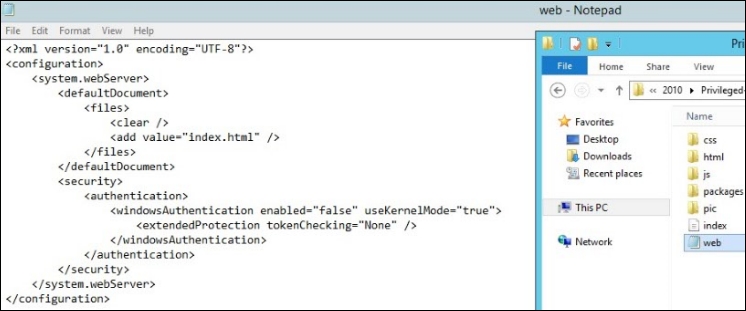
Unzip the Privileged-Access-Management-Portal\src folder to \Program Files\Microsoft Forefront Identity Manager\2010\Privileged Access Management Portal and create a web.config file, as shown in the following screenshot:
Note

As we have seen throughout this book, the MIM product still uses the old branding name of Forefront Identity Manager (FIM) in some of its services, folder paths, and portal dialog boxes.

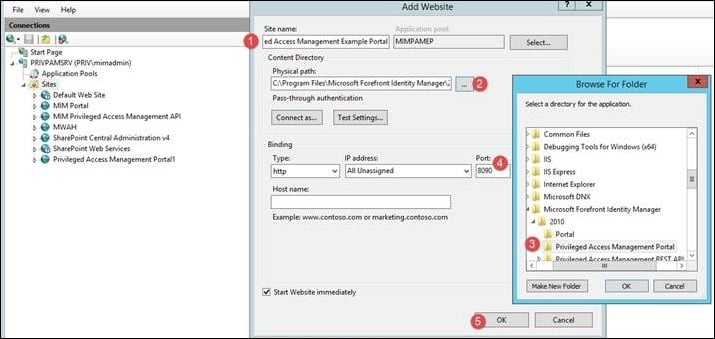
Next, create the IIS application pool, create a new IIS website with a name (1), then browse (2) and select the C:\Program Files\Microsoft Forefront Identity Manager\2010\Privileged Access Management Portal folder (3), and specify port 8090 (4). Lastly, click on OK (5). Take a look at the following screenshot:
If you try to create the website via PowerShell's New-Website cmdlet, you will find that the site will throw a server 500 error. The issue is documented in the blog...