

This section has some guidelines related to jQuery UI, jQuery, and JavaScript in general . Let's go through them one by one.
Instead of serving the jQuery UI library .js file and its theme's CSS file from your web server, it is better to use a Content Delivery Network (CDN). Using a CDN makes loading of web pages faster. This is because browsers cache .js files. Hence, if you have referenced a jQuery UI file from CDN, if it is found in the browser's cache from some earlier visit to a website, the browser will not load the file again. If you are using multiple libraries on a page, it can have a significant effect on reducing page-load time. Another advantage is that since these files are referenced from external domains, the browser will be able to make multiple requests to load the files.
Here are the three popular and commonly used CDNs' for loading jQuery and jQuery UI files, along with their different versions:
jQuery CDN: https://code.jquery.com/ui/
CDN hosted by Google: https://developers.google.com/speed/libraries/devguide. Apart from jQuery and jQuery UI, Google CDN hosts several
Microsoft CDN: http://www.asp.net/ajax/cdn
If you only want a tab widget or, say, a slider, it does not make sense to download the whole jQuery UI library just for this. The jQuery UI website has an option to create a customized build with only the required components.
Go to http://jqueryui.com/download/ in your browser, this will open a download builder page. Here you have two options, either download the complete build, or create a customized build:
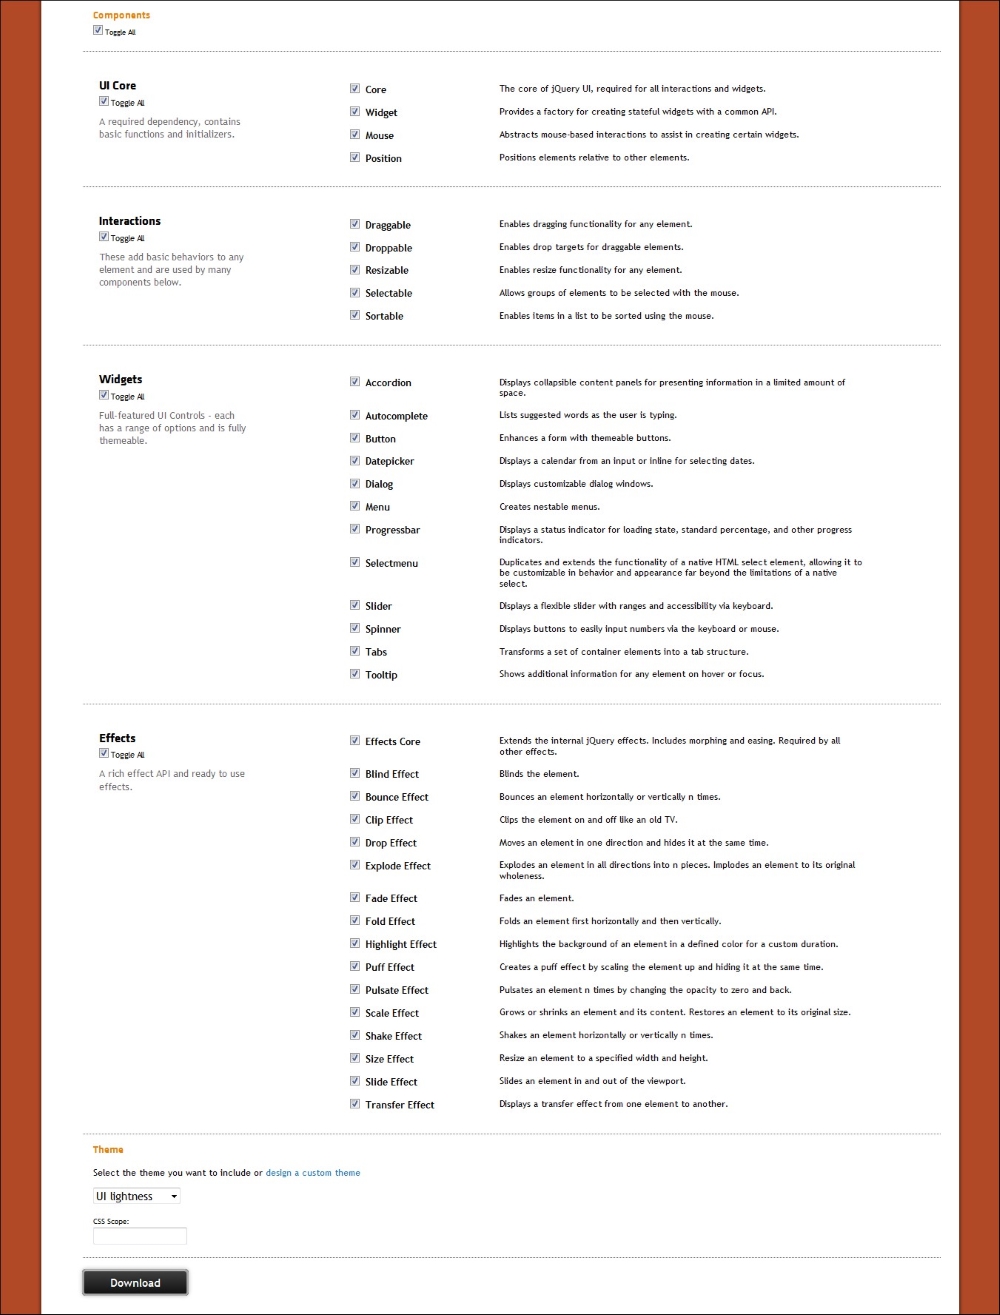
For a customized build, first you have to select the version of jQuery UI you want to download. Next to it are listed all components, which are grouped in four sections. Each component has a checkbox next to it. Checking a component's checkbox automatically selects other components that it depends on.
The first section is UI Core. You will probably want to retain all components as UI Core. It is the base on top of which all other components are built. Next are the interaction components: draggable, droppable, resizable, selectable, and sortable. All the components in this section require the Core, Widget, and Mouse components. You can verify this by unchecking all checkboxes first, and then checking any of the interaction components. The third section contains the widgets and the fourth and final section has the effects API.
Once you are done with the selections, proceed to the bottom of the page and you'll see another option presented there to select a theme. At the time of writing, there are 2 dozen themes available. Select any one of these and click on Download. You will be prompted to download a customized build that will only contain your selected jQuery UI components.
jQuery UI also provides a large number of icons. Displaying an icon is also very easy. To display an icon you just have to give two CSS class names to an HTML element. For a particular icon, "ui-icon" is followed by the class name of that icon. The ui-icon is the base class which must be included for each icon to be displayed.
Go to the page http://api.jqueryui.com/theming/icons/ to see all available icons.
Element IDs are the fastest to search for in DOM compared to class names and element names, since they are unique. You will not notice any difference in speed while using any of the methods in small pages. But say you have a large page with hundreds of table rows that are dynamically created. you will start seeing lags if your selectors are not efficient.
For example let's have a look at the following HTML code:
<div class="outerDiv">
  <div class="innerDiv">
    <p>A paragraph</p>
    <ul id="myList">
      <li>first item</li>
      <li>second item</li>
      <li>third item</li>
    </ul>
  </div>
</div>
Now suppose you want to hide the ul element. We can use any of the two ways as written below:
//Method 1
$('#myList').hide();
//Method 2
$('.outerDiv').find('ul#myList').hide();
For a page with a large number of elements, Method 1 in the preceding code will be fastest as opposed to Method 2.
The point here is to be as precise as you can. If you have a choice between using multiple parent selectors and a find selector method, always go for find.
Chaining is a great feature in jQuery, and we have used it in past chapters as well. Almost all jQuery methods return the element itself, when a method is called. This can be used to call multiple methods on an element. The advantages here are performance, avoiding repetition, readability, and significant reduction in the number of lines.
Suppose you have an HTML element and you want to remove an existing class from it, add a new class, and then toggle it. First let us do it without chaining, as shown in the following code snippet:
$('#element').removeClass('oldClass');
$('#element').addClass('newClass');
$('#element').slideToggle('slow');
Those are three lines and a lot of repetition. Now let's use chaining and do the same again:
$('#reset').removeClass('oldClass')
  .addClass('newClass')
  .slideToggle('slow');
Now this is a single statement. You will encounter these types of situations regularly in your applications, where chaining can save you a lot of typing as well as improve performance.
Whenever a selector is used, DOM is searched for that element and then the element is fetched. As a rule of thumb, you should avoid touching the DOM as much as possible. Caching selectors can help in this situation; once a selector is retrieved from DOM, it can be stored in a JavaScript variable and any jQuery or jQuery UI methods can be used on it. Here is an example:
$('#dialog').dialog();

$('#dialog').on('dialogopen', function(event,ui)
{
  //do something here
});
Instead of searching for an element with ID dialog again, you can cache it and use it again like this:
var dialog = $('#dialog');

dialog.dialog();

dialog.on('dialogopen', function(event,ui)
{
  //do something here
});
The preceding code retrieves the element from DOM only once and then acts on it as many times as needed.
Similarly to that mentioned previously, when you are running for loops, you can cache those as well:
Var myArray;//an array of 1000 items
for(var i=0; i<myArray.length; i++)
{
  //do something here
}
What happens is that the length of myArray is calculated in each iteration, which is obviously not good. The solution is simple, calculate length beforehand and use that value:
Var myArray;
for(var i=0, len = myArray.length; i < len; i++)
{
  //do something here
}
While the loop is initializing, we store the array length in a variable len and this variable is used for all iterations.
Each time an element is removed from DOM, added to it, or any change is made to an existing element, the whole DOM is affected. This is called reflow. While using jQuery we do not think of it often but each addClass, css, html, text, and append method causes the DOM to reflow.
A simple example is iterating in an array and creating an unordered list:
//assuming you have a ul with id myList in DOM
var fruits = ['Apple', 'Orange', 'Banana', 'Guava', 'Mango'];
for(var i =0; i< fruits.length; i++)
{
    $('#myList').append('<li>' + fruits[i] + '</li>');
}
The preceding code looks completely harmless but it's reflowing the DOM five times. With some simple changes, we can reduce this number to one. Here's how:
//assuming you have a ul with id myList in DOM
var fruits = ['Apple', 'Orange', 'Banana', 'Guava', 'Mango'];
var listElement = $('#myList');
var strDOM = '';

for(var i =0; i< fruits.length; i++)
{
  strDOM+= '<li>' + fruits[i] + '</li>';
}

listElement.html(strDOM);
We created the DOM and stored it in a local variable. Once the loop is over we pushed it back to the DOM.