
So far, in this chapter, we have worked on creating some basic Gradle scripts. We will conclude this chapter by creating a Java application with Gradle. To create a Java application, we'll be using Eclipse IDE with the Gradle plugin.
With Integrated Development Environment (IDE), application development becomes much easier. In this section, we will explore how to install the Gradle plugin in Eclipse, create a simple Java application, explore Eclipse plugin tasks, and execute Gradle tasks from Eclipse.
Apart from Eclipse, another popular IDE is JetBrains IntelliJ IDEA. Gradle also supports IDEA plugin, which is very similar to the Eclipse plugin. However, in this book, we will focus only on the Eclipse plugin since it is freely available and is open source.
The Eclipse Integration Gradle project from the spring source (https://github.com/spring-projects/eclipse-integration-gradle/) helps the developer to work with Gradle in Eclipse. This tool offers support for:
Using
Gradle Import Wizardto import Gradle projects into EclipseUsing
New Gradle Project Wizardto create new Gradle projectsUsing
Executing Gradle tasks using
Gradle Task UIIntegration with the Groovy Eclipse via DSLD (DSL Descriptors)
Following are the steps to install this plugin in Eclipse (3.7.2 or higher) from the update site:
Launch Eclipse. Navigate to Help | Install New Software.
In the Install New Software dialog, click on the Add button to add a new site.
Enter the Location as
http://dist.springsource.com/release/TOOLS/gradleand Name asGradle. You can enter any meaningful name you want.Click on OK to add the repository.
Select the newly created Gradle repository from the repository list.
Check only the box next to Extensions / Gradle Integration | Gradle IDE. Click on Next (Refer to Figure 1.2).
On the next screen, click on Next.
Accept the terms and conditions and click on Finish. Eclipse should download and install Gradle IDE. Then restart Eclipse.

Figure 1.2
We have successfully installed Gradle plugin. Now, we'll create a simple Gradle project and we'll look into few Eclipse-related important files, for example, .project and .classpath. Then we will build the project using the Gradle Task UI.
Following are the steps to create a Gradle project:
In Eclipse, navigate to File | New | Gradle | Gradle Project.
In the New Gradle Project window, specify the project name as FirstGradleProject and select the sample project as Java Quickstart.
Click on Finish and wait for the build to be successful.
You will find the following console output:
:cleanEclipseClasspath UP-TO-DATE
:cleanEclipseJdt UP-TO-DATE
:cleanEclipseProject UP-TO-DATE
:cleanEclipse UP-TO-DATE
:eclipseClasspath
…
:eclipseJdt
:eclipseProject
:eclipse

BUILD SUCCESSFUL
The output clearly shows what is going on here. Gradle initially executes a series of clean tasks (cleanEclipseClasspath, cleanEclipse, and so on.), then downloads some jar files from the Maven repository and finally executes a few more tasks (eclipseJdt, eclipse, and so on) to complete the build process.
The autogenerated build.gradle file has the following contents:
apply plugin: 'java'
apply plugin: 'eclipse'

sourceCompatibility = 1.5
version = '1.0'
jar {
  manifest {
    attributes 'Implementation-Title': 'Gradle Quickstart', 'Implementation-Version': version
  }
}

repositories {
  mavenCentral()
}

dependencies {
  compile group: 'commons-collections', name: 'commons-collections', version: '3.2'
  testCompile group: 'junit', name: 'junit', version: '4.+'
}

test {
  systemProperties 'property': 'value'
}

uploadArchives {
  repositories {
    flatDir {
      dirs 'repos'
    }
  }
}
This build file is, quite different from what we created earlier in this chapter. The Java and Eclipse plugin declarations were added in the beginning. Project properties such as sourceCompatibility and version were added. The repository was declared as mavenCentral(). Dependencies, common-collections, and JUnit were configured on compile and testCompile respectively. We'll learn each and every component in the next chapters; now, let's concentrate on the other artifacts created by the Gradle project.
If you browse the source code (look for the src folder) of the project, you'll find that the application was prepopulated with some Java source code and JUnit test cases.
Apart from the source code and build file,a few other files, namely, .project, and .classpath and a folder, namely, .settings, were added to this Java project. These are the default files created by Eclipse. As the name suggests, the .project file contains the metadata information about the project such as name, description and build specification. The .classpath file describes the Java dependency, external library dependencies, and other project dependencies. .settings/org.eclipse.jdt.core.prefs stores information such as the Java compiler version, source, and the target Java version. All these three files were created during the build process when the eclipse task was executed.
So, we claimed that the Eclipse plugin was responsible for creating all of the Eclipse IDE-specific files. To confirm, first execute the gradle cleanEclipse command from the project of the base folder:
$ gradle cleanEclipse
:cleanEclipseClasspath
:cleanEclipseJdt
:cleanEclipseProject
:cleanEclipse

BUILD SUCCESSFUL
The cleanEclipse task executed three more dependent tasks: cleanEclipseClasspath (removes the .classpath file), cleanEclipseJdt (removes the .settings/org.eclipse.jdt.core.prefs file), and cleanEclipseProject (removes the .project file).
Check whether all the three files got deleted from the project, and, finally, execute the gradle eclipse command to recreate those files.
$ gradle eclipse
:eclipseClasspath
:eclipseJdt
:eclipseProject
:eclipse

BUILD SUCCESSFUL
Now the question is if I have a Java project, how do I import that project in Eclipse IDE?
We have learned this already and you might have guessed it. It takes just three steps: add the Eclipse plugin into the build file (apply the eclipse plugin ), execute Eclipse task (gradle eclipse), and finally import project using Eclipse File | Import.
Alternatively, you can use Gradle IDE. From Eclipse, select the project by navigating to File | Import | Gradle | Gradle Project, and then perform Build Model and finish. Use of Gradle IDE helps to avoid all the manual steps mentioned earlier.
We'll conclude this section by exploring Gradle Task UI, which enables us to execute tasks. Gradle task execution is supported by the standard Eclipse launching framework. This means that before we execute any task, we must create a standard Eclipse launch configuration. To create the launch configuration, navigate to Gradle project | Run As | and click on Gradle Build.
In the text area, enter the task names you want to execute, such as clean build. Then click on Run to execute the tasks. The launch configuration will be saved as the project name by default. In Figure 1.3, the configuration is saved as FirstGradleProject, which is the project name.
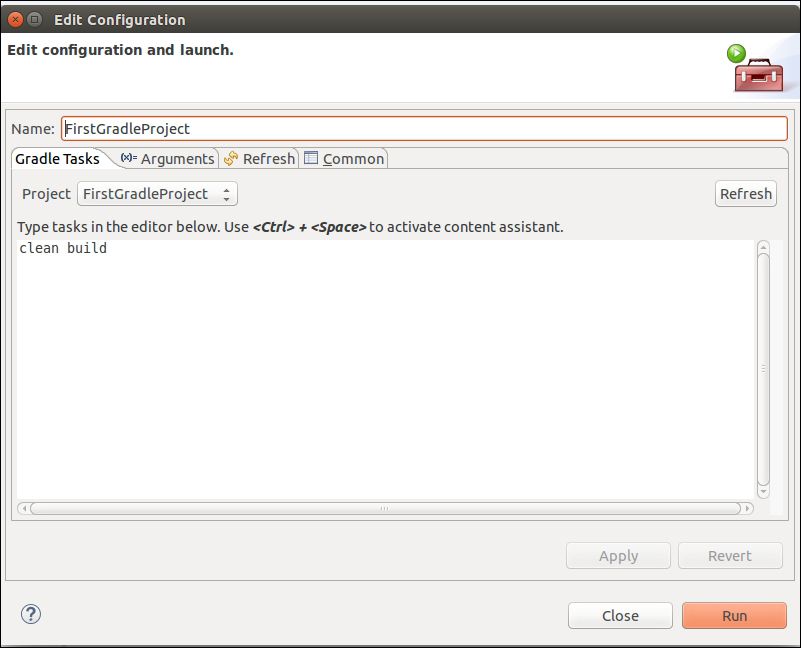
Figure 1.3
This launch configuration will be saved in Eclipse, so that it can be executed again. To launch the previously saved configuration, FirstGradleProject, you need to navigate to Run As | Gradle Build. This will once again, execute the clean build command.