

With the goals set, let's get started by launching the Unreal launcher. If you already have an Unreal Editor instance running, that is not a problem; just choose to make a new project from within the File menu and that will launch the proper screen of the launcher. Otherwise inside the launcher, just hit the Launch button of the editor version you want. After a few seconds of loading, the editor project selection window will appear. Do the following:
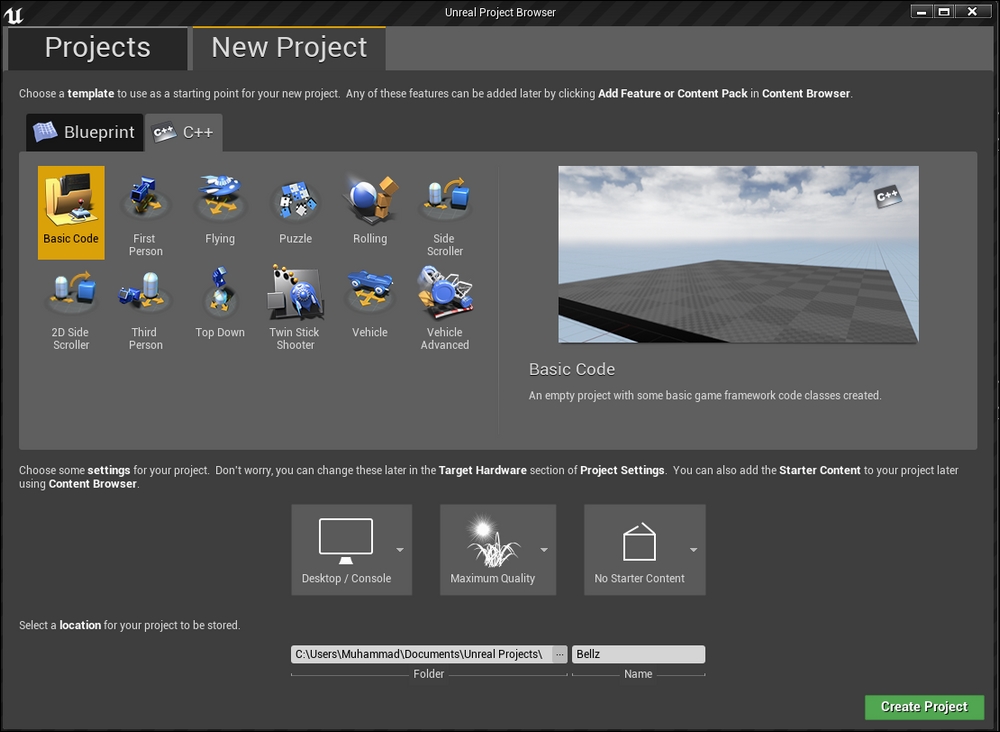
Switch to the New Project tab.
Under New Project, switch to the C++ subtab.
Choose a Basic Code project type.
Set the target to Desktop/Console as that's our target!
Set the quality to Maximum Quality.
Remove the starter content, it will not be useful at all.
Give your project a name, but make sure to remember that name, as a lot of the code will be using it. Mine is called
Bellz. I would say go ahead and name your project with the same name so you can easily follow along with the tutorial without any confusion or naming conflicts.Finally hit Create Project!
If that was your first time creating a code project (which I guess is the case for the book's target audience), the project will take quite a time, it is not going to appear within a second like the other blueprint-based projects.
A C++-based project needs to copy some header files, build a Visual Studio solution/project (or Xcode if you are running on Mac), add the necessary code to the project, build files, inputs, the engine, and so on, and then finally run the Visual Studio command-line tool to compile and launch the project editor.
Now that you have a basic project, shall we go ahead and learn more about the C++ game project structure?
Yes!
But why?
Well, an Unreal project could increase to a crazy size at some point, especially if you are going to source-control your project using Git or SVN. You have to be wary about the space, as some free hosting services put a limit on the file type and file size you are using within your repository.
By opening the game project folder you will have these files and folders; some new files and folders might appear in the future as long as we keep adding stuff to the project. This is what I had by the end of the project:

While the folder is full of subfolders and files, it makes much more sense to break it all down. If you understand how the project directory works, it will be easy to understand how the game director works, and how you can optimize the size of the project.
Binaries: This folder holds.dllfiles and executables that will be autogenerated during the compilation time.Build: A folder for all the necessary files to build the editor or the game itself.Config: A whole folder for the configuration files, basically a bunch of text files that hold a lot of the settings you set for the project and the game from within the project setting and the editor settings. You can do changes here, but it is not that easy to locate exactly what you want. However, it's a good place to search for the causes of problems.Content: TheContentfolder hosts all the assets, blueprints, maps, Marketplace assets and any other item you use to build your game. Any folder you create inside your editor to hold some assets will end up inside theContentfolder. Code files will not be included inside the content, in case your game is based on C++ not blueprints.Intermediate: The majority of the files underneath this folder are temporary files, all of them being generated while building the game or the engine, which means deleting this folder's content will not affect you, as all the content will be regenerated as soon as you build.Saved: TheSavedfolder contains lots of different saved files, some are backups that are saved every once in a while, some are autosaved copies of the assets, and other files are the save data of the game itself (saved using the save API).Source: This folder contains all the game code. Any C++ classes you are going to add in the future for the project will end up in this folder.PNGImage: The icon file for the project, which has the same name as the project; it is not necessary for it to represent the final build, but will be mainly used to visualize the project at the Unreal Launcher library section. Keep in mind that this image must be a square of 192 by 192 pixels. You can change it either by directly replacing it, or through the project settings.SQLFile: This is an.sdfformat file named with the project name; you don't have to worry that much about it, as Visual Studio will be generating a new one every time you open the solution.Visual Studio solution: The Visual Studio solution for the game code has the same name as the project. You can open it directly, or you can launch it from within the Unreal Editor itself through the File menu. Keep in mind that the project options section of the File menu is very dynamic. If you have a C++-based project (such as the one we are creating) the menu will always give you two main options, the first to refresh the Visual Studio project and the second to open the Visual Studio project.
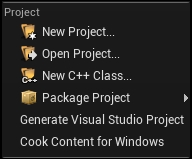
But if you made a blueprint-based project, and at some point you wanted to convert it to a code file, you will find that the project options of the File menu display only one option for the Visual Studio, which is Generate Visual Studio Project.
Unreal Engine Project: An Unreal Engine project file that has the same name as the project and has the extension*.uproject. You can easily open the project using it, either by double-clicking on it or by browsing for it from the Unreal Launcher.