Book Image

MEAN Cookbook

By : Nicholas McClay
Book Image

MEAN Cookbook

By: Nicholas McClay

Overview of this book

The MEAN Stack is a framework for web application development using JavaScript-based technologies; MongoDB, Express, Angular, and Node.js. If you want to expand your understanding of using JavaScript to produce a fully functional standalone web application, including the web server, user interface, and database, then this book can help guide you through that transition. This book begins by configuring the frontend of the MEAN stack web application using the Angular JavaScript framework. We then implement common user interface enhancements before moving on to configuring the server layer of our MEAN stack web application using Express for our backend APIs. You will learn to configure the database layer of your MEAN stack web application using MongoDB and the Mongoose framework, including modeling relationships between documents. You will explore advanced topics such as optimizing your web application using WebPack as well as the use of automated testing with the Mocha and Chai frameworks. By the end of the book, you should have acquired a level of proficiency that allows you to confidently build a full production-ready and scalable MEAN stack application.
Table of Contents (13 chapters)

Upgrading to Angular 4 using NPM

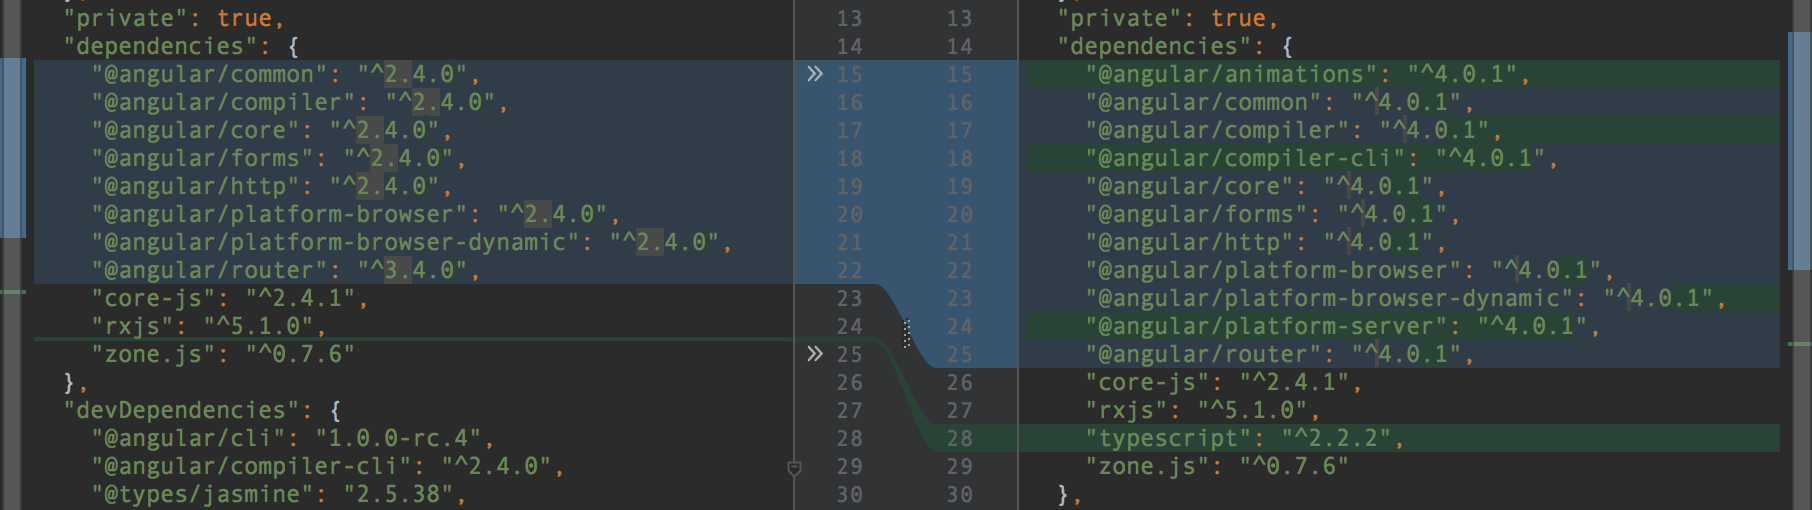
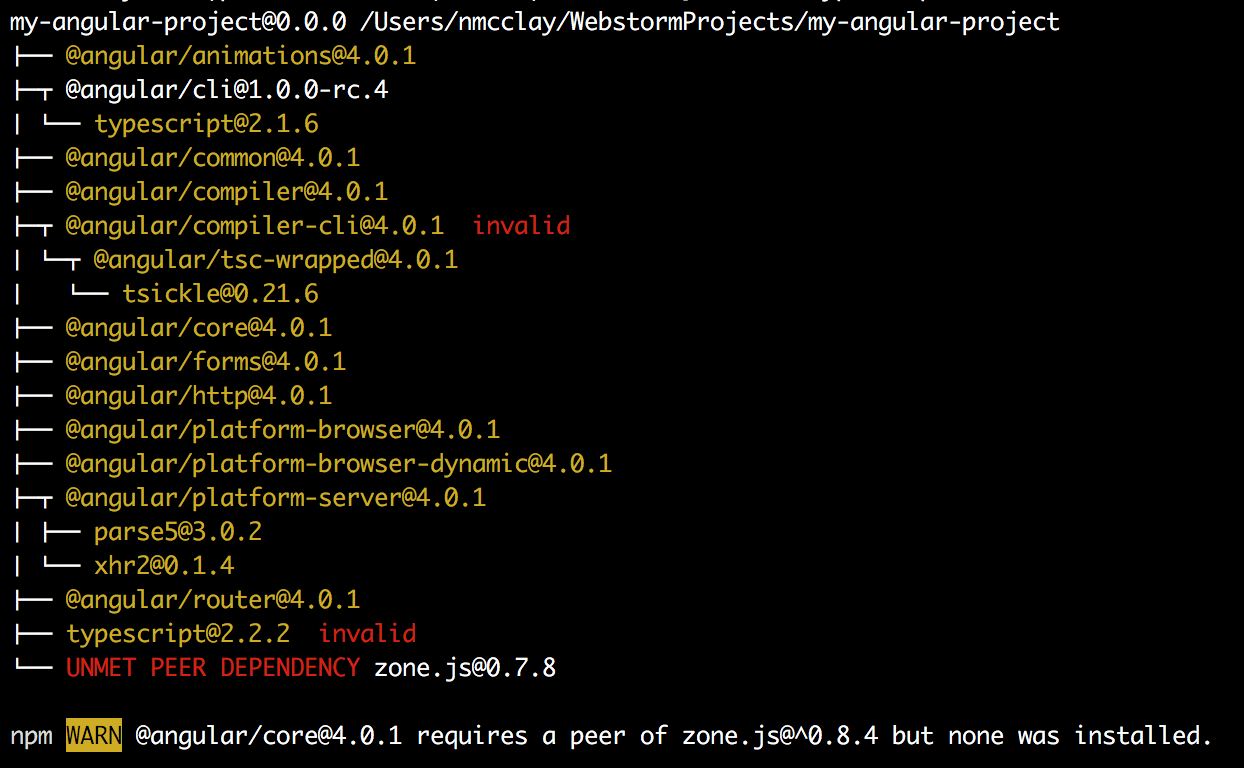
For folks with existing Angular 2 applications, we will discuss the upgrade process to move from Angular 2 to Angular 4, which we will use for the rest of the recipes covered in this book. If you are starting from scratch with a new Angular 4 project, you may wish to skip this recipe and instead start with the Generating a new Angular project using Angular-CLI recipe. If you are interested in a comprehensive list of detailed changes that come with upgrading to Angular 4, please refer to the What's New in Angular 4 Appendix in the back of this book.

Getting ready

Unlike some frameworks, there is no explicit upgrade command in Angular-CLI to move from Angular 2 to 4. Instead, the actual upgrading is done via updating the underlying NPM dependencies in our web application's package.json file. We can do this upgrade manually, but the simplest method is to use the NPM CLI to tell it exactly what packages we want it to install and save them to our project's package.json file.

How to do it...

Let’s take a look at the NPM commands for upgrading to Angular 4 in different environments:

  1. On the Mac OSX and Linux environments, the following is the NPM command to upgrade to Angular 4:
npm install @angular/{common,compiler,compiler-cli,core,forms,http,platform-browser,platform-browser-dynamic,platform-server,router,animations}@latest typescript@latest --save
  1. On the Windows environment, the following is the NPM command to upgrade to Angular 4:
npm install @angular/common@latest @angular/compiler@latest @angular/compiler-cli@latest @angular/core@latest @angular/forms@latest @angular/http@latest @angular/platform-browser@latest @angular/platform-browser-dynamic@latest @angular/platform-server@latest @angular/router@latest @angular/animations@latest typescript@latest --save

How it works...

The commands mentioned in the preceding section may seem very different, but in reality they both do exactly the same thing. Both install all the Angular 4's libraries to your node_modules directory and save the dependencies in your package.json file.

This installation command may take a few minutes to complete, but after it is done, your package.json file will be only file that's updated by this process:

An example of the package.json file showing difference before Angular 4 upgrade with NPM

The amazing thing about this upgrade process is that this is pretty much all there is to it. Upon restarting your Angular application, you should now have your legacy Angular 2 application running on Angular 4. If your application leveraged any of the deprecated or changed APIs mentioned in the What's New in Angular 4 Appendix, you may see a compiler error at this time. You will need to review the change list and find the deprecation that is the closest match to the exception you are encountering and resolve that before trying again.

There’s more…

Working with dependencies in Angular can be tricky if you haven't had to manage a web application framework as robust as Angular before. Let's look at few of the most common types of dependency and package-related issues developers can get stuck on when upgrading their Angular applications.

Taking advantage of optional dependencies

One of the best parts about removing libraries, such as animations, from Angular 4's core dependencies is that we can now decide whether we want to or not. If our application doesn't need any animation capability, it is completely safe for us to not include it as a dependency in our package.json or as a part of our NPM install upgrade command. If we change our mind later, we can always install the animation library when the need arises. Depending on the functionality of your web application, you may also be able to do without the router, forms, or HTTP libraries.

Once your upgraded Angular 4 application successfully compiles, ensure that you take time to check that all your existing automated tests and the application functionality itself continue to function as expected. Assuming that your application is functioning properly, you will be enjoying an approximately 25% smaller generated file size as well as access to the new APIs and features.

Peer dependency warnings after upgrade

Angular 4 also depends on a number of other JavaScript libraries to function; some of those libraries are peerDependencies within Angular's own dependencies. That means that they must be fulfilled by your application in order for Angular to function. Some of these dependencies, such as TypeScript, were actually provided in the NPM install command; however, some of them, such as Zone.js, are not. These peerDependencies can vary even between minor version differences of Angular, so if you do see one of these warnings, your best bet is to manually update your package.json dependency for that library and try again:

An example of an unmet peer dependency warning during Angular 4 upgrade

Now that our Angular application is upgraded to Angular 4, we will move on to using Angular 4 for the rest of this book's Angular content. From now on, when I use the term Angular, it is specifically in reference to Angular 4. This conforms with Google’s own usage of the name, always using Angular generically to be the latest major SemVer version of the Angular framework.

Official Angular guidelines: Google has actually gone to great lengths to provide developers, bloggers, and the press with detailed examples of a proper usage of Angular terminology and the reasoning behind it. You can find more information about these guidelines on the official Angular blog, including a link to the official press kit: http://angularjs.blogspot.com/2017/01/branding-guidelines-for-angular-and.html
https://angular.io/presskit.html.