Book Image

MEAN Cookbook

By : Nicholas McClay
Book Image

MEAN Cookbook

By: Nicholas McClay

Overview of this book

The MEAN Stack is a framework for web application development using JavaScript-based technologies; MongoDB, Express, Angular, and Node.js. If you want to expand your understanding of using JavaScript to produce a fully functional standalone web application, including the web server, user interface, and database, then this book can help guide you through that transition. This book begins by configuring the frontend of the MEAN stack web application using the Angular JavaScript framework. We then implement common user interface enhancements before moving on to configuring the server layer of our MEAN stack web application using Express for our backend APIs. You will learn to configure the database layer of your MEAN stack web application using MongoDB and the Mongoose framework, including modeling relationships between documents. You will explore advanced topics such as optimizing your web application using WebPack as well as the use of automated testing with the Mocha and Chai frameworks. By the end of the book, you should have acquired a level of proficiency that allows you to confidently build a full production-ready and scalable MEAN stack application.
Table of Contents (13 chapters)

Generating a new Angular project using Angular-CLI

For developers starting with Angular 4 from scratch, this section will cover how to use the Angular-CLI utility to generate a new project. There are many ways to create a new Angular project, but a very popular convention for getting started is to use a dedicated CLI utility. Angular-CLI is an all-in-one new project initializer and everything that we will need to run our new application locally. It includes a standalone web server, live reload server, and test runner to use in local development. We will use Angular-CLI in many of the examples throughout this book when working with Angular. There are also many useful features in Angular-CLI besides creating new projects, which we will discuss later in this chapter.

Getting ready

To create a new Angular project, we will use the Angular-CLI command-line utility. To install this utility, you must first have Node.js version 8.4.0 or greater installed locally as well as NPM version 4 or greater. You can check your local Node.js and NPM versions with the following commands:

node --version
npm --version
Using a node version mangement tool:
Node.js version management can be an important aspect of maintaining consistent application builds, especially in a team environment. Angular-CLI doesn’t come with a predefined Node.js version management system, so adding a configuration file to your project for a Node.js version management utility, such as NVM, Nodenv, or Nodist, to your project early can help you solve configuration headaches down the road.

How to do it...

Let's look at the following steps to create an Angular project:

  1. To install Angular-CLI, simply run the following command:
npm install -g @angular/cli
  1. This may take several minutes to install Angular-CLI locally and make it ready and available to use in your project. Wait until the command prompt is ready, before proceeding to generate a new Angular project using Angular-CLI.
  1. To create a new Angular application, simply type ng new, followed by the name of your new application--in this case, I am using my-angular-project:
ng new my-angular-project
  1. This will create a new project folder called my-angular-project and preinstall everything that we need to run our new Angular application locally.

How it works...

There are many options available when working with commands in Angular-CLI. For example, let's look at what other options are available for the new command:

ng new --help

This will show you all the available optional flags you can pass when initializing your project.

Whenever you are trying out a new command, passing the --help option can be a handy way to learn what options are available before running the command.

Now that we have our new Angular project set up, we can start the application locally using the built-in web server capability of Angular-CLI. Start the web server by calling the serve command:

ng serve

After running this command, you can actually see Angular compile all the default modules necessary to run your new application, including a message that tells you where to find your project in your local web browser:

** NG Live Development Server is running on http://localhost:4200 **

There's more...

NPM scripts are a great way to run common actions in your Angular application. In fact, Angular-CLI sets up your project with some predefined scripts tailored for it. By opening the package.json file in your project, you can find the scripts configuration, which should look very similar to this:

"scripts": {
"ng": "ng",
"start": "ng serve",
"build": "ng build",
"test": "ng test",
"lint": "ng lint",
"e2e": "ng e2e"
},

From here, you can see that ng serve is mapped to the start command in NPM. The start script is a special type of script command that is available by default in NPM, whereas other commands, such as lint, are nonstandard, and, therefore, must be called using the run command in NPM:

npm start
npm run lint

Editing these NPM script commands are a great way to automate passing flags to your application configuration. For example, to make Angular-CLI automatically open your default web browser with your application during the startup, you could try updating your start command, as follows:

“start”: “ng serve --open”,

Now, whenever you run npm start, your Angular application will automatically boot up with your custom options, and a web browser pointing to the correct host and port will open.

Configuration errors can often cause problems when you start your application. A common configuration error is caused by a missing configuration file:

Cannot read property 'config' of null
TypeError: Cannot read property 'config' of null

There are many hidden dot-files in a newly created Angular application. If you created a new project and moved its app contents and structure to a new location for reorganization, this error means that you have missed or accidentally deleted the hidden .angular-cli.json file. If you are encountering this error after your project creation, it probably means that the project wasn’t created in exactly the directory you wanted. Instead of moving the project, an easy fix is to provide the --directory flag when you create a new project:

ng new my-angular-project --directory my-angular-project

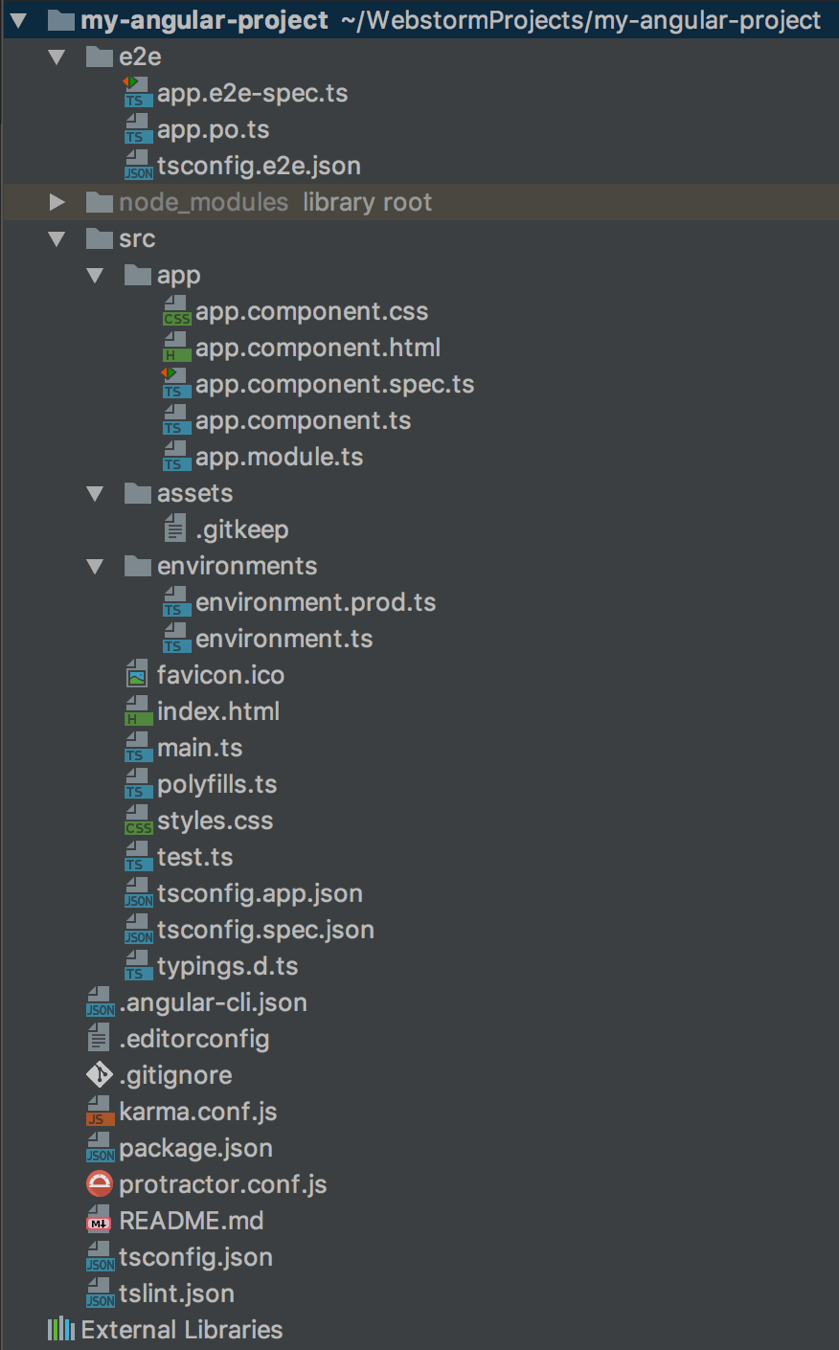
Now that our application is running, let’s take a look at the project structure of the newly created Angular application. Your project structure should look very similar to the following example:

There are a lot of files in a new Angular application. Many are specific configuration files, which we won’t touch on in this book. Most of the content we will work with in this book will be focused on the /src directory and the content within it. This directory is the default location for virtually all of our Angular project structures, which we will start stubbing out in the next section.

However, before we continue, you may wish to fulfill the age-old tradition of creating a Hello World app. Simply open the /src/app/app.component.ts file to change the title property to 'Hello World!':

export class AppComponent {
title = 'Hello World!';
}

After saving, your application will automatically reload using live-reload to show your changes in your web browser. Live-reload is another feature that comes out of the box with Angular-CLI that makes development much easier to iterate and see changes rapidly in the frontend of your application.

Tips for resolving port collision

Port collision is a problem that can happen when the port you are attempting to run your app on is already in use:

Port 4200 is already in use. Use '--port' to specify a different port.

This often happens if you accidentally leave open a previous instance of your application while trying to start another. On Unix systems, you can find and kill orphaned processes using the ps and grep commands:

ps aux | grep angular

This will return a process list you can consult to find your rogue Angular-CLI process:

nmcclay    88221   0.0  1.8  3398784 296516   ??  S     7:56PM   0:12.59 @angular/cli

Now that you have found your process, you can stop it with the kill command:

Kill 88221

Another common cause of this error can be running multiple different web applications locally. In this case, the best option is to simply change the default port used in the NPM start command of your package.json file:

start”: “ng serve --port 4500”,