

Views are the actual output of the application that is delivered to the user. It is what they actually see when they access your application from the screen. All the components, be it menus, input elements, dialog boxes, and everything the user sees comes from your Views only. If you do not provide good user experience when accessing your application, users will not care how great your application is. So, Views play a critical role when building an ASP.NET MVC application.
In this chapter, we'll cover the following topics:
- The purpose of View Engine and Razor View Engine
- Programming in Razor View Engine and different programming constructs
- Layout in ASP.NET Core and its features
- HTML Helpers
- Partial Views
- Tag Helpers
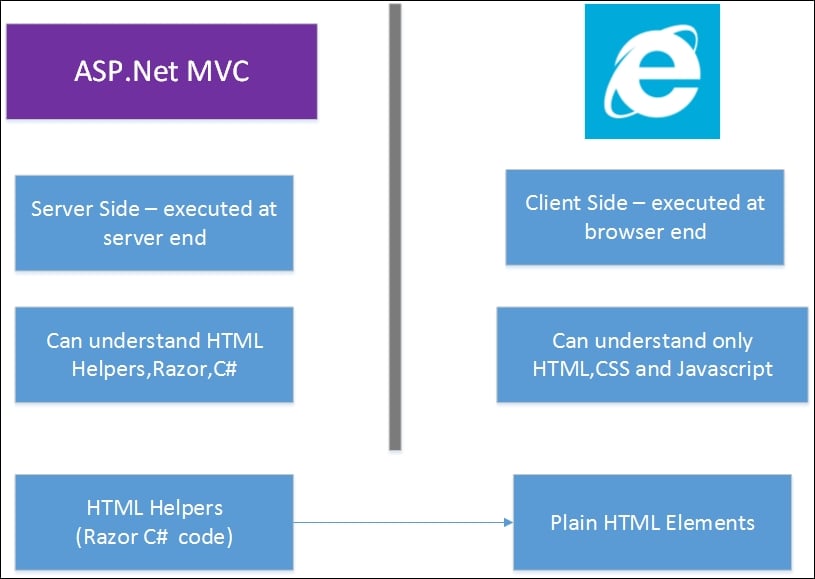
As discussed in Chapter 1, Introduction to ASP.NET Core, a browser can only understand HTML, CSS, and JavaScript. The purpose of the View engine is to generate the HTML code from your View and send it to the browser so that it can understand the content. Primarily, there are two different types of View engines—Razor View engine and Webform View engine. Although these two View engines come out of the box with ASP.NET MVC, you can use any custom View engine.
The Razor View engine is the default and recommended View engine in ASP.NET Core, and going forward, this may be the only View engine coming out of the box when you install ASP.NET MVC.
You can mix a C# code and HTML code in your Razor View and the Razor View engine is intelligent enough to distinguish between these two and generate the expected output. In some scenarios, we may have to give additional information to Razor View to produce the appropriate results. Razor code blocks start with the @ symbol and do not require a closing @.
Programming in Razor View engine is just like you program in C#. The difference is that, in Razor View engine, your C# code will get mixed with HTML to produce the desired HTML output.
You can declare a variable inside the razor block and use that variable using the @ symbol.
Let's discuss this with an example.
- Create a
Controllersfolder and a Controller calledHomeController. - Create a folder called
Views, a subfolder calledHome, and a View file calledIndex.cshtmlby right-clicking the context menu and selecting Add | New Item and then MVC Razor View from the list.
The HomeController.cs file will have following code:
public class HomeController : Controller
{
  // GET: /<controller>/
  public IActionResult Index()
  {
    return View();
  }
}
Next is the updated Razor View where we will declare a variable and use it. The first five lines and the last two lines are simple HTML elements.
We will concentrate on the lines that are bold. Then, we will create a Razor block using @ { … } and declaring a variable inside it. The Razor block ends with the closing curly bracket. The snippet Value: is considered as simple HTML text. As we would like to use the razor variable value, we will use @i to instruct the Razor View engine that i is not a normal HTML text; and it is a Razor construct and is to be treated accordingly. The complete HTML code is as follows:
<html>
  <head>
    <title> Views demo</title>
  </head>
  <body>
    @{
       int i = 5;

     }
     Value: @i
  </body>
</html>
When you run the application, you'll see the following output:

Please note that when you access the razor variable, you will need to use the @ symbol. Without this, Razor View engine sees the i as text and not as an expression.
The following screenshot is the result you will get when you access the variable without @ symbol:

You can use most of the programming constructs available in C# in Razor View. The following piece of code is the for loop construct where we loop through five times and print the variable name:
@{
   for (int i = 0; i < 5; i++)
   {
     <li>@(i+1)</li>
   }
 }
The following are a few points to be noted:
- As the for loop is a razor code, we should enclose the loop with the
@symbol to indicate that the code that follows is a Razor code and not normal HTML. - Whenever we use an HTML element or tag, Razor View engine falls back to HTML mode. If you want to use any Razor expression within the HTML tags, you will want to include the
@symbol again to tell the Razor View engine that whatever follows is a Razor code and not an HTML element. This is the reason we use the@symbol again in the preceding expression, even within the parent root-level razor code.
The complete code for the View is as follows:
<html>
  <head>
    <title> Views demo</title>
  </head>
  <body>
    <ul>
    @{
       for (int i = 0; i < 5; i++)
       {
         <li>@(i+1)</li>
       }
     }
    </ul>
  </body>
</html>
The following piece of code is the while loop implementation for the same loop. Please note that the emboldened expressions increment the variable i. We will not use the @ symbol as it is not within the HTML element:
@{
   int i = 0;
   while(i<5)
   {
     <li>@(i + 1)</li>
     i++;
   }
 }
The foreach loop in Razor View is the same as the foreach loop in C#. In the following code, we will initialize a list of integers, iterate through the list and print it as a list item:
<ul>
  @{
     List<int> integers = new List<int>
     {
       1,2,3,4,5
     };
     foreach (int i in integers)
     {
       <li>@i</li>
     }
   }
</ul>In the following code, we will check if the value of the variable is less than 10. If it is less than 10, we will print i is less than 10, otherwise, we will say i is greater than 10. You may wonder why we have to include the text tag and what its purpose is. As we are inside the Razor View code block, the text i is less than 10 will be considered as Razor expression, but it is not.
This text tag is to instruct the Razor View engine that whatever follows the text tag is to be considered as a text and not as a Razor expression:
@{
   int i = 5;
   if (i < 10)
   {
     <text>i is less than 10</text>
   }
   else
   {
     <text>i is greater than 10</text>
   }
}In all the previous examples we discussed, we have done the complete View coding in a single file. This will result in a lack of flexibility and reduced reusability.
Consider the following web page structure where the Top Section contains the company logo or banner and the Side Section contains the links to various sections of the site. The Content Section changes for every page.

If we code the complete content in a single view, we may have to duplicate the Top Section and Side Section in every page. If we want to change anything in the Side Section, we will have to change all the files. This clearly shows that a single View file is not the best solution.
The layout comes to the rescue in this scenario. The layout defines the site structure that can be reused across all the web pages. The layout does not even need to have something like the top section or side section; it can contain even a simple HTML structure where you can have common content and the body content will be rendered from individual view.
Let's build our first layout. In order to use the layout, you will need to have the following three things:
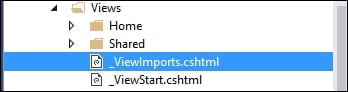
- Inform the name of the layout file—this information should be made available in
_ViewStart.cshtml. By convention, the names of all the shared files will start with an underscore and this file is located directly under theViewsfolder. - Create the Layout file—by convention, the name of the file is
_Layout.cshtmland it will be located in theSharedfolder. All the shared content, such as partial views, will also be available here. Partial Views will be discussed later in this chapter. - Create the content View file—this View file is almost same as the earlier View files that we created so far with only one difference; only page-specific content will be available in this file, and this means that you'll not have any
html,head, ortitletags here.
After the creation of _ViewStart.cshtml, _Layout.cshtml, and page-specific View files, the folder structure will be like the preceding snapshot.
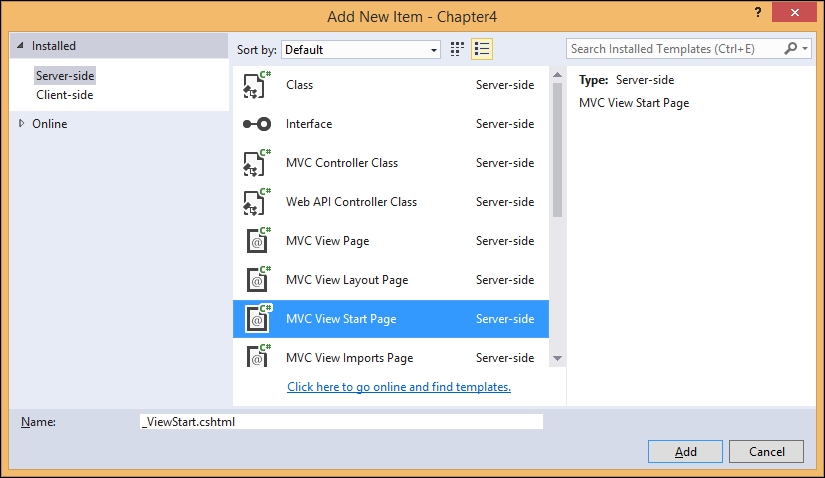
Right-click on the Views folder and select Add New Item from the Context menu. Then, select MVC View Start Page from the Add New Item dialog box as shown in the following screenshot:
When you click the Add button, it will create a file with the following content:
@{
   Layout = "_Layout";
}Create a folder called Shared within the Views folder. Then, right-click on the Shared folder and select Add New Item from the Context menu as shown in the following screenshot:

When you click the Add button, it will create _Layout.cshtml with the following content:
<!DOCTYPE html>
<html>
<head>
<meta name="viewport" content="width=device-width" />
<title>@ViewBag.Title</title>
</head>
<body>
<div>
@RenderBody()

</div>
</body>
</html>
The preceding layout file is a simple HTML content with a couple of Razor expressions. @ViewBag. The title is used to display the title information passed from the Controller and @RenderBody is the Razor expression that calls the page specific View and merges that content over there.
Before adding the View, we will need to add an action method in our HomeController file from which we will be calling our page-specific view.
Let's add an action method named Index2 as follows:
public IActionResult Index2()
{
  ViewBag.Title = "This is Index2";
  return View();
}
The ViewBag is used to pass information from the Controller to the View. Here, we are passing the Title information from the action method to the View.
Now, right-click on the Views folder, select Add | New Item, select MVC View Page, and save the file as Index2.cshtml.
In the generated view, I have added simple Hello text. This text will be rendered in the body of the layout page. The complete code of the View file is as follows:
@*
For more information on enabling MVC for empty projects, visit http://go.microsoft.com/fwlink/?LinkID=397860
*@
@{
 …
 }
 Hello. This text will be rendered in body of the layout page
Everything is set now. Run the application and type the URL http://localhost:50132/Home/Index2 in the browser. Please note that the port number after the local host may vary when you run the application from your PC.

As expected, you'll see the text seen in the preceding picture. However, our point is not about the text. It's about the structure of the generated HTML content.
View the source by pressing Ctrl + U (on the Chrome browser in Windows). You'll see the following HTML content:

The top content (the html, head, body, and div opening tags) and bottom content (the html, head, body, and div closing tags) come from the layout file and the text comes from the View specific to the page.
Creating _ViewStart.cshtml
Right-click on the Views folder and select Add New Item from the Context menu. Then, select MVC View Start Page from the Add New Item dialog box as shown in the following screenshot:
When you click the Add button, it will create a file with the following content:
@{
   Layout = "_Layout";
}Create a folder called Shared within the Views folder. Then, right-click on the Shared folder and select Add New Item from the Context menu as shown in the following screenshot:
When you click the Add button, it will create _Layout.cshtml with the following content:
<!DOCTYPE html>
<html>
<head>
<meta name="viewport" content="width=device-width" />
<title>@ViewBag.Title</title>
</head>
<body>
<div>
@RenderBody()

</div>
</body>
</html>
The preceding layout file is a simple HTML content with a couple of Razor expressions. @ViewBag. The title is used to display the title information passed from the Controller and @RenderBody is the Razor expression that calls the page specific View and merges that content over there.
Before adding the View, we will need to add an action method in our HomeController file from which we will be calling our page-specific view.
Let's add an action method named Index2 as follows:
public IActionResult Index2()
{
  ViewBag.Title = "This is Index2";
  return View();
}
The ViewBag is used to pass information from the Controller to the View. Here, we are passing the Title information from the action method to the View.
Now, right-click on the Views folder, select Add | New Item, select MVC View Page, and save the file as Index2.cshtml.
In the generated view, I have added simple Hello text. This text will be rendered in the body of the layout page. The complete code of the View file is as follows:
@*
For more information on enabling MVC for empty projects, visit http://go.microsoft.com/fwlink/?LinkID=397860
*@
@{
 …
 }
 Hello. This text will be rendered in body of the layout page
Everything is set now. Run the application and type the URL http://localhost:50132/Home/Index2 in the browser. Please note that the port number after the local host may vary when you run the application from your PC.
As expected, you'll see the text seen in the preceding picture. However, our point is not about the text. It's about the structure of the generated HTML content.
View the source by pressing Ctrl + U (on the Chrome browser in Windows). You'll see the following HTML content:
The top content (the html, head, body, and div opening tags) and bottom content (the html, head, body, and div closing tags) come from the layout file and the text comes from the View specific to the page.
Creating _Layout.cshtml
Create a folder called Shared within the Views folder. Then, right-click on the Shared folder and select Add New Item from the Context menu as shown in the following screenshot:
When you click the Add button, it will create _Layout.cshtml with the following content:
<!DOCTYPE html>
<html>
<head>
<meta name="viewport" content="width=device-width" />
<title>@ViewBag.Title</title>
</head>
<body>
<div>
@RenderBody()

</div>
</body>
</html>
The preceding layout file is a simple HTML content with a couple of Razor expressions. @ViewBag. The title is used to display the title information passed from the Controller and @RenderBody is the Razor expression that calls the page specific View and merges that content over there.
Before adding the View, we will need to add an action method in our HomeController file from which we will be calling our page-specific view.
Let's add an action method named Index2 as follows:
public IActionResult Index2()
{
  ViewBag.Title = "This is Index2";
  return View();
}
The ViewBag is used to pass information from the Controller to the View. Here, we are passing the Title information from the action method to the View.
Now, right-click on the Views folder, select Add | New Item, select MVC View Page, and save the file as Index2.cshtml.
In the generated view, I have added simple Hello text. This text will be rendered in the body of the layout page. The complete code of the View file is as follows:
@*
For more information on enabling MVC for empty projects, visit http://go.microsoft.com/fwlink/?LinkID=397860
*@
@{
 …
 }
 Hello. This text will be rendered in body of the layout page
Everything is set now. Run the application and type the URL http://localhost:50132/Home/Index2 in the browser. Please note that the port number after the local host may vary when you run the application from your PC.
As expected, you'll see the text seen in the preceding picture. However, our point is not about the text. It's about the structure of the generated HTML content.
View the source by pressing Ctrl + U (on the Chrome browser in Windows). You'll see the following HTML content:
The top content (the html, head, body, and div opening tags) and bottom content (the html, head, body, and div closing tags) come from the layout file and the text comes from the View specific to the page.
Adding a page-specific View
Before adding the View, we will need to add an action method in our HomeController file from which we will be calling our page-specific view.
Let's add an action method named Index2 as follows:
public IActionResult Index2()
{
  ViewBag.Title = "This is Index2";
  return View();
}
The ViewBag is used to pass information from the Controller to the View. Here, we are passing the Title information from the action method to the View.
Now, right-click on the Views folder, select Add | New Item, select MVC View Page, and save the file as Index2.cshtml.
In the generated view, I have added simple Hello text. This text will be rendered in the body of the layout page. The complete code of the View file is as follows:
@*
For more information on enabling MVC for empty projects, visit http://go.microsoft.com/fwlink/?LinkID=397860
*@
@{
 …
 }
 Hello. This text will be rendered in body of the layout page
Everything is set now. Run the application and type the URL http://localhost:50132/Home/Index2 in the browser. Please note that the port number after the local host may vary when you run the application from your PC.
As expected, you'll see the text seen in the preceding picture. However, our point is not about the text. It's about the structure of the generated HTML content.
View the source by pressing Ctrl + U (on the Chrome browser in Windows). You'll see the following HTML content:
The top content (the html, head, body, and div opening tags) and bottom content (the html, head, body, and div closing tags) come from the layout file and the text comes from the View specific to the page.
As discussed in Chapter 1, Introduction to ASP.NET Core, browsers can understand only HTML, CSS, and JavaScript, irrespective of the technology that you use to build the web application. This holds true when building the application in ASP.NET MVC as well.
Most applications get the user input, process the input, and then store the required information in the database to retrieve them later. In the context of web applications, Form HTML elements are used to get the user input.
The following are a couple of ways to generate HTML elements in ASP.NET Core:
- HTML Helpers
- Tag Helpers
HTML Helpers are server-side methods that aid in generating HTML elements, which can be understood by the browsers. HTML helpers were the primary method of generating the HTML elements up till ASP.NET MVC 5.
Tag Helpers, introduced in ASP.NET Core, also produce HTML elements. Tag helpers, which we will discuss in a later section of this chapter, will look just like HTML elements where you add attributes to identify them as Tag Helpers. The advantage of using Tag helpers over HTML helpers is that the user interfaces designers/engineers do not need to worry about Razor code. They just code with HTML elements and additional attributes.
Before discussing HTML helpers and Tag helpers, let's take a step back and talk about why we need them in the first place.
Let's consider a simple form, as shown in the following picture, where we would like to get the user's name and their age. If the user enters her age, we will display You are eligible to vote!. If not, we will display You are not eligible to vote now:

The following is the HTML code to show the preceding simple form:
<form>
  <table>
    <tr>
      <td>
        <label for="txtName">Name</label>
      </td>
      <td>
        <input type="text" id="txtName" />
      </td>
    </tr>
   <tr>
     <td>
       <label for="txtAge">Age</label>
     </td>
     <td>
      <input type="text" id="txtAge" />
     </td>
   </tr>
   <tr>
     <td colspan="2">
       <input type="submit"  />
     </td>
   </tr>
  </table>
</form>
This method of coding HTML elements directly is time-consuming and error-prone. For example, in the preceding form, the label and input HTML elements refer to the same element (txtName in the first group and txtAge in the second group). If we hand-code the HTML element, there is a possibility of a typo error in building the HTML element.
HTML helpers are server-side methods that generate HTML for you. We can generate the same form using HTML helpers as follows (HTML.BeginForm, @Html.Label, and @Html.TextBox generate the HTML form element, label, and textbox elements, respectively):
@using (Html.BeginForm())
 {
   <table>
     <tr>
       <td>@Html.Label("Name")</td>
       <td>@Html.TextBox("txtName")</td>
     </tr>
     <tr>
       <td>@Html.Label("Age")</td>
       <td>@Html.TextBox("txtAge")</td>
     </tr>
     <tr>
       <td colspan="2"><input type="submit" value="Submit" /></td>
     </tr>
   </table>
}
You might wonder why we need to use HTML helpers when we can write the HTML code manually. Things will get more complex when we pass the model from the Controller to the view. Using HTML helpers, we can directly build form elements from Models files so that they will pick the names from the Models that you are using.
For example, let's create a folder called Models and a class called Person. This class will act as a model as shown in the following screenshot:

The Person class is just a POCO (Plain Old C# Object) class and will act as a model. The complete code for this class is as follows:
public class Person
{
  public int PersonId { get; set; }
  public string Name { get; set; }
  public int Age { get; set; }
}
Let's create a new action method called ValidateAge. In this method, we will create an empty Person class and pass the Model to the View. We will also create a dynamic property called Title in ViewBag so that we can display this value in View:
[HttpGet]
public IActionResult ValidateAge()
{
  ViewBag.Title = "Validate Age for voting";
  Person person1 = new Person();
  return View(person1);
}
In the view, create the form using the following HTML Helpers:
@model Chapter4.Models.Person
@using (Html.BeginForm("ValidateAge", "Home", FormMethod.Post))
 {
   <table>
     <tr>
       <td>@Html.LabelFor(Model => Model.Name) </td>
       <td>@Html.TextBoxFor(Model => Model.Name) </td>
     </tr>
     <tr>
       <td>@Html.LabelFor(Model => Model.Age)</td>
       <td>@Html.TextBoxFor(Model => Model.Age)</td>
     </tr>
     <tr>
       <td colspan="2"><input type="submit" value="Submit" /></td>
     </tr>
   </table>
}
In the first line, we are telling the View that we are passing the Model of type Person class. This enables you to use the strong type of Model, that is, when you type Model and a dot, IntelliSense provides you with all the properties of the Person class
In the second line, we are using the overloaded BeginForm HTML helpers which accept three parameters—the action method name, the Controller name, and the Form method.
Simply, when the user submits the form, the information should be passed to the mentioned action of the Controller.
In the LabelFor and TextBox For HTML helpers, we are just passing Model properties (name and age); it automatically queries and gets the Model properties and builds the respective HTML elements. This is one of the primary advantages of using HTML helpers. Without using the HTML helpers, this process might become complex.
Now, let's write the respective POST action method in the same way. In the following POST action method, based on the age entered in the form, we set the dynamic property as Message.
[HttpPost]
public IActionResult ValidateAge(Person person1)
{
  if(person1.Age>=18)
  {
    ViewBag.Message = "You are eligible to Vote!";
  }
  else
  {
    ViewBag.Message = "Sorry.You are not old enough to vote!";
  }
  return View();
}
It is to be noted that both the GET and POST action method refer to the same View —ValidateAge.cshtml. Add the following content to the View just above the form element:
@if(ViewBag.Message!=null)
 {
   <b>@ViewBag.Message</b>
 }
Once the user submits the form, the POST action method sets the dynamic Message property in ViewBag. However, the value of this property will be null when the View is rendered as part of the GET request. If the value is not null, insert the message at the top of the page.
When you run the application, you'll get the following output:

HTML Helpers
HTML helpers are server-side methods that generate HTML for you. We can generate the same form using HTML helpers as follows (HTML.BeginForm, @Html.Label, and @Html.TextBox generate the HTML form element, label, and textbox elements, respectively):
@using (Html.BeginForm())
 {
   <table>
     <tr>
       <td>@Html.Label("Name")</td>
       <td>@Html.TextBox("txtName")</td>
     </tr>
     <tr>
       <td>@Html.Label("Age")</td>
       <td>@Html.TextBox("txtAge")</td>
     </tr>
     <tr>
       <td colspan="2"><input type="submit" value="Submit" /></td>
     </tr>
   </table>
}
You might wonder why we need to use HTML helpers when we can write the HTML code manually. Things will get more complex when we pass the model from the Controller to the view. Using HTML helpers, we can directly build form elements from Models files so that they will pick the names from the Models that you are using.
For example, let's create a folder called Models and a class called Person. This class will act as a model as shown in the following screenshot:
The Person class is just a POCO (Plain Old C# Object) class and will act as a model. The complete code for this class is as follows:
public class Person
{
  public int PersonId { get; set; }
  public string Name { get; set; }
  public int Age { get; set; }
}
Let's create a new action method called ValidateAge. In this method, we will create an empty Person class and pass the Model to the View. We will also create a dynamic property called Title in ViewBag so that we can display this value in View:
[HttpGet]
public IActionResult ValidateAge()
{
  ViewBag.Title = "Validate Age for voting";
  Person person1 = new Person();
  return View(person1);
}
In the view, create the form using the following HTML Helpers:
@model Chapter4.Models.Person
@using (Html.BeginForm("ValidateAge", "Home", FormMethod.Post))
 {
   <table>
     <tr>
       <td>@Html.LabelFor(Model => Model.Name) </td>
       <td>@Html.TextBoxFor(Model => Model.Name) </td>
     </tr>
     <tr>
       <td>@Html.LabelFor(Model => Model.Age)</td>
       <td>@Html.TextBoxFor(Model => Model.Age)</td>
     </tr>
     <tr>
       <td colspan="2"><input type="submit" value="Submit" /></td>
     </tr>
   </table>
}
In the first line, we are telling the View that we are passing the Model of type Person class. This enables you to use the strong type of Model, that is, when you type Model and a dot, IntelliSense provides you with all the properties of the Person class
In the second line, we are using the overloaded BeginForm HTML helpers which accept three parameters—the action method name, the Controller name, and the Form method.
Simply, when the user submits the form, the information should be passed to the mentioned action of the Controller.
In the LabelFor and TextBox For HTML helpers, we are just passing Model properties (name and age); it automatically queries and gets the Model properties and builds the respective HTML elements. This is one of the primary advantages of using HTML helpers. Without using the HTML helpers, this process might become complex.
Now, let's write the respective POST action method in the same way. In the following POST action method, based on the age entered in the form, we set the dynamic property as Message.
[HttpPost]
public IActionResult ValidateAge(Person person1)
{
  if(person1.Age>=18)
  {
    ViewBag.Message = "You are eligible to Vote!";
  }
  else
  {
    ViewBag.Message = "Sorry.You are not old enough to vote!";
  }
  return View();
}
It is to be noted that both the GET and POST action method refer to the same View —ValidateAge.cshtml. Add the following content to the View just above the form element:
@if(ViewBag.Message!=null)
 {
   <b>@ViewBag.Message</b>
 }
Once the user submits the form, the POST action method sets the dynamic Message property in ViewBag. However, the value of this property will be null when the View is rendered as part of the GET request. If the value is not null, insert the message at the top of the page.
When you run the application, you'll get the following output:
Partial Views are just Views that can be reused across your application. Partial Views can be thought of as pluggable reusable blocks that you can call from anywhere and have the content of the partial view displayed.
Consider the following structure of a web page—it's the same layout page that we used earlier, but with a couple of changes. The Latest News block is added to the Side Section and the Login block is added to the Top Section. These blocks are not restricted to the Top Section or Side Section and can be used anywhere in your application, including your Content Section as shown in the following figure:

These Partial Views are not restricted to static content and can contain form elements. In the preceding screenshot, the Latest News Partial View contains the text content and the login Partial View contains form elements to get the e-mail ID and password.
Location of Partial Views—Framework does not restrict the location of the Partial View. However, by convention, if your Partial View will be used only by your Controller, you can create that Partial View in the Controller-specific Views folder. For example, if your Partial View will only be used in HomeController file, you can create that Partial View in the Views\Home folder.
Let's take look at how to create a Partial View and use it.
As discussed earlier, a Partial View is just like a normal View. So, we will create a Partial View in the same way we create normal View.
Right-click on the Shared folder and select Add | New Item. By convention, like all shared content, the name of the Partial View will also start with "_"(underscore), as shown in the following screenshot:

In the generated Partial View, I have added the following simple static content—a text and a simple table:
<b>This content and below table is coming from partial view</b>
<table border="1">
  <tr>
    <th>Employee No</th>
    <th>Employee Name</th>
  </tr>
  <tr>
    <td>10012</td>
    <td>Jon Skeet</td>
  </tr>
  <tr>
    <td>10013</td>
    <td>Scott Guthrie</td>
  </tr>
</table>A Partial View can be called using the @Html.Partial HTML helper.
In our case, we will be calling the Partial View from Index2.cshtml file. The parameter that you pass will be the name of the partial file. It will search for the Partial View by that name and render that complete content as part of the Index2.cshtml file.
The content of Index2.html file will now be as follows:
Hello. This text will be rendered in body of the layout page<br/> <br/> <br/>

@Html.Partial("_PartialHelloWorld")
Now, run the application and access the URL http://localhost:50132/Home/Index2. You'll see the following output:

Calling the Partial View
A Partial View can be called using the @Html.Partial HTML helper.
In our case, we will be calling the Partial View from Index2.cshtml file. The parameter that you pass will be the name of the partial file. It will search for the Partial View by that name and render that complete content as part of the Index2.cshtml file.
The content of Index2.html file will now be as follows:
Hello. This text will be rendered in body of the layout page<br/> <br/> <br/>

@Html.Partial("_PartialHelloWorld")
Now, run the application and access the URL http://localhost:50132/Home/Index2. You'll see the following output:
View components are a new feature introduced in ASP.NET Core, they are almost similar to Partial Views but is more powerful. When you use Partial Views, you have dependency over the Controller. However, when you use the ViewComponent attribute, you do not have to depend on the Controller, so we will establish separation of concerns and have better testability. Even though the existing Partial View HTML helper is still supported, it is preferable to use the View component whenever you want to show a reusable piece of information when you are using .NET Core.
You can create a ViewComponent using any of the following:
- Create a class by deriving from the
ViewComponentattribute - Decorate a class with the
[ViewComponent]attribute or derive it from the class that has the[ViewComponent]attribute - You can use the convention by creating a class that ends with a suffix
ViewComponentattribute
Whatever option you choose, this ViewComponent should be public, non-nested, and non-abstract classes.
Like Controllers, you can use the Dependency Injection (via a constructor) in the ViewComponent attribute as well. As the ViewComponent attribute is separate from the Controller lifecycle, you may not be able to use the action filters in ViewComponents.
There is a method called Invoke (or InvokeAync, the asynchronous equivalent of Invoke), that will return the IComponentViewResult interface. This method is similar to the action method of the Controller that will return the View.
Let's get our hands dirty by creating a ViewComponent attribute.
Create a new folder called ViewComponents in your project and a new class called SimpleViewComponent, as shown in the following screenshot:

The SimpleViewComponent file that we created will look like the following:
using System;
using System.Collections.Generic;
using System.Linq;
using System.Threading.Tasks;
using Microsoft.AspNet.Mvc;

namespace Chapter4.ViewComponents
{
  public class SimpleViewComponent :ViewComponent
  {
    public IViewComponentResult Invoke()
    {
      var data = GetSampleData();
      return View(data);
    }
    /// <summary>
    /// This is a simple private method to return some dummy data
    /// </summary>
    /// <returns></returns>

    private List<string> GetSampleData()
    {
      List<string> data = new List<string>();
      data.Add("One");
      data.Add("Two");
      data.Add("Three");
      return data;
    }
  }
}
We just have a couple of methods, one to populate the data and the other is the Invoke method where we will render the View.
Once you have created the ViewComponent attribute, you will need to include the ViewComponent namespace in the Views\_ViewImports.cshtml file so that the ViewComponents attributes can be available for all the Views. The highlighted code snippet in the following is added to the View:
@using Chapter4
@using Chapter4.Models
@using Chapter4.ViewComponents

@addTagHelper "*, Microsoft.AspNet.Mvc.TagHelpers"
We have created the ViewComponent and made them available to all of the Views. A simple action method in the HomeController file just returns the View:
public ActionResult Sample()
{
return View();
}
In the associated View, we can just invoke the component as shown in the following code snippet:
<p>
  This is a sample web page <br/>
  <div>
    @Component.Invoke("Simple")
  </div>
</p>
When you invoke the component, it will search in the following two folders:
- The
Views\<controller_name>\Components\<view component name>\<view name>folder - The
Views\Shared\Components\<view_component_name>/<view_name>folder
The default View name of the View component is Default, which makes your file name for the View Default.cshtml. So, we will need to create the Default.cshtml file in Views\Shared\Simple\Default.cshtml folder, as shown in the following screenshot:

In the the View (Default.cshtml file) of the ViewComponent file, we are just iterating the items in the model and displaying them as an unordered list item, as shown in the following code:
@model IEnumerable<string>

<h3> Sample list</h3>
<ul>
  @foreach(var item in Model)
  {
    <li>@item</li>
  }
</ul>
When you run the application and access the URL (http://localhost:50132/Home/Sample), you should see the following output:

The first line, This is a sample web page, comes from the parent View file (sample.cshtml) whereas the subsequent list comes from ViewComponent attribute.
The ViewComponent attributes are usually referred in the Views. However, if you want to call the ViewComponent directly from your Controller, you can do so.
I have called the Sample action method to call the Simple ViewComponent directly instead of calling it through some other View as follows:
public ActionResult Sample()
{
  return ViewComponent("Simple");
  //return View();
}

Thus, these ViewComponents have far more flexibility and features, such as Dependency Injection, when compared to old HTML Partial Views. This ensures ViewComponents are separately tested.
Creating a View component
You can create a ViewComponent using any of the following:
- Create a class by deriving from the
ViewComponentattribute - Decorate a class with the
[ViewComponent]attribute or derive it from the class that has the[ViewComponent]attribute - You can use the convention by creating a class that ends with a suffix
ViewComponentattribute
Whatever option you choose, this ViewComponent should be public, non-nested, and non-abstract classes.
Like Controllers, you can use the Dependency Injection (via a constructor) in the ViewComponent attribute as well. As the ViewComponent attribute is separate from the Controller lifecycle, you may not be able to use the action filters in ViewComponents.
There is a method called Invoke (or InvokeAync, the asynchronous equivalent of Invoke), that will return the IComponentViewResult interface. This method is similar to the action method of the Controller that will return the View.
Let's get our hands dirty by creating a ViewComponent attribute.
Create a new folder called ViewComponents in your project and a new class called SimpleViewComponent, as shown in the following screenshot:
The SimpleViewComponent file that we created will look like the following:
using System;
using System.Collections.Generic;
using System.Linq;
using System.Threading.Tasks;
using Microsoft.AspNet.Mvc;

namespace Chapter4.ViewComponents
{
  public class SimpleViewComponent :ViewComponent
  {
    public IViewComponentResult Invoke()
    {
      var data = GetSampleData();
      return View(data);
    }
    /// <summary>
    /// This is a simple private method to return some dummy data
    /// </summary>
    /// <returns></returns>

    private List<string> GetSampleData()
    {
      List<string> data = new List<string>();
      data.Add("One");
      data.Add("Two");
      data.Add("Three");
      return data;
    }
  }
}
We just have a couple of methods, one to populate the data and the other is the Invoke method where we will render the View.
Once you have created the ViewComponent attribute, you will need to include the ViewComponent namespace in the Views\_ViewImports.cshtml file so that the ViewComponents attributes can be available for all the Views. The highlighted code snippet in the following is added to the View:
@using Chapter4
@using Chapter4.Models
@using Chapter4.ViewComponents

@addTagHelper "*, Microsoft.AspNet.Mvc.TagHelpers"
We have created the ViewComponent and made them available to all of the Views. A simple action method in the HomeController file just returns the View:
public ActionResult Sample()
{
return View();
}
In the associated View, we can just invoke the component as shown in the following code snippet:
<p>
  This is a sample web page <br/>
  <div>
    @Component.Invoke("Simple")
  </div>
</p>
When you invoke the component, it will search in the following two folders:
- The
Views\<controller_name>\Components\<view component name>\<view name>folder - The
Views\Shared\Components\<view_component_name>/<view_name>folder
The default View name of the View component is Default, which makes your file name for the View Default.cshtml. So, we will need to create the Default.cshtml file in Views\Shared\Simple\Default.cshtml folder, as shown in the following screenshot:
In the the View (Default.cshtml file) of the ViewComponent file, we are just iterating the items in the model and displaying them as an unordered list item, as shown in the following code:
@model IEnumerable<string>

<h3> Sample list</h3>
<ul>
  @foreach(var item in Model)
  {
    <li>@item</li>
  }
</ul>
When you run the application and access the URL (http://localhost:50132/Home/Sample), you should see the following output:
The first line, This is a sample web page, comes from the parent View file (sample.cshtml) whereas the subsequent list comes from ViewComponent attribute.
The ViewComponent attributes are usually referred in the Views. However, if you want to call the ViewComponent directly from your Controller, you can do so.
I have called the Sample action method to call the Simple ViewComponent directly instead of calling it through some other View as follows:
public ActionResult Sample()
{
  return ViewComponent("Simple");
  //return View();
}
Thus, these ViewComponents have far more flexibility and features, such as Dependency Injection, when compared to old HTML Partial Views. This ensures ViewComponents are separately tested.
Tag Helpers are a new feature in ASP.NET Core; they help generate the HTML elements. In HTML helpers, we will write a C#/Razor code to generate the HTML. The disadvantage associated with this approach is that many frontend engineers will not know C#/Razor code. They work on plain HTML, CSS, and JavaScript. Tag Helpers look just like HTML code but have all the features of server-side rendering. You can even build your custom Tag Helper for your needs.
Let's take a look at how to use a Tag Helper. In order to use the Tag helper, you will need to install the Microsoft.AspNet.Mvc.TagHelpers NuGet package.
Open the Package Manager Console window by selecting View | Other Windows | Package Manager Console, as shown in the following screenshot:

You can install TagHelpers methods by entering the following command in the Package Manager Console window, the following command:
Install-Package Microsoft.AspNet.Mvc.TagHelpers -Pre
The following response will appear when you've entered the command:

Once the TagHelpers package is installed, we will need to call ViewImports file, where we will add the TagHelpers directive so that Tag Helpers are available to our Views.
Right-click on the Views folder and select the Add New Item option from the Context menu; you'll see the following screen:

Add the following content to the _ViewImports.cs file. The first couple of lines tells ASP.NET MVC to include the necessary namespaces. The last line tells ASP.NET MVC to include all the TagHelpers available in Microsoft.AspNet.Mvc.TagHelpers. The first parameter indicates the name of TagHelper. We have used *, which means that we may want to use all the Tag Helpers. The second parameter indicates the assembly where the TagHelpers will be available:
@using Chapter4
@using Chapter4.Models
@addTagHelper "*, Microsoft.AspNet.Mvc.TagHelpers"
As we are creating the _ViewImports.cshtml file directly under the Views folder, as shown in the following screenshot, the Tag Helpers will be available for all the Views:
Had we included the _ViewImports.cshtml file under the Home folder, the Tag Helpers would be available only for the Views under the Home folder.
Let's add a simple action method called Index3 in the HomeController file, and in the associated View, we will use Tag Helpers as shown in the following code:
public IActionResult Index3()
{
  ViewBag.Title = "This is Index3";
  Person person = new Person();
  return View(person);
}
Add the corresponding View (Index3.cshtml file) for the Index3 action method with the following code:
@model Chapter4.Models.Person
<form asp-controller="Home" asp-action="Index3">
  <table>
    <tr>
      <td><labelasp-for="Name"></label></td>
      <td><input asp-for="Name" /></td>
    </tr>
    <tr>
      <td><labelasp-for="Age"></label></td>
      <td><inputasp-for="Age" /></td>
    </tr>
    <tr>
      <td colspan="2"><input type="submit" value="Submit" /></td>
    </tr>
  </table>
</form>
The following are a few things that you need to note in the preceding code, for the use of Tag Helpers:
- All the form elements look just like standard HTML elements with just a few changes in the attributes. This makes frontend developers work independently, without learning HTML/Razor code and thus more easily achieving the separation which concerns.
- The first line of the preceding view indicates the type of model data passed to the view from the Controller.
- The Form element has a couple of attributes named
asp-controllerandasp-actionwhich represent Controller names and action method names respectively. - The Label and input tag helpers are just like HTML elements, with just an additional
asp-forattribute. The values for these attributes represent the model properties. You can take advantage of IntelliSense when entering the values for these attributes.
ASP.NET Core provides many built-in Tag Helpers to help you create the necessary HTML elements for many scenarios. However, this process is not comprehensive and is exhaustive. Sometimes, you may want to make some changes in the generated HTML element, or you may want to create an HTML element with new properties or a new HTML element altogether. You are not restricted to using only the existing Tag Helpers in the ASP.NET Core application. You can create your own Tag Helper if the existing Tag Helpers do not suit your needs. Let's create a simple Tag Helper to create an e-mail link:
<a href="mailto:[email protected]">
There are a couple of ways to create Tag Helpers to implement the ITagHelper interface or inherit the TagHelper class. The TagHelper class has a Process method that you can override to write your custom Tag Helpers. The TagHelper class also has the TagHelperOutput parameter, which you can use to write and generate the desired output HTML. So, it is preferable to create Tag Helpers by inheriting from the TagHelper class.
Our objective is to write a custom e-mail Tag Helper so that when someone uses that Tag Helper, which is <email mailTo="[email protected]"></email>, it should be converted to the following line of code:
<a href="mailto:[email protected]">Drop us a mail</a>
The following are the steps that need to be performed to create the custom Tag Helper in the ASP.NET Core application.
Create a folder called TagHelper and add a new item named the EmailTagHelper.cs file. By convention, all Tag Helpers class should end with TagHelper, even though we can override this convention.

Once you have created the file, you will need to override the Process method to generate the desired HTML output:
using System;
using System.Collections.Generic;
using System.Linq;
using System.Threading.Tasks;
using Microsoft.AspNet.Razor.TagHelpers;

namespace Chapter4.TagHelpers
{
  public class EmailTagHelper : TagHelper
  {
    public override void Process(TagHelperContext context, TagHelperOutput output)
    {
      string emailTo= context.AllAttributes["mailTo"].Value.ToString();
      output.TagName = "a";
      output.Attributes["href"] = "mailto:" + emailTo;
      output.Content.SetContent("Drop us a mail");
    }
  }
}
The parameters used in the preceding code are explained as follows:
- The
contextparameter will give you all the information that you supply at Tag Helper. For example, in the<emailmailTo="[email protected]"></email>Tag Helper, you can get themailToattribute and its associated value from thecontextparameter. In the first line of the precedingProcessmethod, we will get themailToattribute value and use that value to create an attribute in the generated HTML (anchor tag). - The
outputparameter is of typeTagHelperOutput, which is used to generate the desired HTML output. - The
output.Content.SetContentparameter will set the text that is to be displayed for the anchor tag.
We have created the e-mail Tag Helper. Now, we have to make it available to our Views so that we can make use of that Tag Helper in our Views. Edit Views\_ViewImports.cshtml to include the namespace of the TagHelpers and add the associated TagHelpers. In the following _ViewImports.cshtml file, we have added the content highlighted in bold:
@using Chapter4
@using Chapter4.Models
@using Chapter4.TagHelpers
@addTagHelper "*, Microsoft.AspNet.Mvc.TagHelpers"
@addTagHelper "*, Chapter4"
The "*" symbol in the following line tells the view engine to include all the TagHelpers in the Chapter4 namespace:
@addTagHelper "*, Chapter4"
You can only specific TagHelpers, For example, the following line will include only the EmailTagHelper so it is available for our Views:
@addTagHelper "Chapter4.TagHelpers.EmailTagHelper, Chapter4"
Let's create a simple action method in our Home Controller. In the view of the associated action method, we will use the e-mail Tag Helper:
public IActionResult AboutUs()
{
  return View();
}
The following is the view of the preceding AboutUs action method:
<h3>About Us</h3>
We are one of the biggest electronics retail store serving millions of people across the nation. blah.blah. blah <br/>

If you want to hear great offers from us
<email mailTo="[email protected]"></email>
When you run the application and access the http://localhost:50132/Home/AboutUs URL, you will see the following output:

Here, we created an anchor tag with the mailto attribute and the email value as the href attribute value.
I have opened the Developer Tools window (Press F12 to do this and select the DOM Explorer tab) to see the generated HTML.
Creating custom Tag Helpers
ASP.NET Core provides many built-in Tag Helpers to help you create the necessary HTML elements for many scenarios. However, this process is not comprehensive and is exhaustive. Sometimes, you may want to make some changes in the generated HTML element, or you may want to create an HTML element with new properties or a new HTML element altogether. You are not restricted to using only the existing Tag Helpers in the ASP.NET Core application. You can create your own Tag Helper if the existing Tag Helpers do not suit your needs. Let's create a simple Tag Helper to create an e-mail link:
<a href="mailto:[email protected]">
There are a couple of ways to create Tag Helpers to implement the ITagHelper interface or inherit the TagHelper class. The TagHelper class has a Process method that you can override to write your custom Tag Helpers. The TagHelper class also has the TagHelperOutput parameter, which you can use to write and generate the desired output HTML. So, it is preferable to create Tag Helpers by inheriting from the TagHelper class.
Our objective is to write a custom e-mail Tag Helper so that when someone uses that Tag Helper, which is <email mailTo="[email protected]"></email>, it should be converted to the following line of code:
<a href="mailto:[email protected]">Drop us a mail</a>
The following are the steps that need to be performed to create the custom Tag Helper in the ASP.NET Core application.
Create a folder called TagHelper and add a new item named the EmailTagHelper.cs file. By convention, all Tag Helpers class should end with TagHelper, even though we can override this convention.
Once you have created the file, you will need to override the Process method to generate the desired HTML output:
using System;
using System.Collections.Generic;
using System.Linq;
using System.Threading.Tasks;
using Microsoft.AspNet.Razor.TagHelpers;

namespace Chapter4.TagHelpers
{
  public class EmailTagHelper : TagHelper
  {
    public override void Process(TagHelperContext context, TagHelperOutput output)
    {
      string emailTo= context.AllAttributes["mailTo"].Value.ToString();
      output.TagName = "a";
      output.Attributes["href"] = "mailto:" + emailTo;
      output.Content.SetContent("Drop us a mail");
    }
  }
}
The parameters used in the preceding code are explained as follows:
- The
contextparameter will give you all the information that you supply at Tag Helper. For example, in the<emailmailTo="[email protected]"></email>Tag Helper, you can get themailToattribute and its associated value from thecontextparameter. In the first line of the precedingProcessmethod, we will get themailToattribute value and use that value to create an attribute in the generated HTML (anchor tag). - The
outputparameter is of typeTagHelperOutput, which is used to generate the desired HTML output. - The
output.Content.SetContentparameter will set the text that is to be displayed for the anchor tag.
We have created the e-mail Tag Helper. Now, we have to make it available to our Views so that we can make use of that Tag Helper in our Views. Edit Views\_ViewImports.cshtml to include the namespace of the TagHelpers and add the associated TagHelpers. In the following _ViewImports.cshtml file, we have added the content highlighted in bold:
@using Chapter4
@using Chapter4.Models
@using Chapter4.TagHelpers
@addTagHelper "*, Microsoft.AspNet.Mvc.TagHelpers"
@addTagHelper "*, Chapter4"
The "*" symbol in the following line tells the view engine to include all the TagHelpers in the Chapter4 namespace:
@addTagHelper "*, Chapter4"
You can only specific TagHelpers, For example, the following line will include only the EmailTagHelper so it is available for our Views:
@addTagHelper "Chapter4.TagHelpers.EmailTagHelper, Chapter4"
Let's create a simple action method in our Home Controller. In the view of the associated action method, we will use the e-mail Tag Helper:
public IActionResult AboutUs()
{
  return View();
}
The following is the view of the preceding AboutUs action method:
<h3>About Us</h3>
We are one of the biggest electronics retail store serving millions of people across the nation. blah.blah. blah <br/>

If you want to hear great offers from us
<email mailTo="[email protected]"></email>
When you run the application and access the http://localhost:50132/Home/AboutUs URL, you will see the following output:
Here, we created an anchor tag with the mailto attribute and the email value as the href attribute value.
I have opened the Developer Tools window (Press F12 to do this and select the DOM Explorer tab) to see the generated HTML.
In this chapter, you learned what a View engine is and how to build a View using the Razor view engine. We also discussed different programming constructs that you can make use of in Razor to produce the desired HTML output. Then, you learned about Layout and how to provide a consistent site structure across all of the pages in your ASP.NET MVC application. Later, we discussed how to promote re-usability using Partial Views with an example. Finally, you learned how to use Tag Helpers to produce clean HTML.