
Data is the heart of every application. A user enters data into the application, edits the entered data, and searches the data. We can even say that an application that we build is just an interface for the operations that we perform on the application data. So, it is absolutely necessary for any framework to provide a mechanism to handle data operations easier and more manageable. Models in ASP.NET MVC are used to represent the business domain data.
In this chapter, you'll be learning about the following topics:
- Models and their purpose
- Creating a simple model and using it in the controller and views of the ASP.NET MVC application
- Creating a model specific to a View model
- Data flow in an ASP.NET MVC application in the context of models and
ViewModels - Purpose of the Entity Framework along with its features and benefits
- Adding, updating, and deleting data using the Entity Framework
- Using the Entity Framework in ASP.NET MVC applications
Models are simple POCO (Plain Old C# Objects) classes representing your business domain data. For an e-commerce business, model classes would be Product, Order, and Inventory. If you are building an application for a university, model classes would be Student, Teacher, and Subject. Models represent the business domain data in your application and they are not aware of the underlying database that is being used in your application. In fact, you don't even need a database to work with models.
They can represent the data stored in an XML file or CSV file or any other data in your application. Having said that, these models could be used to interact with your database (in most cases) but they don't have any dependency to the database.
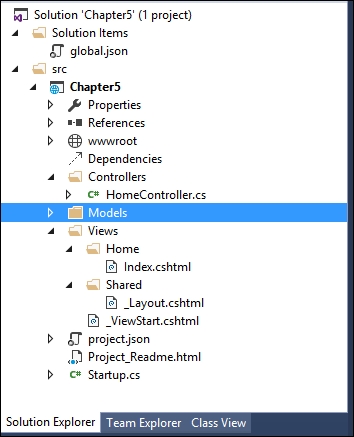
The following steps describe how to create an ASP.NET Core application that uses Models:
- Make sure to create an ASP.NET 5 application with an empty template. Install the ASP.NET Core
NuGetpackage and configure this, as discussed in an earlier chapter. - Create a
Controllersfolder and create aHomeControllerwith a singleIndexaction method. - Create the following folder/files for the
Viewsmodel:Views: This folder is inside your project.Views\_ViewStart.cshtml: This identifies the name of theLayoutfile.Views\Sharedfolder: This folder holds all the shared View components for your application.Shared\_Layout.cshtml: This file identifies what your web application structure should look like.Views\Homefolder: This folder contains all of the Views of yourHomeController.Views\Home\Index.cshtml: This is the view corresponding to theIndexaction method ofHomeController.
Now, we have created an ASP.NET Core application with Controllers and Views.
Let us create a Models folder in our application; this folder will contain all of your model files. In a real world application, this folder and the respective model files would reside in separate projects. For the sake of simplicity, we are keeping the Models folder and its files in the same project.
Let us create a simple model class Product model, in the Models folder:
public class Product {
  public int ProductId { get; set; }
  public string Name { get; set; }
  public decimal Price { get; set; }
}
This Product model class is no different from any other C# class and contains a few properties about the product.
Update the Index action method in HomeController to use the Product model, as shown in the following code snippet. We are building the model data and passing the model data to the View so that it can be shown to the users. However, it is NOT recommended to build the Model data in the controller's action methods as it violates the separation of concerns. For the sake of simplicity only, we are building the Model data in an action method.
public IActionResult Index() {
  /* Build the products model. It is NOT RECOMMENDED to build    models in Controller action methods  like this. In real world appication, these models and the    respective Data Access Layer(DAL) would  be in separate projects. We are creating it here to make things    simpler to explain */
  List<Product> Products = new List<Product> {
    new Product {
      Name = "Mobile Phone",
      Price = 300
    },
    new Product {
      Name = "Laptop",
      Price = 1000
    },
    new Product {
      Name = "Tablet",
      Price = 600
    }
  };
  return View(Products);
}
Update the corresponding Index View method to use the Model data loop through each product and show it as an unordered list item. The @model in the first line represents the Model metadata; the type of data being passed to the View. The Model in the for…each loop represents the actual data itself, a list of products in our case:
@model List<Chapter5.Models.Product>

<ul>
  @foreach (var Product in Model) {
    <li>@Product.Name</li>
  }
</ul>
When you run the application, you'll get the following output:

We have successfully created a Model and have used it in our Controller and View.
Let us create a comparatively complex Model class, Order (Order.cs in the Models folder), which contains a list of products and their total amount:
public class Order {
  public int OrderId { get; set; }
  public List<Product> Products { get; set; }
  public decimal Total { get; set; }
}

Now, we have to update the Index action method to use the Order model. Once we build the list of products, we are assigning the products list to the Order property and calculating the total cost of the order. These calculations would usually be done as part of the business layer. Again, for the sake of simplicity, we are building the data Model and calculations here in the action; this should never be the case in a real world application.
The code highlighted in bold is the changes that we have made in the action method:
public IActionResult Index() {
  /* Build the products model. It is NOT RECOMMENDED to build    models in Controller action methods  like this. In real world appication, these models and the    respective Data Access Layer(DAL) would  be in separate projects. We are creating it here to make things    simpler to explain   */
  List<Product> Products = new List<Product> {
    new Product {
      Name = "Mobile Phone",
      Price = 300
    },
    new Product {
      Name = "Laptop",
      Price = 1000
    },
    new Product {
      Name = "Tablet",
      Price = 600
    }
  };

  Order order = new Order();
  order.Products = Products;
  order.Total = Products.Sum(product => product.Price);

  return View(order);
}
The View is updated to accommodate the Model changes. Model metadata (@model) is changed to indicate that the Order information is passed to the View instead of the list of products.
Then, we are showing the list of products in table format. Please note that all of the Model data (Order object and its properties, in this case) can be accessed through the Model. For example, the Products class can be accessed through Model.Products and the value of the Total can be obtained through Model.Total:
@model Chapter5.Models.Order

<table border="1">

  <tr>
    <th>Product Name</th>
    <th>Price</th>
  </tr>

  @foreach (var Product in Model.Products){
    <tr>
      <td>@Product.Name</td>
      <td>@Product.Price</td>
    </tr>
  }
  <tr>
    <td><b>Total</b></td>
    <td><b>@Model.Total</b></td>
  </tr>
</table>
When you run the application, you'll see the following output:

There are scenarios where you might want to update only a few properties in a large Model or you might want to create a new Model based on a few models. In such scenarios, it is better to create a new Model specific to the View.
For example, let us assume that we are building a screen where you update the price of the product. This simple screen may contain only three properties—product ID, product name, and price of the product. But the product's Model may contain more than 30 properties to hold all details of the product such as manufacturer, color, size, and other properties. Instead of sending the complete Model with all the properties, we can create a new Model specific to this view with only a few properties—ID, Name, and Price.
The ViewModels are entities where when you update the Model, your View would get updated automatically and vice versa. In many online articles and even in some books, they are referring to ViewModels when they are actually trying to mean Models specific to the View.
In ViewModels, binding is two ways—when you update either the Model or the View, the other one would get updated automatically. Let us consider a simple example; you have a form with various fields on the left-hand side and print preview on the right side. In this case, whatever you type in real time in the form will be reflected immediately on the right side. In such cases, you can use pure View models when you type, your ViewModel would be updated and that ViewModel would be consumed in the right-hand side print preview. These pure ViewModels are being used in advanced JavaScript frameworks such as Knockout or AngularJS.
In Models specific to the View, we are binding in only one way from the Model to the View. Here, we are sending a Model specific to the View instead of the generic Model (which represents a business domain class).
However, in this book, we will be referring to Models specific to View as ViewModel for brevity. Unless otherwise specified, you should read all ViewModels as Models specific to View. So, I am making the same mistake made by other authors  .
.
The following block diagram shows the data flow in an ASP.NET MVC application:

Data Source represents your application data. The application data could reside anywhere—from full-fledged RDBMS such as SQL servers to simple Excel spreadsheets, or anything in between.
Models represent the business domain data for your application and are independent of the data source being used. The same model could be used with different data sources.
We can use the Model as-is in our views to get data or to present it. But in some views, you might not need all the properties of the model. So, instead of sending the entire Model to the View, we create models specific to the View and use them in our View. This makes things simpler.
The following is the high-level sequence of events that happens when you store or retrieve a record in ASP.NET Core using the Model:
- Users enter the data in a form (created using Views) in the application. The fields in the form do not need to represent the complete model as we need only a few properties in the Model.
- The entered data is passed to the controller where Model binding happens. Model binding is the process where the data entered in the View gets mapped to the Model or ViewModel.
- If the data is received in the ViewModel, then we would be converting the ViewModel to the Model.
- Finally, the Model data is stored in the data source.
Till now, we have been handling only in-memory data in our application. In almost all real world applications, some form of the database will be used for data storage, access, and retrieval. In the next section, we will discuss the Entity Framework (ORM framework), which makes data access simpler from a .NET application.
Model binding is the process of mapping the Model data coming from the View to the ViewModel parameter of the action method in the Controller.
Let us consider a simple form with a couple of form fields—Name and EmailID. On the submission of the form, these values would be mapped to the ViewModel object of the action method of the Controller. Model binding takes care of this mapping. The Model binder looks for a match in the form fields, query strings, and request parameters.
In the preceding example, any class with these properties would be picked up by ModelBinder without any issues.
As the following Person class contains the Name and EmailID properties, the model binder would not complain about using this model for mapping the entered values in the form:
public class Person {
  public string Name { get; set; }
  public string EmailID { get; set; }
}
The following code snippet shows how to use the Person class in the action method:
public ActionResult Add(Person p) {
  return View();
}
The Entity Framework is the Object Relational Mapping (ORM) framework that enables developers to work on domain-specific objects directly for data access instead of working on database queries. This reduces a lot of the code complexity in the data access layer in the application.
Before discussing the Entity Framework and its features, let us pause for a moment and think about the steps that we follow when we try to save some information to the database when using ADO.NET:
- Construct the business domain object.
- Create a connection to your database.
- Open the connection.
- Create a command object along with the command type.
- Add the properties of your business domain object to the parameters of the command object.
- Execute the command that saves the data into the database.
We have to follow the previously mentioned six steps for common operations such as saving a piece of data into the database.
If you are using an ORM framework such as the Entity Framework, you just need three steps:
- Construct the business domain object.
- Create the
DbContextclass for your business domain object. The instance of theDbContextclass represents the session with the database. - Save it to the database using the instance of the
DBContextclass.
You might wonder how that is possible.
As a matter of fact, in the background, the Entity Framework creates a connection to the database and executes the query to save the business domain object to the database. To make it simple, the Entity Framework writes all the data access code for you so that you can concentrate on achieving the business functionality of the application rather than writing the database layer code.
As discussed earlier, the Entity Framework is an ORM framework for accessing data and is independent of ASP.NET MVC. The Entity Framework could be used in Windows Communication Foundation (WCF) services, Web API services, and even in console applications. You could use the Entity Framework in any type of application and make use of it to access data using objects. The concepts and the functionalities of the Entity Framework remain the same, irrespective of the type of application that you use it with.
Now, we are going to use the Entity Framework with the console application. This allows us to concentrate on the task at hand and demonstrate the functionalities of the Entity Framework instead of working on the boilerplate code of the ASP.NET Core application. In a later part of this chapter, we will integrate the Entity Framework with the ASP.NET Core application.
The latest version of the Entity Framework for the SQL server is 7.0.0 and it is still in beta at the time of writing this book. EF7 (Entity Framework 7) brings significant changes when compared to its previous version (Entity Framework 6). However, EF7 is the recommended version when building ASP.NET 5 applications and hence we will be using this version in this book.
Follow these steps to create a simple console application:
- Select File | New Project and select Console Application.
- Name the project and click on OK.

There are two ways to install any NuGet package in your application:
- Using the
NuGetPackage Manager - Using Package Manager Console
People who prefer graphical interfaces can use this option:
- Right-click on the console project and select Manage NuGet Packages from the context menu:

- Search for
EntityFramework.MicrosoftSqlServerin theNuGetpackage and make sure the Include prerelease checkbox is checked. Click on Install once you select EntityFramework.MicrosoftSqlServer and select Latest pre-release 7.0.0-rc1-final (at the time of writing this book). You can select any latest version of Entity Framework 7:
- Once you click on Install, the
NuGetpackage manager will ask you to review the changes. Click on OK:
- Click on I Accept in the License Acceptance window:

- Once you click on I Accept, it will install the Entity Framework with all its dependencies. In the Output window, you will get the Finished message once the installation is complete:

To install the NuGet package using the Package Manager Console, follow these steps:
- Open the Package Manager Console window by selecting the menu option View | Other Windows | Package Manager Console.

- Type
Install-Package EntityFramework.MicrosoftSqlServer - Prein the Package Manager Console window as shown in the following screenshot:
- Once the installation is complete, a message, Successfully installed 'EntityFramework.MicrosoftSqlServer 7.0.0-rc1-final', will be shown:

We need to install the Entity Framework commands package in order to perform migration activities. Migration includes the creation of a database and its associated tables. Any changes in the schema will also be taken care of by migration:
As discussed earlier, we need to follow three steps in order to interact with the database when we are using the Entity Framework:
- Create the
Modelclasses. - Create the
DbContextclass for your business domain object. The instance of theDbContextclass represents the session with the database. - Construct the business domain object and save it to the database using the instance of the
DBContextclass.
Let us discuss each of the preceding steps in details and try to save an object to the database.
The Model classes are simple POCO objects, which can be used with the Entity Framework.
Let us create a POCO class for our business domain object, the Employee class in our case. I have created a new file named Employee.cs in our console application with the following content. This Employee class contains a few properties of an employee and has no special properties or fields to make it work with the Entity Framework.
Let's take a look at the following code snippet:
public class Employee {
  public int EmployeeId { get; set; }
  public string Name { get; set; }
  public decimal Salary { get; set; }
  public string Designation { get; set; }
}
By convention, if the property name is Id or ClassName+Id, it will be considered as a primary key by Entity Framework while creating the database table.
Properties with string data types will be created as fields of the type nvarchar(max). However, we can override this behavior by using annotations, which we will be discussed later.
The instance of the DbContext class represents the session to the database and this DbContext class does most of the heavy lifting of your data access for your application.
Create a new class by the named EmployeeDbContext with the following content:
using Microsoft.Data.Entity;
using System.Configuration;

namespace ConsoleEF7 {
  public class EmployeeDbContext : DbContext{
    public DbSet<Employee> Employees {get; set;}

    protected override void OnConfiguring(DbContextOptionsBuilder      optionsBuilder) {string connectionString =        ConfigurationManager.ConnectionStrings       ["SqlServerExpress"].ConnectionString;
      optionsBuilder.UseSqlServer(connectionString);
      base.OnConfiguring(optionsBuilder);
    }
  }
}
Configure it using App.Config:
<?xml version="1.0" encoding="utf-8" ?>
<configuration>
  <startup>
    <supportedRuntime version="v4.0"
    sku=".NETFramework,Version=v4.6.1" />
  </startup>
  <connectionStrings>
    <add name="SqlServerExpress" connectionString="Data Source=     MUGIL-PC\SQLEXPRESS;Initial Catalog=EF7Console;Integrated      Security=True"/>
  </connectionStrings>
</configuration>
There are a few things to be noted in the preceding code snippet:
- Include the
Microsoft.Data.Entitynamespace as theDbContextclass available in this namespace. Our connection string is available in theApp.Configfile. In order to read the contents of theApp.Configfile, we are including theConfigurationManagerclass inSystem.Configuration. - In order to use the
DbContextAPI, a class has to be created which inherits from theDbContextclass so that we can access methods of theDbContextAPI. We have created theEmployeeDbContextclass which was inherited fromDbContextclass. DbSetis a class which allows operations of the Entity Framework to be performed for a given Entity type. We need to create theDbSetobject for each of the Entity types that we use in our application. In this example, we are using only oneDbSetobject as we are working with theEmployeeclass.
Migration is the process of recording all the changes of your database. Add-Migration is the Entity Framework command for adding migration:
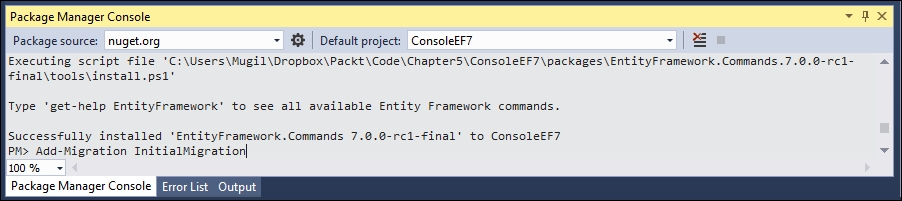
- Once you add the migration, you can revoke the changes by executing the
Remove-MigrationEntity Framework command.
- This is what the migrations directory looks like:

- This is what the migrations directory looks like:
- Update the database by issuing the Entity Framework command
Update-Database, which updates the database tables as per the information available in the migration. As we have installed theEntityFramework.Commandspackage earlier, these commands will be available for the application:
- Once you update the database, you can see the changes in the database by connecting to SQL Server Management Studio:

- Perform the database operation to save the business domain object in the database. You can create the database manually or, if the database is not available, it will create one for you.
The Main method is updated with the following code:
class Program {
  static void Main(string[] args) {
    AddEmployee();
  }

  static void AddEmployee() {
    using (var db = new EmployeeDbContext()) {
      Employee employee= new Employee {
        Designation = "Software Engineer",
        Name = "Scott",
        Salary = 5600
      };

      db.Employees.Add(employee);
      int recordsInserted = db.SaveChanges();
      Console.WriteLine("Number of records inserted:" +        recordsInserted);
      Console.ReadLine();
    }
  }
}
Firstly, we are constructing the business domain object. Then, we are adding the constructed Employee object to the employee's DbSet of the DbContext class. Finally, we are calling the SaveChanges method DbContext API, which will save all the pending changes to the database.
You might be wondering how it can save it to the database when we have not even given the connection string.
Let us discuss what happens behind the scenes when we run the program:
- When you make changes to any of the
DbSetcollection, the Entity Framework checks whether the database exists. If it does not exist, it creates a new one using the pattern<Namespace of DbContextName>. In our case, a database called byEF6.EmployeeDbContextwould be created. - Then, it creates database tables for the entities declared in
DbSet. By convention, the Entity Framework uses the pluralized form of Entity for the table names. As we have declaredDbSetfor theEmployeeentity, the Entity Framework creates a pluralized form ofEmployeeand creates the table namedEmployees.
The creation of the database and tables happens when the following code is executed:
db.Employees.Add(employee);
When SaveChanges method is executed, the data in the Employee object will get saved to the database and returns the number of records affected. In the preceding case, it returns 1.
When you run the application again, the first two steps mentioned previously will be skipped as the database and table will have already been created.
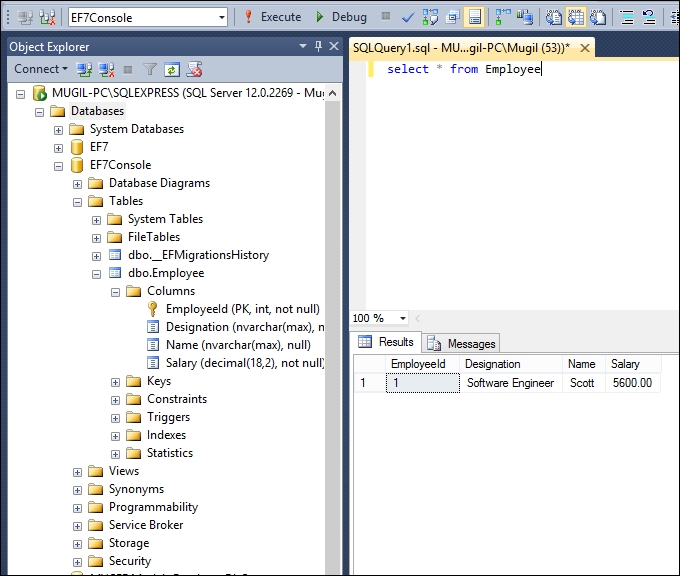
When you query the database, you can see the newly inserted record:
When we are making changes, the Entity Framework tracks the state of each of the objects and executes the appropriate query when SaveChanges method is called.
For example, when we add an Employee object to the employees' collection (DbSet), this object is being tracked as Entity in the Added state. When SaveChanges is called, the Entity Framework creates an insert query for the same and executes it. The same is the case with updating and deleting the object. The Entity Framework sets the Entity state of the respective objects to Modified and Deleted. When SaveChanges is called, it creates and executes the Update and Delete queries.
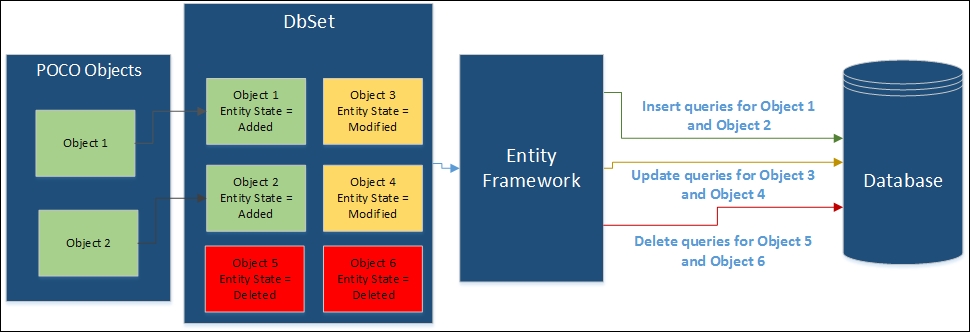
The preceding figure explains how the SaveChanges method works at a high-level for different types of change. We have a couple of POCO objects (Object 1 and Object 2), which have been added to the employees' DbSet object. Let us assume Object 3 and Object 4 have been modified and objects Object 5 and Object 6 are in Deleted state. When you call SaveChanges method, it creates three sets of queries. The first set of queries is for the addition of objects, resulting in insert queries getting executed against the database. In the second set of queries, Update queries are created and executed for the objects whose state is modified. Finally, Delete queries are executed for the objects for all the Deleted state objects.
Let us try to update the salary of an inserted employee record using the Entity Framework:
static void UpdateSalary() {
  using (var db = new EmployeeDbContext()){
    Employee employee = db.Employees.Where(emp => emp.EmployeeId      == 1).FirstOrDefault();
    if(employee!=null){
      employee.Salary = 6500;
      int recordsUpdated = db.SaveChanges();
      Console.WriteLine("Records updated:" + recordsUpdated);
      Console.ReadLine();
    }
  }
}
In the preceding method, we find the employee with EmployeeId = 1. Then, we update the salary of the employee to 6500 and save the employee object to the database. Please note that, in the preceding method, we interact with the database a couple of times—once to find the correct employee record (read operation) and again to update the record (update operation).
static void Main(string[] args){
  UpdateSalary();
}
The Main method is updated to call the UpdateSalary method. When you query the database, you should see the record with the updated information:

Deleting the record is a bit tricky as it involves setting the state directly. In the following method, firstly we get the object and setting the state of the object to Deleted. Then calling the SaveChanges method will generate the delete query for the object and execute it, which in turn will eventually delete the record in the database:
static void DeleteEmployee() {
  using (var db = new EmployeeDbContext()) {
    Employee employeeToBeDeleted = db.Employees.Where(emp =>      emp.EmployeeId == 1).FirstOrDefault();
    if (employeeToBeDeleted != null) {
      db.Entry(employeeToBeDeleted).State =        Microsoft.Data.Entity.EntityState.Deleted;
      int recordsDeleted = db.SaveChanges();
      Console.WriteLine("Number of records deleted:" +        recordsDeleted);
      Console.ReadLine();
    }
  }
}

static void Main(string[] args) {
  DeleteEmployee();
}
The Entity Framework is independent of ASP.NET MVC
As discussed earlier, the Entity Framework is an ORM framework for accessing data and is independent of ASP.NET MVC. The Entity Framework could be used in Windows Communication Foundation (WCF) services, Web API services, and even in console applications. You could use the Entity Framework in any type of application and make use of it to access data using objects. The concepts and the functionalities of the Entity Framework remain the same, irrespective of the type of application that you use it with.
Now, we are going to use the Entity Framework with the console application. This allows us to concentrate on the task at hand and demonstrate the functionalities of the Entity Framework instead of working on the boilerplate code of the ASP.NET Core application. In a later part of this chapter, we will integrate the Entity Framework with the ASP.NET Core application.
The latest version of the Entity Framework for the SQL server is 7.0.0 and it is still in beta at the time of writing this book. EF7 (Entity Framework 7) brings significant changes when compared to its previous version (Entity Framework 6). However, EF7 is the recommended version when building ASP.NET 5 applications and hence we will be using this version in this book.
Follow these steps to create a simple console application:
- Select File | New Project and select Console Application.
- Name the project and click on OK.
There are two ways to install any NuGet package in your application:
- Using the
NuGetPackage Manager - Using Package Manager Console
People who prefer graphical interfaces can use this option:
- Right-click on the console project and select Manage NuGet Packages from the context menu:
- Search for
EntityFramework.MicrosoftSqlServerin theNuGetpackage and make sure the Include prerelease checkbox is checked. Click on Install once you select EntityFramework.MicrosoftSqlServer and select Latest pre-release 7.0.0-rc1-final (at the time of writing this book). You can select any latest version of Entity Framework 7: - Once you click on Install, the
NuGetpackage manager will ask you to review the changes. Click on OK: - Click on I Accept in the License Acceptance window:
- Once you click on I Accept, it will install the Entity Framework with all its dependencies. In the Output window, you will get the Finished message once the installation is complete:
To install the NuGet package using the Package Manager Console, follow these steps:
- Open the Package Manager Console window by selecting the menu option View | Other Windows | Package Manager Console.
- Type
Install-Package EntityFramework.MicrosoftSqlServer - Prein the Package Manager Console window as shown in the following screenshot: - Once the installation is complete, a message, Successfully installed 'EntityFramework.MicrosoftSqlServer 7.0.0-rc1-final', will be shown:
We need to install the Entity Framework commands package in order to perform migration activities. Migration includes the creation of a database and its associated tables. Any changes in the schema will also be taken care of by migration:
As discussed earlier, we need to follow three steps in order to interact with the database when we are using the Entity Framework:
- Create the
Modelclasses. - Create the
DbContextclass for your business domain object. The instance of theDbContextclass represents the session with the database. - Construct the business domain object and save it to the database using the instance of the
DBContextclass.
Let us discuss each of the preceding steps in details and try to save an object to the database.
The Model classes are simple POCO objects, which can be used with the Entity Framework.
Let us create a POCO class for our business domain object, the Employee class in our case. I have created a new file named Employee.cs in our console application with the following content. This Employee class contains a few properties of an employee and has no special properties or fields to make it work with the Entity Framework.
Let's take a look at the following code snippet:
public class Employee {
  public int EmployeeId { get; set; }
  public string Name { get; set; }
  public decimal Salary { get; set; }
  public string Designation { get; set; }
}
By convention, if the property name is Id or ClassName+Id, it will be considered as a primary key by Entity Framework while creating the database table.
Properties with string data types will be created as fields of the type nvarchar(max). However, we can override this behavior by using annotations, which we will be discussed later.
The instance of the DbContext class represents the session to the database and this DbContext class does most of the heavy lifting of your data access for your application.
Create a new class by the named EmployeeDbContext with the following content:
using Microsoft.Data.Entity;
using System.Configuration;

namespace ConsoleEF7 {
  public class EmployeeDbContext : DbContext{
    public DbSet<Employee> Employees {get; set;}

    protected override void OnConfiguring(DbContextOptionsBuilder      optionsBuilder) {string connectionString =        ConfigurationManager.ConnectionStrings       ["SqlServerExpress"].ConnectionString;
      optionsBuilder.UseSqlServer(connectionString);
      base.OnConfiguring(optionsBuilder);
    }
  }
}
Configure it using App.Config:
<?xml version="1.0" encoding="utf-8" ?>
<configuration>
  <startup>
    <supportedRuntime version="v4.0"
    sku=".NETFramework,Version=v4.6.1" />
  </startup>
  <connectionStrings>
    <add name="SqlServerExpress" connectionString="Data Source=     MUGIL-PC\SQLEXPRESS;Initial Catalog=EF7Console;Integrated      Security=True"/>
  </connectionStrings>
</configuration>
There are a few things to be noted in the preceding code snippet:
- Include the
Microsoft.Data.Entitynamespace as theDbContextclass available in this namespace. Our connection string is available in theApp.Configfile. In order to read the contents of theApp.Configfile, we are including theConfigurationManagerclass inSystem.Configuration. - In order to use the
DbContextAPI, a class has to be created which inherits from theDbContextclass so that we can access methods of theDbContextAPI. We have created theEmployeeDbContextclass which was inherited fromDbContextclass. DbSetis a class which allows operations of the Entity Framework to be performed for a given Entity type. We need to create theDbSetobject for each of the Entity types that we use in our application. In this example, we are using only oneDbSetobject as we are working with theEmployeeclass.
Migration is the process of recording all the changes of your database. Add-Migration is the Entity Framework command for adding migration:
- Once you add the migration, you can revoke the changes by executing the
Remove-MigrationEntity Framework command.- This is what the migrations directory looks like:
- This is what the migrations directory looks like:
- Update the database by issuing the Entity Framework command
Update-Database, which updates the database tables as per the information available in the migration. As we have installed theEntityFramework.Commandspackage earlier, these commands will be available for the application: - Once you update the database, you can see the changes in the database by connecting to SQL Server Management Studio:
- Perform the database operation to save the business domain object in the database. You can create the database manually or, if the database is not available, it will create one for you.
The Main method is updated with the following code:
class Program {
  static void Main(string[] args) {
    AddEmployee();
  }

  static void AddEmployee() {
    using (var db = new EmployeeDbContext()) {
      Employee employee= new Employee {
        Designation = "Software Engineer",
        Name = "Scott",
        Salary = 5600
      };

      db.Employees.Add(employee);
      int recordsInserted = db.SaveChanges();
      Console.WriteLine("Number of records inserted:" +        recordsInserted);
      Console.ReadLine();
    }
  }
}
Firstly, we are constructing the business domain object. Then, we are adding the constructed Employee object to the employee's DbSet of the DbContext class. Finally, we are calling the SaveChanges method DbContext API, which will save all the pending changes to the database.
You might be wondering how it can save it to the database when we have not even given the connection string.
Let us discuss what happens behind the scenes when we run the program:
- When you make changes to any of the
DbSetcollection, the Entity Framework checks whether the database exists. If it does not exist, it creates a new one using the pattern<Namespace of DbContextName>. In our case, a database called byEF6.EmployeeDbContextwould be created. - Then, it creates database tables for the entities declared in
DbSet. By convention, the Entity Framework uses the pluralized form of Entity for the table names. As we have declaredDbSetfor theEmployeeentity, the Entity Framework creates a pluralized form ofEmployeeand creates the table namedEmployees.
The creation of the database and tables happens when the following code is executed:
db.Employees.Add(employee);
When SaveChanges method is executed, the data in the Employee object will get saved to the database and returns the number of records affected. In the preceding case, it returns 1.
When you run the application again, the first two steps mentioned previously will be skipped as the database and table will have already been created.
When you query the database, you can see the newly inserted record:
When we are making changes, the Entity Framework tracks the state of each of the objects and executes the appropriate query when SaveChanges method is called.
For example, when we add an Employee object to the employees' collection (DbSet), this object is being tracked as Entity in the Added state. When SaveChanges is called, the Entity Framework creates an insert query for the same and executes it. The same is the case with updating and deleting the object. The Entity Framework sets the Entity state of the respective objects to Modified and Deleted. When SaveChanges is called, it creates and executes the Update and Delete queries.
The preceding figure explains how the SaveChanges method works at a high-level for different types of change. We have a couple of POCO objects (Object 1 and Object 2), which have been added to the employees' DbSet object. Let us assume Object 3 and Object 4 have been modified and objects Object 5 and Object 6 are in Deleted state. When you call SaveChanges method, it creates three sets of queries. The first set of queries is for the addition of objects, resulting in insert queries getting executed against the database. In the second set of queries, Update queries are created and executed for the objects whose state is modified. Finally, Delete queries are executed for the objects for all the Deleted state objects.
Let us try to update the salary of an inserted employee record using the Entity Framework:
static void UpdateSalary() {
  using (var db = new EmployeeDbContext()){
    Employee employee = db.Employees.Where(emp => emp.EmployeeId      == 1).FirstOrDefault();
    if(employee!=null){
      employee.Salary = 6500;
      int recordsUpdated = db.SaveChanges();
      Console.WriteLine("Records updated:" + recordsUpdated);
      Console.ReadLine();
    }
  }
}
In the preceding method, we find the employee with EmployeeId = 1. Then, we update the salary of the employee to 6500 and save the employee object to the database. Please note that, in the preceding method, we interact with the database a couple of times—once to find the correct employee record (read operation) and again to update the record (update operation).
static void Main(string[] args){
  UpdateSalary();
}
The Main method is updated to call the UpdateSalary method. When you query the database, you should see the record with the updated information:
Deleting the record is a bit tricky as it involves setting the state directly. In the following method, firstly we get the object and setting the state of the object to Deleted. Then calling the SaveChanges method will generate the delete query for the object and execute it, which in turn will eventually delete the record in the database:
static void DeleteEmployee() {
  using (var db = new EmployeeDbContext()) {
    Employee employeeToBeDeleted = db.Employees.Where(emp =>      emp.EmployeeId == 1).FirstOrDefault();
    if (employeeToBeDeleted != null) {
      db.Entry(employeeToBeDeleted).State =        Microsoft.Data.Entity.EntityState.Deleted;
      int recordsDeleted = db.SaveChanges();
      Console.WriteLine("Number of records deleted:" +        recordsDeleted);
      Console.ReadLine();
    }
  }
}

static void Main(string[] args) {
  DeleteEmployee();
}
Creating console applications with the Entity Framework
Follow these steps to create a simple console application:
- Select File | New Project and select Console Application.
- Name the project and click on OK.
There are two ways to install any NuGet package in your application:
- Using the
NuGetPackage Manager - Using Package Manager Console
People who prefer graphical interfaces can use this option:
- Right-click on the console project and select Manage NuGet Packages from the context menu:
- Search for
EntityFramework.MicrosoftSqlServerin theNuGetpackage and make sure the Include prerelease checkbox is checked. Click on Install once you select EntityFramework.MicrosoftSqlServer and select Latest pre-release 7.0.0-rc1-final (at the time of writing this book). You can select any latest version of Entity Framework 7: - Once you click on Install, the
NuGetpackage manager will ask you to review the changes. Click on OK: - Click on I Accept in the License Acceptance window:
- Once you click on I Accept, it will install the Entity Framework with all its dependencies. In the Output window, you will get the Finished message once the installation is complete:
To install the NuGet package using the Package Manager Console, follow these steps:
- Open the Package Manager Console window by selecting the menu option View | Other Windows | Package Manager Console.
- Type
Install-Package EntityFramework.MicrosoftSqlServer - Prein the Package Manager Console window as shown in the following screenshot: - Once the installation is complete, a message, Successfully installed 'EntityFramework.MicrosoftSqlServer 7.0.0-rc1-final', will be shown:
We need to install the Entity Framework commands package in order to perform migration activities. Migration includes the creation of a database and its associated tables. Any changes in the schema will also be taken care of by migration:
As discussed earlier, we need to follow three steps in order to interact with the database when we are using the Entity Framework:
- Create the
Modelclasses. - Create the
DbContextclass for your business domain object. The instance of theDbContextclass represents the session with the database. - Construct the business domain object and save it to the database using the instance of the
DBContextclass.
Let us discuss each of the preceding steps in details and try to save an object to the database.
The Model classes are simple POCO objects, which can be used with the Entity Framework.
Let us create a POCO class for our business domain object, the Employee class in our case. I have created a new file named Employee.cs in our console application with the following content. This Employee class contains a few properties of an employee and has no special properties or fields to make it work with the Entity Framework.
Let's take a look at the following code snippet:
public class Employee {
  public int EmployeeId { get; set; }
  public string Name { get; set; }
  public decimal Salary { get; set; }
  public string Designation { get; set; }
}
By convention, if the property name is Id or ClassName+Id, it will be considered as a primary key by Entity Framework while creating the database table.
Properties with string data types will be created as fields of the type nvarchar(max). However, we can override this behavior by using annotations, which we will be discussed later.
The instance of the DbContext class represents the session to the database and this DbContext class does most of the heavy lifting of your data access for your application.
Create a new class by the named EmployeeDbContext with the following content:
using Microsoft.Data.Entity;
using System.Configuration;

namespace ConsoleEF7 {
  public class EmployeeDbContext : DbContext{
    public DbSet<Employee> Employees {get; set;}

    protected override void OnConfiguring(DbContextOptionsBuilder      optionsBuilder) {string connectionString =        ConfigurationManager.ConnectionStrings       ["SqlServerExpress"].ConnectionString;
      optionsBuilder.UseSqlServer(connectionString);
      base.OnConfiguring(optionsBuilder);
    }
  }
}
Configure it using App.Config:
<?xml version="1.0" encoding="utf-8" ?>
<configuration>
  <startup>
    <supportedRuntime version="v4.0"
    sku=".NETFramework,Version=v4.6.1" />
  </startup>
  <connectionStrings>
    <add name="SqlServerExpress" connectionString="Data Source=     MUGIL-PC\SQLEXPRESS;Initial Catalog=EF7Console;Integrated      Security=True"/>
  </connectionStrings>
</configuration>
There are a few things to be noted in the preceding code snippet:
- Include the
Microsoft.Data.Entitynamespace as theDbContextclass available in this namespace. Our connection string is available in theApp.Configfile. In order to read the contents of theApp.Configfile, we are including theConfigurationManagerclass inSystem.Configuration. - In order to use the
DbContextAPI, a class has to be created which inherits from theDbContextclass so that we can access methods of theDbContextAPI. We have created theEmployeeDbContextclass which was inherited fromDbContextclass. DbSetis a class which allows operations of the Entity Framework to be performed for a given Entity type. We need to create theDbSetobject for each of the Entity types that we use in our application. In this example, we are using only oneDbSetobject as we are working with theEmployeeclass.
Migration is the process of recording all the changes of your database. Add-Migration is the Entity Framework command for adding migration:
- Once you add the migration, you can revoke the changes by executing the
Remove-MigrationEntity Framework command.- This is what the migrations directory looks like:
- This is what the migrations directory looks like:
- Update the database by issuing the Entity Framework command
Update-Database, which updates the database tables as per the information available in the migration. As we have installed theEntityFramework.Commandspackage earlier, these commands will be available for the application: - Once you update the database, you can see the changes in the database by connecting to SQL Server Management Studio:
- Perform the database operation to save the business domain object in the database. You can create the database manually or, if the database is not available, it will create one for you.
The Main method is updated with the following code:
class Program {
  static void Main(string[] args) {
    AddEmployee();
  }

  static void AddEmployee() {
    using (var db = new EmployeeDbContext()) {
      Employee employee= new Employee {
        Designation = "Software Engineer",
        Name = "Scott",
        Salary = 5600
      };

      db.Employees.Add(employee);
      int recordsInserted = db.SaveChanges();
      Console.WriteLine("Number of records inserted:" +        recordsInserted);
      Console.ReadLine();
    }
  }
}
Firstly, we are constructing the business domain object. Then, we are adding the constructed Employee object to the employee's DbSet of the DbContext class. Finally, we are calling the SaveChanges method DbContext API, which will save all the pending changes to the database.
You might be wondering how it can save it to the database when we have not even given the connection string.
Let us discuss what happens behind the scenes when we run the program:
- When you make changes to any of the
DbSetcollection, the Entity Framework checks whether the database exists. If it does not exist, it creates a new one using the pattern<Namespace of DbContextName>. In our case, a database called byEF6.EmployeeDbContextwould be created. - Then, it creates database tables for the entities declared in
DbSet. By convention, the Entity Framework uses the pluralized form of Entity for the table names. As we have declaredDbSetfor theEmployeeentity, the Entity Framework creates a pluralized form ofEmployeeand creates the table namedEmployees.
The creation of the database and tables happens when the following code is executed:
db.Employees.Add(employee);
When SaveChanges method is executed, the data in the Employee object will get saved to the database and returns the number of records affected. In the preceding case, it returns 1.
When you run the application again, the first two steps mentioned previously will be skipped as the database and table will have already been created.
When you query the database, you can see the newly inserted record:
When we are making changes, the Entity Framework tracks the state of each of the objects and executes the appropriate query when SaveChanges method is called.
For example, when we add an Employee object to the employees' collection (DbSet), this object is being tracked as Entity in the Added state. When SaveChanges is called, the Entity Framework creates an insert query for the same and executes it. The same is the case with updating and deleting the object. The Entity Framework sets the Entity state of the respective objects to Modified and Deleted. When SaveChanges is called, it creates and executes the Update and Delete queries.
The preceding figure explains how the SaveChanges method works at a high-level for different types of change. We have a couple of POCO objects (Object 1 and Object 2), which have been added to the employees' DbSet object. Let us assume Object 3 and Object 4 have been modified and objects Object 5 and Object 6 are in Deleted state. When you call SaveChanges method, it creates three sets of queries. The first set of queries is for the addition of objects, resulting in insert queries getting executed against the database. In the second set of queries, Update queries are created and executed for the objects whose state is modified. Finally, Delete queries are executed for the objects for all the Deleted state objects.
Let us try to update the salary of an inserted employee record using the Entity Framework:
static void UpdateSalary() {
  using (var db = new EmployeeDbContext()){
    Employee employee = db.Employees.Where(emp => emp.EmployeeId      == 1).FirstOrDefault();
    if(employee!=null){
      employee.Salary = 6500;
      int recordsUpdated = db.SaveChanges();
      Console.WriteLine("Records updated:" + recordsUpdated);
      Console.ReadLine();
    }
  }
}
In the preceding method, we find the employee with EmployeeId = 1. Then, we update the salary of the employee to 6500 and save the employee object to the database. Please note that, in the preceding method, we interact with the database a couple of times—once to find the correct employee record (read operation) and again to update the record (update operation).
static void Main(string[] args){
  UpdateSalary();
}
The Main method is updated to call the UpdateSalary method. When you query the database, you should see the record with the updated information:
Deleting the record is a bit tricky as it involves setting the state directly. In the following method, firstly we get the object and setting the state of the object to Deleted. Then calling the SaveChanges method will generate the delete query for the object and execute it, which in turn will eventually delete the record in the database:
static void DeleteEmployee() {
  using (var db = new EmployeeDbContext()) {
    Employee employeeToBeDeleted = db.Employees.Where(emp =>      emp.EmployeeId == 1).FirstOrDefault();
    if (employeeToBeDeleted != null) {
      db.Entry(employeeToBeDeleted).State =        Microsoft.Data.Entity.EntityState.Deleted;
      int recordsDeleted = db.SaveChanges();
      Console.WriteLine("Number of records deleted:" +        recordsDeleted);
      Console.ReadLine();
    }
  }
}

static void Main(string[] args) {
  DeleteEmployee();
}
Installing the Entity Framework 7 NuGet package
There are two ways to install any NuGet package in your application:
- Using the
NuGetPackage Manager - Using Package Manager Console
People who prefer graphical interfaces can use this option:
- Right-click on the console project and select Manage NuGet Packages from the context menu:
- Search for
EntityFramework.MicrosoftSqlServerin theNuGetpackage and make sure the Include prerelease checkbox is checked. Click on Install once you select EntityFramework.MicrosoftSqlServer and select Latest pre-release 7.0.0-rc1-final (at the time of writing this book). You can select any latest version of Entity Framework 7: - Once you click on Install, the
NuGetpackage manager will ask you to review the changes. Click on OK: - Click on I Accept in the License Acceptance window:
- Once you click on I Accept, it will install the Entity Framework with all its dependencies. In the Output window, you will get the Finished message once the installation is complete:
To install the NuGet package using the Package Manager Console, follow these steps:
- Open the Package Manager Console window by selecting the menu option View | Other Windows | Package Manager Console.
- Type
Install-Package EntityFramework.MicrosoftSqlServer - Prein the Package Manager Console window as shown in the following screenshot: - Once the installation is complete, a message, Successfully installed 'EntityFramework.MicrosoftSqlServer 7.0.0-rc1-final', will be shown:
We need to install the Entity Framework commands package in order to perform migration activities. Migration includes the creation of a database and its associated tables. Any changes in the schema will also be taken care of by migration:
As discussed earlier, we need to follow three steps in order to interact with the database when we are using the Entity Framework:
- Create the
Modelclasses. - Create the
DbContextclass for your business domain object. The instance of theDbContextclass represents the session with the database. - Construct the business domain object and save it to the database using the instance of the
DBContextclass.
Let us discuss each of the preceding steps in details and try to save an object to the database.
The Model classes are simple POCO objects, which can be used with the Entity Framework.
Let us create a POCO class for our business domain object, the Employee class in our case. I have created a new file named Employee.cs in our console application with the following content. This Employee class contains a few properties of an employee and has no special properties or fields to make it work with the Entity Framework.
Let's take a look at the following code snippet:
public class Employee {
  public int EmployeeId { get; set; }
  public string Name { get; set; }
  public decimal Salary { get; set; }
  public string Designation { get; set; }
}
By convention, if the property name is Id or ClassName+Id, it will be considered as a primary key by Entity Framework while creating the database table.
Properties with string data types will be created as fields of the type nvarchar(max). However, we can override this behavior by using annotations, which we will be discussed later.
The instance of the DbContext class represents the session to the database and this DbContext class does most of the heavy lifting of your data access for your application.
Create a new class by the named EmployeeDbContext with the following content:
using Microsoft.Data.Entity;
using System.Configuration;

namespace ConsoleEF7 {
  public class EmployeeDbContext : DbContext{
    public DbSet<Employee> Employees {get; set;}

    protected override void OnConfiguring(DbContextOptionsBuilder      optionsBuilder) {string connectionString =        ConfigurationManager.ConnectionStrings       ["SqlServerExpress"].ConnectionString;
      optionsBuilder.UseSqlServer(connectionString);
      base.OnConfiguring(optionsBuilder);
    }
  }
}
Configure it using App.Config:
<?xml version="1.0" encoding="utf-8" ?>
<configuration>
  <startup>
    <supportedRuntime version="v4.0"
    sku=".NETFramework,Version=v4.6.1" />
  </startup>
  <connectionStrings>
    <add name="SqlServerExpress" connectionString="Data Source=     MUGIL-PC\SQLEXPRESS;Initial Catalog=EF7Console;Integrated      Security=True"/>
  </connectionStrings>
</configuration>
There are a few things to be noted in the preceding code snippet:
- Include the
Microsoft.Data.Entitynamespace as theDbContextclass available in this namespace. Our connection string is available in theApp.Configfile. In order to read the contents of theApp.Configfile, we are including theConfigurationManagerclass inSystem.Configuration. - In order to use the
DbContextAPI, a class has to be created which inherits from theDbContextclass so that we can access methods of theDbContextAPI. We have created theEmployeeDbContextclass which was inherited fromDbContextclass. DbSetis a class which allows operations of the Entity Framework to be performed for a given Entity type. We need to create theDbSetobject for each of the Entity types that we use in our application. In this example, we are using only oneDbSetobject as we are working with theEmployeeclass.
Migration is the process of recording all the changes of your database. Add-Migration is the Entity Framework command for adding migration:
- Once you add the migration, you can revoke the changes by executing the
Remove-MigrationEntity Framework command.- This is what the migrations directory looks like:
- This is what the migrations directory looks like:
- Update the database by issuing the Entity Framework command
Update-Database, which updates the database tables as per the information available in the migration. As we have installed theEntityFramework.Commandspackage earlier, these commands will be available for the application: - Once you update the database, you can see the changes in the database by connecting to SQL Server Management Studio:
- Perform the database operation to save the business domain object in the database. You can create the database manually or, if the database is not available, it will create one for you.
The Main method is updated with the following code:
class Program {
  static void Main(string[] args) {
    AddEmployee();
  }

  static void AddEmployee() {
    using (var db = new EmployeeDbContext()) {
      Employee employee= new Employee {
        Designation = "Software Engineer",
        Name = "Scott",
        Salary = 5600
      };

      db.Employees.Add(employee);
      int recordsInserted = db.SaveChanges();
      Console.WriteLine("Number of records inserted:" +        recordsInserted);
      Console.ReadLine();
    }
  }
}
Firstly, we are constructing the business domain object. Then, we are adding the constructed Employee object to the employee's DbSet of the DbContext class. Finally, we are calling the SaveChanges method DbContext API, which will save all the pending changes to the database.
You might be wondering how it can save it to the database when we have not even given the connection string.
Let us discuss what happens behind the scenes when we run the program:
- When you make changes to any of the
DbSetcollection, the Entity Framework checks whether the database exists. If it does not exist, it creates a new one using the pattern<Namespace of DbContextName>. In our case, a database called byEF6.EmployeeDbContextwould be created. - Then, it creates database tables for the entities declared in
DbSet. By convention, the Entity Framework uses the pluralized form of Entity for the table names. As we have declaredDbSetfor theEmployeeentity, the Entity Framework creates a pluralized form ofEmployeeand creates the table namedEmployees.
The creation of the database and tables happens when the following code is executed:
db.Employees.Add(employee);
When SaveChanges method is executed, the data in the Employee object will get saved to the database and returns the number of records affected. In the preceding case, it returns 1.
When you run the application again, the first two steps mentioned previously will be skipped as the database and table will have already been created.
When you query the database, you can see the newly inserted record:
When we are making changes, the Entity Framework tracks the state of each of the objects and executes the appropriate query when SaveChanges method is called.
For example, when we add an Employee object to the employees' collection (DbSet), this object is being tracked as Entity in the Added state. When SaveChanges is called, the Entity Framework creates an insert query for the same and executes it. The same is the case with updating and deleting the object. The Entity Framework sets the Entity state of the respective objects to Modified and Deleted. When SaveChanges is called, it creates and executes the Update and Delete queries.
The preceding figure explains how the SaveChanges method works at a high-level for different types of change. We have a couple of POCO objects (Object 1 and Object 2), which have been added to the employees' DbSet object. Let us assume Object 3 and Object 4 have been modified and objects Object 5 and Object 6 are in Deleted state. When you call SaveChanges method, it creates three sets of queries. The first set of queries is for the addition of objects, resulting in insert queries getting executed against the database. In the second set of queries, Update queries are created and executed for the objects whose state is modified. Finally, Delete queries are executed for the objects for all the Deleted state objects.
Let us try to update the salary of an inserted employee record using the Entity Framework:
static void UpdateSalary() {
  using (var db = new EmployeeDbContext()){
    Employee employee = db.Employees.Where(emp => emp.EmployeeId      == 1).FirstOrDefault();
    if(employee!=null){
      employee.Salary = 6500;
      int recordsUpdated = db.SaveChanges();
      Console.WriteLine("Records updated:" + recordsUpdated);
      Console.ReadLine();
    }
  }
}
In the preceding method, we find the employee with EmployeeId = 1. Then, we update the salary of the employee to 6500 and save the employee object to the database. Please note that, in the preceding method, we interact with the database a couple of times—once to find the correct employee record (read operation) and again to update the record (update operation).
static void Main(string[] args){
  UpdateSalary();
}
The Main method is updated to call the UpdateSalary method. When you query the database, you should see the record with the updated information:
Deleting the record is a bit tricky as it involves setting the state directly. In the following method, firstly we get the object and setting the state of the object to Deleted. Then calling the SaveChanges method will generate the delete query for the object and execute it, which in turn will eventually delete the record in the database:
static void DeleteEmployee() {
  using (var db = new EmployeeDbContext()) {
    Employee employeeToBeDeleted = db.Employees.Where(emp =>      emp.EmployeeId == 1).FirstOrDefault();
    if (employeeToBeDeleted != null) {
      db.Entry(employeeToBeDeleted).State =        Microsoft.Data.Entity.EntityState.Deleted;
      int recordsDeleted = db.SaveChanges();
      Console.WriteLine("Number of records deleted:" +        recordsDeleted);
      Console.ReadLine();
    }
  }
}

static void Main(string[] args) {
  DeleteEmployee();
}
Using the NuGet Package Manager
People who prefer graphical interfaces can use this option:
- Right-click on the console project and select Manage NuGet Packages from the context menu:
- Search for
EntityFramework.MicrosoftSqlServerin theNuGetpackage and make sure the Include prerelease checkbox is checked. Click on Install once you select EntityFramework.MicrosoftSqlServer and select Latest pre-release 7.0.0-rc1-final (at the time of writing this book). You can select any latest version of Entity Framework 7: - Once you click on Install, the
NuGetpackage manager will ask you to review the changes. Click on OK: - Click on I Accept in the License Acceptance window:
- Once you click on I Accept, it will install the Entity Framework with all its dependencies. In the Output window, you will get the Finished message once the installation is complete:
To install the NuGet package using the Package Manager Console, follow these steps:
- Open the Package Manager Console window by selecting the menu option View | Other Windows | Package Manager Console.
- Type
Install-Package EntityFramework.MicrosoftSqlServer - Prein the Package Manager Console window as shown in the following screenshot: - Once the installation is complete, a message, Successfully installed 'EntityFramework.MicrosoftSqlServer 7.0.0-rc1-final', will be shown:
We need to install the Entity Framework commands package in order to perform migration activities. Migration includes the creation of a database and its associated tables. Any changes in the schema will also be taken care of by migration:
As discussed earlier, we need to follow three steps in order to interact with the database when we are using the Entity Framework:
- Create the
Modelclasses. - Create the
DbContextclass for your business domain object. The instance of theDbContextclass represents the session with the database. - Construct the business domain object and save it to the database using the instance of the
DBContextclass.
Let us discuss each of the preceding steps in details and try to save an object to the database.
The Model classes are simple POCO objects, which can be used with the Entity Framework.
Let us create a POCO class for our business domain object, the Employee class in our case. I have created a new file named Employee.cs in our console application with the following content. This Employee class contains a few properties of an employee and has no special properties or fields to make it work with the Entity Framework.
Let's take a look at the following code snippet:
public class Employee {
  public int EmployeeId { get; set; }
  public string Name { get; set; }
  public decimal Salary { get; set; }
  public string Designation { get; set; }
}
By convention, if the property name is Id or ClassName+Id, it will be considered as a primary key by Entity Framework while creating the database table.
Properties with string data types will be created as fields of the type nvarchar(max). However, we can override this behavior by using annotations, which we will be discussed later.
The instance of the DbContext class represents the session to the database and this DbContext class does most of the heavy lifting of your data access for your application.
Create a new class by the named EmployeeDbContext with the following content:
using Microsoft.Data.Entity;
using System.Configuration;

namespace ConsoleEF7 {
  public class EmployeeDbContext : DbContext{
    public DbSet<Employee> Employees {get; set;}

    protected override void OnConfiguring(DbContextOptionsBuilder      optionsBuilder) {string connectionString =        ConfigurationManager.ConnectionStrings       ["SqlServerExpress"].ConnectionString;
      optionsBuilder.UseSqlServer(connectionString);
      base.OnConfiguring(optionsBuilder);
    }
  }
}
Configure it using App.Config:
<?xml version="1.0" encoding="utf-8" ?>
<configuration>
  <startup>
    <supportedRuntime version="v4.0"
    sku=".NETFramework,Version=v4.6.1" />
  </startup>
  <connectionStrings>
    <add name="SqlServerExpress" connectionString="Data Source=     MUGIL-PC\SQLEXPRESS;Initial Catalog=EF7Console;Integrated      Security=True"/>
  </connectionStrings>
</configuration>
There are a few things to be noted in the preceding code snippet:
- Include the
Microsoft.Data.Entitynamespace as theDbContextclass available in this namespace. Our connection string is available in theApp.Configfile. In order to read the contents of theApp.Configfile, we are including theConfigurationManagerclass inSystem.Configuration. - In order to use the
DbContextAPI, a class has to be created which inherits from theDbContextclass so that we can access methods of theDbContextAPI. We have created theEmployeeDbContextclass which was inherited fromDbContextclass. DbSetis a class which allows operations of the Entity Framework to be performed for a given Entity type. We need to create theDbSetobject for each of the Entity types that we use in our application. In this example, we are using only oneDbSetobject as we are working with theEmployeeclass.
Migration is the process of recording all the changes of your database. Add-Migration is the Entity Framework command for adding migration:
- Once you add the migration, you can revoke the changes by executing the
Remove-MigrationEntity Framework command.- This is what the migrations directory looks like:
- This is what the migrations directory looks like:
- Update the database by issuing the Entity Framework command
Update-Database, which updates the database tables as per the information available in the migration. As we have installed theEntityFramework.Commandspackage earlier, these commands will be available for the application: - Once you update the database, you can see the changes in the database by connecting to SQL Server Management Studio:
- Perform the database operation to save the business domain object in the database. You can create the database manually or, if the database is not available, it will create one for you.
The Main method is updated with the following code:
class Program {
  static void Main(string[] args) {
    AddEmployee();
  }

  static void AddEmployee() {
    using (var db = new EmployeeDbContext()) {
      Employee employee= new Employee {
        Designation = "Software Engineer",
        Name = "Scott",
        Salary = 5600
      };

      db.Employees.Add(employee);
      int recordsInserted = db.SaveChanges();
      Console.WriteLine("Number of records inserted:" +        recordsInserted);
      Console.ReadLine();
    }
  }
}
Firstly, we are constructing the business domain object. Then, we are adding the constructed Employee object to the employee's DbSet of the DbContext class. Finally, we are calling the SaveChanges method DbContext API, which will save all the pending changes to the database.
You might be wondering how it can save it to the database when we have not even given the connection string.
Let us discuss what happens behind the scenes when we run the program:
- When you make changes to any of the
DbSetcollection, the Entity Framework checks whether the database exists. If it does not exist, it creates a new one using the pattern<Namespace of DbContextName>. In our case, a database called byEF6.EmployeeDbContextwould be created. - Then, it creates database tables for the entities declared in
DbSet. By convention, the Entity Framework uses the pluralized form of Entity for the table names. As we have declaredDbSetfor theEmployeeentity, the Entity Framework creates a pluralized form ofEmployeeand creates the table namedEmployees.
The creation of the database and tables happens when the following code is executed:
db.Employees.Add(employee);
When SaveChanges method is executed, the data in the Employee object will get saved to the database and returns the number of records affected. In the preceding case, it returns 1.
When you run the application again, the first two steps mentioned previously will be skipped as the database and table will have already been created.
When you query the database, you can see the newly inserted record:
When we are making changes, the Entity Framework tracks the state of each of the objects and executes the appropriate query when SaveChanges method is called.
For example, when we add an Employee object to the employees' collection (DbSet), this object is being tracked as Entity in the Added state. When SaveChanges is called, the Entity Framework creates an insert query for the same and executes it. The same is the case with updating and deleting the object. The Entity Framework sets the Entity state of the respective objects to Modified and Deleted. When SaveChanges is called, it creates and executes the Update and Delete queries.
The preceding figure explains how the SaveChanges method works at a high-level for different types of change. We have a couple of POCO objects (Object 1 and Object 2), which have been added to the employees' DbSet object. Let us assume Object 3 and Object 4 have been modified and objects Object 5 and Object 6 are in Deleted state. When you call SaveChanges method, it creates three sets of queries. The first set of queries is for the addition of objects, resulting in insert queries getting executed against the database. In the second set of queries, Update queries are created and executed for the objects whose state is modified. Finally, Delete queries are executed for the objects for all the Deleted state objects.
Let us try to update the salary of an inserted employee record using the Entity Framework:
static void UpdateSalary() {
  using (var db = new EmployeeDbContext()){
    Employee employee = db.Employees.Where(emp => emp.EmployeeId      == 1).FirstOrDefault();
    if(employee!=null){
      employee.Salary = 6500;
      int recordsUpdated = db.SaveChanges();
      Console.WriteLine("Records updated:" + recordsUpdated);
      Console.ReadLine();
    }
  }
}
In the preceding method, we find the employee with EmployeeId = 1. Then, we update the salary of the employee to 6500 and save the employee object to the database. Please note that, in the preceding method, we interact with the database a couple of times—once to find the correct employee record (read operation) and again to update the record (update operation).
static void Main(string[] args){
  UpdateSalary();
}
The Main method is updated to call the UpdateSalary method. When you query the database, you should see the record with the updated information:
Deleting the record is a bit tricky as it involves setting the state directly. In the following method, firstly we get the object and setting the state of the object to Deleted. Then calling the SaveChanges method will generate the delete query for the object and execute it, which in turn will eventually delete the record in the database:
static void DeleteEmployee() {
  using (var db = new EmployeeDbContext()) {
    Employee employeeToBeDeleted = db.Employees.Where(emp =>      emp.EmployeeId == 1).FirstOrDefault();
    if (employeeToBeDeleted != null) {
      db.Entry(employeeToBeDeleted).State =        Microsoft.Data.Entity.EntityState.Deleted;
      int recordsDeleted = db.SaveChanges();
      Console.WriteLine("Number of records deleted:" +        recordsDeleted);
      Console.ReadLine();
    }
  }
}

static void Main(string[] args) {
  DeleteEmployee();
}
Using the Package Manager Console
To install the NuGet package using the Package Manager Console, follow these steps:
- Open the Package Manager Console window by selecting the menu option View | Other Windows | Package Manager Console.
- Type
Install-Package EntityFramework.MicrosoftSqlServer - Prein the Package Manager Console window as shown in the following screenshot: - Once the installation is complete, a message, Successfully installed 'EntityFramework.MicrosoftSqlServer 7.0.0-rc1-final', will be shown:
We need to install the Entity Framework commands package in order to perform migration activities. Migration includes the creation of a database and its associated tables. Any changes in the schema will also be taken care of by migration:
As discussed earlier, we need to follow three steps in order to interact with the database when we are using the Entity Framework:
- Create the
Modelclasses. - Create the
DbContextclass for your business domain object. The instance of theDbContextclass represents the session with the database. - Construct the business domain object and save it to the database using the instance of the
DBContextclass.
Let us discuss each of the preceding steps in details and try to save an object to the database.
The Model classes are simple POCO objects, which can be used with the Entity Framework.
Let us create a POCO class for our business domain object, the Employee class in our case. I have created a new file named Employee.cs in our console application with the following content. This Employee class contains a few properties of an employee and has no special properties or fields to make it work with the Entity Framework.
Let's take a look at the following code snippet:
public class Employee {
  public int EmployeeId { get; set; }
  public string Name { get; set; }
  public decimal Salary { get; set; }
  public string Designation { get; set; }
}
By convention, if the property name is Id or ClassName+Id, it will be considered as a primary key by Entity Framework while creating the database table.
Properties with string data types will be created as fields of the type nvarchar(max). However, we can override this behavior by using annotations, which we will be discussed later.
The instance of the DbContext class represents the session to the database and this DbContext class does most of the heavy lifting of your data access for your application.
Create a new class by the named EmployeeDbContext with the following content:
using Microsoft.Data.Entity;
using System.Configuration;

namespace ConsoleEF7 {
  public class EmployeeDbContext : DbContext{
    public DbSet<Employee> Employees {get; set;}

    protected override void OnConfiguring(DbContextOptionsBuilder      optionsBuilder) {string connectionString =        ConfigurationManager.ConnectionStrings       ["SqlServerExpress"].ConnectionString;
      optionsBuilder.UseSqlServer(connectionString);
      base.OnConfiguring(optionsBuilder);
    }
  }
}
Configure it using App.Config:
<?xml version="1.0" encoding="utf-8" ?>
<configuration>
  <startup>
    <supportedRuntime version="v4.0"
    sku=".NETFramework,Version=v4.6.1" />
  </startup>
  <connectionStrings>
    <add name="SqlServerExpress" connectionString="Data Source=     MUGIL-PC\SQLEXPRESS;Initial Catalog=EF7Console;Integrated      Security=True"/>
  </connectionStrings>
</configuration>
There are a few things to be noted in the preceding code snippet:
- Include the
Microsoft.Data.Entitynamespace as theDbContextclass available in this namespace. Our connection string is available in theApp.Configfile. In order to read the contents of theApp.Configfile, we are including theConfigurationManagerclass inSystem.Configuration. - In order to use the
DbContextAPI, a class has to be created which inherits from theDbContextclass so that we can access methods of theDbContextAPI. We have created theEmployeeDbContextclass which was inherited fromDbContextclass. DbSetis a class which allows operations of the Entity Framework to be performed for a given Entity type. We need to create theDbSetobject for each of the Entity types that we use in our application. In this example, we are using only oneDbSetobject as we are working with theEmployeeclass.
Migration is the process of recording all the changes of your database. Add-Migration is the Entity Framework command for adding migration:
- Once you add the migration, you can revoke the changes by executing the
Remove-MigrationEntity Framework command.- This is what the migrations directory looks like:
- This is what the migrations directory looks like:
- Update the database by issuing the Entity Framework command
Update-Database, which updates the database tables as per the information available in the migration. As we have installed theEntityFramework.Commandspackage earlier, these commands will be available for the application: - Once you update the database, you can see the changes in the database by connecting to SQL Server Management Studio:
- Perform the database operation to save the business domain object in the database. You can create the database manually or, if the database is not available, it will create one for you.
The Main method is updated with the following code:
class Program {
  static void Main(string[] args) {
    AddEmployee();
  }

  static void AddEmployee() {
    using (var db = new EmployeeDbContext()) {
      Employee employee= new Employee {
        Designation = "Software Engineer",
        Name = "Scott",
        Salary = 5600
      };

      db.Employees.Add(employee);
      int recordsInserted = db.SaveChanges();
      Console.WriteLine("Number of records inserted:" +        recordsInserted);
      Console.ReadLine();
    }
  }
}
Firstly, we are constructing the business domain object. Then, we are adding the constructed Employee object to the employee's DbSet of the DbContext class. Finally, we are calling the SaveChanges method DbContext API, which will save all the pending changes to the database.
You might be wondering how it can save it to the database when we have not even given the connection string.
Let us discuss what happens behind the scenes when we run the program:
- When you make changes to any of the
DbSetcollection, the Entity Framework checks whether the database exists. If it does not exist, it creates a new one using the pattern<Namespace of DbContextName>. In our case, a database called byEF6.EmployeeDbContextwould be created. - Then, it creates database tables for the entities declared in
DbSet. By convention, the Entity Framework uses the pluralized form of Entity for the table names. As we have declaredDbSetfor theEmployeeentity, the Entity Framework creates a pluralized form ofEmployeeand creates the table namedEmployees.
The creation of the database and tables happens when the following code is executed:
db.Employees.Add(employee);
When SaveChanges method is executed, the data in the Employee object will get saved to the database and returns the number of records affected. In the preceding case, it returns 1.
When you run the application again, the first two steps mentioned previously will be skipped as the database and table will have already been created.
When you query the database, you can see the newly inserted record:
When we are making changes, the Entity Framework tracks the state of each of the objects and executes the appropriate query when SaveChanges method is called.
For example, when we add an Employee object to the employees' collection (DbSet), this object is being tracked as Entity in the Added state. When SaveChanges is called, the Entity Framework creates an insert query for the same and executes it. The same is the case with updating and deleting the object. The Entity Framework sets the Entity state of the respective objects to Modified and Deleted. When SaveChanges is called, it creates and executes the Update and Delete queries.
The preceding figure explains how the SaveChanges method works at a high-level for different types of change. We have a couple of POCO objects (Object 1 and Object 2), which have been added to the employees' DbSet object. Let us assume Object 3 and Object 4 have been modified and objects Object 5 and Object 6 are in Deleted state. When you call SaveChanges method, it creates three sets of queries. The first set of queries is for the addition of objects, resulting in insert queries getting executed against the database. In the second set of queries, Update queries are created and executed for the objects whose state is modified. Finally, Delete queries are executed for the objects for all the Deleted state objects.
Let us try to update the salary of an inserted employee record using the Entity Framework:
static void UpdateSalary() {
  using (var db = new EmployeeDbContext()){
    Employee employee = db.Employees.Where(emp => emp.EmployeeId      == 1).FirstOrDefault();
    if(employee!=null){
      employee.Salary = 6500;
      int recordsUpdated = db.SaveChanges();
      Console.WriteLine("Records updated:" + recordsUpdated);
      Console.ReadLine();
    }
  }
}
In the preceding method, we find the employee with EmployeeId = 1. Then, we update the salary of the employee to 6500 and save the employee object to the database. Please note that, in the preceding method, we interact with the database a couple of times—once to find the correct employee record (read operation) and again to update the record (update operation).
static void Main(string[] args){
  UpdateSalary();
}
The Main method is updated to call the UpdateSalary method. When you query the database, you should see the record with the updated information:
Deleting the record is a bit tricky as it involves setting the state directly. In the following method, firstly we get the object and setting the state of the object to Deleted. Then calling the SaveChanges method will generate the delete query for the object and execute it, which in turn will eventually delete the record in the database:
static void DeleteEmployee() {
  using (var db = new EmployeeDbContext()) {
    Employee employeeToBeDeleted = db.Employees.Where(emp =>      emp.EmployeeId == 1).FirstOrDefault();
    if (employeeToBeDeleted != null) {
      db.Entry(employeeToBeDeleted).State =        Microsoft.Data.Entity.EntityState.Deleted;
      int recordsDeleted = db.SaveChanges();
      Console.WriteLine("Number of records deleted:" +        recordsDeleted);
      Console.ReadLine();
    }
  }
}

static void Main(string[] args) {
  DeleteEmployee();
}
Installing Entity Framework commands
We need to install the Entity Framework commands package in order to perform migration activities. Migration includes the creation of a database and its associated tables. Any changes in the schema will also be taken care of by migration:
As discussed earlier, we need to follow three steps in order to interact with the database when we are using the Entity Framework:
- Create the
Modelclasses. - Create the
DbContextclass for your business domain object. The instance of theDbContextclass represents the session with the database. - Construct the business domain object and save it to the database using the instance of the
DBContextclass.
Let us discuss each of the preceding steps in details and try to save an object to the database.
The Model classes are simple POCO objects, which can be used with the Entity Framework.
Let us create a POCO class for our business domain object, the Employee class in our case. I have created a new file named Employee.cs in our console application with the following content. This Employee class contains a few properties of an employee and has no special properties or fields to make it work with the Entity Framework.
Let's take a look at the following code snippet:
public class Employee {
  public int EmployeeId { get; set; }
  public string Name { get; set; }
  public decimal Salary { get; set; }
  public string Designation { get; set; }
}
By convention, if the property name is Id or ClassName+Id, it will be considered as a primary key by Entity Framework while creating the database table.
Properties with string data types will be created as fields of the type nvarchar(max). However, we can override this behavior by using annotations, which we will be discussed later.
The instance of the DbContext class represents the session to the database and this DbContext class does most of the heavy lifting of your data access for your application.
Create a new class by the named EmployeeDbContext with the following content:
using Microsoft.Data.Entity;
using System.Configuration;

namespace ConsoleEF7 {
  public class EmployeeDbContext : DbContext{
    public DbSet<Employee> Employees {get; set;}

    protected override void OnConfiguring(DbContextOptionsBuilder      optionsBuilder) {string connectionString =        ConfigurationManager.ConnectionStrings       ["SqlServerExpress"].ConnectionString;
      optionsBuilder.UseSqlServer(connectionString);
      base.OnConfiguring(optionsBuilder);
    }
  }
}
Configure it using App.Config:
<?xml version="1.0" encoding="utf-8" ?>
<configuration>
  <startup>
    <supportedRuntime version="v4.0"
    sku=".NETFramework,Version=v4.6.1" />
  </startup>
  <connectionStrings>
    <add name="SqlServerExpress" connectionString="Data Source=     MUGIL-PC\SQLEXPRESS;Initial Catalog=EF7Console;Integrated      Security=True"/>
  </connectionStrings>
</configuration>
There are a few things to be noted in the preceding code snippet:
- Include the
Microsoft.Data.Entitynamespace as theDbContextclass available in this namespace. Our connection string is available in theApp.Configfile. In order to read the contents of theApp.Configfile, we are including theConfigurationManagerclass inSystem.Configuration. - In order to use the
DbContextAPI, a class has to be created which inherits from theDbContextclass so that we can access methods of theDbContextAPI. We have created theEmployeeDbContextclass which was inherited fromDbContextclass. DbSetis a class which allows operations of the Entity Framework to be performed for a given Entity type. We need to create theDbSetobject for each of the Entity types that we use in our application. In this example, we are using only oneDbSetobject as we are working with theEmployeeclass.
Migration is the process of recording all the changes of your database. Add-Migration is the Entity Framework command for adding migration:
- Once you add the migration, you can revoke the changes by executing the
Remove-MigrationEntity Framework command.- This is what the migrations directory looks like:
- This is what the migrations directory looks like:
- Update the database by issuing the Entity Framework command
Update-Database, which updates the database tables as per the information available in the migration. As we have installed theEntityFramework.Commandspackage earlier, these commands will be available for the application: - Once you update the database, you can see the changes in the database by connecting to SQL Server Management Studio:
- Perform the database operation to save the business domain object in the database. You can create the database manually or, if the database is not available, it will create one for you.
The Main method is updated with the following code:
class Program {
  static void Main(string[] args) {
    AddEmployee();
  }

  static void AddEmployee() {
    using (var db = new EmployeeDbContext()) {
      Employee employee= new Employee {
        Designation = "Software Engineer",
        Name = "Scott",
        Salary = 5600
      };

      db.Employees.Add(employee);
      int recordsInserted = db.SaveChanges();
      Console.WriteLine("Number of records inserted:" +        recordsInserted);
      Console.ReadLine();
    }
  }
}
Firstly, we are constructing the business domain object. Then, we are adding the constructed Employee object to the employee's DbSet of the DbContext class. Finally, we are calling the SaveChanges method DbContext API, which will save all the pending changes to the database.
You might be wondering how it can save it to the database when we have not even given the connection string.
Let us discuss what happens behind the scenes when we run the program:
- When you make changes to any of the
DbSetcollection, the Entity Framework checks whether the database exists. If it does not exist, it creates a new one using the pattern<Namespace of DbContextName>. In our case, a database called byEF6.EmployeeDbContextwould be created. - Then, it creates database tables for the entities declared in
DbSet. By convention, the Entity Framework uses the pluralized form of Entity for the table names. As we have declaredDbSetfor theEmployeeentity, the Entity Framework creates a pluralized form ofEmployeeand creates the table namedEmployees.
The creation of the database and tables happens when the following code is executed:
db.Employees.Add(employee);
When SaveChanges method is executed, the data in the Employee object will get saved to the database and returns the number of records affected. In the preceding case, it returns 1.
When you run the application again, the first two steps mentioned previously will be skipped as the database and table will have already been created.
When you query the database, you can see the newly inserted record:
When we are making changes, the Entity Framework tracks the state of each of the objects and executes the appropriate query when SaveChanges method is called.
For example, when we add an Employee object to the employees' collection (DbSet), this object is being tracked as Entity in the Added state. When SaveChanges is called, the Entity Framework creates an insert query for the same and executes it. The same is the case with updating and deleting the object. The Entity Framework sets the Entity state of the respective objects to Modified and Deleted. When SaveChanges is called, it creates and executes the Update and Delete queries.
The preceding figure explains how the SaveChanges method works at a high-level for different types of change. We have a couple of POCO objects (Object 1 and Object 2), which have been added to the employees' DbSet object. Let us assume Object 3 and Object 4 have been modified and objects Object 5 and Object 6 are in Deleted state. When you call SaveChanges method, it creates three sets of queries. The first set of queries is for the addition of objects, resulting in insert queries getting executed against the database. In the second set of queries, Update queries are created and executed for the objects whose state is modified. Finally, Delete queries are executed for the objects for all the Deleted state objects.
Let us try to update the salary of an inserted employee record using the Entity Framework:
static void UpdateSalary() {
  using (var db = new EmployeeDbContext()){
    Employee employee = db.Employees.Where(emp => emp.EmployeeId      == 1).FirstOrDefault();
    if(employee!=null){
      employee.Salary = 6500;
      int recordsUpdated = db.SaveChanges();
      Console.WriteLine("Records updated:" + recordsUpdated);
      Console.ReadLine();
    }
  }
}
In the preceding method, we find the employee with EmployeeId = 1. Then, we update the salary of the employee to 6500 and save the employee object to the database. Please note that, in the preceding method, we interact with the database a couple of times—once to find the correct employee record (read operation) and again to update the record (update operation).
static void Main(string[] args){
  UpdateSalary();
}
The Main method is updated to call the UpdateSalary method. When you query the database, you should see the record with the updated information:
Deleting the record is a bit tricky as it involves setting the state directly. In the following method, firstly we get the object and setting the state of the object to Deleted. Then calling the SaveChanges method will generate the delete query for the object and execute it, which in turn will eventually delete the record in the database:
static void DeleteEmployee() {
  using (var db = new EmployeeDbContext()) {
    Employee employeeToBeDeleted = db.Employees.Where(emp =>      emp.EmployeeId == 1).FirstOrDefault();
    if (employeeToBeDeleted != null) {
      db.Entry(employeeToBeDeleted).State =        Microsoft.Data.Entity.EntityState.Deleted;
      int recordsDeleted = db.SaveChanges();
      Console.WriteLine("Number of records deleted:" +        recordsDeleted);
      Console.ReadLine();
    }
  }
}

static void Main(string[] args) {
  DeleteEmployee();
}
Creating Model classes
The Model classes are simple POCO objects, which can be used with the Entity Framework.
Let us create a POCO class for our business domain object, the Employee class in our case. I have created a new file named Employee.cs in our console application with the following content. This Employee class contains a few properties of an employee and has no special properties or fields to make it work with the Entity Framework.
Let's take a look at the following code snippet:
public class Employee {
  public int EmployeeId { get; set; }
  public string Name { get; set; }
  public decimal Salary { get; set; }
  public string Designation { get; set; }
}
By convention, if the property name is Id or ClassName+Id, it will be considered as a primary key by Entity Framework while creating the database table.
Properties with string data types will be created as fields of the type nvarchar(max). However, we can override this behavior by using annotations, which we will be discussed later.
The instance of the DbContext class represents the session to the database and this DbContext class does most of the heavy lifting of your data access for your application.
Create a new class by the named EmployeeDbContext with the following content:
using Microsoft.Data.Entity;
using System.Configuration;

namespace ConsoleEF7 {
  public class EmployeeDbContext : DbContext{
    public DbSet<Employee> Employees {get; set;}

    protected override void OnConfiguring(DbContextOptionsBuilder      optionsBuilder) {string connectionString =        ConfigurationManager.ConnectionStrings       ["SqlServerExpress"].ConnectionString;
      optionsBuilder.UseSqlServer(connectionString);
      base.OnConfiguring(optionsBuilder);
    }
  }
}
Configure it using App.Config:
<?xml version="1.0" encoding="utf-8" ?>
<configuration>
  <startup>
    <supportedRuntime version="v4.0"
    sku=".NETFramework,Version=v4.6.1" />
  </startup>
  <connectionStrings>
    <add name="SqlServerExpress" connectionString="Data Source=     MUGIL-PC\SQLEXPRESS;Initial Catalog=EF7Console;Integrated      Security=True"/>
  </connectionStrings>
</configuration>
There are a few things to be noted in the preceding code snippet:
- Include the
Microsoft.Data.Entitynamespace as theDbContextclass available in this namespace. Our connection string is available in theApp.Configfile. In order to read the contents of theApp.Configfile, we are including theConfigurationManagerclass inSystem.Configuration. - In order to use the
DbContextAPI, a class has to be created which inherits from theDbContextclass so that we can access methods of theDbContextAPI. We have created theEmployeeDbContextclass which was inherited fromDbContextclass. DbSetis a class which allows operations of the Entity Framework to be performed for a given Entity type. We need to create theDbSetobject for each of the Entity types that we use in our application. In this example, we are using only oneDbSetobject as we are working with theEmployeeclass.
Migration is the process of recording all the changes of your database. Add-Migration is the Entity Framework command for adding migration:
- Once you add the migration, you can revoke the changes by executing the
Remove-MigrationEntity Framework command.- This is what the migrations directory looks like:
- This is what the migrations directory looks like:
- Update the database by issuing the Entity Framework command
Update-Database, which updates the database tables as per the information available in the migration. As we have installed theEntityFramework.Commandspackage earlier, these commands will be available for the application: - Once you update the database, you can see the changes in the database by connecting to SQL Server Management Studio:
- Perform the database operation to save the business domain object in the database. You can create the database manually or, if the database is not available, it will create one for you.
The Main method is updated with the following code:
class Program {
  static void Main(string[] args) {
    AddEmployee();
  }

  static void AddEmployee() {
    using (var db = new EmployeeDbContext()) {
      Employee employee= new Employee {
        Designation = "Software Engineer",
        Name = "Scott",
        Salary = 5600
      };

      db.Employees.Add(employee);
      int recordsInserted = db.SaveChanges();
      Console.WriteLine("Number of records inserted:" +        recordsInserted);
      Console.ReadLine();
    }
  }
}
Firstly, we are constructing the business domain object. Then, we are adding the constructed Employee object to the employee's DbSet of the DbContext class. Finally, we are calling the SaveChanges method DbContext API, which will save all the pending changes to the database.
You might be wondering how it can save it to the database when we have not even given the connection string.
Let us discuss what happens behind the scenes when we run the program:
- When you make changes to any of the
DbSetcollection, the Entity Framework checks whether the database exists. If it does not exist, it creates a new one using the pattern<Namespace of DbContextName>. In our case, a database called byEF6.EmployeeDbContextwould be created. - Then, it creates database tables for the entities declared in
DbSet. By convention, the Entity Framework uses the pluralized form of Entity for the table names. As we have declaredDbSetfor theEmployeeentity, the Entity Framework creates a pluralized form ofEmployeeand creates the table namedEmployees.
The creation of the database and tables happens when the following code is executed:
db.Employees.Add(employee);
When SaveChanges method is executed, the data in the Employee object will get saved to the database and returns the number of records affected. In the preceding case, it returns 1.
When you run the application again, the first two steps mentioned previously will be skipped as the database and table will have already been created.
When you query the database, you can see the newly inserted record:
When we are making changes, the Entity Framework tracks the state of each of the objects and executes the appropriate query when SaveChanges method is called.
For example, when we add an Employee object to the employees' collection (DbSet), this object is being tracked as Entity in the Added state. When SaveChanges is called, the Entity Framework creates an insert query for the same and executes it. The same is the case with updating and deleting the object. The Entity Framework sets the Entity state of the respective objects to Modified and Deleted. When SaveChanges is called, it creates and executes the Update and Delete queries.
The preceding figure explains how the SaveChanges method works at a high-level for different types of change. We have a couple of POCO objects (Object 1 and Object 2), which have been added to the employees' DbSet object. Let us assume Object 3 and Object 4 have been modified and objects Object 5 and Object 6 are in Deleted state. When you call SaveChanges method, it creates three sets of queries. The first set of queries is for the addition of objects, resulting in insert queries getting executed against the database. In the second set of queries, Update queries are created and executed for the objects whose state is modified. Finally, Delete queries are executed for the objects for all the Deleted state objects.
Let us try to update the salary of an inserted employee record using the Entity Framework:
static void UpdateSalary() {
  using (var db = new EmployeeDbContext()){
    Employee employee = db.Employees.Where(emp => emp.EmployeeId      == 1).FirstOrDefault();
    if(employee!=null){
      employee.Salary = 6500;
      int recordsUpdated = db.SaveChanges();
      Console.WriteLine("Records updated:" + recordsUpdated);
      Console.ReadLine();
    }
  }
}
In the preceding method, we find the employee with EmployeeId = 1. Then, we update the salary of the employee to 6500 and save the employee object to the database. Please note that, in the preceding method, we interact with the database a couple of times—once to find the correct employee record (read operation) and again to update the record (update operation).
static void Main(string[] args){
  UpdateSalary();
}
The Main method is updated to call the UpdateSalary method. When you query the database, you should see the record with the updated information:
Deleting the record is a bit tricky as it involves setting the state directly. In the following method, firstly we get the object and setting the state of the object to Deleted. Then calling the SaveChanges method will generate the delete query for the object and execute it, which in turn will eventually delete the record in the database:
static void DeleteEmployee() {
  using (var db = new EmployeeDbContext()) {
    Employee employeeToBeDeleted = db.Employees.Where(emp =>      emp.EmployeeId == 1).FirstOrDefault();
    if (employeeToBeDeleted != null) {
      db.Entry(employeeToBeDeleted).State =        Microsoft.Data.Entity.EntityState.Deleted;
      int recordsDeleted = db.SaveChanges();
      Console.WriteLine("Number of records deleted:" +        recordsDeleted);
      Console.ReadLine();
    }
  }
}

static void Main(string[] args) {
  DeleteEmployee();
}
Creating the DbContext class
The instance of the DbContext class represents the session to the database and this DbContext class does most of the heavy lifting of your data access for your application.
Create a new class by the named EmployeeDbContext with the following content:
using Microsoft.Data.Entity;
using System.Configuration;

namespace ConsoleEF7 {
  public class EmployeeDbContext : DbContext{
    public DbSet<Employee> Employees {get; set;}

    protected override void OnConfiguring(DbContextOptionsBuilder      optionsBuilder) {string connectionString =        ConfigurationManager.ConnectionStrings       ["SqlServerExpress"].ConnectionString;
      optionsBuilder.UseSqlServer(connectionString);
      base.OnConfiguring(optionsBuilder);
    }
  }
}
Configure it using App.Config:
<?xml version="1.0" encoding="utf-8" ?>
<configuration>
  <startup>
    <supportedRuntime version="v4.0"
    sku=".NETFramework,Version=v4.6.1" />
  </startup>
  <connectionStrings>
    <add name="SqlServerExpress" connectionString="Data Source=     MUGIL-PC\SQLEXPRESS;Initial Catalog=EF7Console;Integrated      Security=True"/>
  </connectionStrings>
</configuration>
There are a few things to be noted in the preceding code snippet:
- Include the
Microsoft.Data.Entitynamespace as theDbContextclass available in this namespace. Our connection string is available in theApp.Configfile. In order to read the contents of theApp.Configfile, we are including theConfigurationManagerclass inSystem.Configuration. - In order to use the
DbContextAPI, a class has to be created which inherits from theDbContextclass so that we can access methods of theDbContextAPI. We have created theEmployeeDbContextclass which was inherited fromDbContextclass. DbSetis a class which allows operations of the Entity Framework to be performed for a given Entity type. We need to create theDbSetobject for each of the Entity types that we use in our application. In this example, we are using only oneDbSetobject as we are working with theEmployeeclass.
Migration is the process of recording all the changes of your database. Add-Migration is the Entity Framework command for adding migration:
- Once you add the migration, you can revoke the changes by executing the
Remove-MigrationEntity Framework command.- This is what the migrations directory looks like:
- This is what the migrations directory looks like:
- Update the database by issuing the Entity Framework command
Update-Database, which updates the database tables as per the information available in the migration. As we have installed theEntityFramework.Commandspackage earlier, these commands will be available for the application: - Once you update the database, you can see the changes in the database by connecting to SQL Server Management Studio:
- Perform the database operation to save the business domain object in the database. You can create the database manually or, if the database is not available, it will create one for you.
The Main method is updated with the following code:
class Program {
  static void Main(string[] args) {
    AddEmployee();
  }

  static void AddEmployee() {
    using (var db = new EmployeeDbContext()) {
      Employee employee= new Employee {
        Designation = "Software Engineer",
        Name = "Scott",
        Salary = 5600
      };

      db.Employees.Add(employee);
      int recordsInserted = db.SaveChanges();
      Console.WriteLine("Number of records inserted:" +        recordsInserted);
      Console.ReadLine();
    }
  }
}
Firstly, we are constructing the business domain object. Then, we are adding the constructed Employee object to the employee's DbSet of the DbContext class. Finally, we are calling the SaveChanges method DbContext API, which will save all the pending changes to the database.
You might be wondering how it can save it to the database when we have not even given the connection string.
Let us discuss what happens behind the scenes when we run the program:
- When you make changes to any of the
DbSetcollection, the Entity Framework checks whether the database exists. If it does not exist, it creates a new one using the pattern<Namespace of DbContextName>. In our case, a database called byEF6.EmployeeDbContextwould be created. - Then, it creates database tables for the entities declared in
DbSet. By convention, the Entity Framework uses the pluralized form of Entity for the table names. As we have declaredDbSetfor theEmployeeentity, the Entity Framework creates a pluralized form ofEmployeeand creates the table namedEmployees.
The creation of the database and tables happens when the following code is executed:
db.Employees.Add(employee);
When SaveChanges method is executed, the data in the Employee object will get saved to the database and returns the number of records affected. In the preceding case, it returns 1.
When you run the application again, the first two steps mentioned previously will be skipped as the database and table will have already been created.
When you query the database, you can see the newly inserted record:
When we are making changes, the Entity Framework tracks the state of each of the objects and executes the appropriate query when SaveChanges method is called.
For example, when we add an Employee object to the employees' collection (DbSet), this object is being tracked as Entity in the Added state. When SaveChanges is called, the Entity Framework creates an insert query for the same and executes it. The same is the case with updating and deleting the object. The Entity Framework sets the Entity state of the respective objects to Modified and Deleted. When SaveChanges is called, it creates and executes the Update and Delete queries.
The preceding figure explains how the SaveChanges method works at a high-level for different types of change. We have a couple of POCO objects (Object 1 and Object 2), which have been added to the employees' DbSet object. Let us assume Object 3 and Object 4 have been modified and objects Object 5 and Object 6 are in Deleted state. When you call SaveChanges method, it creates three sets of queries. The first set of queries is for the addition of objects, resulting in insert queries getting executed against the database. In the second set of queries, Update queries are created and executed for the objects whose state is modified. Finally, Delete queries are executed for the objects for all the Deleted state objects.
Let us try to update the salary of an inserted employee record using the Entity Framework:
static void UpdateSalary() {
  using (var db = new EmployeeDbContext()){
    Employee employee = db.Employees.Where(emp => emp.EmployeeId      == 1).FirstOrDefault();
    if(employee!=null){
      employee.Salary = 6500;
      int recordsUpdated = db.SaveChanges();
      Console.WriteLine("Records updated:" + recordsUpdated);
      Console.ReadLine();
    }
  }
}
In the preceding method, we find the employee with EmployeeId = 1. Then, we update the salary of the employee to 6500 and save the employee object to the database. Please note that, in the preceding method, we interact with the database a couple of times—once to find the correct employee record (read operation) and again to update the record (update operation).
static void Main(string[] args){
  UpdateSalary();
}
The Main method is updated to call the UpdateSalary method. When you query the database, you should see the record with the updated information:
Deleting the record is a bit tricky as it involves setting the state directly. In the following method, firstly we get the object and setting the state of the object to Deleted. Then calling the SaveChanges method will generate the delete query for the object and execute it, which in turn will eventually delete the record in the database:
static void DeleteEmployee() {
  using (var db = new EmployeeDbContext()) {
    Employee employeeToBeDeleted = db.Employees.Where(emp =>      emp.EmployeeId == 1).FirstOrDefault();
    if (employeeToBeDeleted != null) {
      db.Entry(employeeToBeDeleted).State =        Microsoft.Data.Entity.EntityState.Deleted;
      int recordsDeleted = db.SaveChanges();
      Console.WriteLine("Number of records deleted:" +        recordsDeleted);
      Console.ReadLine();
    }
  }
}

static void Main(string[] args) {
  DeleteEmployee();
}
Create a migration
Migration is the process of recording all the changes of your database. Add-Migration is the Entity Framework command for adding migration:
- Once you add the migration, you can revoke the changes by executing the
Remove-MigrationEntity Framework command.- This is what the migrations directory looks like:
- This is what the migrations directory looks like:
- Update the database by issuing the Entity Framework command
Update-Database, which updates the database tables as per the information available in the migration. As we have installed theEntityFramework.Commandspackage earlier, these commands will be available for the application: - Once you update the database, you can see the changes in the database by connecting to SQL Server Management Studio:
- Perform the database operation to save the business domain object in the database. You can create the database manually or, if the database is not available, it will create one for you.
The Main method is updated with the following code:
class Program {
  static void Main(string[] args) {
    AddEmployee();
  }

  static void AddEmployee() {
    using (var db = new EmployeeDbContext()) {
      Employee employee= new Employee {
        Designation = "Software Engineer",
        Name = "Scott",
        Salary = 5600
      };

      db.Employees.Add(employee);
      int recordsInserted = db.SaveChanges();
      Console.WriteLine("Number of records inserted:" +        recordsInserted);
      Console.ReadLine();
    }
  }
}
Firstly, we are constructing the business domain object. Then, we are adding the constructed Employee object to the employee's DbSet of the DbContext class. Finally, we are calling the SaveChanges method DbContext API, which will save all the pending changes to the database.
You might be wondering how it can save it to the database when we have not even given the connection string.
Let us discuss what happens behind the scenes when we run the program:
- When you make changes to any of the
DbSetcollection, the Entity Framework checks whether the database exists. If it does not exist, it creates a new one using the pattern<Namespace of DbContextName>. In our case, a database called byEF6.EmployeeDbContextwould be created. - Then, it creates database tables for the entities declared in
DbSet. By convention, the Entity Framework uses the pluralized form of Entity for the table names. As we have declaredDbSetfor theEmployeeentity, the Entity Framework creates a pluralized form ofEmployeeand creates the table namedEmployees.
The creation of the database and tables happens when the following code is executed:
db.Employees.Add(employee);
When SaveChanges method is executed, the data in the Employee object will get saved to the database and returns the number of records affected. In the preceding case, it returns 1.
When you run the application again, the first two steps mentioned previously will be skipped as the database and table will have already been created.
When you query the database, you can see the newly inserted record:
When we are making changes, the Entity Framework tracks the state of each of the objects and executes the appropriate query when SaveChanges method is called.
For example, when we add an Employee object to the employees' collection (DbSet), this object is being tracked as Entity in the Added state. When SaveChanges is called, the Entity Framework creates an insert query for the same and executes it. The same is the case with updating and deleting the object. The Entity Framework sets the Entity state of the respective objects to Modified and Deleted. When SaveChanges is called, it creates and executes the Update and Delete queries.
The preceding figure explains how the SaveChanges method works at a high-level for different types of change. We have a couple of POCO objects (Object 1 and Object 2), which have been added to the employees' DbSet object. Let us assume Object 3 and Object 4 have been modified and objects Object 5 and Object 6 are in Deleted state. When you call SaveChanges method, it creates three sets of queries. The first set of queries is for the addition of objects, resulting in insert queries getting executed against the database. In the second set of queries, Update queries are created and executed for the objects whose state is modified. Finally, Delete queries are executed for the objects for all the Deleted state objects.
Let us try to update the salary of an inserted employee record using the Entity Framework:
static void UpdateSalary() {
  using (var db = new EmployeeDbContext()){
    Employee employee = db.Employees.Where(emp => emp.EmployeeId      == 1).FirstOrDefault();
    if(employee!=null){
      employee.Salary = 6500;
      int recordsUpdated = db.SaveChanges();
      Console.WriteLine("Records updated:" + recordsUpdated);
      Console.ReadLine();
    }
  }
}
In the preceding method, we find the employee with EmployeeId = 1. Then, we update the salary of the employee to 6500 and save the employee object to the database. Please note that, in the preceding method, we interact with the database a couple of times—once to find the correct employee record (read operation) and again to update the record (update operation).
static void Main(string[] args){
  UpdateSalary();
}
The Main method is updated to call the UpdateSalary method. When you query the database, you should see the record with the updated information:
Deleting the record is a bit tricky as it involves setting the state directly. In the following method, firstly we get the object and setting the state of the object to Deleted. Then calling the SaveChanges method will generate the delete query for the object and execute it, which in turn will eventually delete the record in the database:
static void DeleteEmployee() {
  using (var db = new EmployeeDbContext()) {
    Employee employeeToBeDeleted = db.Employees.Where(emp =>      emp.EmployeeId == 1).FirstOrDefault();
    if (employeeToBeDeleted != null) {
      db.Entry(employeeToBeDeleted).State =        Microsoft.Data.Entity.EntityState.Deleted;
      int recordsDeleted = db.SaveChanges();
      Console.WriteLine("Number of records deleted:" +        recordsDeleted);
      Console.ReadLine();
    }
  }
}

static void Main(string[] args) {
  DeleteEmployee();
}
How the SaveChanges method works
When we are making changes, the Entity Framework tracks the state of each of the objects and executes the appropriate query when SaveChanges method is called.
For example, when we add an Employee object to the employees' collection (DbSet), this object is being tracked as Entity in the Added state. When SaveChanges is called, the Entity Framework creates an insert query for the same and executes it. The same is the case with updating and deleting the object. The Entity Framework sets the Entity state of the respective objects to Modified and Deleted. When SaveChanges is called, it creates and executes the Update and Delete queries.
The preceding figure explains how the SaveChanges method works at a high-level for different types of change. We have a couple of POCO objects (Object 1 and Object 2), which have been added to the employees' DbSet object. Let us assume Object 3 and Object 4 have been modified and objects Object 5 and Object 6 are in Deleted state. When you call SaveChanges method, it creates three sets of queries. The first set of queries is for the addition of objects, resulting in insert queries getting executed against the database. In the second set of queries, Update queries are created and executed for the objects whose state is modified. Finally, Delete queries are executed for the objects for all the Deleted state objects.
Let us try to update the salary of an inserted employee record using the Entity Framework:
static void UpdateSalary() {
  using (var db = new EmployeeDbContext()){
    Employee employee = db.Employees.Where(emp => emp.EmployeeId      == 1).FirstOrDefault();
    if(employee!=null){
      employee.Salary = 6500;
      int recordsUpdated = db.SaveChanges();
      Console.WriteLine("Records updated:" + recordsUpdated);
      Console.ReadLine();
    }
  }
}
In the preceding method, we find the employee with EmployeeId = 1. Then, we update the salary of the employee to 6500 and save the employee object to the database. Please note that, in the preceding method, we interact with the database a couple of times—once to find the correct employee record (read operation) and again to update the record (update operation).
static void Main(string[] args){
  UpdateSalary();
}
The Main method is updated to call the UpdateSalary method. When you query the database, you should see the record with the updated information:
Deleting the record is a bit tricky as it involves setting the state directly. In the following method, firstly we get the object and setting the state of the object to Deleted. Then calling the SaveChanges method will generate the delete query for the object and execute it, which in turn will eventually delete the record in the database:
static void DeleteEmployee() {
  using (var db = new EmployeeDbContext()) {
    Employee employeeToBeDeleted = db.Employees.Where(emp =>      emp.EmployeeId == 1).FirstOrDefault();
    if (employeeToBeDeleted != null) {
      db.Entry(employeeToBeDeleted).State =        Microsoft.Data.Entity.EntityState.Deleted;
      int recordsDeleted = db.SaveChanges();
      Console.WriteLine("Number of records deleted:" +        recordsDeleted);
      Console.ReadLine();
    }
  }
}

static void Main(string[] args) {
  DeleteEmployee();
}
Updating the record
Let us try to update the salary of an inserted employee record using the Entity Framework:
static void UpdateSalary() {
  using (var db = new EmployeeDbContext()){
    Employee employee = db.Employees.Where(emp => emp.EmployeeId      == 1).FirstOrDefault();
    if(employee!=null){
      employee.Salary = 6500;
      int recordsUpdated = db.SaveChanges();
      Console.WriteLine("Records updated:" + recordsUpdated);
      Console.ReadLine();
    }
  }
}
In the preceding method, we find the employee with EmployeeId = 1. Then, we update the salary of the employee to 6500 and save the employee object to the database. Please note that, in the preceding method, we interact with the database a couple of times—once to find the correct employee record (read operation) and again to update the record (update operation).
static void Main(string[] args){
  UpdateSalary();
}
The Main method is updated to call the UpdateSalary method. When you query the database, you should see the record with the updated information:
Deleting the record is a bit tricky as it involves setting the state directly. In the following method, firstly we get the object and setting the state of the object to Deleted. Then calling the SaveChanges method will generate the delete query for the object and execute it, which in turn will eventually delete the record in the database:
static void DeleteEmployee() {
  using (var db = new EmployeeDbContext()) {
    Employee employeeToBeDeleted = db.Employees.Where(emp =>      emp.EmployeeId == 1).FirstOrDefault();
    if (employeeToBeDeleted != null) {
      db.Entry(employeeToBeDeleted).State =        Microsoft.Data.Entity.EntityState.Deleted;
      int recordsDeleted = db.SaveChanges();
      Console.WriteLine("Number of records deleted:" +        recordsDeleted);
      Console.ReadLine();
    }
  }
}

static void Main(string[] args) {
  DeleteEmployee();
}
Deleting the record
Deleting the record is a bit tricky as it involves setting the state directly. In the following method, firstly we get the object and setting the state of the object to Deleted. Then calling the SaveChanges method will generate the delete query for the object and execute it, which in turn will eventually delete the record in the database:
static void DeleteEmployee() {
  using (var db = new EmployeeDbContext()) {
    Employee employeeToBeDeleted = db.Employees.Where(emp =>      emp.EmployeeId == 1).FirstOrDefault();
    if (employeeToBeDeleted != null) {
      db.Entry(employeeToBeDeleted).State =        Microsoft.Data.Entity.EntityState.Deleted;
      int recordsDeleted = db.SaveChanges();
      Console.WriteLine("Number of records deleted:" +        recordsDeleted);
      Console.ReadLine();
    }
  }
}

static void Main(string[] args) {
  DeleteEmployee();
}
There is not much difference between using the Entity Framework in a console application and ASP.NET MVC application. Now, we are going to build a simple application with a single screen as shown in the following image. In this screen, we will have a form where the user will enter the information about the employee; once the user submits the form, the information will be saved to the database and reflected in the following screenshots:

We can create a simple Model for the employee. We need to build a ViewModel for this View, as we need to get the employee information from the user and we need to show a list of employees as well on the same screen.
Let us create an ASP.NET Core application, adding the employee and showing the list of employees. The following is the step-by-step instructions to create the application for the previously mentioned objective:
- Create an ASP.NET Core project in Visual Studio by selecting an empty ASP.NET 5 application.
- Install the ASP.NET Core
NuGetpackage. - Install the Entity Framework 7
NuGetpackage and ef EntityFramework commands (for database migration) as explained earlier in this chapter. - Add
config.jsonto declare the connection string of the database:{ "Data": { "DefaultConnection": { "ConnectionString": "Data Source=MUGIL-PC\\SQLEXPRESS;Initial Catalog=Validation;Integrated Security=True" } } } - Update
project.jsonto include EntityFramework 7 and EntityFramework commands. The changes are highlighted in bold:{ "version": "1.0.0-*", "compilationOptions":{ "emitEntryPoint": true }, "dependencies": { "Microsoft.AspNet.IISPlatformHandler": "1.0.0-rc1-final", "Microsoft.AspNet.Mvc": "6.0.0-rc1-final", "Microsoft.AspNet.Server.Kestrel": "1.0.0-rc1-final", "EntityFramework.MicrosoftSqlServer": "7.0.0-rc1-final", "EntityFramework.Commands": "7.0.0-rc1-final" }, "commands": { "web": "Microsoft.AspNet.Server.Kestrel", "ef": "EntityFramework.Commands" }, "frameworks": { "dnx451": { }, "dnxcore50": { } }, "exclude": [ "wwwroot", "node_modules" ], "publishExclude": [ "**.user", "**.vspscc" ] } - Configure MVC in the
Startupclass (Startup.cs):- In the constructor, we are building the configuration by reading the
config.jsonfile - Add the MVC service and the Entity Framework service to the services in the
ConfigureServicesmethod - Configure the MVC routing in the
Configuremethod:using Microsoft.AspNet.Builder; using Microsoft.AspNet.Hosting; using Microsoft.AspNet.Http; using Microsoft.Extensions.DependencyInjection; using Microsoft.Extensions.Configuration; using Validation.Models; using Microsoft.Data.Entity; using Microsoft.Extensions.PlatformAbstractions; namespace Validation { public class Startup { public IConfigurationRoot Configuration { get; set; } public Startup(IHostingEnvironment env, IApplicationEnvironment appEnv) { var builder = new ConfigurationBuilder() .AddJsonFile("config.json") .AddEnvironmentVariables(); Configuration = builder.Build(); } // This method gets called by the runtime. Use this method to add services to the container. // For more information on how to configure your application, visit http ://go.microsoft.com/fwlink/?LinkID=398940 public void ConfigureServices(IServiceCollection services) { services.AddEntityFramework() .AddSqlServer() .AddDbContext<EmployeeDbContext>(options => { options.UseSqlServer(Configuration.Get<string> ("Data:DefaultConnection:ConnectionString")); }); services.AddMvc(); } // This method gets called by the runtime. Use this method to configure the HTTP request pipeline. public void Configure(IApplicationBuilder app) { app.UseIISPlatformHandler(); app.UseMvc(routes => { routes.MapRoute( name: "default", template: "{controller=Employee}/ {action=Index}/{id?}"); }); } // Entry point for the application. public static void Main(string[] args) => WebApplication.Run<Startup>(args); } }
- In the constructor, we are building the configuration by reading the
- Create
ModelsandDbContextclasses. - Create the
Modelsfolder and add theEmployeemodel class andEmployeeDbContextclass. - Create the
EmployeeModel class (Employee.csin theModelsfolder):public class Employee { public int EmployeeId { get; set; } public string Name { get; set; } public string Designation { get; set; } public decimal Salary { get; set; } } - Create
EmployeeDbContext(EmployeeDbContext.csin theModelsfolder):using Microsoft.Data.Entity; using Microsoft.Extensions.Configuration; namespace Validation.Models { public class EmployeeDbContext : DbContext { public IConfigurationRoot Configuration { get; set; } public DbSet<Employee> Employees { get; set; } public EmployeeDbContext() { var builder = new ConfigurationBuilder() .AddJsonFile("config.json") .AddEnvironmentVariables(); Configuration = builder.Build(); } protected override void OnConfiguring (DbContextOptionsBuilder optionsBuilder) { optionsBuilder.UseSqlServer (Configuration.Get<string> ("Data:DefaultConnection:ConnectionString")); base.OnConfiguring(optionsBuilder); } } } - Create
ViewModels:- As we are going to show a list of employees and the form to add employees in the same screen, we are going to build a Model specific to this View. This model will contain information about the list of employees and the employee to be added.
- Create the
ViewModelsfolder and add theEmployeeAddViewModel:using MVCEF7.Models; namespace MVCEF7.ViewModels { public class EmployeeAddViewModel { public List<Employee> EmployeesList { get; set; } public Employee NewEmployee { get; set; } } }- This
ViewModelhas a couple of properties.EmployeesListandNewEmployee.EmployeesListwill contain the list of employees. This list would be fetched from the database.NewEmployeewill hold the employee information entered by the user.
- This
- Create
Controllersto handle the incoming requests:- Create a
Controllersfolder and add theEmployeeControllerclass with a couple of action methods-one forGETand another forPOST. TheIndexaction method corresponding to theGETaction method will be called when you access the URL (http://localhost/Employee/Index) or when you run the application. ThePOST Indexaction method will be called when you submit the form as following:public IActionResult Index() { EmployeeAddViewModel employeeAddViewModel = new EmployeeAddViewModel(); using (var db = new EmployeeDbContext()) { employeeAddViewModel.EmployeesList = db.Employees.ToList(); employeeAddViewModel.NewEmployee = new Employee(); } return View(employeeAddViewModel); } - In the preceding
GET Indexaction method, we are creating theViewModelobject and passing it to the View. - The following code uses
POST Indexaction method:[HttpPost] public IActionResult Index(EmployeeAddViewModel employeeAddViewModel) { using (var db = new EmployeeDbContext()) { db.Employees.Add(employeeAddViewModel.NewEmployee); db.SaveChanges(); //Redirect to get Index GET method return RedirectToAction("Index"); } } - We get the
NewEmployeeproperty in the ViewModel, which contains the information on the user. Save it to the database. Once we save the employee information to the database and we redirect the control to theGET Indexaction method, theGET Indexaction method will again show the form to enter the employee information and the list of employees in table format.
- Create a
- Add the
Viewsfolder:- Create
Views\_ViewStart.cshtmlwith the following content:@{ Layout = "_Layout"; } - Create
Views\Shared\_Layout.cshtmlwith the following content:<!DOCTYPE html> <html> <head> <meta name="viewport" content="width=device-width" /> <title>@ViewBag.Title</title> </head> <body> <div> @RenderBody() </div> </body> </html> - Create
Views\Employee\Index.cshtmlwith the following content:@model MVCEF.ViewModels.EmployeeAddViewModel @* //For more information on enabling MVC for empty projects, visit http://go.microsoft.com/fwlink/?LinkID=397860 *@ @{ } <div> @using (Html.BeginForm("Index", "Employee", FormMethod.Post)) { <table> <tr> <td>@Html.LabelFor(Model => Model.NewEmployee.Name)</td> <td>@Html.TextBoxFor(Model => Model.NewEmployee.Name)</td> </tr> <tr> <td>@Html.LabelFor(Model => Model.NewEmployee.Designation)</td> <td>@Html.TextBoxFor(Model => Model.NewEmployee.Designation)</td> </tr> <tr> <td>@Html.LabelFor(Model => Model.NewEmployee.Salary)</td> <td>@Html.TextBoxFor(Model => Model.NewEmployee.Salary)</td> </tr> <tr> <td colspan="2"><input type="submit" value="Submit"/> </td> </tr> </table> } </div> <br/><br/> <br/> <b> List of employees:</b> <br/> <div> <table border="1"> <tr> <th> ID </th> <th> Name </th> <th> Designation </th> <th> Salary </th> </tr> @foreach(var employee in Model.EmployeesList) { <tr> <td>@employee.EmployeeId</td> <td>@employee.Name</td> <td>@employee.Designation</td> <td>@employee.Salary</td> </tr> } </table> </div>
- Create
In the preceding Index view, we create a form where we get the employee information from the user in the topmost div. In the next div, we show the list of employees in a tabular format.
Once we create all the folders and the files, the project structure should look like the following:
We have created the business entity—the Employee class. Now, we can proceed with the migration. Migration is a two-step process: in the first step, we create the migration files. This can be done by executing the following command from the command prompt from the context of the project:
dnx ef migrations add InitialMigration
This command will create the migration files in your project, as shown in the following screenshot:

Then execute the following command to create the database:

This command will read the migration files created in the previous step and create the database along with the associated tables:
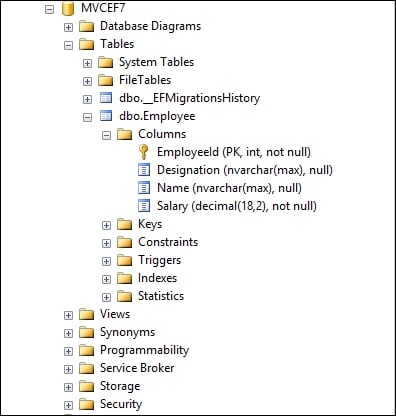
Run the application. You will get the following screen, where the user can enter the employee information in the form. As we are using the strongly typed model in our view, it takes the default values for all the properties. The Name and Designation are properties of type string and the default values are empty string for these fields, Salary is of type decimal and the default value for decimal is 0 hence 0 is shown in the form when it is loaded for the Salary field.
As there are no records, we are showing 0 records in the List of employees table:

When you enter the information in the form and submit it, the information gets saved in the database and all the database records in the Employees table will be presented as follows:

In this chapter, we learned what a Model is and how it fits in the ASP.NET MVC application. Then, we created a simple Model, built model data in a Controller, passed the Model to the View, and shown the data using the View. We have learned about the Models specific to a View and have discussed the flow of the data with respect to Models. We learned about the Entity Framework, an ORM framework from Microsoft, and how it simplifies database access from your .NET application. We have created simple console application where we have inserted, updated, and deleted the records. Finally, we have built an ASP.NET Core application that uses Model, ViewModel, and Entity Framework.