-
Book Overview & Buying
-
Table Of Contents
Django 3 By Example - Third Edition
By :
You will build a comment system wherein users will be able to comment on posts. To build the comment system, you need to do the following:
First, let's build a model to store comments. Open the models.py file of your blog application and add the following code:
class Comment(models.Model):
post = models.ForeignKey(Post,
on_delete=models.CASCADE,
related_name='comments')
name = models.CharField(max_length=80)
email = models.EmailField()
body = models.TextField()
created = models.DateTimeField(auto_now_add=True)
updated = models.DateTimeField(auto_now=True)
active = models.BooleanField(default=True)
class Meta:
ordering = ('created',)
def __str__(self):
return f'Comment by {self.name} on {self.post}'
This is your Comment model. It contains a ForeignKey to associate a comment with a single post. This many-to-one relationship is defined in the Comment model because each comment will be made on one post, and each post may have multiple comments.
The related_name attribute allows you to name the attribute that you use for the relationship from the related object back to this one. After defining this, you can retrieve the post of a comment object using comment.post and retrieve all comments of a post using post.comments.all(). If you don't define the related_name attribute, Django will use the name of the model in lowercase, followed by _set (that is, comment_set) to name the relationship of the related object to the object of the model, where this relationship has been defined.
You can learn more about many-to-one relationships at https://docs.djangoproject.com/en/3.0/topics/db/examples/many_to_one/.
You have included an active Boolean field that you will use to manually deactivate inappropriate comments. You use the created field to sort comments in a chronological order by default.
The new Comment model that you just created is not yet synchronized into the database. Run the following command to generate a new migration that reflects the creation of the new model:
python manage.py makemigrations blog
You should see the following output:
Migrations for 'blog':
blog/migrations/0002_comment.py
- Create model Comment
Django has generated a 0002_comment.py file inside the migrations/ directory of the blog application. Now, you need to create the related database schema and apply the changes to the database. Run the following command to apply existing migrations:
python manage.py migrate
You will get an output that includes the following line:
Applying blog.0002_comment... OK
The migration that you just created has been applied; now a blog_comment table exists in the database.
Next, you can add your new model to the administration site in order to manage comments through a simple interface. Open the admin.py file of the blog application, import the Comment model, and add the following ModelAdmin class:
from .models import Post, Comment
@admin.register(Comment)
class CommentAdmin(admin.ModelAdmin):
list_display = ('name', 'email', 'post', 'created', 'active')
list_filter = ('active', 'created', 'updated')
search_fields = ('name', 'email', 'body')
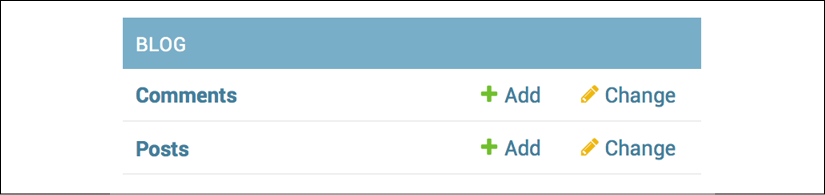
Start the development server with the python manage.py runserver command and open http://127.0.0.1:8000/admin/ in your browser. You should see the new model included in the BLOG section, as shown in the following screenshot:

Figure 2.6: Blog application models on the Django administration index page
The model is now registered in the administration site, and you can manage Comment instances using a simple interface.
You still need to build a form to let your users comment on blog posts. Remember that Django has two base classes to build forms: Form and ModelForm. You used the first one previously to let your users share posts by email. In the present case, you will need to use ModelForm because you have to build a form dynamically from your Comment model. Edit the forms.py file of your blog application and add the following lines:
from .models import Comment
class CommentForm(forms.ModelForm):
class Meta:
model = Comment
fields = ('name', 'email', 'body')
To create a form from a model, you just need to indicate which model to use to build the form in the Meta class of the form. Django introspects the model and builds the form dynamically for you.
Each model field type has a corresponding default form field type. The way that you define your model fields is taken into account for form validation. By default, Django builds a form field for each field contained in the model. However, you can explicitly tell the framework which fields you want to include in your form using a fields list, or define which fields you want to exclude using an exclude list of fields. For your CommentForm form, you will just use the name, email, and body fields, because those are the only fields that your users will be able to fill in.
You will use the post detail view to instantiate the form and process it, in order to keep it simple. Edit the views.py file, add imports for the Comment model and the CommentForm form, and modify the post_detail view to make it look like the following:
from .models import Post, Comment
from .forms import EmailPostForm, CommentForm
def post_detail(request, year, month, day, post):
post = get_object_or_404(Post, slug=post,
status='published',
publish__year=year,
publish__month=month,
publish__day=day)
# List of active comments for this post
comments = post.comments.filter(active=True)
new_comment = None
if request.method == 'POST':
# A comment was posted
comment_form = CommentForm(data=request.POST)
if comment_form.is_valid():
# Create Comment object but don't save to database yet
new_comment = comment_form.save(commit=False)
# Assign the current post to the comment
new_comment.post = post
# Save the comment to the database
new_comment.save()
else:
comment_form = CommentForm()
return render(request,
'blog/post/detail.html',
{'post': post,
'comments': comments,
'new_comment': new_comment,
'comment_form': comment_form})
Let's review what you have added to your view. You used the post_detail view to display the post and its comments. You added a QuerySet to retrieve all active comments for this post, as follows:
comments = post.comments.filter(active=True)
You build this QuerySet, starting from the post object. Instead of building a QuerySet for the Comment model directly, you leverage the post object to retrieve the related Comment objects. You use the manager for the related objects that you defined as comments using the related_name attribute of the relationship in the Comment model. You use the same view to let your users add a new comment. You initialize the new_comment variable by setting it to None. You will use this variable when a new comment is created.
You build a form instance with comment_form = CommentForm() if the view is called by a GET request. If the request is done via POST, you instantiate the form using the submitted data and validate it using the is_valid() method. If the form is invalid, you render the template with the validation errors. If the form is valid, you take the following actions:
Comment object by calling the form's save() method and assign it to the new_comment variable, as follows:
new_comment = comment_form.save(commit=False)
The save() method creates an instance of the model that the form is linked to and saves it to the database. If you call it using commit=False, you create the model instance, but don't save it to the database yet. This comes in handy when you want to modify the object before finally saving it, which is what you will do next.
The save() method is available for ModelForm but not for Form instances, since they are not linked to any model.
new_comment.post = post
By doing this, you specify that the new comment belongs to this post.
save() method:
new_comment.save()
Your view is now ready to display and process new comments.
You have created the functionality to manage comments for a post. Now you need to adapt your post/detail.html template to do the following things:
First, you will add the total comments. Open the post/detail.html template and append the following code to the content block:
{% with comments.count as total_comments %}
<h2>
{{ total_comments }} comment{{ total_comments|pluralize }}
</h2>
{% endwith %}
You are using the Django ORM in the template, executing the QuerySet comments.count(). Note that the Django template language doesn't use parentheses for calling methods. The {% with %} tag allows you to assign a value to a new variable that will be available to be used until the {% endwith %} tag.
The {% with %} template tag is useful for avoiding hitting the database or accessing expensive methods multiple times.
You use the pluralize template filter to display a plural suffix for the word "comment," depending on the total_comments value. Template filters take the value of the variable they are applied to as their input and return a computed value. We will discuss template filters in Chapter 3, Extending Your Blog Application.
The pluralize template filter returns a string with the letter "s" if the value is different from 1. The preceding text will be rendered as 0 comments, 1 comment, or N comments. Django includes plenty of template tags and filters that can help you to display information in the way that you want.
Now, let's include the list of comments. Append the following lines to the post/detail.html template below the preceding code:
{% for comment in comments %}
<div class="comment">
<p class="info">
Comment {{ forloop.counter }} by {{ comment.name }}
{{ comment.created }}
</p>
{{ comment.body|linebreaks }}
</div>
{% empty %}
<p>There are no comments yet.</p>
{% endfor %}
You use the {% for %} template tag to loop through comments. You display a default message if the comments list is empty, informing your users that there are no comments on this post yet. You enumerate comments with the {{ forloop.counter }} variable, which contains the loop counter in each iteration. Then, you display the name of the user who posted the comment, the date, and the body of the comment.
Finally, you need to render the form or display a success message instead when it is successfully submitted. Add the following lines just below the preceding code:
{% if new_comment %}
<h2>Your comment has been added.</h2>
{% else %}
<h2>Add a new comment</h2>
<form method="post">
{{ comment_form.as_p }}
{% csrf_token %}
<p><input type="submit" value="Add comment"></p>
</form>
{% endif %}
The code is pretty straightforward: if the new_comment object exists, you display a success message because the comment was successfully created. Otherwise, you render the form with a paragraph, <p>, element for each field and include the CSRF token required for POST requests.
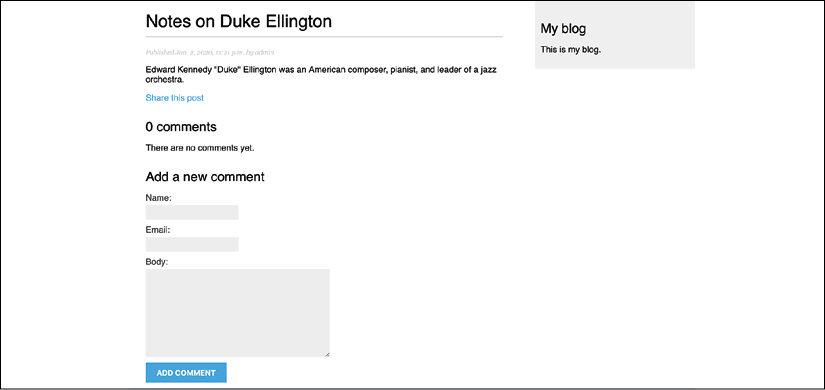
Open http://127.0.0.1:8000/blog/ in your browser and click on a post title to take a look at its detail page. You will see something like the following screenshot:

Figure 2.7: The post detail page, including the form to add a comment
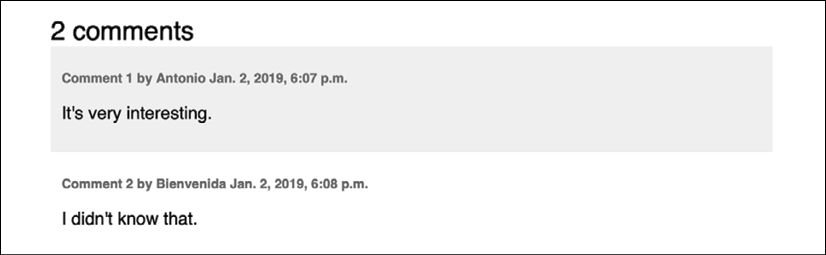
Add a couple of comments using the form. They should appear under your post in chronological order, as follows:

Figure 2.8: The comment list on the post detail page
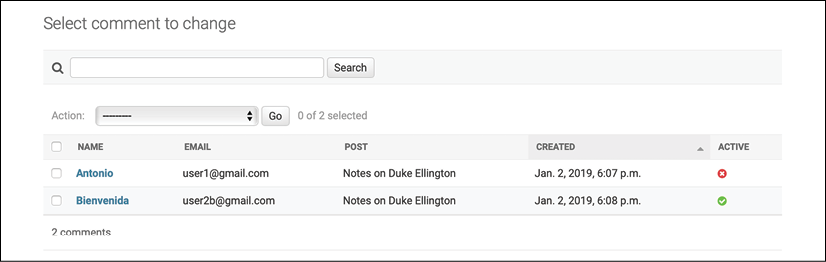
Open http://127.0.0.1:8000/admin/blog/comment/ in your browser. You will see the administration page with the list of comments you created. Click on the name of one of them to edit it, uncheck the Active checkbox, and click on the Save button. You will be redirected to the list of comments again, and the ACTIVE column will display an inactive icon for the comment. It should look like the first comment in the following screenshot:

Figure 2.9: Active/inactive comments on the Django administration site
If you return to the post detail view, you will note that the inactive comment is not displayed anymore; neither is it counted for the total number of comments. Thanks to the active field, you can deactivate inappropriate comments and avoid showing them on your posts.
Change the font size
Change margin width
Change background colour