

Let's go ahead and start the 5.19 upgrade. Here are the steps:
1. Download and extract the 5.19
tar.gz(from http://drupal.org/) to your local desktop. This will create a folder titleddrupal-5.19.2. Connect to your server through FTP/SFTP. Open up your local FTP window to show the Drupal 5.19 folder. Make sure your remote window shows your current Drupal site.
3. Select and move the following folders:
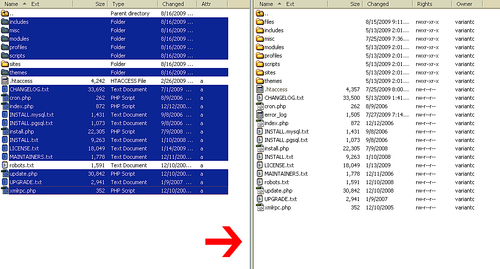
includes, misc, modules, profiles, scripts, themes). Also, move over all of the root level files (cron.php, index.php, and so on). You do not need to move over the/sitesfolder as this has your customizedsettings.phpfile. You do not want to replace that file, so just ignore that folder. You do not want to replace your.htaccessfile or yourrobots.txtfile either, as those may also have customized code. The rest of the folders and files will only replace the core Drupal files and folders, updating their code with the latest version. You do not need to replace the/filesfolder either.4. Start the transfer.
5. As soon as the files have transferred over through FTP, refresh your site's Status report. You should now see Drupal 5.19 listed.
6. Run
cronmanually again to see if you receive any new flag messages or errors. At this point Drupal will tell you that you need to update your database schema by runningupdate.php. This is a crucial step during any Drupal upgrade process, as it updates your entire Drupal database schema. For minor version upgrades, you usually do not need to runupdate.php, but if in doubt, run your Status report and this will tell you whether you need to update your database schema.7. If you are using the jQuery Update module in Drupal 5.x, you may receive a message in your Status report telling you to copy the
jQuery.jsscript file to the correct location. The upgrade process places this script into the/miscfolder and will overwrite your previousjQuery.jsfile. You will need to follow the instructions that Drupal gives you in your Status report and copy the file fromsites/all/modules/jquery_update/misc/jquery.js.

8. Run
crononce more to check Status report. You should now have a fully upgraded core Drupal 5.19 site.
The next step is to upgrade any contributed modules to the latest 5.x versions. This is a requirement before trying to upgrade to version 6. To determine if there's a new version of our contributed modules, we can install the Drupal Update Status module. Drupal 6.x has update status as part of its core modules, but with Drupal 5.x you need to install a contributed module. This will give you some practice in installing Drupal modules.
1. Go directly here: http://drupal.org/project/update_status and download the 5.x-2.3 version.
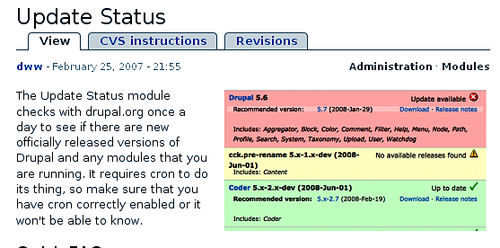
4. Go back to your Status report. You should see a red-flagged box notifying you that your modules need updating. The Module update status box will state: Not secure!

5. Click on the available updates link to see what contributed modules in your site need updating.
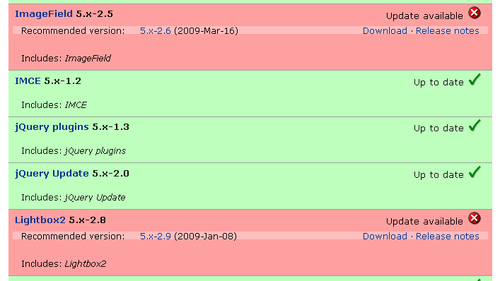
6. The Available Updates page will load and all modules needing updates will be flagged in red with the recommended version listed. The module provides a link to the module's project page at http://drupal.org/, so you can easily download the most recent version to your desktop.
7. Notice in our list, we need to update the ImageField and the Lightbox2 modules.
Remember that you need to update your contributed modules to the latest 5.x released versions before attempting to upgrade your Drupal site to 6.x. Before upgrading the 5.x versions of contributed modules, it's a good idea to back up your site files and database once more now that you're at the core Drupal 5.19 release.
1. Download the latest stable release of the Imagefield, Lightbox2, and Webform modules. The Project pages are here:
2. Copy the extracted folders to your
/sites/all/modulesfolder to replace current versions. Be aware here that you will be overwriting your contributed module code. So if you have made any hacks or edits to contributed code, you will need to replace those files later after you've upgraded.
Note
Remember that the golden rule followed by the Drupal project and community is do not hack core. This is also a good rule to follow with your contributed modules. If you have to manipulate module code, do this by using proper Drupal theme and module overrides in your template.php file.
3. Once you have replaced your Imagefield, Lightbox2, and Webform modules, refresh your available updates page.
4. Notice that in our FTP screenshot there's a bunch of
tar.gzfolders residing in our/sites/all/modulesdirectory. Sometimes you'll find these zipped folders remaining in your modules directory. They are just taking up unnecessary space. You can delete them safely from your/sites/all/modulesdirectory.5. Once you copy over your new versions, your available updates page should be green next to each module.
6. Run your Status report again—this is important because Drupal will then let you know if you need to run
update.php. Very often with contributed module upgrades and updates, you need to update your database schema. It's recommended to runupdate.phpafter every contributed module upgrade.7. In this case, after running Status report we do not need to update our database schema. The three modules we updated did not make any database level changes. So, we're good to go with our Drupal 5.19 upgrade. The update/upgrade process is now complete and we're ready to move onto the Drupal 6.x upgrade procedure.
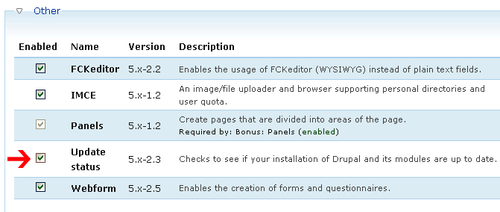
Before proceeding with the full version upgrade to Drupal 6.x, we must uninstall and remove the Drupal Update Status module. This module comes packaged with Drupal 6.x core, so we cannot leave the 5.x version of the Update status module in place.
1. Go to your modules admin page (Administer | Site Building | Modules).
2. Uncheck the Update status module checkbox and save the module configuration. This will disable the module.
3. Click on the Uninstall tab at the top of your modules page. This will load the uninstall list and any modules available (disabled modules) for uninstalling.
4. Check the Update status module box.
5. Click on the Uninstall button.
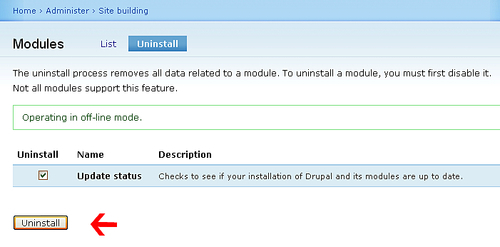
6. Drupal will ask you to confirm that you want to uninstall the module. Click on Uninstall again.
7. The module will be uninstalled.
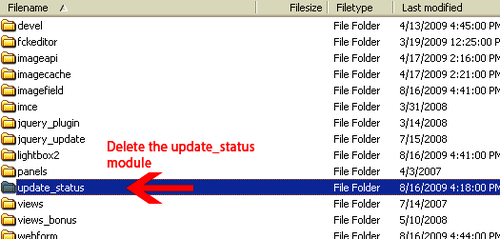
8. If you revisit your module admin list, you'll notice that the Update status module is still listed, but is not checked/enabled. You need to also delete the entire file folder for this module from your
/sites/all/modulesdirectory before proceeding with the upgrade. If any files are lingering on the server for this module, you could generate errors during the upgrade process.9. FTP into your server and remove the
update_statusfolder from/sites/all/modules.
10. Refresh your modules admin list and the
Update_statusmodule table row should be deleted.
Before proceeding with the upgrade to Drupal 6.x, complete the following steps:
1. Run
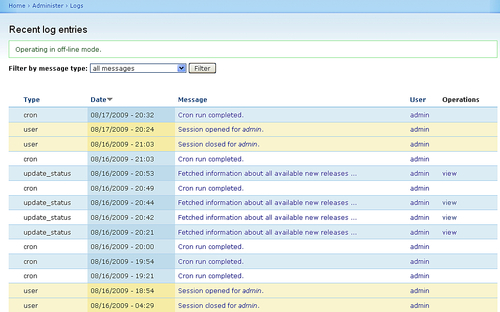
cronagain here:/admin/logs/status.2. View recent log entries to make sure you're not getting any parse errors or other errors in your current Drupal 5.19 site. It's a good idea to check and try to get as few errors as possible in your recent log reports before upgrading to Drupal 6.x. This will make the process go smoother.
3. To check recent log entries, go to Administer | Logs | Recent log entries. Your report or table should list all blue links and successful tasks. If you notice any red errors, make a note of them to troubleshoot before going forward. You should see something similar to the following screenshot (notice that no errors are visible):
In our upgrade process to Drupal 6.x, I'm going to focus on two contributed modules and the process of upgrading these two modules (as well as our other contributed modules) to their 6.x versions. When upgrading your contributed modules, it's good practice to read all of the module project information on the drupal.org website. Visit the Drupal contributed module project page for details about the module and how the module behaves during the upgrade process. You will also want to confirm that your contributed modules have 6.x versions. If the module has not been ported to 6.x yet, you will not want to proceed with an upgrade to Drupal 6.x unless you can live without that module's functionality on your website. Many of the contributed modules have been ported to Drupal 6.x at this time, but some are still in development mode. You are responsible for checking for this information and confirming the release version before upgrading.
While viewing a module's project page at drupal.org, look for the release versions in the Releases table at the bottom of the project page. For example, for the Views module you will see this:
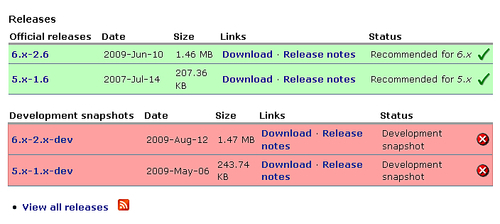
Official releases with a green background and blue hyperlinks mean that the release is stable and ported for that version of Drupal. So, Views has a valid and stable 6.x release according to the project page. You will also see many development versions (snapshots) of the release. Use stable versions as much as possible. Development versions should not be run on production web servers.