We're going to install and upgrade the contributed Zen theme (6.x-1.0) so that we can reinstall and configure our Apollo custom theme files. The first part of this process is to install the main Zen theme folder in your /sites/all/themes directory.
1. Download the 6.x version of the Zen theme from its project page here: http://drupal.org/project/zen
2. Extract the file in your contributed modules directory on your desktop.
3. Connect to your site through FTP and browse to the
/sites/all/ themesfolder.4. Upload the Zen folder.
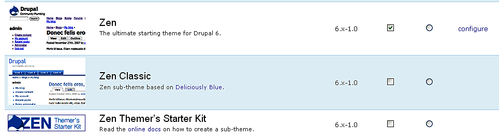
5. Now when you refresh your themes admin list, you'll see the 6.x-1.0 versions of Zen, Zen Classic, and the Zen Themer's Starter Kit.
Now we need to add our custom theme back to the site. Our theme is called 'Apollo' and we originally used the Zen Themer's Starter Kit files in Drupal 5.x to create this custom theme. Here are the steps for upgrading our custom theme to Drupal 6.x and for using the new upgraded Zen Themer's Starter Kit code base. Bear in mind that we did not make any template code edits to our original Apollo theme, so we do not need to worry about updating our new template files with our existing template code. This may be different in your specific case. Make sure to have good backups of all your existing Drupal 5.x custom theme files. We will need to copy over the CSS files from our existing Apollo theme, so we have the same CSS styles in our new 6.x site. Here are the steps:
1. Copy over your existing
apollofolder using FTP into the mainZendirectory in your/sites/all/modulesfolder.2. Open the
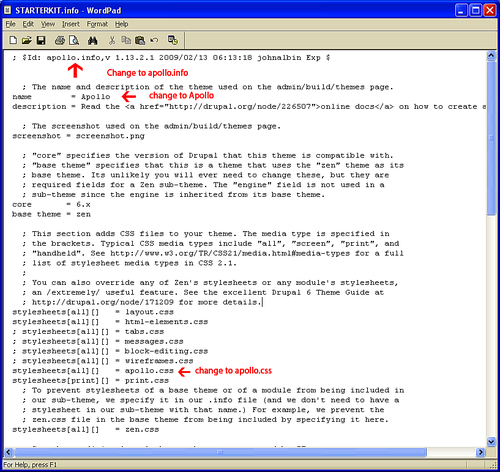
apollofolder on the remote side and delete the following files:template.php, theme-settings.php, andtheme-settings.init.php. These are the older template files and we will replace these with the latest TPL versions—make sure you note down any specific theme override functions you may have customized or added—you can copy those out and then paste them back into the new TPL files once you add them. In our case, we did not add any specific theme overrides.3. Now, with Drupal 6.x themes the new rule is that you need to have a
.infofile in your theme directory, so that the theme will show up in the modules admin list, and in order for all of your theme regions to be defined properly. You need to add anapollo.infofile in the root directory of the theme. Copy theSTARTERKIT.infofile (from theSTARTERKITtheme folder) to your local side of FTP. Open the file in WordPad, and change any reference toSTARTERKITin the file toapollo.
4. Save the file and then re-name it to
apollo.info. Upload thisapollo.infofile back to yourapollotheme directory.5. Refresh your themes admin list and the Apollo theme will now be visible.
6. Grab the
template.phpfile and thetheme-settings.phpfiles from theSTARTERKITfolder and move those to your local site. Rename any instance ofSTARTERKITin those 2 files toapollo. This includes the main function intemplate.php(functionapollo_theme):
/**
* Implementation of HOOK_theme().
*/
function apollo_theme(&$existing, $type, $theme, $path) {
$hooks = zen_theme($existing, $type, $theme, $path);
// Add your theme hooks like this:
/*
$hooks['hook_name_here'] = array( // Details go here );
*/
// @TODO: Needs detailed comments. Patches welcome!
return $hooks;
}
function apollo_settings($saved_settings) {
// Get the default values from the .info file.
$defaults = zen_theme_get_default_settings('apollo');
// Merge the saved variables and their default values.
$settings = array_merge($defaults, $saved_settings);
/*
* Create the form using Forms API: http://api.drupal.org/api/6
*/
7. Once those functions are renamed, upload those two PHP files to your
/apollodirectory.8. Refresh your themes admin listing.
9. Enable your Apollo theme as the Default.

10. Confirm that your Garland theme is set to the default admin theme here: Administer | Site Configuration | Administration theme. You can also choose whether you want to use the Garland theme for content editing. Save configuration.
11. Congratulations! You've upgraded your custom theme to Drupal 6.x. Good work!
The last thing to do in order to have a completely successful upgrade process is to carry out any content cleanup that's required and to reset your Views. Looking at our photo gallery content pages post-upgrade, I notice that the Lightbox2 imagecache settings were not implemented during the upgrade process. In order to use the correct Teaser and Full node display types, you may need to go back into your Photo Gallery content type and manage the Display fields configuration on your Photo file field.
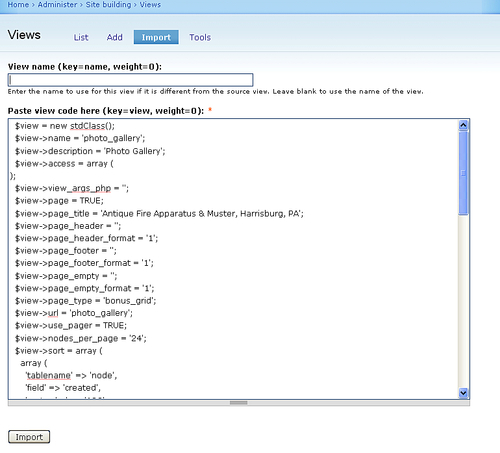
The last thing you need to do is import your View code that we had exported from our Drupal 5.x site before we upgraded. Go ahead and open that .txt tile you saved and copy all the code.
1. Select all and copy code from your
photo_gallery.txtfile.2. Go to your Site Building | Views admin and click on the Import button.
3. Leave the View name field blank.
4. Paste your copied View export code into the box.
5. Click on Import.