
We now have to add the matching composite pictures exercise to an existing Moodle course.
1. Log in to your Moodle server.
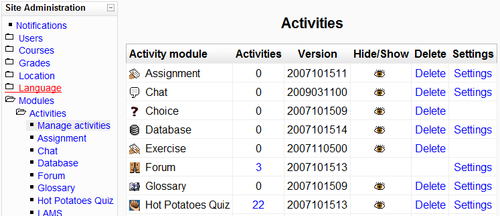
2. As we are going to add a Hot Potatoes exercise, you have to make sure that the Hot Potatoes Quiz activity module isn't hidden. Click on Modules | Activities | Manage activities in the Site administration panel. If the Hot Potatoes Quiz activity module appears in grey and displaying a closed eye icon in the Hide/Show column, you must click on this icon and it will change to an opened eye icon. This way, Moodle will enable this activity, as shown in the following screenshot:
3. Click on the desired course name (School). You can create a new course or use an existing one.
4. Click on Turn editing on. The web page will change to enable you to edit the Weekly outline.
5. Position the mouse pointer over the desired week under Weekly outline and click on the Edit summary icon (a small hand with a pencil).
6. Enter
Exercise 1in Summary and click on the Save changes button.7. Next, click on the Add an activity combo box for the selected week and select Hot Potatoes Quiz, as shown in the next screenshot:

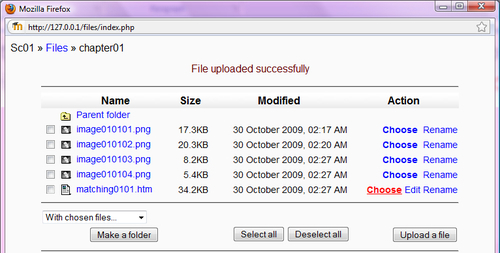
8. A new web page will appear displaying the title Adding a new Hot Potatoes Quiz. Click on the Choose or upload a file button and a pop-up window displaying information about files and folders will appear.
9. Click on the Make a folder button.
10. Enter
chapter01in the textbox and click on Create. Moodle will create a folder with this name and it will allow us to organize the necessary files for our exercise.11. Click on chapter01 (the recently created folder's hyperlink).
12. Click on the Upload a file button.
13. Click on the Browse button. Browse to the folder that holds the images and the files used in the exercise (
C:\School) and select the file to upload,image010101.png. Then, click on Open and on the Upload this file button.14. Repeat the aforementioned steps (12 to 13) for each of the files shown in the following list. You have to upload the following files in the
chapter01folder.image010102.pngimage010103.pngimage010104.pngmatching0101.html
15. Next, position the mouse pointer over the
matching0101.htmlname and move it horizontally to the Choose action hyperlink in the same row. Then, click on Choose, as shown in the following screenshot:
16. Moodle will display
chapter01/matching0101.htmlin the File name textbox. This is the web page that will run the exercise previously created using JMatch.17. Scroll down and click on the Save and display button, located at the bottom of the web page. The web browser will show the matching exercise with a drag/drop format, as shown in the next screenshot:

18. Click on the short course hyperlink on the top of the web page and the exercise will appear listed on the previously selected week, as shown in the following screenshot:

We added the matching composite pictures exercise to a Moodle course. Now, the students are going to be able to run the activity by clicking on its hyperlink on the corresponding week.
We created a new folder, chapter01. This folder will hold all the necessary files for the activities related to the school journey.
We then uploaded the four bitmap images and the HTML file created with JMatch (matching0101.html). This file has links to the bitmap images inserted with JMatch, therefore, it was very important to upload these image files.
It is possible to upload all the necessary files for an exercise as a single ZIP file, also known as a ZIP folder. A ZIP file is a file with the .zip extension that contains many compressed files.
You can select File | Create Zip Package | Create Drag/Drop Zip Package from JMatch's main menu and enter the name for the new ZIP file. JMatch will create a ZIP file with all the necessary files to upload to Moodle in order to run the JMatch exercise.
You can then upload this single file to Moodle by following the previously explained steps. Once the file is uploaded, an Unzip command will appear at the right of the new ZIP file, under the Action column. You have to locate the mouse pointer over the ZIP file name and move it horizontally to the Unzip action hyperlink in the same row. Moodle will extract all the compressed files from this ZIP file and you will be able to choose the main HTML file, in this case, matching0101.html.