
It is time to use a digital pen (also known as pen sketch) as a mouse to draw one of the characters according to the speech bubbles. We will solve the activity as a student.
We can also use a classic mouse to solve the exercise. However, a digital pen is more appropriate.
1. Connect the USB digital pen to the computer and install its driver if you haven't already done so.
2. Click on the course name (School) and switch your role to student.
3. Click on the Drawing with a digital pen link on the corresponding week. The web browser will show the activity's description and the comic strip. Try to imagine one of the characters.
4. Start Inkscape.
5. Click on the Draw calligraphic or brush strokes button in the toolbar. This function will allow you to draw using a digital pen or a mouse, as shown in the next screenshot:
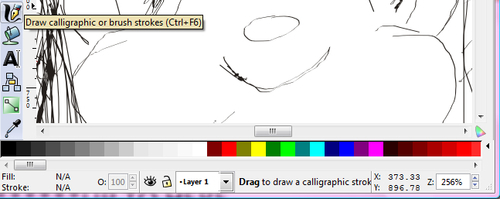
6. Now, imagine and draw the desired character on the tablet using the digital pen as a pencil, as shown in the next image:

7. Select File | Save from Inkscape's main menu. Save the file as
mycharacter.svgin your documents folder.8. Select File | Export Bitmap. A dialog box showing many export options will appear. Enter
90on the first dpi (Dots Per Inch) textbox.9. Click on the Drawing button, and then on Export. Inkscape will export the drawing in PNG format. The exported drawing will be
mycharacter.png.10. Go back to your web browser and click on Browse. Browse to the folder where you saved the drawing, select it, and click on Open.
11. Next, click on Upload this file and the drawing in PNG format will be uploaded to the Moodle server. A File uploaded successfully message will appear if the file finished the upload process without problems. Click on Continue.
12. Now, the previously uploaded drawing in PNG format will appear below the instructions with the name mycharacter.png.
13. Finally, you will be able to download and open the uploaded drawing by clicking on the link that appears at the bottom of the page. The web browser is going to offer the default application to view this kind of file, as shown in the next screenshot.

14. Don't forget to check the results for this exercise as previously learned.
In this activity, we created speech bubbles in a comic strip, using the online tools offered by stripgenerator.com. We asked the child to imagine and draw one of the characters of the comic strip using the digital pen.
This is an amusing and attractive activity for young children. They really enjoy working with a digital pen. We applied the following concepts and resources in order to stimulate both the attention and the concentration:
Reading comprehension: The child has to read and understand the text found in the speech bubbles.
Listening comprehension: If the child can't read and understand the comic strip alone, he/she can work with the help of a therapist or a family member, so that her/she can imagine the character.
Abstraction of situations
Creativity
Why did we use the digital pen? This device offers a great variety of resources to perform artistic activities. Furthermore, it is another resource for those children who have manual dyspraxia.
Children enjoy tracing drawings! Another alternative for solving this exercise is to trace an existing drawing using the digital pen.
You can do it by placing the model drawing on the tablet. You can then use the digital pen to draw over the existing lines, as shown in the next image:

Your new activities are really engaging! You want to add a new matching pictures activity. However, you don't want to use text, just pictures on both sides.
Create a new matching composite pictures activity using JMatch. Add three 3D scenes on the left-hand side and three 2D pictures on the right-hand side. This way, the student will have to match the 3D scene with the corresponding equivalent 2D picture.
Use Inkscape to combine the 2D clipart and the 3D models for each picture. Create four pairs of images, combining the following elements:
A pencil and a compass
A piece of paper and an eraser
A paint brush and colored pencils
A pencil case and a school bag
Create a new Moodle exercise and run it as a student. Then, run the activity using a digital pen as a mouse to drag-and-drop the images to match each 2D picture with its corresponding 3D scene.
Note
You can apply all the techniques learned in this chapter with many other Hot Potatoes exercises. We worked with JMatch and JQuiz to create visual exercises. However, this application offers many other interesting modules. The creation of other kinds of activities using Hot Potatoes is described in depth in Moodle 1.9 for Teaching 7-14 Year Olds: Beginner's Guide by Mary Cooch, Packt Publishing.
1. You can define a background color for a PNG image in a JMatch activity using:
a. HTML tags
b. A simple menu option
c. A color context menu
2. You can define a font for a sentence in JMatch activity using:
a. A simple combo box
b. A font context menu
c. HTML tags
3. JMatch allows you to insert pictures with the:
a. SVG format
b. PNG format
c. TARGA format
4. In order to add a JMatch activity using many images to a Moodle course, you must:
a. Upload the HTML file (.html) generated by JMatch and all the image files
b. Upload only the HTML file (.html) generated by JMatch
c. Upload only the JMT file (.jmt) saved by JMatch
5. In order to test an exercise as a student, you can:
a. Click on the Student picture
b. Restart the Moodle server
c. Click on the Switch role to combo box and choose Student
6. You can find and rotate pictures of rendered 3D models in:
a. Google 3D warehouse
b. Microsoft Office Office Online Clip Art & Media
c. Inkscape 3D warehouse
7. You can map a gamepad's mini stick to the:
a. Mouse wheel
b. Digital pen
c. Mouse pointer