

Many Tkinter widgets let you specify custom font specifications either at the time of widget creation or later using the configure() option. For most cases, default fonts provide a standard look and feel. However, should you want to change font specifications, Tkinter lets you do so. There is one caveat though.
When you specify your own font, you need to make sure it looks good on all platforms where the program is intended to be deployed. This is because a font might look good and match well on a particular platform, but may look awful on another. Unless you know what you are doing, it is always advisable to stick to Tkinter's default fonts.
Most platforms have their own set of standard fonts that are used by the platform's native widgets. So, rather than trying to reinvent the wheel on what looks good on a given platform or what would be available for a given platform, Tkinter assigns these standard platform-specific fonts into its widget, thus providing a native look and feel on every platform.
Note
Tkinter assigns nine fonts to nine different names, which you can therefore use in your programs. The font names are as follows:
Accordingly, you can use them in your programs in the following way:
Label(text="Sale Up to 50% Off !", font="TkHeadingFont 20")

Label(text="**Conditions Apply", font="TkSmallCaptionFont 8")
Using these kinds of fonts mark up, you can be assured that your font will look native across all platforms.
In addition to the above method on handling fonts, Tkinter provides a separate Font class implementation. The source code of this class is located at the following link: <Python27_installtion_dir>\Lib\lib-tk\tkfont.py.
To use this module, you need to import tkFont into your namespace.(refer to 8.08 tkfont demo.py):
from Tkinter import Tk, Label, Pack
import tkFont
root=Tk()
label = Label(root, text="Humpty Dumpty was pushed")
label.pack()
currentfont = tkFont.Font(font=label['font'])
print'Actual :' + str(currentfont.actual())
print'Family :' + currentfont.cget("family")
print'Weight :' + currentfont.cget("weight")
print'Text width of Dumpty : %d' %currentfont.measure("Dumpty")
print'Metrics:' + str(currentfont.metrics())
currentfont.config(size=14)
label.config (font=currentfont)
print'New Actual :' + str(currentfont.actual())
root.mainloop()
The console output of this program is as follows:
Actual :{'family': 'Segoe UI', 'weight': 'normal', 'slant': 'roman', 'overstrike': 0, 'underline': 0, 'size': 9}
Family : Segoe UI
Weight : normal
Text width of Dumpty : 43
Metrics:{'fixed': 0, 'ascent': 12, 'descent': 3, 'linespace': 15}
As you can see, the tkfont module provides a much better fine-grained control over various aspects of fonts, which are otherwise inaccessible.
Now that we have seen the basic features available in the tkfont module, let's use it to implement a font selector. The font selector would look like the one shown here:
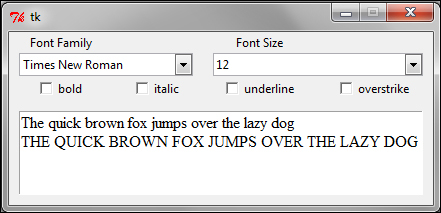
The code for the font selector is as follows (refer to 8.09 font selector.py):
from Tkinter import *
import ttk
import tkFont
class FontSelectorDemo():
    def __init__(self):
      self.currentfont    = tkFont.Font(font=('Times New Roman',12))
      self.family         = StringVar(value='Times New Roman')
      self.fontsize       = StringVar(value='12')
      self.fontweight     =StringVar(value=tkFont.NORMAL)
      self.slant          =  StringVar(value=tkFont.ROMAN)
      self.underlinevalue = BooleanVar(value=False)
      self.overstrikevalue= BooleanVar(value=False)
      self.gui_creator()
The description of the preceding code is as follows:
We import
Tkinter(for all widgets),ttk(for the Combobox widget), andtkfontfor handling font-related aspects of the programWe create a class named
FontSelectorDemoand use its__init_method to initialize al attributes that we intend to track in our program.Finally, the
__init__method calls another method namedgui_creator(), which is be responsible for creating all the GUI elements of the program
The code represented here is a highly abridged version of the actual code (refer to 8.09 font selector.py). Here, we removed all the code that creates basic widgets, such as Label and Checkbuttons, in order to show only the font-related code:
def gui_creator(self):
    # create the top labels – code removed
    fontList = ttk.Combobox(textvariable=self.family)
    fontList.bind('<<ComboboxSelected>>', self.on_value_change)
    allfonts = list(tkFont.families())
    allfonts.sort()
    fontList['values'] =  allfonts
      # Font Sizes
    sizeList = ttk.Combobox(textvariable=self.fontsize)
    sizeList.bind('<<ComboboxSelected>>', self.on_value_change)
    allfontsizes = range(6,70)
    sizeList['values'] =  allfontsizes
    # add four checkbuttons to provide choice for font style
    # all checkbuttons command attached to self.on_value_change
    #create text widget
    sampletext ='The quick brown fox jumps over the lazy dog'
    self.text.insert(INSERT,'%s\n%s'% (sampletext,sampletext.upper()),'fontspecs')
    self.text.config(state=DISABLED)
The description of the preceding code is as follows:
We have highlighted the code that creates two Combobox widgets; one for the Font Family, and the other for the Font Size selection.
We use
tkfont.families()to fetch the list of all the fonts installed on a computer. This is converted into a list format and sorted before it is inserted into thefontListCombobox widget.Similarly, we add a font size range of values from
6to70in the Font Size combobox.We also add four Checkbutton widgets to keep track of font styles bold, italics, underline, and overstrike. The code for this has not been shown previously, because we have created similar check buttons in some of our previous programs.
We then add a Text widget and insert a sample text into it. More importantly, we add a tag to the text named
fontspec.Finally, all our widgets have a command callback method connecting back to a common method named
on_value_change. This method will be responsible for updating the display of the sample text at the time of changes in the values of any of the widgets.
def on_value_change(self, event=None):
    try:
        self.currentfont.config(family=self.family.get(), size=self.fontsize.get(), weight=self.fontweight.get(), slant=self.slant.get(), underline=self.underlinevalue.get(), overstrike=self.overstrikevalue.get())
        self.text.tag_config('fontspecs', font=self.currentfont)
    except ValueError:
        pass ### invalid entry - ignored for now. You can use a  tkMessageBox dialog to show an error
The description of the preceding code is as follows:
This method is called at the time of a state change for any of the widgets
This method simply fetches all font data and configures our
currentfontattribute with the updated font valuesFinally, it updates the text content tagged as
fontspecwith the values of the current font