
Now that you have completed the development of your cross-platform application, the next obvious step is to distribute your app on the app stores. Xamarin apps are distributed in exactly the same way as Java or Objective-C apps; however, there are still a lot of hoops to jump through to successfully get your applications on the stores. iOS has an official approval process, which makes app store submission a much lengthier process than Android. Developers have to wait for a week, a month, or longer depending on how many times the app is rejected. Android requires some additional steps to submit the app on Google Play compared to debugging your application, but you can still get your application submitted in just a few hours.
In this chapter, we will cover:
- The App Store Review Guidelines
- Submitting an iOS app to the App Store
- Setting up Android signing keys
- Submitting an Android app to Google Play
- Tips for being successful on app stores
Your application's name, app icon, screenshots, and other aspects are declared on Apple's website called iTunes Connect. Sales reports, app store rejections, contract and bank information, and app updates are all managed through the website at http://itunesconnect.apple.com.
The primary purpose of Apple's guidelines is to keep the iOS App Store safe and free of malware. There is certainly little to no malware found on the iOS App Store. Generally, the worst thing an iOS application could do to you is bombard you with ads. To a certain extent, the guidelines also reinforce Apple's revenue share with payments within your application. Sadly, some of Apple's guidelines controversially eliminate one of their competitors in a key area on iOS. An example of this would be an app selling e-books, since it would be a direct competitor with iTunes and iBooks.

However, the key point here is to get your applications through the store approval process without facing the App Store rejections. As long as you are not intentionally trying to break the rules, most applications will not face much difficulty in getting approved by Apple. The most common rejections are related to mistakes by developers, which is a good thing, since you would not want to release an app with a critical issue to the public.
The App Store Review Guidelines are quite lengthy, so let's break it down into the most common situations you might run into. A full list of the guidelines are found at https://developer.apple.com/appstore/resources/approval/guidelines.html. Note that a valid iOS developer account is required to view this site.
Some general rules to follow are as follows:
- Applications that crash, have bugs, or fail critically will be rejected
- Applications that do not perform as advertised or contain hidden features will be rejected
- Applications that use nonpublic Apple APIs, or read/write files from prohibited locations on the filesystem will be rejected
- Apps that provide little value or that have been overdone (such as flashlight, burp, or fart apps) will be rejected
- Applications cannot use trademarked words as the app name or keywords without the permission of the trademark holder
- Applications cannot distribute copyrighted material illegally
- Apps that can simply be implemented by a mobile-friendly website, such as apps with lots of HTML content that provide no native functionality can be rejected
These rules make sense to keep the overall quality and safety of the iOS App Store higher than it would have otherwise been. It can be difficult to get a simple app with very few features into the store due to some of these rules, so make sure that your app is useful and compelling enough for the App Store review team to allow it to be available on the store.
Some rules related to the mistakes made by the developers or incorrect labeling in iTunes Connect are as follows:
- Applications or metadata that mention other mobile platforms such as Android, for example, will be rejected
- Applications that are labeled with an incorrect or inappropriate category/genre, screenshots, or icons will be rejected
- Developers must give an appropriate age rating and keywords for the application
- Support, privacy policy, and marketing URLs must be functional at the time the app is reviewed
- Developers should not declare iOS features that are not used; for example, do not declare Game Center or iCloud usage if your application does not actually use these features
- Applications that use features such as location or push notifications without the consent of the user will be rejected
These can sometimes simply be a mistake on the developer's part. Just make sure you double-check all of your application's information before that final submission to the iOS App Store.
Additionally, Apple has the following rules regarding content that can be contained within an application:
- Applications that contain objectionable content or content that can be considered rude will be rejected
- Applications that are designed to upset or disgust users will be rejected
- Applications that contain excessive imagery of violence will be rejected
- Applications that target a specific government, race, culture, or company as enemies will be rejected
- Applications with icons or screenshots that do not adhere to the four plus age rating might be rejected
The app store delivers apps to children and adults alike. Apple also supports an over 17 age restriction on applications; however, this will seriously limit the number of potential users for your app. It's best to keep applications clean and appropriate for as many ages as possible.
The next category of rules listed related to Apple's 70/30 revenue share from the App Store are as follows:
- Applications that link to products or software sold on a website might be rejected.
- Apps using a payment mechanism other than iOS in-app purchases (IAPs) will be rejected.
- Applications that use IAPs to purchase physical goods will be rejected.
- Apps can display digital content that is purchased outside the application as long as you cannot link to or purchase from within the app. All digital content purchased within the app must use IAPs.
These rules are easy to follow as long as you are not trying to circumvent Apple's revenue share in the App Store. Always use IAPs to unlock the digital content within your applications.
Last but not least, here are some general tips related to App Store rejections:
- If your application requires a username and password, make sure you include the credentials under the Demo Account Information section for the app review team to use.
- If your application contains IAPs or other features that the app review team must explicitly test, make sure you include instructions in Review Notes to reach the appropriate screen in your application.
- Schedule ahead! Don't let your product's app rejection ruin a deadline; plan at least a month into your schedule for app store approval.
- When in doubt, be as descriptive as possible in the Review Notes section of iTunes Connect.
If your application does get rejected, most of the time there is an easy resolution. Apple's review team will explicitly reference the guidelines if a rule is broken and will include the relevant crash logs and screenshots. If you can correct an issue without submitting a new build, you can respond to the app review team via the Resolution Center option in the iTunes Connect website. If you upload a new build, this will put your application at the end of the queue to be reviewed.
There are certainly more in-depth and specific rules for features in iOS, so make sure you take a look at the complete set of guidelines if you are thinking about doing something creative or out of the box with an iOS feature. As always, if you are unsure about a specific guideline, it is best to seek professional, legal advice on the matter. Calling Apple's support number will not shed any light on the subject since its support personnel are not allowed to give advice related to the App Store Review Guidelines.
Before we get started with submitting our application to the store, we need to review a short checklist to make sure you are ready to do so. It is a pain to reach a point in the process and realize you have something missing or haven't done something quite right. Additionally, there are a few requirements that will need to be met by a designer or the marketing team, which should not necessarily be left to the developer.
Make sure you have done the following prior to beginning with the submission:
- Your application's
Info.plistfile is completely filled out. This includes splash screen images, app icons, app name, and other settings that need to be filled out for advanced features. Note that the app name here is what is displayed under the application icon. It can be differ from the App Store name, and unlike the App Store name, it does not have to be unique from all the other apps in the store. - You have at least three names selected for your app on the App Store. A name might be unavailable even if it is not currently taken on the App Store, as it could have been previously taken by a developer for an app that was removed from the store for some reason.
- You have a large 1024 x 1024 app icon image. There isn't a need to include this file in the application, unless you are distributing enterprise or ad hoc builds through iTunes (the desktop application).
- You have at least one screenshot per device that your application is targeting. This includes iPhone 4 retina, iPhone 5, iPhone 6, iPhone 6 Plus, and iPad retina sized screenshots for a universal iOS application. However, I would strongly recommend that you fill out all the five screenshots slots.
- You have a well-written and edited description for the App Store.
- You have selected a set of keywords to improve the search for your application.
Once you have double-checked the preceding checklist, we can begin the process for submission. Our first step will be to create a provisioning profile for the App Store distribution.
Let's begin by creating a new provisioning profile by carrying out the following steps:
- Navigate to http://developer.apple.com/ios.
- Click on Certificates, Identifiers & Profiles in the right-hand navigation bar.
- Click on Provisioning Profiles.
- Click on the plus button in the top-right corner of the window.
- Select App Store under Distribution and click on Continue.
- Select your app ID. You should have created one already in Chapter 7, Deploying and Testing on Devices; click on Continue.
- Select the certificate for the provisioning profile. Normally, there will be only one option here. Click on Continue.
- Give the profile an appropriate name such as
MyAppAppStore. Click on Generate. - Once complete, you can download and install the profile manually or synchronize your provisioning profiles in Xcode under Preferences | Accounts, as we did earlier in the module.
You will arrive at the following screen when successful:

For our next set of steps, we will start filling out the details of your application to be displayed on the Apple App Store.
We can begin by performing the following set of steps to set up your app in iTunes Connect:
- Navigate to http://itunesconnect.apple.com and log in.
- Click on My Apps.
- Click on the plus button in the top-left corner of the window, followed by New iOS App.
- Enter an app Name to be displayed on the App Store.
- Enter the Version to be displayed on the App Store.
- Choose a Primary Language for your app.
- Enter a value in the SKU field. This is used to identify your app in reports.
- Select your Bundle ID. You should have already created one in Chapter 7, Deploying and Testing on Devices; click on Continue.
- There is a lot of required information to fill out here. If you miss any, iTunes Connect is pretty helpful at displaying warnings. It should be fairly user-friendly since the site is meant to be used by marketing professionals as well as developers.
- Click on Save after making your changes.
There are a lot of optional fields too. Make sure you fill out Review Notes or Demo Account Information. If there is any additional information, the app review team will require to review your application. When complete, you will see your application with the status Prepare for Submission, as seen in the following screenshot:

Now we need to actually upload our app to iTunes Connect. You must either upload a build from Xcode or Application Loader. Either method will produce the same results, but some prefer to use Application Loader if a nondeveloper submits the app.
Our last step for App Store submission is to provide our binary file that contains our application to the store. We need to create the Release build of our application, signed with the distribution provisioning profile we created earlier in this chapter.
Xamarin Studio makes this very simple. We can configure the build as follows:
After a few moments, Xamarin Studio will open the archived builds menu, as shown in the following screenshot:

The process creates a xarchive file that is stored in ~/Library/Developer/Xcode/Archives. The Validate… button will check your archive for any potential errors that can occur during the upload, while Distribute… will actually submit the application to the store. Sadly, at the time of writing this module, the Distribute… button merely launches the Application Loader application, which cannot upload the xarchive files. Until Xamarin works this out, you can access these options for the archive in Xcode by navigating to Window | Organizer in the Archives tab.
Go ahead and locate the archive in Xcode; you might have to restart Xcode if it does not appear, and perform the following steps:
- Click on Distribute…. Don't worry, it will validate the archive before uploading.
- Select Submit to the iOS App Store and click on Next.
- Log in with your credentials for iTunes Connect and click on Next.
- Select the appropriate provisioning profile for the application and click on Submit.
After several moments, depending on the size of your application, you will get a confirmation screen, and the status of your application will change to Upload Received. The following screenshot shows what a confirmation screen looks like:
If you return to iTunes Connect, and navigate to the Prerelease tab, you will see the build you just uploaded with a status of Processing:

After a few minutes, the build will get processed and can be added to an App Store release. The next step is to select the build under the Versions tab, which is under the Build section, as shown in the following screenshot:

After hitting Save, you should be able to click on Submit for Review without any remaining warnings. Next, answer the three questions about export laws, ad identifiers, and so on and hit Submit as the final step to submit your app.
At this point, you have no control over the status of your application while its waiting in line to be reviewed by an Apple employee. This can take one to two weeks, depending on the current workload of apps to be reviewed and the time of the year. Updates will also go through the same process, but the wait time is generally a bit shorter than a new app submission.
Luckily, there are a few situations where you can fast track this process. If you navigate to https://developer.apple.com/appstore/contact/?topic=expedite, you can request for an expedited app review. Your issue must either be a critical bug fix or a time-sensitive event related to your application. Apple doesn't guarantee accepting an expedite request, but it can be a lifesaver in times of need.
Additionally, if something goes wrong with a build you submitted, you can cancel the submission by going to the top of the app details page and selecting remove this version from review. In situations where you discover a bug after submission, this allows you to upload a new build in its place.
Creating a distribution provisioning profile
Once you have double-checked the preceding checklist, we can begin the process for submission. Our first step will be to create a provisioning profile for the App Store distribution.
Let's begin by creating a new provisioning profile by carrying out the following steps:
- Navigate to http://developer.apple.com/ios.
- Click on Certificates, Identifiers & Profiles in the right-hand navigation bar.
- Click on Provisioning Profiles.
- Click on the plus button in the top-right corner of the window.
- Select App Store under Distribution and click on Continue.
- Select your app ID. You should have created one already in Chapter 7, Deploying and Testing on Devices; click on Continue.
- Select the certificate for the provisioning profile. Normally, there will be only one option here. Click on Continue.
- Give the profile an appropriate name such as
MyAppAppStore. Click on Generate. - Once complete, you can download and install the profile manually or synchronize your provisioning profiles in Xcode under Preferences | Accounts, as we did earlier in the module.
You will arrive at the following screen when successful:
For our next set of steps, we will start filling out the details of your application to be displayed on the Apple App Store.
We can begin by performing the following set of steps to set up your app in iTunes Connect:
- Navigate to http://itunesconnect.apple.com and log in.
- Click on My Apps.
- Click on the plus button in the top-left corner of the window, followed by New iOS App.
- Enter an app Name to be displayed on the App Store.
- Enter the Version to be displayed on the App Store.
- Choose a Primary Language for your app.
- Enter a value in the SKU field. This is used to identify your app in reports.
- Select your Bundle ID. You should have already created one in Chapter 7, Deploying and Testing on Devices; click on Continue.
- There is a lot of required information to fill out here. If you miss any, iTunes Connect is pretty helpful at displaying warnings. It should be fairly user-friendly since the site is meant to be used by marketing professionals as well as developers.
- Click on Save after making your changes.
There are a lot of optional fields too. Make sure you fill out Review Notes or Demo Account Information. If there is any additional information, the app review team will require to review your application. When complete, you will see your application with the status Prepare for Submission, as seen in the following screenshot:
Now we need to actually upload our app to iTunes Connect. You must either upload a build from Xcode or Application Loader. Either method will produce the same results, but some prefer to use Application Loader if a nondeveloper submits the app.
Our last step for App Store submission is to provide our binary file that contains our application to the store. We need to create the Release build of our application, signed with the distribution provisioning profile we created earlier in this chapter.
Xamarin Studio makes this very simple. We can configure the build as follows:
After a few moments, Xamarin Studio will open the archived builds menu, as shown in the following screenshot:
The process creates a xarchive file that is stored in ~/Library/Developer/Xcode/Archives. The Validate… button will check your archive for any potential errors that can occur during the upload, while Distribute… will actually submit the application to the store. Sadly, at the time of writing this module, the Distribute… button merely launches the Application Loader application, which cannot upload the xarchive files. Until Xamarin works this out, you can access these options for the archive in Xcode by navigating to Window | Organizer in the Archives tab.
Go ahead and locate the archive in Xcode; you might have to restart Xcode if it does not appear, and perform the following steps:
- Click on Distribute…. Don't worry, it will validate the archive before uploading.
- Select Submit to the iOS App Store and click on Next.
- Log in with your credentials for iTunes Connect and click on Next.
- Select the appropriate provisioning profile for the application and click on Submit.
After several moments, depending on the size of your application, you will get a confirmation screen, and the status of your application will change to Upload Received. The following screenshot shows what a confirmation screen looks like:
If you return to iTunes Connect, and navigate to the Prerelease tab, you will see the build you just uploaded with a status of Processing:
After a few minutes, the build will get processed and can be added to an App Store release. The next step is to select the build under the Versions tab, which is under the Build section, as shown in the following screenshot:
After hitting Save, you should be able to click on Submit for Review without any remaining warnings. Next, answer the three questions about export laws, ad identifiers, and so on and hit Submit as the final step to submit your app.
At this point, you have no control over the status of your application while its waiting in line to be reviewed by an Apple employee. This can take one to two weeks, depending on the current workload of apps to be reviewed and the time of the year. Updates will also go through the same process, but the wait time is generally a bit shorter than a new app submission.
Luckily, there are a few situations where you can fast track this process. If you navigate to https://developer.apple.com/appstore/contact/?topic=expedite, you can request for an expedited app review. Your issue must either be a critical bug fix or a time-sensitive event related to your application. Apple doesn't guarantee accepting an expedite request, but it can be a lifesaver in times of need.
Additionally, if something goes wrong with a build you submitted, you can cancel the submission by going to the top of the app details page and selecting remove this version from review. In situations where you discover a bug after submission, this allows you to upload a new build in its place.
Adding your app to iTunes Connect
For our next set of steps, we will start filling out the details of your application to be displayed on the Apple App Store.
We can begin by performing the following set of steps to set up your app in iTunes Connect:
- Navigate to http://itunesconnect.apple.com and log in.
- Click on My Apps.
- Click on the plus button in the top-left corner of the window, followed by New iOS App.
- Enter an app Name to be displayed on the App Store.
- Enter the Version to be displayed on the App Store.
- Choose a Primary Language for your app.
- Enter a value in the SKU field. This is used to identify your app in reports.
- Select your Bundle ID. You should have already created one in Chapter 7, Deploying and Testing on Devices; click on Continue.
- There is a lot of required information to fill out here. If you miss any, iTunes Connect is pretty helpful at displaying warnings. It should be fairly user-friendly since the site is meant to be used by marketing professionals as well as developers.
- Click on Save after making your changes.
There are a lot of optional fields too. Make sure you fill out Review Notes or Demo Account Information. If there is any additional information, the app review team will require to review your application. When complete, you will see your application with the status Prepare for Submission, as seen in the following screenshot:
Now we need to actually upload our app to iTunes Connect. You must either upload a build from Xcode or Application Loader. Either method will produce the same results, but some prefer to use Application Loader if a nondeveloper submits the app.
Our last step for App Store submission is to provide our binary file that contains our application to the store. We need to create the Release build of our application, signed with the distribution provisioning profile we created earlier in this chapter.
Xamarin Studio makes this very simple. We can configure the build as follows:
After a few moments, Xamarin Studio will open the archived builds menu, as shown in the following screenshot:
The process creates a xarchive file that is stored in ~/Library/Developer/Xcode/Archives. The Validate… button will check your archive for any potential errors that can occur during the upload, while Distribute… will actually submit the application to the store. Sadly, at the time of writing this module, the Distribute… button merely launches the Application Loader application, which cannot upload the xarchive files. Until Xamarin works this out, you can access these options for the archive in Xcode by navigating to Window | Organizer in the Archives tab.
Go ahead and locate the archive in Xcode; you might have to restart Xcode if it does not appear, and perform the following steps:
- Click on Distribute…. Don't worry, it will validate the archive before uploading.
- Select Submit to the iOS App Store and click on Next.
- Log in with your credentials for iTunes Connect and click on Next.
- Select the appropriate provisioning profile for the application and click on Submit.
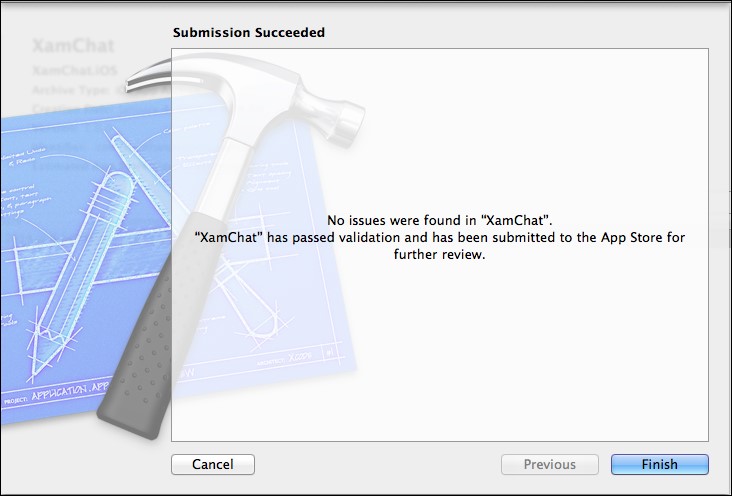
After several moments, depending on the size of your application, you will get a confirmation screen, and the status of your application will change to Upload Received. The following screenshot shows what a confirmation screen looks like:
If you return to iTunes Connect, and navigate to the Prerelease tab, you will see the build you just uploaded with a status of Processing:
After a few minutes, the build will get processed and can be added to an App Store release. The next step is to select the build under the Versions tab, which is under the Build section, as shown in the following screenshot:
After hitting Save, you should be able to click on Submit for Review without any remaining warnings. Next, answer the three questions about export laws, ad identifiers, and so on and hit Submit as the final step to submit your app.
At this point, you have no control over the status of your application while its waiting in line to be reviewed by an Apple employee. This can take one to two weeks, depending on the current workload of apps to be reviewed and the time of the year. Updates will also go through the same process, but the wait time is generally a bit shorter than a new app submission.
Luckily, there are a few situations where you can fast track this process. If you navigate to https://developer.apple.com/appstore/contact/?topic=expedite, you can request for an expedited app review. Your issue must either be a critical bug fix or a time-sensitive event related to your application. Apple doesn't guarantee accepting an expedite request, but it can be a lifesaver in times of need.
Additionally, if something goes wrong with a build you submitted, you can cancel the submission by going to the top of the app details page and selecting remove this version from review. In situations where you discover a bug after submission, this allows you to upload a new build in its place.
Making an iOS binary for the App Store
Our last step for App Store submission is to provide our binary file that contains our application to the store. We need to create the Release build of our application, signed with the distribution provisioning profile we created earlier in this chapter.
Xamarin Studio makes this very simple. We can configure the build as follows:
After a few moments, Xamarin Studio will open the archived builds menu, as shown in the following screenshot:
The process creates a xarchive file that is stored in ~/Library/Developer/Xcode/Archives. The Validate… button will check your archive for any potential errors that can occur during the upload, while Distribute… will actually submit the application to the store. Sadly, at the time of writing this module, the Distribute… button merely launches the Application Loader application, which cannot upload the xarchive files. Until Xamarin works this out, you can access these options for the archive in Xcode by navigating to Window | Organizer in the Archives tab.
Go ahead and locate the archive in Xcode; you might have to restart Xcode if it does not appear, and perform the following steps:
- Click on Distribute…. Don't worry, it will validate the archive before uploading.
- Select Submit to the iOS App Store and click on Next.
- Log in with your credentials for iTunes Connect and click on Next.
- Select the appropriate provisioning profile for the application and click on Submit.
After several moments, depending on the size of your application, you will get a confirmation screen, and the status of your application will change to Upload Received. The following screenshot shows what a confirmation screen looks like:
If you return to iTunes Connect, and navigate to the Prerelease tab, you will see the build you just uploaded with a status of Processing:
After a few minutes, the build will get processed and can be added to an App Store release. The next step is to select the build under the Versions tab, which is under the Build section, as shown in the following screenshot:
After hitting Save, you should be able to click on Submit for Review without any remaining warnings. Next, answer the three questions about export laws, ad identifiers, and so on and hit Submit as the final step to submit your app.
At this point, you have no control over the status of your application while its waiting in line to be reviewed by an Apple employee. This can take one to two weeks, depending on the current workload of apps to be reviewed and the time of the year. Updates will also go through the same process, but the wait time is generally a bit shorter than a new app submission.
Luckily, there are a few situations where you can fast track this process. If you navigate to https://developer.apple.com/appstore/contact/?topic=expedite, you can request for an expedited app review. Your issue must either be a critical bug fix or a time-sensitive event related to your application. Apple doesn't guarantee accepting an expedite request, but it can be a lifesaver in times of need.
Additionally, if something goes wrong with a build you submitted, you can cancel the submission by going to the top of the app details page and selecting remove this version from review. In situations where you discover a bug after submission, this allows you to upload a new build in its place.
All Android packages (the apk files) are signed by a certificate or a keystore file to enable their installation on a device. When you are debugging/developing your application, your package is automatically signed by a development certificate that was generated by the Android SDK. It is fine to use this certificate for development or even beta testing; however, it cannot be used on an application distributed to Google Play.
To create a production certificate, we can use a command-line tool included with the Android SDK named keytool. To create your own keystore file, run the following line in a terminal window:
keytool -genkey -v -keystore <filename>.keystore -alias <key-name> -keyalg RSA -keysize 2048 -validity 10000
Replace <filename> and <key-name> with appropriate terms for your application. The keytool command-line tool will then prompt several questions for you to identify the party that is signing the application. This is very similar to an SSL certificate if you have ever worked with one before. You will also be prompted for a keystore password and a key password; you can let these be the same or change them, depending on how secure you want your key to be.
Your console output will look something like what is shown in the following screenshot:

When complete, you should store your keystore file and password in a very safe place. Once you sign an application with this keystore file and submit it to Google Play, you will not be able to submit the updates of the application without signing it with the same key. There is no mechanism to retrieve a lost keystore file. If you do happen to lose it, your only option is to remove the existing app from the store, and submit a new app that contains your updated changes. This can potentially cause you to lose a lot of users.
To sign an Android package, you can use another command-line tool included with the Android SDK named jarsigner. However, Xamarin Studio simplifies this process by providing a user interface to run your package.
Open your Android project in Xamarin Studio and carry out the following steps to walk you through the process of signing an apk file:
- Change your build configuration to Release.
- Select the appropriate project and navigate to Project | Publish Android Application.
- Select the
keystorefile that you just created. - Enter the values in the Password, Alias, and Key Password fields you used when creating the key. Click on Forward.
- Choose a directory to deploy the
apkfile and click on Create.
When successful, a pad in Xamarin Studio will appear that displays the progress. The pad that appears looks like what is shown in the following screenshot:

It is important to note that Xamarin.Android automatically runs a second tool called zipalign after signing the APK. This tool aligns the bytes within an APK to improve the start up time of your app. If you plan on running jarsigner from the command line itself, you must run zipalign as well. Otherwise, the app will crash on startup, and Google Play will also not accept the APK.
Once you have a signed the Android package, submitting your application to Google Play is relatively painless compared to iOS. Everything can be completed via the Developer Console tab in the browser without having to upload the package with an OS X application.
Before starting the submission, make sure you have completed the tasks on the following checklist:
- You have declared an
AndroidManifest.xmlfile with your application name, package name, and icon declared. - You have an
apkfile signed with a production key. - You have selected an application name for Google Play. This is not unique across the store.
- You have a 512 x 512 high-resolution icon image for Google Play.
- You have a well-written and edited description for the store.
- You have at least two screenshots. However, I recommend that you use all the eight slots that include sizes for phones and 7- and 10-inch tablets.
After going through the checklist, you should be fully prepared to submit your application to Google Play. The tab to add new apps looks like the following screenshot:

To begin with, navigate to https://play.google.com/apps/publish and log in to your account, then carry out the following steps:
- Select the All Applications tab and click on Add new application.
- Enter a name to be displayed for the app on Google Play and click on Upload APK.
- Click on Upload your first APK to Production.
- Browse to your signed
apkfile and click on OK. You will see the APK tab's checkmark turn green. - Select the Store Listing tab.
- Fill out all the required fields, including Description, High-res Icon, Categorization, and Privacy Policy (or select the checkbox that says you aren't submitting a policy), and provide at least two screenshots.
- Click on Save. You will see the checkmark on the Store Listing tab turn green.
- Select the Pricing & Distribution tab.
- Select a price and the countries you wish to distribute to.
- Accept the agreement for Content guidelines and US export laws.
- Click on Save. You will see the checkmark on the Pricing & Distribution tab turn green.
- Select the Ready to publish dropdown in the top-right corner, as shown in the following screenshot, and select Publish this app:

In a few hours, your application will be available on Google Play. No approval process is required, and the updates to your apps are equally painless.
To provide a safe store environment, Google retroactively deletes applications that violate its policies and will generally delete the entire developer account—not just the application. Google's policies are are aimed at improving the quality of applications available on Google Play and are not quite as lengthy as the set of rules on iOS. That being said, the following is a basic summary of Google's policies:
- Apps cannot have sexually explicit material, gratuitous violence, or hate speeches.
- Apps cannot infringe upon copyrighted material.
- Apps cannot be malicious in nature, or capture private information of users without their knowledge.
- Apps cannot modify the basic functionalities of users' devices (such as modifying the home screen) without their consent. If applications include this functionality, it must be easy for the users to turn off this functionality.
- All the digital content within your application must use Google Play's in-app billing (or in-app purchases). Physical goods cannot be purchased with IAPs.
- Applications must not abuse the cellular network usage that could result in the user incurring high bill amounts.
As with iOS, if you have a concern about one of the policies, it is best to procure professional, legal advice about the policy. For a complete list of the policies, visit https://play.google.com/about/developer-content-policy.html.

Google Play Developer Program Policies
To provide a safe store environment, Google retroactively deletes applications that violate its policies and will generally delete the entire developer account—not just the application. Google's policies are are aimed at improving the quality of applications available on Google Play and are not quite as lengthy as the set of rules on iOS. That being said, the following is a basic summary of Google's policies:
- Apps cannot have sexually explicit material, gratuitous violence, or hate speeches.
- Apps cannot infringe upon copyrighted material.
- Apps cannot be malicious in nature, or capture private information of users without their knowledge.
- Apps cannot modify the basic functionalities of users' devices (such as modifying the home screen) without their consent. If applications include this functionality, it must be easy for the users to turn off this functionality.
- All the digital content within your application must use Google Play's in-app billing (or in-app purchases). Physical goods cannot be purchased with IAPs.
- Applications must not abuse the cellular network usage that could result in the user incurring high bill amounts.
As with iOS, if you have a concern about one of the policies, it is best to procure professional, legal advice about the policy. For a complete list of the policies, visit https://play.google.com/about/developer-content-policy.html.
From my personal experience, I have been submitting applications built with Xamarin to the iOS App Store and Google Play for quite some time. After delivering over 50 mobile applications totaling tens of millions downloads, a lot of lessons are to be learned about what makes a mobile application a success or a failure. Xamarin apps are indistinguishable from Java or Objective-C apps to the end user, so you can make your app successful by following the same patterns as standard iOS or Android applications.
There is quite a bit you can do to make your app more successful. Here are some tips to follow:
- Pricing it right: If your application appeals to almost anyone, consider a freemium model that makes revenue from ad placements or in-app purchases. However, if your app is fairly niche, you will be much better off pricing your app at $1.99 or higher. However, premium apps must hold a higher standard of quality.
- Knowing your competition: If there are other apps in the same space as yours, make sure your application is better or offers a much wider feature set than the competition. It might also be a good idea to avoid the space altogether if there are already several apps with the same functionality as yours.
- Prompting loyal users for reviews: It is a good idea to prompt users for a review after they open your application several times. This gives users who really like your application a chance to write a good review.
- Supporting your users: Provide a valid support e-mail address or Facebook page for you to easily interact with your users. Respond to bug reports and negative reviews—Google Play even has the option to e-mail users who write reviews on your app. Adding a feedback button directly in the app is also a great option here.
- Keeping your application small: Staying under the 100 MB limit on iOS or 50 MB on Google Play will allow users to download your application on their cellular data plan. Doing this negates the possibility of friction to install your app, as users will associate a lengthy download with a slow running application.
- Submitting your app to review websites: Try to get as many reviews on the web as possible. Apple provides the ability to send coupon codes, but with the Android version of your app, you can send your actual Android package. Sending your app to review websites or popular Youtube channels can be a great way to free advertising.
- Using an app analytics or a tracking service: Reporting your app's usage and crash reports can be very helpful to understand your users. Fixing crashes in the wild and modifying your user interface to improve spending behavior is very important. Examples of these would be to add Google Analytics or Flurry Analytics to your app.
There is no silver bullet to having a successful mobile application. If your application is compelling, fulfills a need, and functions quickly and properly, you could have the next hit on your hands. Being able to deliver a consistent cross-platform experience using Xamarin will also give you a head start on your competitors.
In this chapter, we covered everything you need to know to submit your application to the iOS App Store and Google Play. We covered the App Store Review Guidelines and simplified them for the most common situations you might run into during the approval process. We went over the set up process for provisioning your app's metadata and upload your binary to iTunes Connect. For Android, we went over how to create a production signing key and sign your Android package (apk) file. We went over submitting an application to Google Play, and finished the chapter with tips on how to deliver a successful and hopefully profitable application to the app stores.
I hope that with this module, you have experienced an end-to-end, practical walkthrough to develop real-world, cross-platform applications with Xamarin. Using C#, which is such a great language compared to the alternatives, you should be very productive. Additionally, you will save time by sharing code without, in any way, limiting the native experience for your users.