

Some of the most vital features used by mobile applications today are based on the new types of data that can be collected by our devices. Features such as GPS location and camera are staples in modern applications such as Instagram or Twitter. It's difficult to develop an application and not use some of these native features. So, let's explore our options to take advantage of this functionality with Xamarin.
In this chapter, we will do the following:
- Introduce the Xamarin.Mobile library
- Read the address book on Android and iOS
- Retrieve the GPS location of our device
- Pull photos from the camera and photo library
To simplify the development of these features across multiple platforms, Xamarin has developed a library called Xamarin.Mobile. It delivers a single API to access the contacts, GPS location, heading of the screen, camera, and photo library for iOS, Android, and even Windows platforms. It also takes advantage of the Task Parallel Libraries (TPL) to deliver a modern C# API that will make our developers more productive than what their native alternatives would. This gives you the ability to write nice, clean, asynchronous code using the async and await keywords in C#. You can also reuse the same code in iOS and Android, minus a few differences that are required by the Android platform.
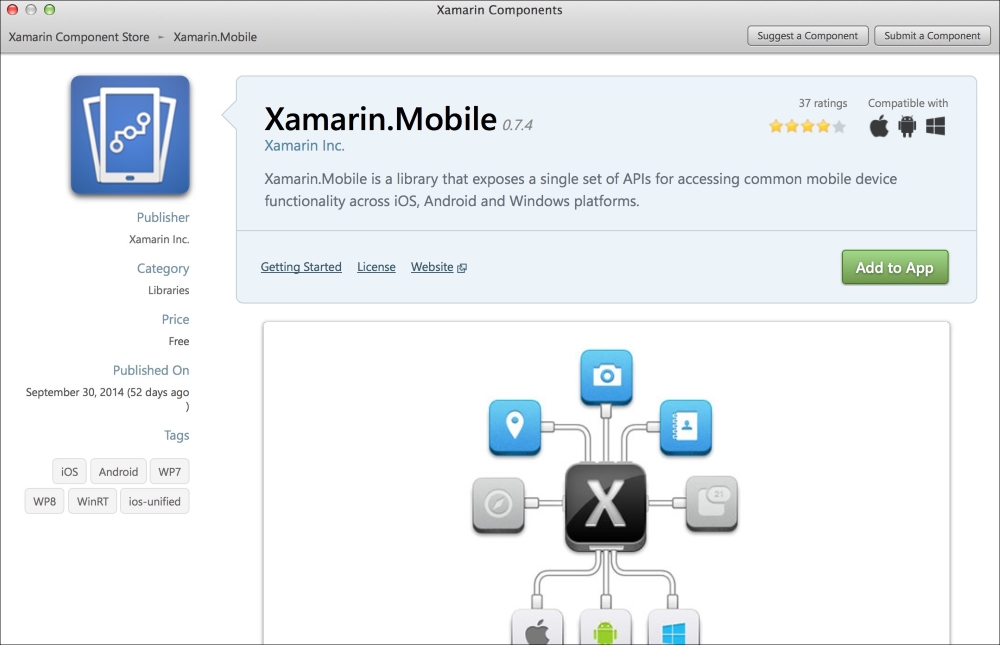
To install Xamarin.Mobile, open the Xamarin Component Store in Xamarin Studio, and add the Xamarin.Mobile component to a project as shown in the following screenshot. You're going to use the following features (of the component):
Before we dig further into using Xamarin.Mobile, let's review the namespaces and functionality available with the library:
Xamarin.Contacts: This contains classes that enable you to interact with the full address book. It includes everything from the contact's photo, phone numbers, address, e-mail, website, and so on.Xamarin.Geolocation: This combined with the accelerometer gives you access to the device's GPS location, including the altitude, heading, longitude, latitude, and speed. You can track the device's position explicitly or listen for GPS position changes over time.Xamarin.Media: This grants access to the device's cameras (if there is more than one) and built-in photo library. This is an easy way to add photo selection capabilities to any application.
For the full documentation of Xamarin.Mobile, visit the API documentation with the Component Store at http://componentsapi.xamarin.com. You can also view it in the native Mono documentation browser by clicking on Open API Documentation when viewing the component in Xamarin Studio.
Xamarin.Mobile is also an open source project with the standard Apache 2.0 license. You can contribute to the project or submit issues to the GitHub page at https://github.com/xamarin/Xamarin.Mobile. Feel free to use Xamarin.Mobile in your applications or fork, and modify it for your own purposes.
To begin our exploration of what Xamarin.Mobile offers, let's access the address book within a Xamarin application. For iOS, the first step is to make a Single View Application project by navigating to iOS | iPhone Storyboard. Make sure you add Xamarin.Mobile to the project from the Component Store.
Now, let's implement a simple UITableView with a list of contacts:
- Open the
MainStoryboard.storyboardfile. Delete any existing controllers created by the project template. - Create
UINavigationControllerwith aUITableViewControlleras its root child controller. - Set the Class of
UITableViewControllertoContactsControllerby navigating to Properties | Widget in the iOS designer. - Save the storyboard file and return to Xamarin Studio.
Open the automatically generated ContactsController.cs and start implementing the table view. Add using Xamarin.Contacts; to the top of the file and make the following changes to the controller:
public partial class ContactsController :UITableViewController, IUITableViewDataSource
{
  public ContactsController (IntPtr handle) : base (handle)
  {
    Title = "Contacts";
  }
}
We filled out the title for the navigation bar, "Contacts", and set the class to implement IUITableViewDataSource. This is a new type of interface that Xamarin has created to simplify using Objective-C protocols from C#. It is exactly the same as creating a class that inherits from UITableViewSource, as we did in the earlier chapters, but you can do it from your controller as well. Xamarin has done some tricks here. They created an interface with the methods that can be optionally implemented, which isn't something that C# supports. This type of interface can make your code a bit cleaner by reducing the need for a new class, which is great for very simple controllers.
Next, let's add some code to load the contacts:
Contact[] contacts;

public async override void ViewDidLoad()
{
  base.ViewDidLoad();
  try
  {
    var book = new AddressBook();
    await book.RequestPermission();
    contacts = book.ToArray();
  }
  catch
  {
    new UIAlertView("Oops!","Something went wrong, try again later.",null, "Ok").Show();
  }
}
To use Xamarin.Mobile for loading contacts, you must first create an AddressBook object. Next, we have to call RequestPermissions in order to ask the user for permission to access the address book. This is an important step since it is required by iOS devices before an application can access the user's contacts. This prevents potentially nefarious applications from retrieving contacts without the user's knowledge. Android, on the other hand, only presents these permissions before installing an application.
Next, we used the System.Linq extension method ToArray to enumerate over the address book and store it in a member variable named contacts. You can also use foreach over the AddressBook object depending on your needs.
If you were to compile and run the application at this point, you would be greeted by the standard iOS pop up requesting access to contacts, as shown in the following screenshot:
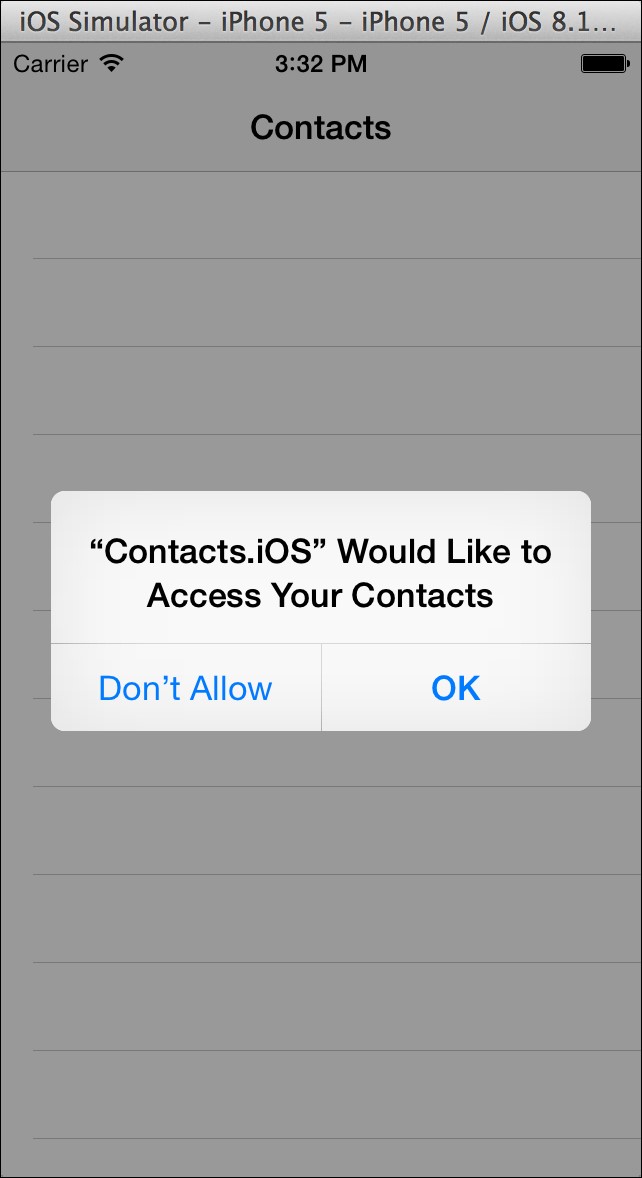
If you accidentally hit Don't Allow, you can change this setting by navigating to Settings | Privacy | Contacts on the device. In the iOS Simulator, you can also reset all the privacy prompts in the simulator by closing the application and navigating to Settings | General | Reset | Reset Location & Privacy. This is a good tip to know whether you need to retest during development.
So, for the next step, we'll need to implement the IUITableViewDataSource interface so that we can work with the array of contacts and display them on the screen. Add the following methods to the controller just like you would to UITableViewSource:
public override int RowsInSection(UITableView tableview, int section)
{
return contacts != null ? contacts.Length : 0;
}
public override UITableViewCell GetCell(UITableView tableView, NSIndexPath indexPath)
{
var contact = contacts [indexPath.Row];
var cell = tableView.DequeueReusableCell(CellName);
if (cell == null)
cell = new UITableViewCell(UITableViewCellStyle.Default, CellName);
cell.TextLabel.Text =contact.LastName + ", " + contact.FirstName;
return cell;
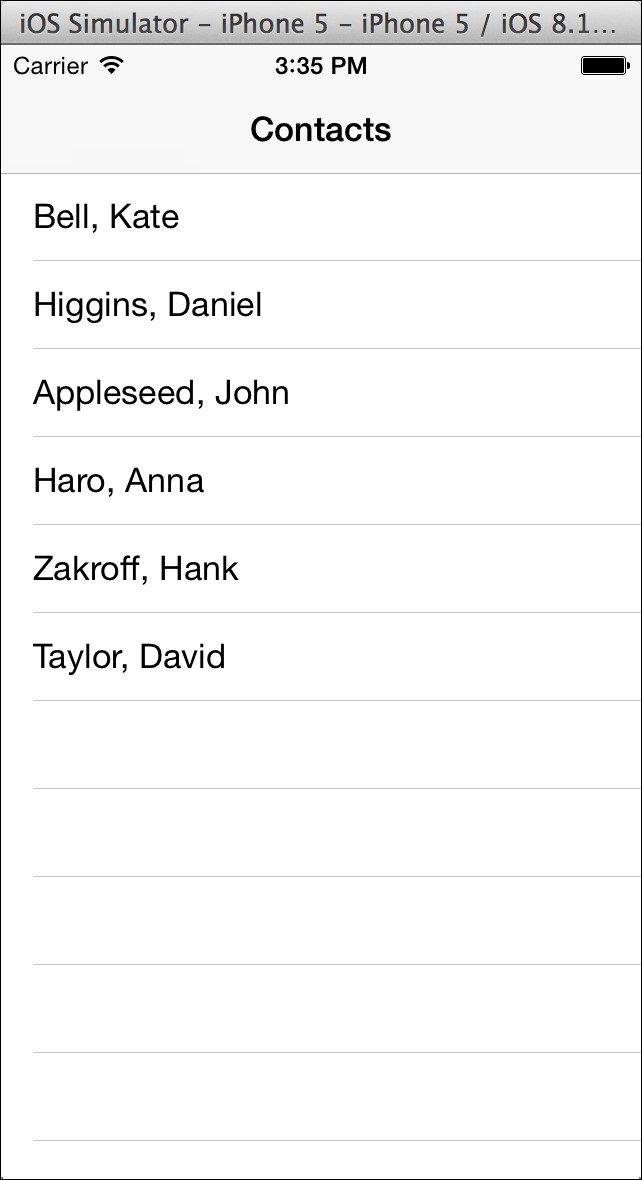
}Also, add a CellName constant string to the class by selecting a string identifier such as ContactCell. Now, if you compile and run the program, you'll be able to see the list of contacts on the device. The following screenshot shows the default list of contacts in the iOS Simulator:
In a very similar fashion, we can retrieve a list of contacts in Android with Xamarin.Mobile. All of the APIs in Xamarin.Mobile are identical in Android with the exception of the requirement of Android.Content.Context to be passed in a few places. This is because many native Android APIs require a reference to the current activity (or to the other context such as Application) in order to function properly. To begin, create a standard Android application project by navigating to Android | Android Application in Xamarin Studio. Make sure you add Xamarin.Mobile to the project from the Component Store.
In a parallel iOS, let's create a simple ListView to display a list of contacts as follows:
- Open the
Main.axmlfile from thelayoutfolder in theResourcesdirectory in the Android designer. - Remove the default button from the project template and add ListView to the layout.
- Set its Id to
@+id/contacts. - Save the file and open
MainActivity.csso that we can make some changes to the code.
Let's begin by removing most of the code; we don't need the code that came from the project template. You will also need to add a using statement for Xamarin.Contacts. Next, let's implement a simple BaseAdapter<Contact> class inside the MainActivity class as follows:
class ContactsAdapter : BaseAdapter<Contact>
{
  public Contact[] Contacts { get; set; }

  public override long GetItemId(int position)
  {
    return position;
  }
  public override View GetView(int position, View convertView, ViewGroup parent)
  {
    var contact = this [position];
    var textView = convertView as TextView;
    if (textView == null)
    {
      textView = new TextView(parent.Context);
    }
    textView.Text = contact.LastName + ", " + contact.FirstName;
    return textView;
  }
  public override int Count
  {
    get { return Contacts == null ? 0 : Contacts.Length; }
  }
  public override Contact this[int index]
  {
    get { return Contacts [index]; }
  }
}
This will display each contact in TextView for each row in ListView. One thing that we've done here in order to simplify things is add a property for the array of contacts. This should be pretty straightforward and similar to what we did in the previous chapters.
Now, let's set up the adapter in OnCreate as follows:
protected async override void OnCreate(Bundle bundle)
{
  base.OnCreate(bundle);

  SetContentView(Resource.Layout.Main);
  var listView = FindViewById<ListView>(Resource.Id.contacts);
  var adapter = new ContactsAdapter();
  listView.Adapter = adapter;
  try
  {
    var book = new AddressBook(this);
    await book.RequestPermission();
    adapter.Contacts = book.ToArray();
    adapter.NotifyDataSetChanged();
  }
  catch
  {
    new AlertDialog.Builder(this).SetTitle("Oops").SetMessage("Something went wrong, try again later.").SetPositiveButton("Ok", delegate { }).Show();
  }
}
This code calls Xamarin.Mobile that is identical to what we did on the code for iOS except that here, this had to be passed for the Android Context in the constructor for AddressBook. Our code changes are complete; however, if you run the application right now, an exception would be thrown. Android requires permission in the manifest file, which will notify the user of its access to the address book when downloaded from Google Play.
We must create an AndroidManifest.xml file and declare a permission as follows:
- Open the project options for the Android project.
- Select the Android Application tab under Build.
- Click on Add Android manifest.
- Under the Required permissions section, check ReadContacts.
- Click on OK to save your changes.
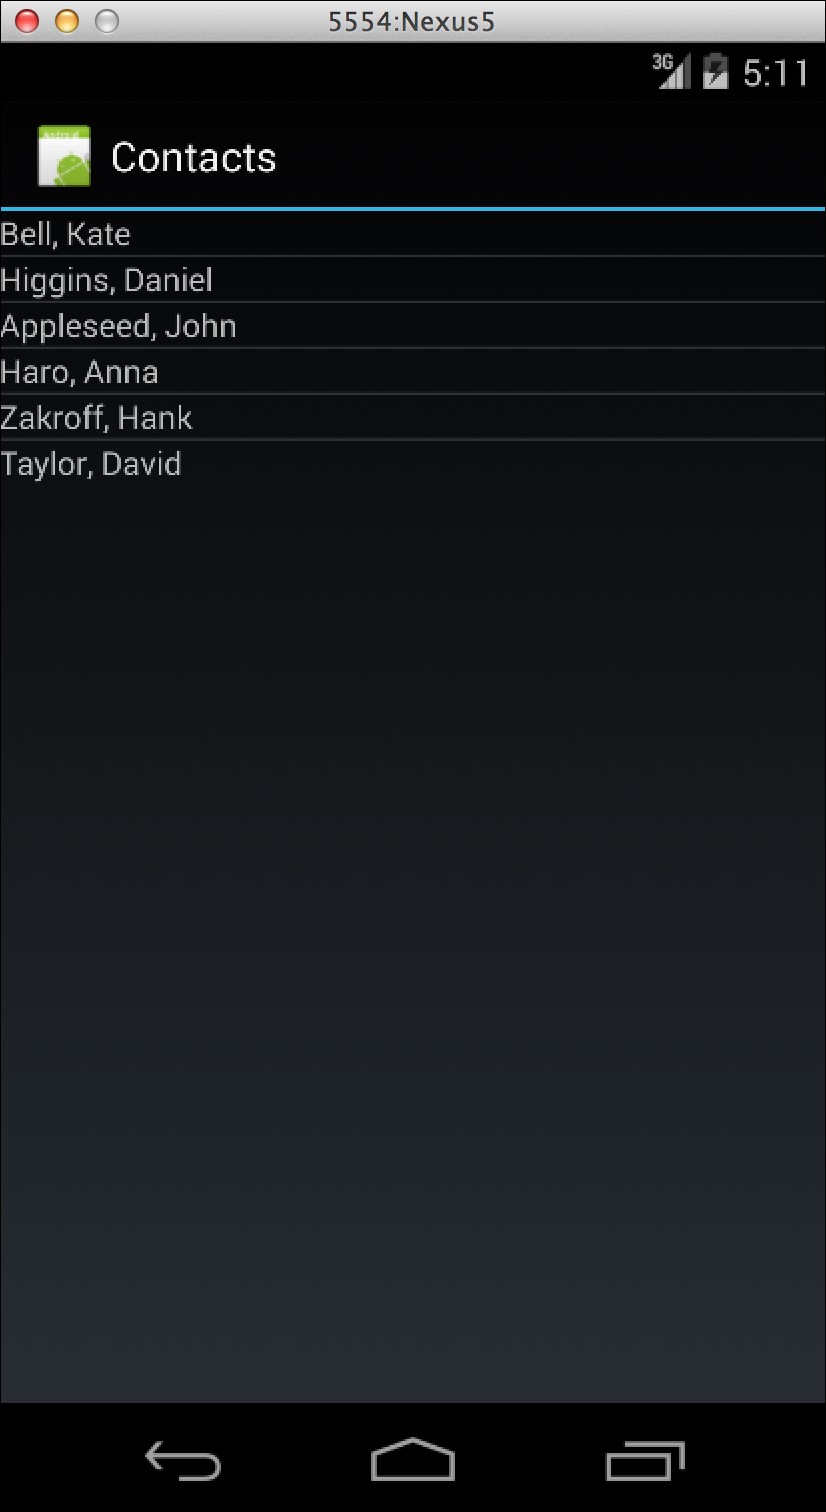
Now, if you run the application, you will get a list of all the contacts on the device, as shown in the following screenshot:
Retrieving contacts on Android
In a very similar fashion, we can retrieve a list of contacts in Android with Xamarin.Mobile. All of the APIs in Xamarin.Mobile are identical in Android with the exception of the requirement of Android.Content.Context to be passed in a few places. This is because many native Android APIs require a reference to the current activity (or to the other context such as Application) in order to function properly. To begin, create a standard Android application project by navigating to Android | Android Application in Xamarin Studio. Make sure you add Xamarin.Mobile to the project from the Component Store.
In a parallel iOS, let's create a simple ListView to display a list of contacts as follows:
- Open the
Main.axmlfile from thelayoutfolder in theResourcesdirectory in the Android designer. - Remove the default button from the project template and add ListView to the layout.
- Set its Id to
@+id/contacts. - Save the file and open
MainActivity.csso that we can make some changes to the code.
Let's begin by removing most of the code; we don't need the code that came from the project template. You will also need to add a using statement for Xamarin.Contacts. Next, let's implement a simple BaseAdapter<Contact> class inside the MainActivity class as follows:
class ContactsAdapter : BaseAdapter<Contact>
{
  public Contact[] Contacts { get; set; }

  public override long GetItemId(int position)
  {
    return position;
  }
  public override View GetView(int position, View convertView, ViewGroup parent)
  {
    var contact = this [position];
    var textView = convertView as TextView;
    if (textView == null)
    {
      textView = new TextView(parent.Context);
    }
    textView.Text = contact.LastName + ", " + contact.FirstName;
    return textView;
  }
  public override int Count
  {
    get { return Contacts == null ? 0 : Contacts.Length; }
  }
  public override Contact this[int index]
  {
    get { return Contacts [index]; }
  }
}
This will display each contact in TextView for each row in ListView. One thing that we've done here in order to simplify things is add a property for the array of contacts. This should be pretty straightforward and similar to what we did in the previous chapters.
Now, let's set up the adapter in OnCreate as follows:
protected async override void OnCreate(Bundle bundle)
{
  base.OnCreate(bundle);

  SetContentView(Resource.Layout.Main);
  var listView = FindViewById<ListView>(Resource.Id.contacts);
  var adapter = new ContactsAdapter();
  listView.Adapter = adapter;
  try
  {
    var book = new AddressBook(this);
    await book.RequestPermission();
    adapter.Contacts = book.ToArray();
    adapter.NotifyDataSetChanged();
  }
  catch
  {
    new AlertDialog.Builder(this).SetTitle("Oops").SetMessage("Something went wrong, try again later.").SetPositiveButton("Ok", delegate { }).Show();
  }
}
This code calls Xamarin.Mobile that is identical to what we did on the code for iOS except that here, this had to be passed for the Android Context in the constructor for AddressBook. Our code changes are complete; however, if you run the application right now, an exception would be thrown. Android requires permission in the manifest file, which will notify the user of its access to the address book when downloaded from Google Play.
We must create an AndroidManifest.xml file and declare a permission as follows:
- Open the project options for the Android project.
- Select the Android Application tab under Build.
- Click on Add Android manifest.
- Under the Required permissions section, check ReadContacts.
- Click on OK to save your changes.
Now, if you run the application, you will get a list of all the contacts on the device, as shown in the following screenshot:
Using Xamarin.Mobile to track a user's GPS location is as simple as accessing their contacts. There is a similar process for setting up access on iOS and Android, but in the case of location, you don't have to request permission from code. iOS will automatically show the standard alert requesting the permission. Android, on the other hand, merely requires a manifest setting.
As an example, let's create an application that displays a list of GPS location updates over time. Let's begin with an iOS example by creating a Single View Application project. This can be done by navigating to iOS | iPhone Storyboard and clicking on Single View Application, just like we did in the previous section. Make sure you add Xamarin.Mobile to the project from the Component Store.
Now, let's implement a simple UITableView to display a list of GPS updates as follows:
- Open the
MainStoryboard.storyboardfile. Delete any existing controllers created by the project template. - Create
UINavigationControllerwithUITableViewControlleras its root child controller. - Set the class of
UITableViewControllertoLocationControllerby navigating to Properties | Widget in the iOS designer. - Save the storyboard file and return to Xamarin Studio.
Open LocationController.cs and let's start by setting up our GPS to update a table view over time. Add using Xamarin.Geolocation; to the top of the file. We can set up some member variables and create our Geolocator object in the controller's constructor as follows:
Geolocator locator;
List<string> messages = new List<string>();
public LocationController (IntPtr handle) : base (handle)
{
  Title = "GPS";
  locator = new Geolocator();
  locator.PositionChanged += OnPositionChanged;
  locator.PositionError += OnPositionError;
}
Next, we can set up our event handlers as follows:
void OnPositionChanged (object sender, PositionEventArgs e)
{
  messages.Add(string.Format("Long: {0:0.##} Lat: {1:0.##}",e.Position.Longitude, e.Position.Latitude));
  TableView.ReloadData();
}
void OnPositionError (object sender, PositionErrorEventArgs e)
{
  messages.Add(e.Error.ToString());
  TableView.ReloadData();
}
These will add a message to the list when there is an error or a location change. We used string.Format to only display the longitude and latitude up to two decimal places.
Next, we have to actually tell Geolocator to start listening for GPS updates. We can do this in ViewDidLoad as follows:
public override void ViewDidLoad()
{
  base.ViewDidLoad();
  locator.StartListening(1000, 50);
}
In the preceding code, 1000 is a hint for the minimum time to update the GPS location, and the value 50 is a hint for the number of meters that will trigger a position update.
Last but not least, we need to set up the table view. Set up LocationController to implement IUITableViewDataSource and add the following methods to the controller:
public override int RowsInSection(UITableView tableview, int section)
{
  return messages.Count;
}
public override UITableViewCell GetCell(UITableView tableView, NSIndexPath indexPath)
{
  var cell = tableView.DequeueReusableCell(CellName);
  if (cell == null)
    cell = new UITableViewCell(UITableViewCellStyle.Default, CellName);
  cell.TextLabel.Text = messages [indexPath.Row];
  return cell;
}
If you compile and run the application, you should see an iOS permission prompt followed by the longitude and latitude in the table view over time, as shown in the following screenshot:

Just as in the previous section, using Xamarin.Mobile for GPS location is almost identical to the APIs we used in iOS. To begin with our Android example, go to Android | Android Application in Xamarin Studio. Make sure you add Xamarin.Mobile to the project from the Component Store.
Let's create ListView to display a list of messages of the GPS location updates as follows:
- Open the
Main.axmlfile from thelayoutfolder under theResourcesdirectory in the Android designer. - Remove the default button from the project template and add
ListViewto the layout. - Set its Id to
@+id/locations. - Save the file and open
MainActivity.csso that we can make some code changes.
As usual, remove any extra code that was created by the project template. Next, add a using statement for Xamarin.Geolocation. Then, add a simple BaseAdapter<string> to the MainActivity class as follows:
class Adapter : BaseAdapter<string>
{
  List<string> messages = new List<string>();

  public void Add(string message)
  {
    messages.Add(message);
    NotifyDataSetChanged();
  }
  public override long GetItemId(int position)
  {
    return position;
  }
  public override View GetView(int position, View convertView, ViewGroup parent)
  {
    var textView = convertView as TextView;
    if (textView == null)
      textView = new TextView(parent.Context);
    textView.Text = messages [position];
    return textView;
  }
  public override int Count
  {
    get { return messages.Count; }
  }
  public override string this[int index]
  {
    get { return messages [index]; }
  }
}
This is similar to other Android adapters we have set up in the past. One difference here is that we made a member variable that contains a List<string> of messages and a method to add the new messages to the list.
Now, let's add a few methods to the MainActivity class in order to set up the GPS location updates as follows:
Geolocator locator;
Adapter adapter;

protected override void OnCreate(Bundle bundle)
{
  base.OnCreate(bundle);
  SetContentView(Resource.Layout.Main);
  var listView = FindViewById<ListView>(Resource.Id.locations);
  listView.Adapter = adapter = new Adapter();
  locator = new Geolocator(this);
  locator.PositionChanged += OnPositionChanged;
  locator.PositionError += OnPositionError;
}
protected override void OnResume()
{
  base.OnResume();
  locator.StartListening(1000, 50);
}
protected override void OnPause()
{
  base.OnPause();
  locator.StopListening();
}
void OnPositionChanged (object sender, PositionEventArgs e)
{
  adapter.Add(string.Format("Long: {0:0.##} Lat: {1:0.##}",e.Position.Longitude, e.Position.Latitude));
}
void OnPositionError (object sender, PositionErrorEventArgs e)
{
  adapter.Add(e.Error.ToString());
}
Again, this looks identical to the code for iOS except for the constructor for Geolocator. If you run the application at this point, it would start with no errors. However, no events will be fired from the Geolocator object. We first need to add a permission to access the location from the Android Manifest file. It is also a good idea to start the locator in OnResume and stop it in OnPause. This will conserve the battery by stopping GPS location when this activity is no longer on the screen.
Let's create an AndroidManifest.xml file and declare two permissions as follows:
- Open the project options for the Android project.
- Select the Android Application tab under Build.
- Click on Add Android manifest.
- Under the Required permissions section, check AccessCoarseLocation and AccessFineLocation.
- Click on OK to save your changes.
Now, if you compile and run the application, you will get the GPS location updates over time, as shown in the following screenshot:
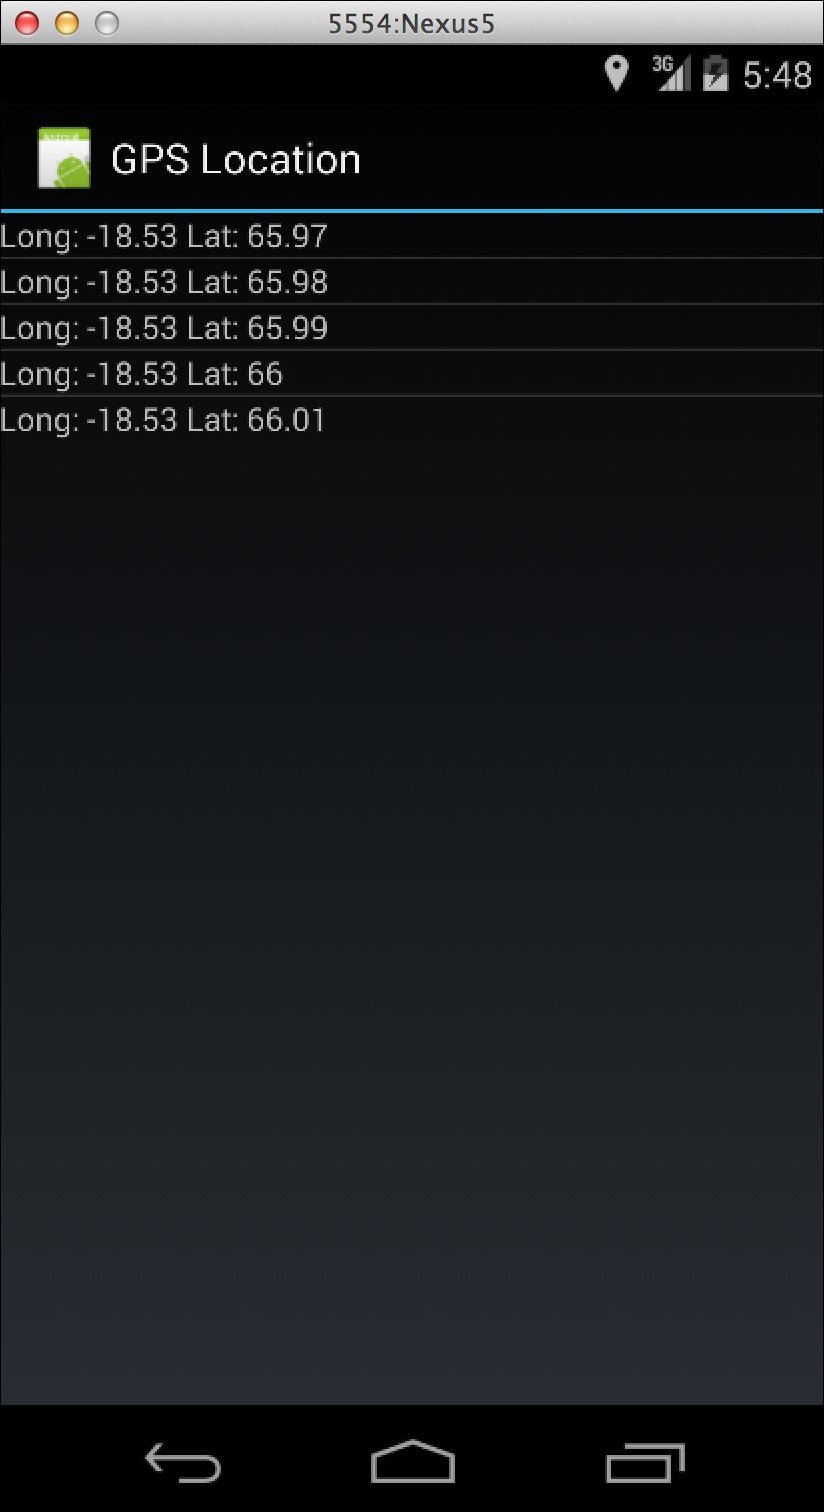
Implementing GPS location on Android
Just as in the previous section, using Xamarin.Mobile for GPS location is almost identical to the APIs we used in iOS. To begin with our Android example, go to Android | Android Application in Xamarin Studio. Make sure you add Xamarin.Mobile to the project from the Component Store.
Let's create ListView to display a list of messages of the GPS location updates as follows:
- Open the
Main.axmlfile from thelayoutfolder under theResourcesdirectory in the Android designer. - Remove the default button from the project template and add
ListViewto the layout. - Set its Id to
@+id/locations. - Save the file and open
MainActivity.csso that we can make some code changes.
As usual, remove any extra code that was created by the project template. Next, add a using statement for Xamarin.Geolocation. Then, add a simple BaseAdapter<string> to the MainActivity class as follows:
class Adapter : BaseAdapter<string>
{
  List<string> messages = new List<string>();

  public void Add(string message)
  {
    messages.Add(message);
    NotifyDataSetChanged();
  }
  public override long GetItemId(int position)
  {
    return position;
  }
  public override View GetView(int position, View convertView, ViewGroup parent)
  {
    var textView = convertView as TextView;
    if (textView == null)
      textView = new TextView(parent.Context);
    textView.Text = messages [position];
    return textView;
  }
  public override int Count
  {
    get { return messages.Count; }
  }
  public override string this[int index]
  {
    get { return messages [index]; }
  }
}
This is similar to other Android adapters we have set up in the past. One difference here is that we made a member variable that contains a List<string> of messages and a method to add the new messages to the list.
Now, let's add a few methods to the MainActivity class in order to set up the GPS location updates as follows:
Geolocator locator;
Adapter adapter;

protected override void OnCreate(Bundle bundle)
{
  base.OnCreate(bundle);
  SetContentView(Resource.Layout.Main);
  var listView = FindViewById<ListView>(Resource.Id.locations);
  listView.Adapter = adapter = new Adapter();
  locator = new Geolocator(this);
  locator.PositionChanged += OnPositionChanged;
  locator.PositionError += OnPositionError;
}
protected override void OnResume()
{
  base.OnResume();
  locator.StartListening(1000, 50);
}
protected override void OnPause()
{
  base.OnPause();
  locator.StopListening();
}
void OnPositionChanged (object sender, PositionEventArgs e)
{
  adapter.Add(string.Format("Long: {0:0.##} Lat: {1:0.##}",e.Position.Longitude, e.Position.Latitude));
}
void OnPositionError (object sender, PositionErrorEventArgs e)
{
  adapter.Add(e.Error.ToString());
}
Again, this looks identical to the code for iOS except for the constructor for Geolocator. If you run the application at this point, it would start with no errors. However, no events will be fired from the Geolocator object. We first need to add a permission to access the location from the Android Manifest file. It is also a good idea to start the locator in OnResume and stop it in OnPause. This will conserve the battery by stopping GPS location when this activity is no longer on the screen.
Let's create an AndroidManifest.xml file and declare two permissions as follows:
- Open the project options for the Android project.
- Select the Android Application tab under Build.
- Click on Add Android manifest.
- Under the Required permissions section, check AccessCoarseLocation and AccessFineLocation.
- Click on OK to save your changes.
Now, if you compile and run the application, you will get the GPS location updates over time, as shown in the following screenshot:
The last major feature of Xamarin.Mobile is the ability to access photos in order to give users the ability to add their own content to your applications. Using a class called MediaPicker, you can pull photos from the device's camera or photo library and optionally display your own UI for the operation.
Let's create an application that loads an image from the camera or photo library on the press of a button and displays it on the screen. To begin with, create a Single View Application project by going to iOS | iPhone Storyboard | Single View Application in Xamarin Studio. Make sure to add Xamarin.Mobile to the project from the Component Store.
Now, let's implement a screen with two UIButton and a UIImageView as follows:
- Open the
MainStoryboard.storyboardfile. Delete any existing controllers created by the project template. - Create
UIViewControllerwith oneUIImageViewand twoUIButtonnamedLibraryandCamera. - Set the class of
UITableViewControllertoContactsControllerby navigating to Properties | Widget in the iOS designer. - Create the Name field for each view in the controller named
imageView,library, andcamerarespectively. - Save the storyboard file and return to Xamarin Studio.
Now, open PhotoController.cs and add the following code in ViewDidLoad:
MediaPicker picker;
public override void ViewDidLoad()
{
  base.ViewDidLoad();

  picker = new MediaPicker();
  if (!picker.IsCameraAvailable)
    camera.Enabled = false;
  camera.TouchUpInside += OnCamera;
  library.TouchUpInside += OnLibrary;
}
Note that we have to check IsCameraAvailable and disable the camera button. There are iOS devices such as the first generation iPad that could possibly not have a camera. Besides this, we just need to create an instance of MediaPicker that can be used when you click on each button.
Now, let's add a method for each button's TouchUpInside event and a couple of other helper methods as follows:
async void OnCamera (object sender, EventArgs e)
{
  try
  {
    var file = await picker.TakePhotoAsync(new StoreCameraMediaOptions());
    imageView.Image = ToImage(file);
  }
  catch
  {
    ShowError();
  }
}
async void OnLibrary (object sender, EventArgs e)
{
  try
  {
    var file = await picker.PickPhotoAsync();
    imageView.Image = ToImage(file);
  }
  catch
  {
      ShowError();
  }
}
UIImage ToImage(MediaFile file)
{
  using (var stream = file.GetStream())
  {
    using (var data = NSData.FromStream(stream))
    {
      return UIImage.LoadFromData(data);
    }
  }
}
void ShowError()
{
  new UIAlertView("Oops!", "Something went wrong, try again later.", null, "Ok").Show();
}
Using MediaPIcker is pretty straightforward; you merely have to call TakePhotoAsync or PickPhotoAsync to retrieve a MediaFile instance. Then, you can call GetStream to do what you want with the image data. In our case, we created UIImage to display directly in UIImageView. It is also necessary to use a try-catch block in case something unexpected happens or the user cancels.
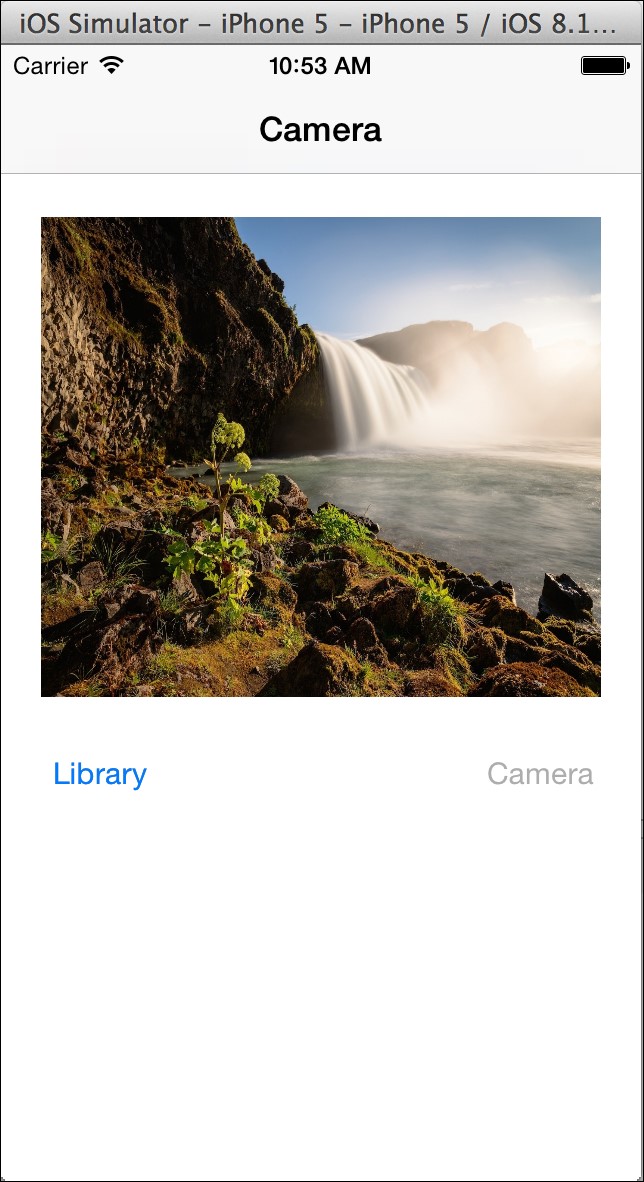
You should now be able to run the app and select a photo to be viewed on the screen. The following screenshot shows a nice default photo from the iOS simulator that I selected from the photo library:
In comparison to iOS, we have to use a slightly different pattern on Android to retrieve photos from the camera or photo library. A common pattern in Android is that it calls StartActivityForResult to launch an activity from another application. When this activity is completed, OnActivityResult will be called from your activity. Because of this, Xamarin.Mobile could not use the same APIs on Android as the other platforms. To start our example, create an Android Application project by going to Android | Android Application in Xamarin Studio. Make sure you add Xamarin.Mobile to the project from the Component Store.
Let's create two Buttons and an ImageView to mimic our UI on iOS as follows:
- Open the
Main.axmlfile from thelayoutfolder under theResourcesdirectory in the Android designer. - Remove the default button from the project template, and add two new
ButtonnamedLibraryandCamera. - Set their Id to
@+id/libraryand@+id/camera, respectively. - Create an
ImageViewwith an Id of@+id/imageView. - Save the file and open
MainActivity.csso that we can make changes to our code.
As usual, remove any extra code that was created by the project template. Next, add a using statement for Xamarin.Media. Then, we can add a new OnCreate method and some member variables for our activity as follows:
MediaPicker picker;
ImageView imageView;

protected override void OnCreate(Bundle bundle)
{
  base.OnCreate(bundle);
  SetContentView(Resource.Layout.Main);
  var library = FindViewById<Button>(Resource.Id.library);
  var camera = FindViewById<Button>(Resource.Id.camera);
  imageView = FindViewById<ImageView>(Resource.Id.imageView);
  picker = new MediaPicker(this);
  library.Click += OnLibrary;
  camera.Click += OnCamera;
  if (!picker.IsCameraAvailable)
    camera.Enabled = false;
}
We retrieved the instance of our views and created a new MediaPicker by passing our activity as Context to its constructor. We hooked up some Click event handlers, and disabled the camera button since a camera is not available.
Next, let's implement the two Click event handlers as follows:
void OnLibrary (object sender, EventArgs e)
{
  var intent = picker.GetPickPhotoUI();
  StartActivityForResult (intent, 1);
}
void OnCamera (object sender, EventArgs e)
{
  var intent = picker.GetTakePhotoUI(new StoreCameraMediaOptions
  {
    Name = "test.jpg", Directory = "PhotoPicker"
  });
  StartActivityForResult (intent, 1);
}
In each case, we make a call to GetPickPhotoUI or GetTakePhotoUI in order to get an instance of an Android Intent object. This object is used to start the new activities within an application. StartActivityForResult will also start the Intent object, expecting a result to be returned from the new activity. We also set some values with StoreCameraMediaOptions to specify a filename and temporary directory to store the photo.
Next, we need to implement OnActivityResult in order to handle what will happen when the new activity is completed:
protected async override void OnActivityResult(
  int requestCode, Result resultCode, Intent data)
{
  if (resultCode == Result.Canceled)
  return;
  var file = await data.GetMediaFileExtraAsync(this);
  using (var stream = file.GetStream())
  {
    imageView.SetImageBitmap(await
      BitmapFactory.DecodeStreamAsync(stream));
  }
}
If this is successful, we retrieve MediaFile and load a new Bitmap with the returned Stream. Next, all that is needed is to call SetImageBitmap to display the image on the screen.
Let's create an AndroidManifest.xml file and declare two permissions as follows:
- Open the project options for the Android project.
- Select the Android Application tab under Build.
- Click on Add Android manifest.
- Under the Required permissions section, check Camera and WriteExternalStorage.
- Click on OK to save your changes.
You should now be able to run the application and load photos to be displayed on the screen, as shown in the following screenshot:
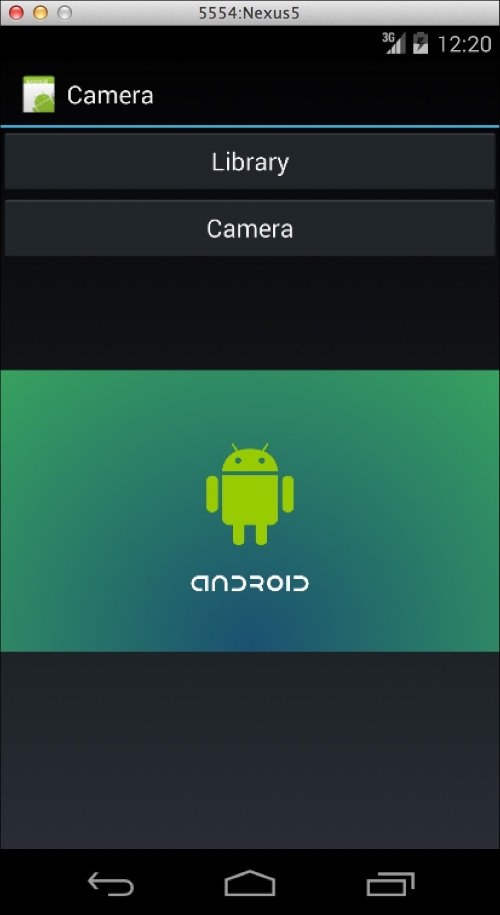
Accessing photos on Android
In comparison to iOS, we have to use a slightly different pattern on Android to retrieve photos from the camera or photo library. A common pattern in Android is that it calls StartActivityForResult to launch an activity from another application. When this activity is completed, OnActivityResult will be called from your activity. Because of this, Xamarin.Mobile could not use the same APIs on Android as the other platforms. To start our example, create an Android Application project by going to Android | Android Application in Xamarin Studio. Make sure you add Xamarin.Mobile to the project from the Component Store.
Let's create two Buttons and an ImageView to mimic our UI on iOS as follows:
- Open the
Main.axmlfile from thelayoutfolder under theResourcesdirectory in the Android designer. - Remove the default button from the project template, and add two new
ButtonnamedLibraryandCamera. - Set their Id to
@+id/libraryand@+id/camera, respectively. - Create an
ImageViewwith an Id of@+id/imageView. - Save the file and open
MainActivity.csso that we can make changes to our code.
As usual, remove any extra code that was created by the project template. Next, add a using statement for Xamarin.Media. Then, we can add a new OnCreate method and some member variables for our activity as follows:
MediaPicker picker;
ImageView imageView;

protected override void OnCreate(Bundle bundle)
{
  base.OnCreate(bundle);
  SetContentView(Resource.Layout.Main);
  var library = FindViewById<Button>(Resource.Id.library);
  var camera = FindViewById<Button>(Resource.Id.camera);
  imageView = FindViewById<ImageView>(Resource.Id.imageView);
  picker = new MediaPicker(this);
  library.Click += OnLibrary;
  camera.Click += OnCamera;
  if (!picker.IsCameraAvailable)
    camera.Enabled = false;
}
We retrieved the instance of our views and created a new MediaPicker by passing our activity as Context to its constructor. We hooked up some Click event handlers, and disabled the camera button since a camera is not available.
Next, let's implement the two Click event handlers as follows:
void OnLibrary (object sender, EventArgs e)
{
  var intent = picker.GetPickPhotoUI();
  StartActivityForResult (intent, 1);
}
void OnCamera (object sender, EventArgs e)
{
  var intent = picker.GetTakePhotoUI(new StoreCameraMediaOptions
  {
    Name = "test.jpg", Directory = "PhotoPicker"
  });
  StartActivityForResult (intent, 1);
}
In each case, we make a call to GetPickPhotoUI or GetTakePhotoUI in order to get an instance of an Android Intent object. This object is used to start the new activities within an application. StartActivityForResult will also start the Intent object, expecting a result to be returned from the new activity. We also set some values with StoreCameraMediaOptions to specify a filename and temporary directory to store the photo.
Next, we need to implement OnActivityResult in order to handle what will happen when the new activity is completed:
protected async override void OnActivityResult(
  int requestCode, Result resultCode, Intent data)
{
  if (resultCode == Result.Canceled)
  return;
  var file = await data.GetMediaFileExtraAsync(this);
  using (var stream = file.GetStream())
  {
    imageView.SetImageBitmap(await
      BitmapFactory.DecodeStreamAsync(stream));
  }
}
If this is successful, we retrieve MediaFile and load a new Bitmap with the returned Stream. Next, all that is needed is to call SetImageBitmap to display the image on the screen.
Let's create an AndroidManifest.xml file and declare two permissions as follows:
- Open the project options for the Android project.
- Select the Android Application tab under Build.
- Click on Add Android manifest.
- Under the Required permissions section, check Camera and WriteExternalStorage.
- Click on OK to save your changes.
You should now be able to run the application and load photos to be displayed on the screen, as shown in the following screenshot:
In this chapter, we discovered the Xamarin.Mobile library and how it can accelerate common native tasks in a cross-platform way. We retrieved the contacts from the address book and set up GPS location updates over time. Lastly, we loaded photos from the camera and photo library. Using the native APIs directly would mean twice as much code on each platform, so we saw how the Xamarin.Mobile library is a useful abstraction that can reduce some development time.
After completing this chapter, you should have a complete grasp of the Xamarin.Mobile library and the common functionality it provides for cross-platform development. It gives clean, modern APIs that offer the async/await functionality that can be accessed across iOS, Android, and Windows Phone. Accessing contacts, GPS, and photos across platforms is very straightforward with Xamarin.Mobile.
In the next chapter, we will cover the steps of how to submit applications to the iOS App Store and Google Play. This will include how to prepare your app to pass the iOS guidelines as well as properly signing up your app for Google Play.