

In this chapter, we will begin developing the Android UI for our XamChat sample application. We will use the native Android APIs directly to create our application and call into our shared portable class library similar to what we did on iOS. Similarly, our Xamarin.Android application will be indistinguishable from an Android application written in Java.
To begin writing the Android version of XamChat, open the solution provided in the previous chapters, and create a new Android Application project. Name the project XamChat.Droid or some other appropriate name of your choice.
In this chapter, we will cover:
- The Android Manifest
- Writing a login screen for XamChat
- Android's ListView and BaseAdapter
- Adding a friends list
- Adding a list of messages
All Android applications have an XML file called the Android Manifest, which declares the basic information about the app such as the application version and name, and is named AndroidManifest.xml. This is very similar to the Info.plist file on iOS, but Android puts much more emphasis on its importance. A default project doesn't have a manifest, so let's begin by creating one by navigating to Project Options | Android Application and clicking on Add Android Manifest. Several new settings for your application will appear.
The most important settings, shown in the following screenshot, are as follows:
- Application name: This is the title of your application, which is displayed below the icon. It is not the same as the name selected on Google Play.
- Package name: This is similar to that on iOS; it's your app's bundle identifier or bundle ID. It is a unique name used to identify your application. The convention is to use the reverse domain style with your company name at the beginning; for example,
com.packt.xamchat. It must begin with a lower case letter and contain at least one "." character within. - Application icon: This is the icon displayed for your app on Android's home screen.
- Version number: This is a one-digit number that represents the version of your application. Raising this number indicates a newer version on Google Play.
- Version name: This is a user-friendly version string for your app that users will see in settings and on Google Play; for example, 1.0.0.
- Minimum Android version: This is the minimum version of Android that your application supports. In modern Android apps, you can generally target Android 4.0, but this is a decision based on your application's core audience.
- Target Android version: This is the version of the Android SDK your application is compiled against. Using higher numbers gives you access to new APIs, however, you might need to do some checks to call these APIs on newer devices.
- Install Location: This defines the different locations your Android application can be installed to: auto (user settings), external (SD card), or internal (device internal memory).
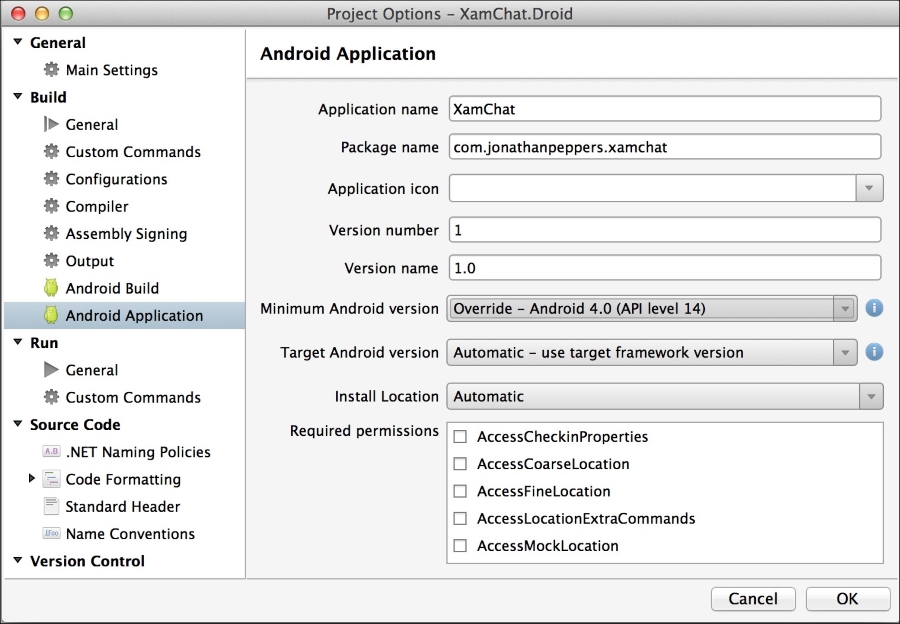
In addition to these settings, there is a set of checkboxes labeled Required permissions. These are displayed to users on Google Play prior to the application being installed. This is Android's way of enforcing a level of security, giving users a way to see what kinds of access an app will have to make changes to their device.
The following are some commonly used manifest permissions:
- Camera: This provides access to the device camera
- Internet: This provides access to make web requests over the Internet
- ReadContacts: This provides access to read the device's contacts library
- ReadExternalStorage: This provides access to read the SD card
- WriteContacts: This provides access to modify the device's contacts library
- WriteExternalStorage: This provides access to write to the SD card
In addition to these settings, a manual change to Android Manifest will be required many times. In this case, you can edit the manifest file as you would edit a standard XML file in Xamarin Studio. For a complete list of valid XML elements and attributes, visit http://developer.android.com/guide/topics/manifest/manifest-intro.html.
Now let's fill out the following settings for our application:
- Application name:
XamChat - Package name:
com.yourcompanyname.xamchat; make sure to name future apps beginning withcom.yourcompanyname - Version number: Just start with the number
1 - Version: This can be any string, but it is recommended to use something that resembles a version number
- Minimum Android version: Select Android 4.0.3 (API Level 15)
- Required permissions: Select Internet; we will be using it later
At this point, we need to reference our shared code from our portable class library we created in Chapter 4, XamChat – a Cross-platform App. Right-click on the References folder for the project, then click on Edit References..., and add a reference to the XamChat.Core project. You will now be able to access all the shared code that was written in Chapter 4, XamChat – a Cross-platform App.
Go to the Resources directory, and in the values folder, open Strings.xml; this is where all the text throughout your Android app should be stored. This is an Android convention that will make it very easy to add multiple languages to your application. Let's change our strings to the following:
<?xml version="1.0" encoding="utf-8"?>
<resources>
    <string name="ApplicationName">XamChat</string>
    <string name="ErrorTitle">Oops!</string>
    <string name="Loading">Loading</string>
</resources>
We'll use these values later in the chapter. Feel free to add new ones in cases where you display the text to the user. If you need to add more languages, it is very straightforward; you can see the Android documentation on this subject at http://developer.android.com/guide/topics/resources/localization.html.
Now let's implement our main application class; add a new Activity from the New File dialog. We won't be subclassing Activity in this file, but this template adds several Android using statements to the top of the file that imports the Android APIs to be used within your code. Create a new Application class where we can register everything in our ServiceContainer as follows:
[Application(Theme = "@android:style/Theme.Holo.Light")]
public class Application : Android.App.Application
{
  public Application(IntPtr javaReference, JniHandleOwnership transfer): base(javaReference, transfer)
  {
  }

  public override void OnCreate()
  {
    base.OnCreate();

    //ViewModels
    ServiceContainer.Register<LoginViewModel>(() => new LoginViewModel());
    ServiceContainer.Register<FriendViewModel>(() => new FriendViewModel());
    ServiceContainer.Register<MessageViewModel>(() => new MessageViewModel());
    ServiceContainer.Register<RegisterViewModel>(() => new RegisterViewModel());

    //Models
    ServiceContainer.Register<ISettings>(() => new FakeSettings());
    ServiceContainer.Register<IWebService>(() => new FakeWebService());
  }
}
We used the built-in Android theme, Theme.Holo.Light, just because it is a neat theme that matches the default style we used on iOS. Note the strange, empty constructor we have to create for this class to function. This is a current requirement of a custom Application class in Xamarin. You can just recognize this as boilerplate code, and you will need to add this in this case.
Now let's implement a simple base class for all the activities throughout our app. Create an Activities folder in the XamChat.Droid project and a new file named BaseActivity.cs with the following content:
[Activity]
public class BaseActivity<TViewModel> : Activitywhere TViewModel : BaseViewModel
{
  protected readonly TViewModel viewModel;
  protected ProgressDialog progress;

  public BaseActivity()
  {
    viewModel = ServiceContainer.Resolve(typeof(TViewModel)) asTViewModel;
  }
  protected override void OnCreate(Bundle bundle)
  {
    base.OnCreate(bundle);
    progress = new ProgressDialog(this);
    progress.SetCancelable(false);progress.SetTitle(Resource.String.Loading);}
  protected override void OnResume()
  {
    base.OnResume();
    viewModel.IsBusyChanged += OnIsBusyChanged;
  }
  protected override void OnPause()
  {
    base.OnPause();
    viewModel.IsBusyChanged -= OnIsBusyChanged;
  }
  void OnIsBusyChanged (object sender, EventArgs e)
  {
    if (viewModel.IsBusy)
      progress.Show();
    else
      progress.Hide();
  }
}
We did several things here to simplify the development of our other activities. First, we made this class generic, and made a protected variable named viewModel to store a ViewModel of a specific type. Note that we did not use generics on controllers in iOS due to platform limitations (see more on Xamarin's documentation website at http://docs.xamarin.com/guides/ios/advanced_topics/limitations/). We also implemented IsBusyChanged, and displayed a simple ProgressDialog function with the Loading string from the Strings.xml file to indicate the network activity.
Let's add one more method to display errors to the user, as follows:
protected void DisplayError(Exception exc)
{
  string error = exc.Message;
  new AlertDialog.Builder(this)
  .SetTitle(Resource.String.ErrorTitle)
  .SetMessage(error)
  .SetPositiveButton(Android.Resource.String.Ok,(IDialogInterfaceOnClickListener)null)
  .Show();
}
This method will display a pop-up dialog indicating that something went wrong. Notice that we also used ErrorTitle and the built-in Android resource for an Ok string.
This will complete the core setup for our Android application. From here, we can move on to implement the UI for the screens throughout our app.
Before creating Android views, it is important to know the different layouts or view group types available in Android. iOS does not have an equivalent for some of these because iOS has a very small variation of screen sizes on its devices. Since Android has virtually infinite screen sizes and densities, the Android SDK has a lot of built-in support for auto-sizing and layout for views.
The following are the common types of layouts:
ViewGroup: This is the base class for a view that contains a collection of child views. You normally won't use this class directly.LinearLayout: This is a layout that positions its child views in rows or columns (but not both). You can also set weights on each child to have them span different percentages of the available space.RelativeLayout: This is a layout that gives much more flexibility on the position of its children. You can position child views relative to each other so that they are above, below, to the left, or to the right of one another.FrameLayout: This layout positions its child views directly on top of one another in the z order on the screen. This layout is best used for cases where you have a large child view that needs other views on top of it and perhaps docked to one side.ListView: This displays views vertically in a list with the help of an adapter class that determines the number of child views. It also has support for its children to be selected.GridView: This displays views in rows and columns within a grid. It also requires the use of an adapter class to supply the number of children.
Before we begin writing the login screen, delete the Main.axml and MainActivity.cs files that were created from the Android project template, as they are not useful for this application. Next, create an Android layout file named Login.axml in the layout folder of the Resources directory in your project.
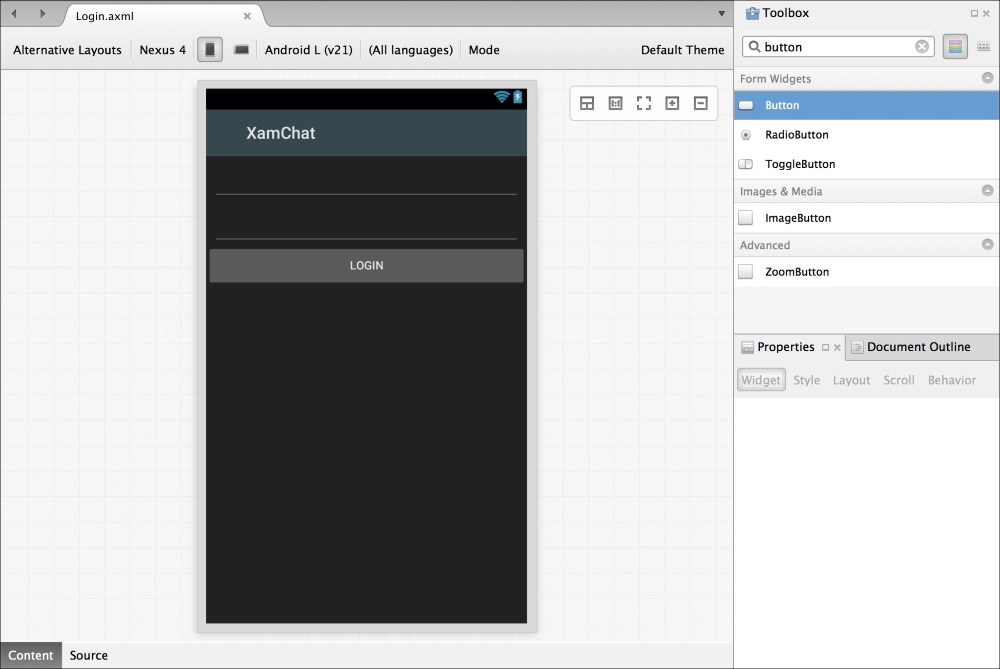
Now we can start adding functionalities to our Android layout as follows:
- Double-click on the
Login.axmlfile to open the Android designer. - Drag two Plain Text views onto the layout found in the Text Fields section.
- In the Id field, enter
@+id/usernameand@+id/passwordrespectively. This is a step that you will take for any control you want to work with from C# code. - For the password field, set its Input Type property to
textPassword. - Drag a Button onto the layout and set its Text property to
Login. - Set the button's Id property to
@+id/login. We will be using this control from code.
Your layout will look something like what is shown in the following screenshot when complete:
Now create a new Android Activity file named LoginActivity.cs in the Activites folder we created earlier. We will use this as the main activity that starts when the application runs. Let's implement the login functionality as follows:
[Activity(Label = "@string/ApplicationName", MainLauncher = true)]
public class LoginActivity : BaseActivity<LoginViewModel>
{
EditText username, password;
Button login;
protected override void OnCreate(Bundle bundle)
{
base.OnCreate(bundle);
SetContentView(Resource.Layout.Login);
username = FindViewById<EditText>(Resource.Id.username);
password = FindViewById<EditText>(Resource.Id.password);
login = FindViewById<Button>(Resource.Id.login);
login.Click += OnLogin;
}
protected override void OnResume()
{
base.OnResume();
username.Text = password.Text = string.Empty;
}
async void OnLogin (object sender, EventArgs e)
{
viewModel.Username = username.Text;
viewModel.Password = password.Text;
try
{
await viewModel.Login();
//TODO: navigate to a new activity
}
catch (Exception exc)
{
DisplayError(exc);
}
}
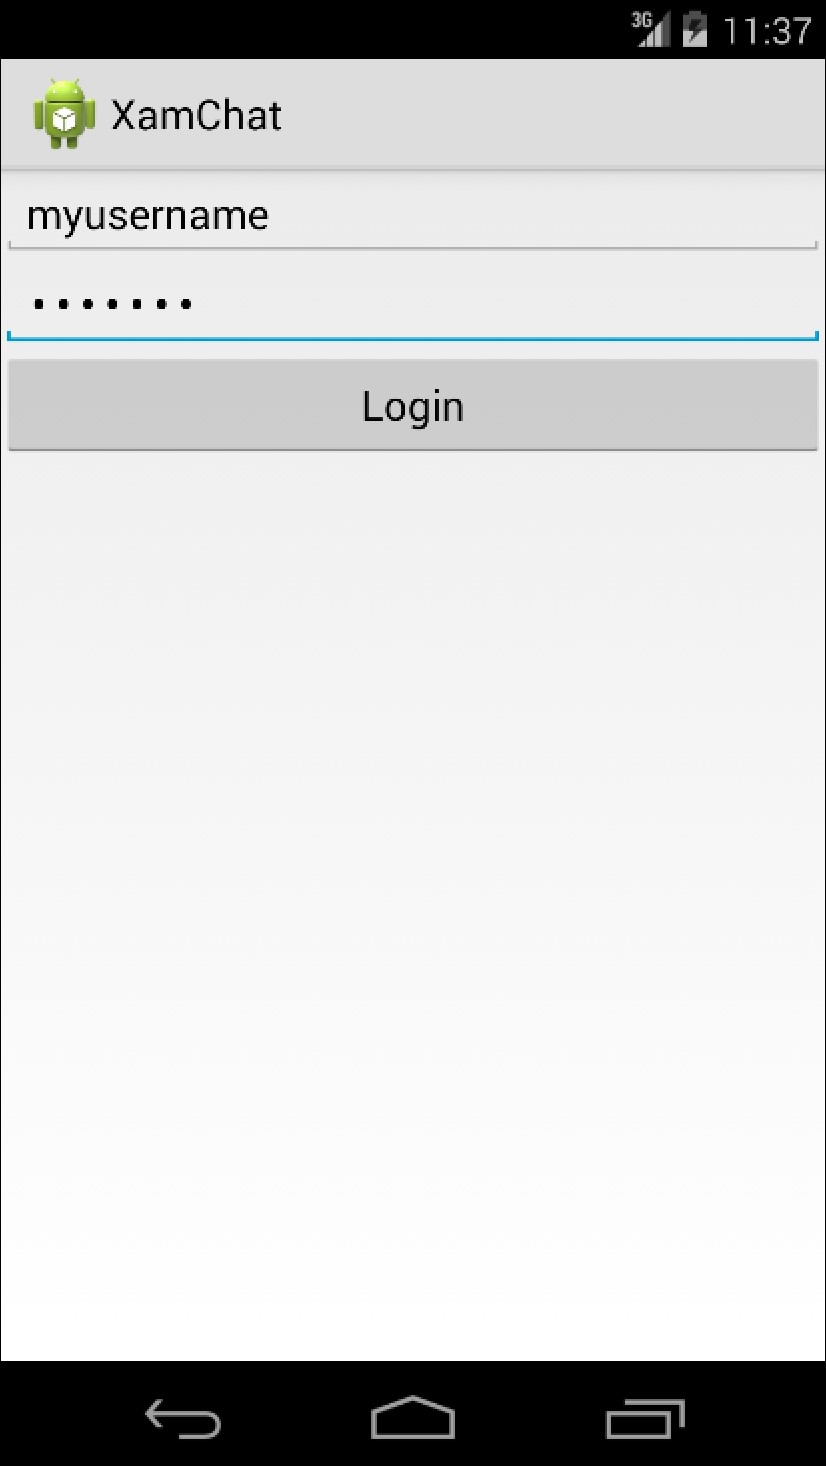
}Notice that we set MainLauncher to true to make this activity the first activity for the application. In some apps, a splash screen is used as the first activity, so keep this in mind if you need to add a splash screen. We also took advantage of the ApplicationName value and the BaseActivity class we set up earlier in the chapter. We also overrode OnResume to clear out the two EditText controls so that the values are cleared out if you return to the screen.
Now if you launch the application, you will be greeted by the login screen we just implemented, as shown in the following screenshot:
Layouts and ViewGroups in Andorid
The following are the common types of layouts:
ViewGroup: This is the base class for a view that contains a collection of child views. You normally won't use this class directly.LinearLayout: This is a layout that positions its child views in rows or columns (but not both). You can also set weights on each child to have them span different percentages of the available space.RelativeLayout: This is a layout that gives much more flexibility on the position of its children. You can position child views relative to each other so that they are above, below, to the left, or to the right of one another.FrameLayout: This layout positions its child views directly on top of one another in the z order on the screen. This layout is best used for cases where you have a large child view that needs other views on top of it and perhaps docked to one side.ListView: This displays views vertically in a list with the help of an adapter class that determines the number of child views. It also has support for its children to be selected.GridView: This displays views in rows and columns within a grid. It also requires the use of an adapter class to supply the number of children.
Before we begin writing the login screen, delete the Main.axml and MainActivity.cs files that were created from the Android project template, as they are not useful for this application. Next, create an Android layout file named Login.axml in the layout folder of the Resources directory in your project.
Now we can start adding functionalities to our Android layout as follows:
- Double-click on the
Login.axmlfile to open the Android designer. - Drag two Plain Text views onto the layout found in the Text Fields section.
- In the Id field, enter
@+id/usernameand@+id/passwordrespectively. This is a step that you will take for any control you want to work with from C# code. - For the password field, set its Input Type property to
textPassword. - Drag a Button onto the layout and set its Text property to
Login. - Set the button's Id property to
@+id/login. We will be using this control from code.
Your layout will look something like what is shown in the following screenshot when complete:
Now create a new Android Activity file named LoginActivity.cs in the Activites folder we created earlier. We will use this as the main activity that starts when the application runs. Let's implement the login functionality as follows:
[Activity(Label = "@string/ApplicationName", MainLauncher = true)]
public class LoginActivity : BaseActivity<LoginViewModel>
{
  EditText username, password;
  Button login;

  protected override void OnCreate(Bundle bundle)
  {
    base.OnCreate(bundle);
    SetContentView(Resource.Layout.Login);
    username = FindViewById<EditText>(Resource.Id.username);
    password = FindViewById<EditText>(Resource.Id.password);
    login = FindViewById<Button>(Resource.Id.login);
    login.Click += OnLogin;
  }
  protected override void OnResume()
  {
    base.OnResume();
    username.Text = password.Text = string.Empty;
  }
  async void OnLogin (object sender, EventArgs e)
  {
    viewModel.Username = username.Text;
    viewModel.Password = password.Text;
    try
    {
      await viewModel.Login();
        //TODO: navigate to a new activity
    }
    catch (Exception exc)
    {
      DisplayError(exc);
    }
  }
}
Notice that we set MainLauncher to true to make this activity the first activity for the application. In some apps, a splash screen is used as the first activity, so keep this in mind if you need to add a splash screen. We also took advantage of the ApplicationName value and the BaseActivity class we set up earlier in the chapter. We also overrode OnResume to clear out the two EditText controls so that the values are cleared out if you return to the screen.
Now if you launch the application, you will be greeted by the login screen we just implemented, as shown in the following screenshot:
Implementing the login functionality
Now create a new Android Activity file named LoginActivity.cs in the Activites folder we created earlier. We will use this as the main activity that starts when the application runs. Let's implement the login functionality as follows:
[Activity(Label = "@string/ApplicationName", MainLauncher = true)]
public class LoginActivity : BaseActivity<LoginViewModel>
{
  EditText username, password;
  Button login;

  protected override void OnCreate(Bundle bundle)
  {
    base.OnCreate(bundle);
    SetContentView(Resource.Layout.Login);
    username = FindViewById<EditText>(Resource.Id.username);
    password = FindViewById<EditText>(Resource.Id.password);
    login = FindViewById<Button>(Resource.Id.login);
    login.Click += OnLogin;
  }
  protected override void OnResume()
  {
    base.OnResume();
    username.Text = password.Text = string.Empty;
  }
  async void OnLogin (object sender, EventArgs e)
  {
    viewModel.Username = username.Text;
    viewModel.Password = password.Text;
    try
    {
      await viewModel.Login();
        //TODO: navigate to a new activity
    }
    catch (Exception exc)
    {
      DisplayError(exc);
    }
  }
}
Notice that we set MainLauncher to true to make this activity the first activity for the application. In some apps, a splash screen is used as the first activity, so keep this in mind if you need to add a splash screen. We also took advantage of the ApplicationName value and the BaseActivity class we set up earlier in the chapter. We also overrode OnResume to clear out the two EditText controls so that the values are cleared out if you return to the screen.
Now if you launch the application, you will be greeted by the login screen we just implemented, as shown in the following screenshot:
Now let's implement a conversations list on Android. The Android equivalent of the UITableView and UITableViewSource iOS classes are ListView and BaseAdapter. There are parallel concepts for these Android classes, such as implementing abstract methods and recycling cells during scrolling. There are a few different types of adapters used in Android such as ArrayAdapter or CursorAdaptor, although BaseAdapter is generally best suited for simple lists.
Let's implement our conversations screen. Let's begin by making a new Android Activity in your Activities folder named ConversationsActivity.cs. Let's start with only a couple of changes to the class definition as follows:
[Activity(Label = "Conversations")]
public class ConversationsActivity :BaseActivity<MessageViewModel>
{
  //Other code here later
}
Perform the following steps to implement a couple of Android layouts:
- Create a new Android layout in the
layoutfolder of theResourcesdirectory namedConversations.axml. - Drag a ListView control from Toolbox onto the layout, and set its Id to
@+id/conversationsList. - Create a second Android layout in the
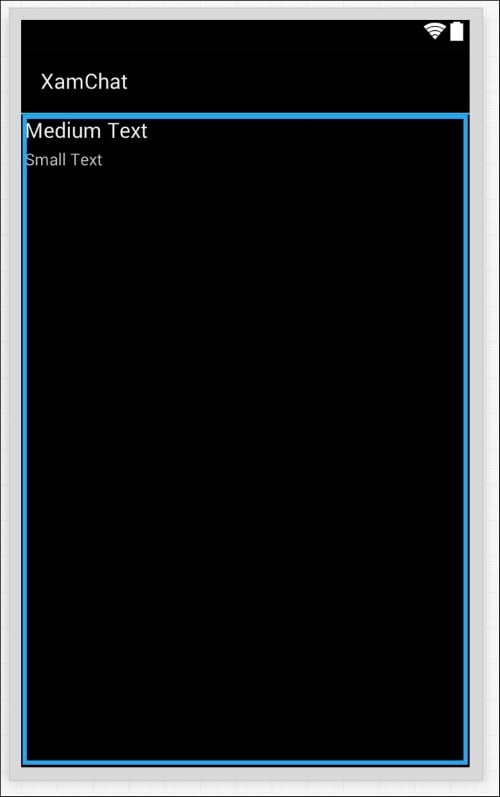
layoutfolder in theResourcesdirectory namedConversationListItem.axml. - Drag a Text (Medium) and a Text (Small) control onto the layout from the Toolbox pane.
- Set their IDs to
@+id/conversationUsernameand@+id/conversationLastMessage. - Finally, let's set each of their Margins to
3dpin the Layout tab of the Properties box.
This will set up all the layout files we'll need to use throughout the conversations screen. Your ConversationListItem.axml layout will look something like what's shown in the following screenshot:
Now we can implement BaseAdapter as a nested class inside ConversationsActivity as follows:
class Adapter : BaseAdapter<Conversation>
{
  readonly MessageViewModel messageViewModel = ServiceContainer.Resolve<MessageViewModel>();
  readonly LayoutInflater inflater;

  public Adapter(Context context)
  {
    inflater = (LayoutInflater)context.GetSystemService (Context.LayoutInflaterService);
  }
  public override long GetItemId(int position)
  {
    //This is an abstract method, just a simple implementation
    return position;
  }
  public override View GetView(int position, View convertView, ViewGroup parent)
  {
    if (convertView == null)
    {
      convertView = inflater.Inflate (Resource.Layout.ConversationListItem, null);
    }
    var conversation = this [position];
    var username = convertView.FindViewById<TextView>(Resource.Id.conversationUsername);
    var lastMessage = convertView.FindViewById<TextView>(Resource.Id.conversationLastMessage);
    username.Text = conversation.Username;
    lastMessage.Text = conversation.LastMessage;
    return convertView;
  }
  public override int Count
  {
    get { return messageViewModel.Conversations == null ? 0: messageViewModel.Conversations.Length; }
  }
  public override Conversation this[int index]
  {
    get { return messageViewModel.Conversations [index]; }
  }
}
The following is a review of what is going on inside the adapter:
- We subclassed
BaseAdapter<Conversation>. - We passed in
Context(our activity) so that we can pull outLayoutInflater. This class enables you to load XML layout resources and inflate them into a view object. - We implemented
GetItemId. This is a general method used to identify rows, but we just returned the position for now. - We set up
GetView, which recycles theconvertViewvariable by only creating a new view if it is null. We also pulled out the text views in our layout to set their text. - We overrode
Countto return the number of conversations. - We implemented an indexer to return a
Conversationobject for a position.
Overall, this should be fairly similar to what we did on iOS.
Now let's set up the adapter in our activity by adding the following to the body of ConversationsActivity:
ListView listView;
Adapter adapter;

protected override void OnCreate(Bundle bundle)
{
  base.OnCreate(bundle);
  SetContentView(Resource.Layout.Conversations);
  listView = FindViewById<ListView>(Resource.Id.conversationsList);
  listView.Adapter = adapter = new Adapter(this);
}
protected async override void OnResume()
{
  base.OnResume();
  try
  {
    await viewModel.GetConversations();
    adapter.NotifyDataSetInvalidated();
  }
  catch (Exception exc)
  {
    DisplayError(exc);
  }
}
This code will set up the adapter and reload our list of conversations when the activity appears on the screen. Note that we called NotifyDataSetInvalidated here so that ListView reloads its rows after the number of conversations has been updated. This is parallel to what we did on iOS by calling the UITableView's ReloadData method.
Last but not least, we need to modify the OnLogin method we set up earlier in LoginActivity to start our new activity as follows:
StartActivity(typeof(ConversationsActivity));
Now if we compile and run our application, we can navigate to a conversations list after logging in, as shown in the following screenshot:
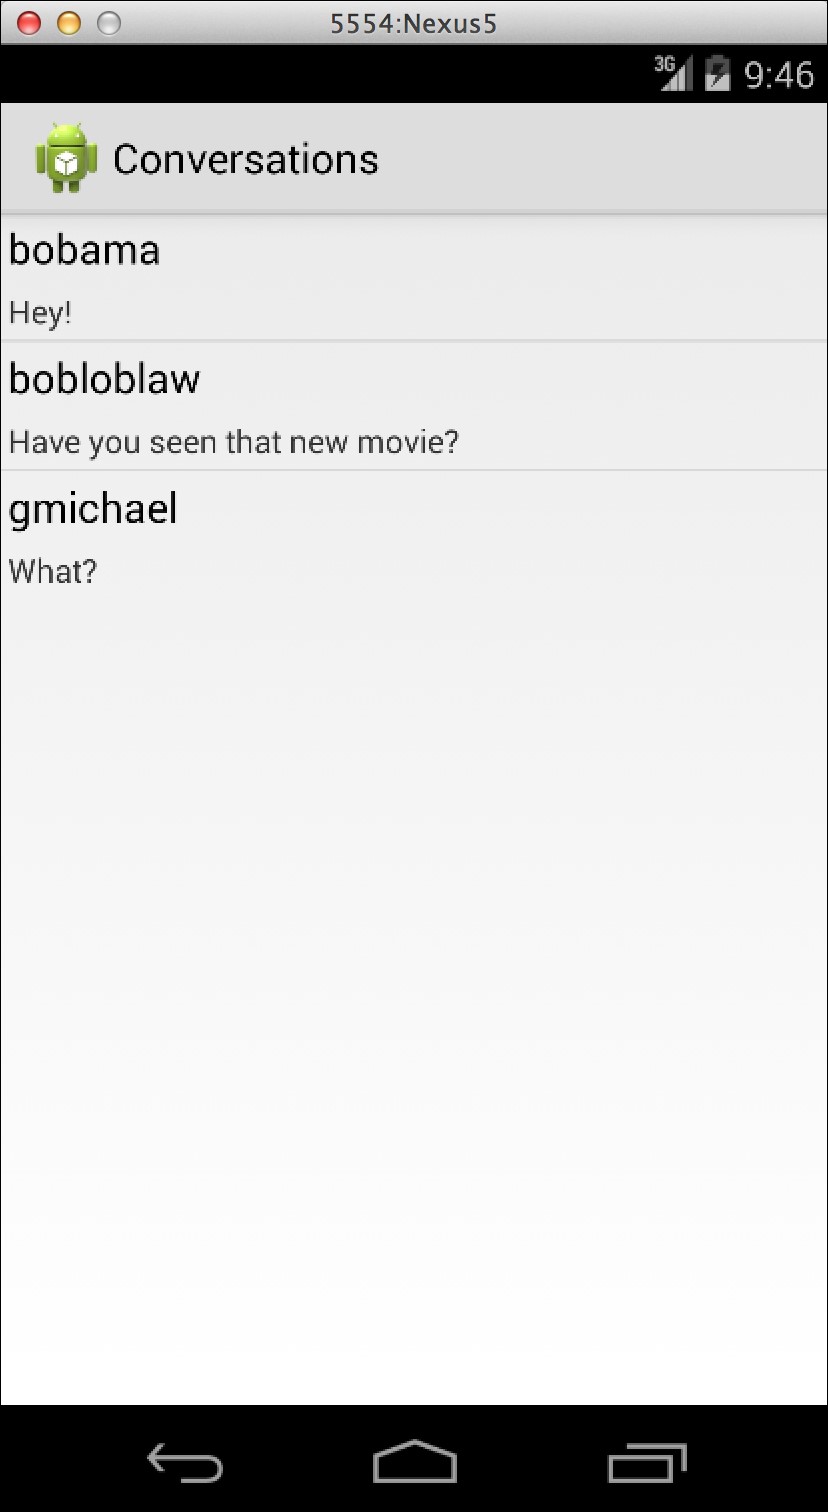
Implementing the conversations screen
Let's implement our conversations screen. Let's begin by making a new Android Activity in your Activities folder named ConversationsActivity.cs. Let's start with only a couple of changes to the class definition as follows:
[Activity(Label = "Conversations")]
public class ConversationsActivity :BaseActivity<MessageViewModel>
{
  //Other code here later
}
Perform the following steps to implement a couple of Android layouts:
- Create a new Android layout in the
layoutfolder of theResourcesdirectory namedConversations.axml. - Drag a ListView control from Toolbox onto the layout, and set its Id to
@+id/conversationsList. - Create a second Android layout in the
layoutfolder in theResourcesdirectory namedConversationListItem.axml. - Drag a Text (Medium) and a Text (Small) control onto the layout from the Toolbox pane.
- Set their IDs to
@+id/conversationUsernameand@+id/conversationLastMessage. - Finally, let's set each of their Margins to
3dpin the Layout tab of the Properties box.
This will set up all the layout files we'll need to use throughout the conversations screen. Your ConversationListItem.axml layout will look something like what's shown in the following screenshot:
Now we can implement BaseAdapter as a nested class inside ConversationsActivity as follows:
class Adapter : BaseAdapter<Conversation>
{
  readonly MessageViewModel messageViewModel = ServiceContainer.Resolve<MessageViewModel>();
  readonly LayoutInflater inflater;

  public Adapter(Context context)
  {
    inflater = (LayoutInflater)context.GetSystemService (Context.LayoutInflaterService);
  }
  public override long GetItemId(int position)
  {
    //This is an abstract method, just a simple implementation
    return position;
  }
  public override View GetView(int position, View convertView, ViewGroup parent)
  {
    if (convertView == null)
    {
      convertView = inflater.Inflate (Resource.Layout.ConversationListItem, null);
    }
    var conversation = this [position];
    var username = convertView.FindViewById<TextView>(Resource.Id.conversationUsername);
    var lastMessage = convertView.FindViewById<TextView>(Resource.Id.conversationLastMessage);
    username.Text = conversation.Username;
    lastMessage.Text = conversation.LastMessage;
    return convertView;
  }
  public override int Count
  {
    get { return messageViewModel.Conversations == null ? 0: messageViewModel.Conversations.Length; }
  }
  public override Conversation this[int index]
  {
    get { return messageViewModel.Conversations [index]; }
  }
}
The following is a review of what is going on inside the adapter:
- We subclassed
BaseAdapter<Conversation>. - We passed in
Context(our activity) so that we can pull outLayoutInflater. This class enables you to load XML layout resources and inflate them into a view object. - We implemented
GetItemId. This is a general method used to identify rows, but we just returned the position for now. - We set up
GetView, which recycles theconvertViewvariable by only creating a new view if it is null. We also pulled out the text views in our layout to set their text. - We overrode
Countto return the number of conversations. - We implemented an indexer to return a
Conversationobject for a position.
Overall, this should be fairly similar to what we did on iOS.
Now let's set up the adapter in our activity by adding the following to the body of ConversationsActivity:
ListView listView;
Adapter adapter;

protected override void OnCreate(Bundle bundle)
{
  base.OnCreate(bundle);
  SetContentView(Resource.Layout.Conversations);
  listView = FindViewById<ListView>(Resource.Id.conversationsList);
  listView.Adapter = adapter = new Adapter(this);
}
protected async override void OnResume()
{
  base.OnResume();
  try
  {
    await viewModel.GetConversations();
    adapter.NotifyDataSetInvalidated();
  }
  catch (Exception exc)
  {
    DisplayError(exc);
  }
}
This code will set up the adapter and reload our list of conversations when the activity appears on the screen. Note that we called NotifyDataSetInvalidated here so that ListView reloads its rows after the number of conversations has been updated. This is parallel to what we did on iOS by calling the UITableView's ReloadData method.
Last but not least, we need to modify the OnLogin method we set up earlier in LoginActivity to start our new activity as follows:
StartActivity(typeof(ConversationsActivity));
Now if we compile and run our application, we can navigate to a conversations list after logging in, as shown in the following screenshot:
Setting up the adapter
Now let's set up the adapter in our activity by adding the following to the body of ConversationsActivity:
ListView listView;
Adapter adapter;

protected override void OnCreate(Bundle bundle)
{
  base.OnCreate(bundle);
  SetContentView(Resource.Layout.Conversations);
  listView = FindViewById<ListView>(Resource.Id.conversationsList);
  listView.Adapter = adapter = new Adapter(this);
}
protected async override void OnResume()
{
  base.OnResume();
  try
  {
    await viewModel.GetConversations();
    adapter.NotifyDataSetInvalidated();
  }
  catch (Exception exc)
  {
    DisplayError(exc);
  }
}
This code will set up the adapter and reload our list of conversations when the activity appears on the screen. Note that we called NotifyDataSetInvalidated here so that ListView reloads its rows after the number of conversations has been updated. This is parallel to what we did on iOS by calling the UITableView's ReloadData method.
Last but not least, we need to modify the OnLogin method we set up earlier in LoginActivity to start our new activity as follows:
StartActivity(typeof(ConversationsActivity));
Now if we compile and run our application, we can navigate to a conversations list after logging in, as shown in the following screenshot:
Before we start implementing the friends list screen, we must first add a menu item to ActionBar in our application. Let's begin by creating a new menu folder within the Resources folder of our project. Next, create a new Android layout file named ConversationsMenu.axml. Remove the default layout created by XML, and replace it with the following:
<?xml version="1.0" encoding="utf-8"?>
<menu xmlns:android="http://schemas.android.com/apk/res/android">
  <item android:id="@+id/addFriendMenu"android:icon="@android:drawable/ic_menu_add"android:showAsAction="ifRoom"/>
</menu>
We set up a root menu with one menu item inside it.
The following is a breakdown of what we set for the item in XML:
android:id: We will use this later in C# to reference the menu item withResource.Id.addFriendMenu.android:icon: This is an image resource used to display the menu item. We used a built-in Android one for a generic plus icon.android:showAsAction: This will make the menu item visible if there is room for the item. If for some reason the device's screen is too narrow, an overflow menu would be displayed for the menu item.
Now we can make some changes in ConversationsActivity.cs to display the menu item as follows:
public override bool OnCreateOptionsMenu(IMenu menu)
{
  MenuInflater.Inflate(Resource.Menu.ConversationsMenu, menu);
  return base.OnCreateOptionsMenu(menu);
}
This code will take our layout and apply it to the menu at the top in our activity's action bar. Next, we can add some code to be run when the menu item is selected as follows:
public override bool OnOptionsItemSelected(IMenuItem item)
{
  if (item.ItemId == Resource.Id.addFriendMenu)
  {
    //TODO: launch the next activity
  }
  return base.OnOptionsItemSelected(item);
}
Now let's implement the next activity. Let's begin by making a copy of Conversations.axml found in the layout folder in the Resources directory and rename it Friends.axml. The only change we'll make in this file will be to rename the ListView's ID to @+id/friendsList.
Next, perform the following steps to create a layout that can be used for the list items in ListView:
- Make a new Android layout called
FriendListItem.axml. - Open the layout and switch to the Source tab found at the bottom of the screen.
- Change the root
LinearLayoutXML element to aRelativeLayoutelement. - Switch back to the Content tab found at the bottom of the screen.
- Drag a Text (Large) control from the Toolbox pane onto the layout and set its Id to
@+id/friendName. - Drag an ImageView control from the Toolbox pane onto the layout; you can either let its Id be its default value or blank it out.
- Change the image view's image to
@android:drawable/ic_menu_add. This is the same plus icon we used earlier in the chapter. You can select it from the Resources dialog under the Framework Resources tab. - Set the Width and Height of both the controls to
wrap_content. This is found under the Layout tab under the ViewGroup section. - Next, check the value for Align Parent Right on just the image view.
- Finally, set the Margins of both the controls to
3dpin the Layout tab of the Properties box.
Using the Xamarin designer can be very productive, but some developers prefer a higher level of control. You might consider writing the XML code yourself as an alternative, which is fairly straightforward, as shown in the following code:
<?xml version="1.0" encoding="utf-8"?>
<RelativeLayout xmlns:android="http://schemas.android.com/apk/res/android"
android:layout_width="fill_parent"
android:layout_height="fill_parent">
  <TextView android:text="Large Text"
  android:textAppearance="?android:attr/textAppearanceLarge"
  android:layout_width="wrap_content"
  android:layout_height="wrap_content"
  android:id="@+id/friendName"
  android:layout_margin="3dp" />
  <ImageView
  android:src="@android:drawable/ic_menu_add"
  android:layout_alignParentRight="true"
  android:layout_width="wrap_content"
  android:layout_height="wrap_content"
  android:layout_margin="3dp" />
</RelativeLayout>
Since we now have all the layouts we need for the new screen, let's create an Android Activity in the Activities folder named FriendsActivity.cs. Let's create the basic definition of the activity as follows, just like we did before:
[Activity(Label = "Friends")]
public class FriendsActivity : BaseActivity<FriendViewModel>
{
  protected override void OnCreate(Bundle bundle)
  {
    base.OnCreate(bundle);
  }
}
Now, let's implement a nested Adapter class to set up the list view items as follows:
class Adapter : BaseAdapter<User>
{
  readonly FriendViewModel friendViewModel = ServiceContainer.Resolve<FriendViewModel>();
  readonly LayoutInflater inflater;

  public Adapter(Context context)
  {
    inflater = (LayoutInflater)context.GetSystemService (Context.LayoutInflaterService);
  }
  public override long GetItemId(int position)
  {
    return position;
  }
  public override View GetView(int position, View convertView, ViewGroup parent)
  {
    if (convertView == null)
    {
      convertView = inflater.Inflate(Resource.Layout.FriendListItem, null);
    }
    var friend = this [position];
    var friendname = convertView.FindViewById<TextView>(Resource.Id.friendName);
    friendname.Text = friend.Username;
    return convertView;
  }
  public override int Count
  {
    get { return friendViewModel.Friends == null ? 0: friendViewModel.Friends.Length; }
  }
  public override User this[int index]
  {
    get { return friendViewModel.Friends [index]; }
  }
}
There is really no difference in this adapter and the previous one we implemented for the conversations screen. We only have to set the friend's name, and we use the User object instead of the Conversation object.
To finish setting up the adapter, we can update the body of the FriendsActivity class as follows:
ListView listView;
Adapter adapter;

protected override void OnCreate(Bundle bundle)
{
  base.OnCreate(bundle);
  SetContentView(Resource.Layout.Friends);
  listView = FindViewById<ListView>(Resource.Id.friendsList);
  listView.Adapter = adapter = new Adapter(this);
}
protected async override void OnResume()
{
  base.OnResume();
  try
  {
    await viewModel.GetFriends();
    adapter.NotifyDataSetInvalidated();
  }
  catch (Exception exc)
  {
    DisplayError(exc);
  }
}
Last but not least, we can update OnOptionsItemSelected in the ConversationsActivity class as follows:
public override bool OnOptionsItemSelected(IMenuItem item)
{
if (item.ItemId == Resource.Id.addFriendMenu)
{
StartActivity(typeof(FriendsActivity));
}
return base.OnOptionsItemSelected(item);
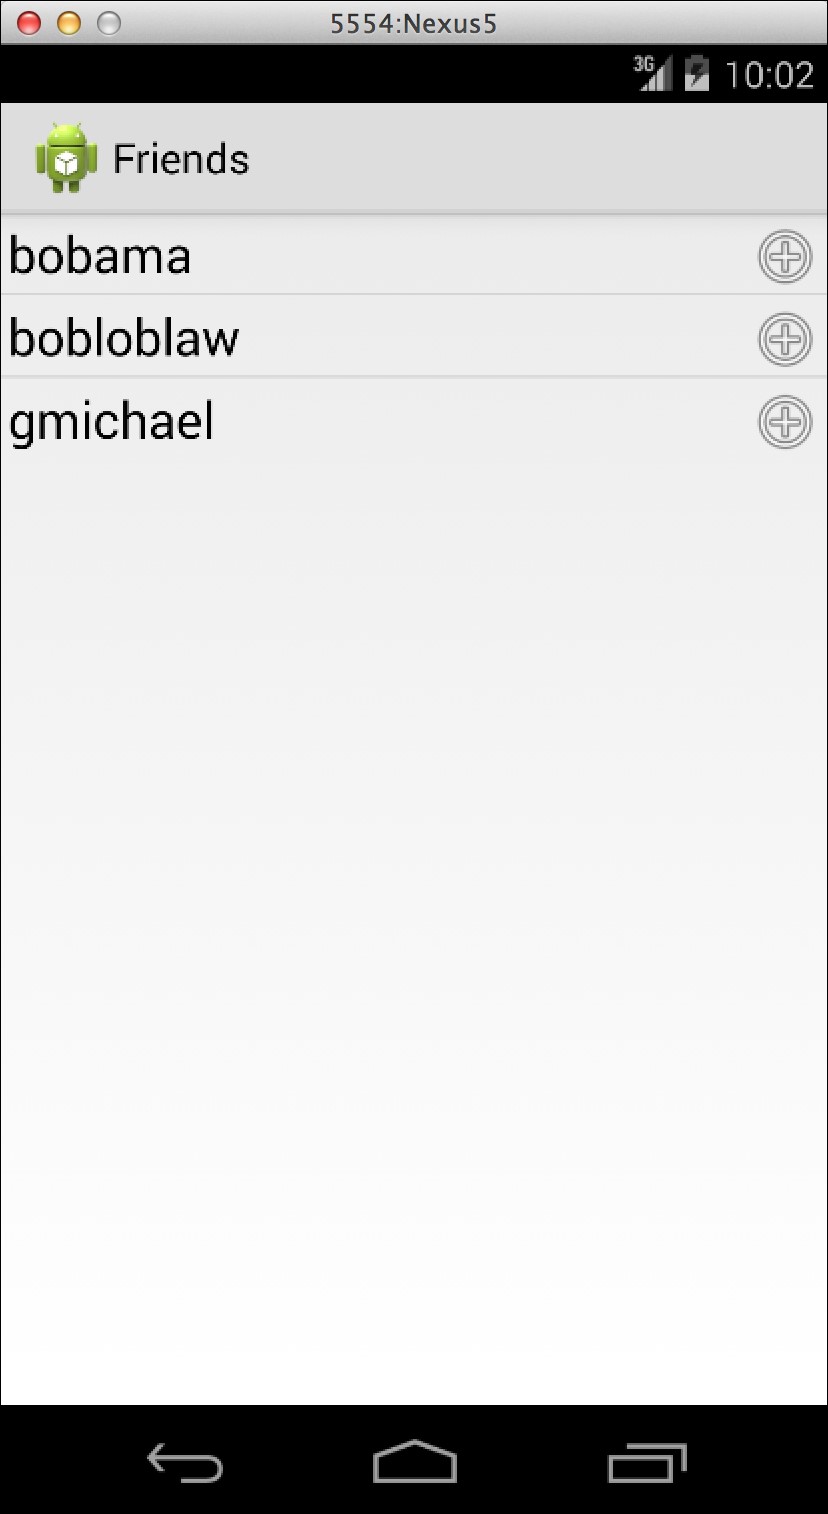
}So, if we compile and run the application, we can navigate to a fully implemented friends list screen, as shown in the following screenshot:
The next screen is a bit more complicated. We will need to create a ListView that uses multiple layout files for each row, depending on the type of the row. We'll also need to perform some layout tricks to place a view below the ListView and set up the ListView to autoscroll.
For the next screen, let's begin by creating a new layout named Messages.axml in the layout folder of the Resources directory and then perform the following steps:
- Drag a new ListView onto the layout. Set its Id to
@+id/messageList. - Check the box for Stack From Bottom, and set Transcript Mode to
alwaysScroll. This will set it up in order to display items from the bottom up. - Set the Weight value to
1for the ListView in the Layout tab under the LinearLayout section. - Drag a new RelativeLayout onto the layout. Let its Id be the default value, or remove it.
- Drag a new Button inside RelativeLayout. Set its Id to
@+id/sendButton. - Check the box for Align Parent Right in the Layout tab.
- Drag a new Plain Text found in the Text Field section inside RelativeLayout to the left of the button. Set its Id to
@+id/messageText. - In the Layout tab, set To Left Of to
@+id/sendButton, and set its Width tomatch_parent. - Check the box for Center in Parent to fix the vertical centering.
When completed, the XML file will be as follows:
<?xml version="1.0" encoding="utf-8"?>
<LinearLayout
  xmlns:android="http://schemas.android.com/apk/res/android"
  android:orientation="vertical"
  android:layout_width="match_parent"
  android:layout_height="match_parent">
  <ListView
    android:minWidth="25px"
    android:minHeight="25px"
    android:layout_width="fill_parent"
    android:layout_height="wrap_content"
    android:id="@+id/messageList"
    android:layout_weight="1"
    android:stackFromBottom="true"
    android:transcriptMode="alwaysScroll" />
  <RelativeLayout
  android:minWidth="25px"
  android:minHeight="25px"
  android:layout_width="fill_parent"
  android:layout_height="wrap_content">
  <Button
    android:text="Send"
    android:layout_alignParentRight="true"
    android:layout_width="wrap_content"
    android:layout_height="wrap_content"
    android:id="@+id/sendButton" />
  <EditText
    android:layout_width="match_parent"
    android:layout_height="wrap_content"
    android:layout_toLeftOf="@id/sendButton"
    android:layout_centerInParent="true"
    android:id="@+id/messageText" />
  </RelativeLayout>
</LinearLayout>
Next, perform the following steps to make two more Android layouts:
- Create a new layout named
MyMessageListItem.axmlin thelayoutfolder of theResourcesdirectory. - Open the layout and switch to the Source tab. Change the root XML element to a
RelativeLayoutelement. - Switch back to the Content tab, and drag two TextView controls onto the layout.
- In the Id field, enter
@+id/myMessageTextand@+id/myMessageDaterespectively. - For both the views, set Margin to
3dp, and Width and Height towrap_content. - For the first TextView, set its Color to
@android:color/holo_blue_brightunder the Style tab. - For the second TextView, check the Align Parent Right checkbox under the Layout tab.
- Create a new layout named
TheirMessageListItem.axmland repeat the process. Select a different color for the first TextView in the new layout.
Finally, we'll need to create a new activity for the screen. Create a new Android Activity named MessagesActivity.cs in the Activities directory. Let's begin with the standard code to set up an activity as follows:
[Activity(Label = "Messages")]
public class MessagesActivity : BaseActivity<MessageViewModel>
{
  protected override void OnCreate(Bundle bundle)
  {
    base.OnCreate(bundle);
  }
}
Next, let's implement a more complicated adapter than what we implemented earlier as follows:
class Adapter : BaseAdapter<Message>
{
  readonly MessageViewModel messageViewModel = ServiceContainer.Resolve<MessageViewModel>();
  readonly ISettings settings = ServiceContainer.Resolve<ISettings>();
  readonly LayoutInflater inflater;
  const int MyMessageType = 0, TheirMessageType = 1;

  public Adapter (Context context)
  {
    inflater = (LayoutInflater)context.GetSystemService (Context.LayoutInflaterService);
  }
  public override long GetItemId(int position)
  {
    return position;
  }
  public override int Count
  {
    get { return messageViewModel.Messages == null ? 0: messageViewModel.Messages.Length; }
  }
  public override Message this[int index]
  {
    get { return messageViewModel.Messages [index]; }
  }
  public override int ViewTypeCount
  {
    get { return 2; }
  }
  public override int GetItemViewType(int position)
  {
    var message = this [position];
    return message.UserId == settings.User.Id ?MyMessageType : TheirMessageType;
  }
}
This includes everything except our implementation of GetView, which we'll get to shortly. Here, the first changes are some constants for MyMessageType and TheirMessageType. We then implemented ViewTypeCount and GetItemViewType. This is Android's mechanism for using two different layouts for list items in a list view. We use one type of layout for the user's messages and a different one for the other user in the conversation.
Next, let's implement GetView as follows:
public override View GetView(int position, View convertView, ViewGroup parent)
{
  var message = this [position];
  int type = GetItemViewType(position);
  if (convertView == null)
  {
    if (type == MyMessageType)
    {
      convertView = inflater.Inflate(Resource.Layout.MyMessageListItem, null);
    }
    else
    {
      convertView = inflater.Inflate(Resource.Layout.TheirMessageListItem, null);
    }
  }
  TextView messageText, dateText;
  if (type == MyMessageType)
  {
    messageText = convertView.FindViewById<TextView>(Resource.Id.myMessageText);
    dateText = convertView.FindViewById<TextView>(Resource.Id.myMessageDate);
  }
  else
  {
    messageText = convertView.FindViewById<TextView>(Resource.Id.theirMessageText);
    dateText = convertView.FindViewById<TextView>(Resource.Id.theirMessageDate);
    }
  messageText.Text = message.Text;
  dateText.Text = message.Date.ToString("MM/dd/yy HH:mm");
  return convertView;
}
Let's break down our implementation through the following steps:
- We first pull out the
messageobject for the position of the row. - Next, we grab the view type that determines whether it is the current user's message or the other user in the conversation.
- If
convertViewisnull, we inflate the appropriate layout based on the type. - Next, we pull the two text views,
messageTextanddateText, out of theconvertView. We have to use the type value to make sure that we use the correct resource IDs. - We set the appropriate text on both the text views using the
messageobject. - We return
convertView.
Now let's finish MessagesActivity by setting up the rest of the adapter. First, let's implement some member variables and the OnCreate method as follows:
ListView listView;
EditText messageText;
Button sendButton;
Adapter adapter;

protected override void OnCreate(Bundle bundle)
{
  base.OnCreate(bundle);

  Title = viewModel.Conversation.Username;
  SetContentView(Resource.Layout.Messages);
  listView = FindViewById<ListView>(Resource.Id.messageList);
  messageText = FindViewById<EditText>(Resource.Id.messageText);
  sendButton = FindViewById<Button>(Resource.Id.sendButton);

  listView.Adapter = adapter = new Adapter(this);

  sendButton.Click += async (sender, e) =>
  {
    viewModel.Text = messageText.Text;
    try
    {
      await viewModel.SendMessage();
      messageText.Text = string.Empty;
      adapter.NotifyDataSetInvalidated();
      listView.SetSelection(adapter.Count);
    }
    catch (Exception exc)
    {
      DisplayError(exc);
    }
  };
}
So far this activity is fairly standard compared to our previous activities in this chapter. We also had to wire up the Click event of sendButton in OnCreate so that it sends the message and refreshes the list. We also used a trick to scroll the list view to the end by setting its selection to the last item.
Next, we'll need to implement OnResume to load the messages, invalidate the adapter, and then scroll the list view to the end as follows:
protected async override void OnResume()
{
base.OnResume();
try
{
await viewModel.GetMessages();
adapter.NotifyDataSetInvalidated();
listView.SetSelection(adapter.Count);
}
catch (Exception exc)
{
DisplayError(exc);
}
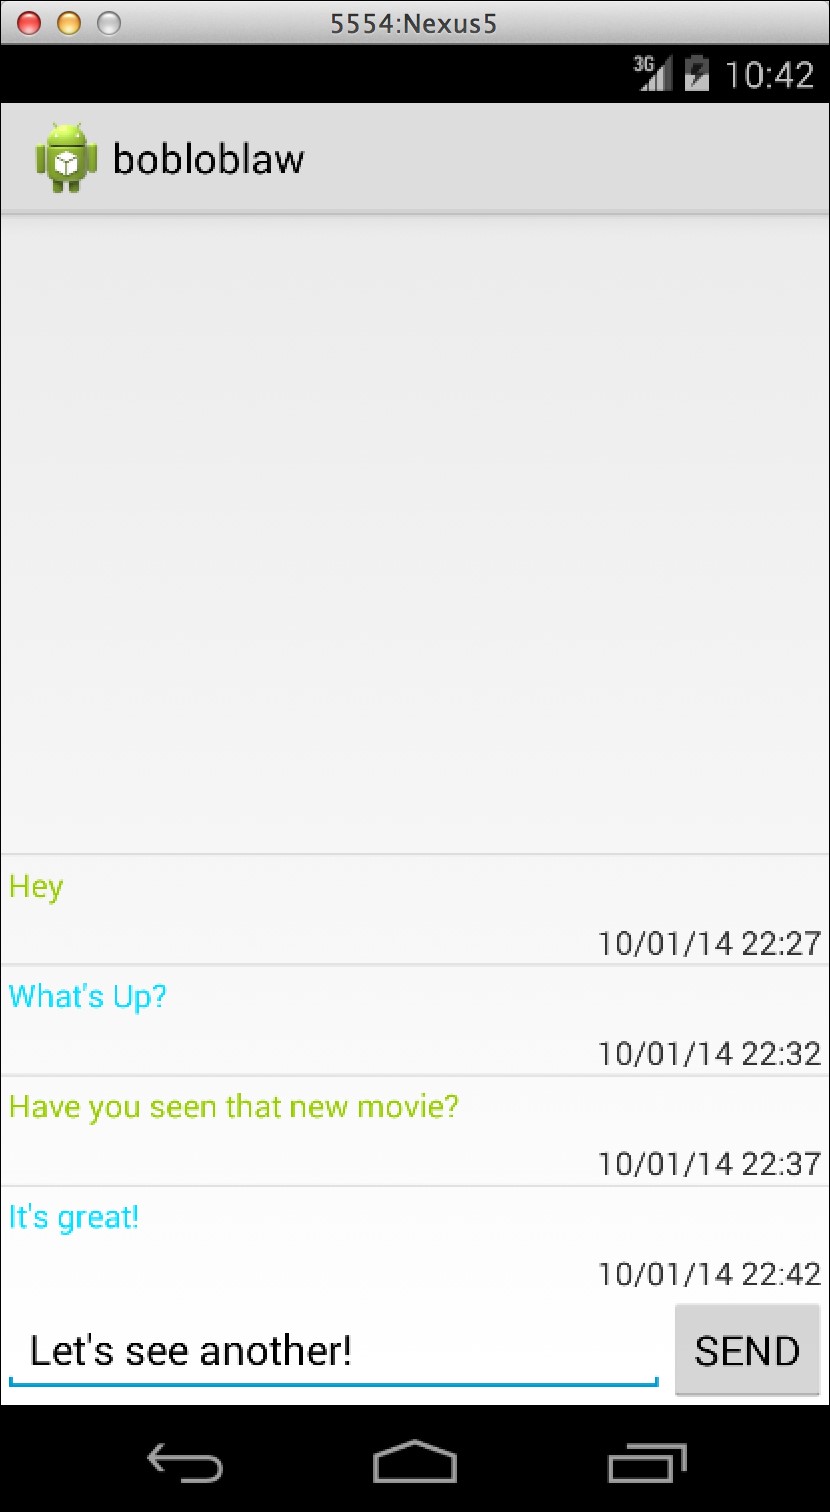
}So finally, if you compile and run the app, you will be able to navigate to the messages screen, and add new messages to the list, as shown in the following screenshot:
In this chapter, we started out by going over the basic settings in the Android Manifest file. Next, we implemented a custom Application class to set up our ServiceContainer. We then went over the different types of Android layouts and implemented a login screen using native Android views. We implemented the friends list screen, and learned about the basics of ListView and adapters. Finally, we implemented the messages screen, and used the more advanced functionality available in list view adapters and layouts.
After completing this chapter, you will have a partially functional Android version of XamChat. You will have gained a deeper understanding of the Android SDK and tools. You should be confident in developing your own Android applications using Xamarin. Take it upon yourself to implement the remaining screens that we did not cover in the chapter. If you get lost, feel free to review the full sample application included with this module. In the next chapter, we'll cover how to deploy to mobile devices and why is it very important to test your applications on real devices.