

In this chapter, we will develop the iOS portion of our cross-platform XamChat application. Since we are using the MVVM design pattern, most of the work we will be doing will be in the View layer of the application. We will mainly be working with native iOS APIs and understanding how we can apply them leverage the shared code in our portable class library. Since Xamarin.iOS enables us to call Apple APIs directly, our iOS app will be indistinguishable from an application developed in Objective-C or Swift.
To begin writing the iOS version of XamChat, create a new Single View Application under the iOS section. Name the project XamChat.iOS or some other appropriate name of your choice. The project template will automatically create a controller with an unfamiliar name; go ahead and delete it. We will create our own controllers as we go.
In this chapter, we will cover the following:
- The basics of an iOS application
- The use of
UINavigationController - Implementing a login screen
- Segues and
UITableView - Adding a friends list
- Adding a list of messages
- Composing messages
Before we start developing our app, let's review the main settings of the application. Apple uses a file named Info.plist to store important information about any iOS app. These settings are used when an iOS application is installed on a device by the Apple App Store. We will begin development on any new iOS application by filling out the information in this file.
Xamarin Studio provides a neat menu to modify values in the Info.plist file, as shown in the following screenshot:
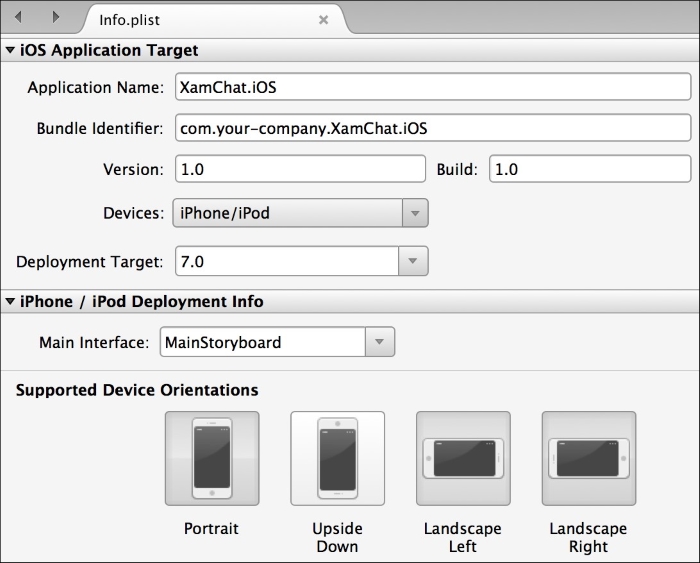
The most important settings are as follows:
- Application Name: This is the title below an app's icon in iOS. Note that this is not the same as the official name of your app in the iOS App Store.
- Bundle Identifier: This is your app's bundle identifier or bundle ID. It is a unique name to identify your application. The convention is to use a reverse domain naming style beginning with your company name, such as
com.packt.xamchat. - Version: This is a version number for your application such as
1.0.0. - Devices: In this field you can select iPhone/iPod, iPad, or Universal (all devices) for your application.
- Deployment Target: This is the minimum iOS version your application runs on.
- Main Interface: This is the main storyboard file for your app that declares most of the UI of your application. iOS will automatically load this file and open the root controller as the initial screen to be displayed.
- Supported Device Orientations: These are the different positions your application will be able to rotate to and support.
There are other settings for app icons, splash screens, and so on. You can also toggle between the Advanced or Source tabs to configure additional settings that Xamarin does not provide a user-friendly menu for.
Configure the following settings for our application:
- Application Name:
XamChat - Bundle Identifier:
com.yourcompanyname.xamchat; make sure that you name future apps beginning withcom.yourcompanyname - Version: This can be any version number you prefer, but it should just not be left blank
- Devices: iPhone/iPod
- Deployment Target: 7.0 (you can also target 8.0, but we aren't using any iOS 8-specific APIs in this app)
- Supported Device Orientations: Only select Portrait
You can find some additional settings for Xamarin iOS applications if you right-click on your project and select Options. It is a good idea to know what is available for iOS-specific projects in Xamarin Studio.
Let's discuss some of the most important options.
- Navigate to the iOS Build | General tab as shown in the following screenshot:

You have the following options under this tab:
- SDK version: This is the version of the iOS SDK to compile your application with. It is generally best to use Default.
- Linker behavior: Xamarin has implemented a feature called linking. The linker will strip any code that will never be called within your assemblies. This keeps your application small and allows them to ship a stripped-down version of the core Mono framework with your app. Except for debug builds, it is best to use the Link SDK assemblies only option. We will cover linking in the next chapter.
- Optimize PNG files for iOS: Apple uses a custom PNG format to speed up the loading of PNGs within your app. You can turn this off to speed up builds, or if you plan on optimizing the images yourself.
- Enable debugging: Turning this on allows Xamarin to include extra information with your app to enable debugging from Xamarin Studio.
- Additional mtouch arguments: This field is for passing extra command-line arguments to the Xamarin compiler for iOS. You can check out the complete list of these arguments at http://iosapi.xamarin.com.
- Navigate to iOS Build | Advanced tab as shown in the following screenshot:

You have the following options under this tab:
- Supported architectures: Here, the options are ARMv7, ARMv7s, and a FAT version that includes both. These are instruction sets that different iOS device processors support. If you really care about performance, you might consider selecting the option to support both; however, this will make your application larger.
- Use LLVM optimizing compiler: Checking this compiles the code that is smaller and runs faster, but it takes longer to compile. LLVM stands for Low Level Virtual Machine.
- Enable generic value type sharing: This is an option specific to Mono that draws better performance from C# generics with value types. It has the downside of making the application slightly larger, but I would recommend that you leave it on.
- Use SGen generational garbage collector: This uses the new Mono garbage collector in your app. I would recommend that you turn this on if you really need good performance with the garbage collector (GC) or are working on an app that needs to be responsive in real time, such as a game. It is probably safe to turn this on by default now, as the SGen garbage collector is very stable.
- Use the reference counting extension (preview): This is currently an experimental feature, but improves the general memory usage of native objects that are accessible from C#. These native object's reference is managed by the GC instead of a backing field on the object when using this setting. Since it is still in preview, you should be careful when using this option.
- You have the following options under iOS Bundle Signing:
- Identity: This is the certificate to identify the app's creator for deploying the application to devices. We'll cover more on this in later chapters.
- Provisioning profile: This is a specific profile that deploys the app to a device. This works in tandem with Identity, but also declares the distribution method, and the devices that can install the app.
- Custom Entitlements: This file contains additional settings to be applied to the provisioning profile, and it contains other specific declarations for the app such as iCloud or push notifications. The project template for iOS apps includes a default
Entitlements.plistfile for new projects.
- iOS Application: These settings are identical to what you see in the
Info.plistfile.
For this application, you can leave all these options at their defaults. When making a real iOS application on your own, you should consider changing many of these as per your application's needs.
In iOS applications, the key class that manages navigation between different controllers is the UINavigationController class. The navigation controller is the most basic building block of navigation on iOS, so it is the best choice to start with most of the iOS applications. It is a parent controller that contains several child controllers in a stack. Users can move forward by putting new controllers on top of the stack or using a built-in back button to pop a controller off the stack and navigate to the previous screen.
The following are the methods in Navigation Controllers:
SetViewControllers: This sets an array of child controllers. It has a value to optionally animate the transition.ViewControllers: This is a property to get or set the array of child controllers without an option for animations.PushViewController: This places a new child controller at the top of the stack with an option to display an animation.PopViewControllerAnimated: This pops off the child controller at the top of the stack with an option to animate the transition.PopToViewController: This pops to the specified child controller, removing all controllers above it. It provides an option to animate the transition.PopToRootViewController: This removes all the child controllers except the bottom-most controller. It includes an option to display an animation.TopViewController: This is a property that returns the child controller that is currently on top of the stack.
Tip
It is important to note that using the option for animations will cause a crash if you try to modify the stack during the animation. To fix this situation, either use the SetViewControllers method and set the entire list of child controllers, or refrain from using the animations during a combination of transitions.
Perform the following steps to set up a Navigation Controller:
- Double-click on the
MainStoryboard.storyboardfile to open it in Xamarin Studio. - Remove the controller that was created by the project template.
- Drag a Navigation Controller element from the Toolbox pane on the right-hand side onto the storyboard.
- Notice that a default View Controller element was created as well as a Navigation Controller element.
- You will see a segue that connects the two controllers. We'll cover this concept in more detail later in the chapter.
- Save the storyboard file.
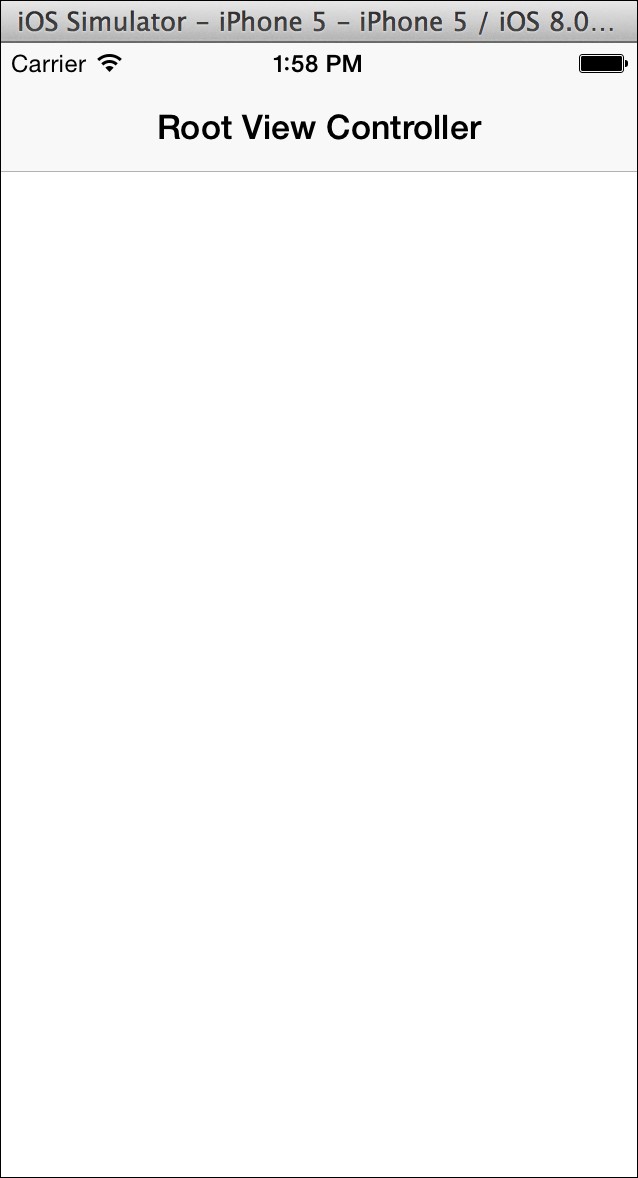
If you run the application at this point, you will have a basic iOS app with a status bar at the top, a navigation controller that contains a navigation bar with a default title, and a child controller that is completely white, as shown in the following screenshot:
Methods in Navigation Controllers
The following are the methods in Navigation Controllers:
SetViewControllers: This sets an array of child controllers. It has a value to optionally animate the transition.ViewControllers: This is a property to get or set the array of child controllers without an option for animations.PushViewController: This places a new child controller at the top of the stack with an option to display an animation.PopViewControllerAnimated: This pops off the child controller at the top of the stack with an option to animate the transition.PopToViewController: This pops to the specified child controller, removing all controllers above it. It provides an option to animate the transition.PopToRootViewController: This removes all the child controllers except the bottom-most controller. It includes an option to display an animation.TopViewController: This is a property that returns the child controller that is currently on top of the stack.
Tip
It is important to note that using the option for animations will cause a crash if you try to modify the stack during the animation. To fix this situation, either use the SetViewControllers method and set the entire list of child controllers, or refrain from using the animations during a combination of transitions.
Perform the following steps to set up a Navigation Controller:
- Double-click on the
MainStoryboard.storyboardfile to open it in Xamarin Studio. - Remove the controller that was created by the project template.
- Drag a Navigation Controller element from the Toolbox pane on the right-hand side onto the storyboard.
- Notice that a default View Controller element was created as well as a Navigation Controller element.
- You will see a segue that connects the two controllers. We'll cover this concept in more detail later in the chapter.
- Save the storyboard file.
If you run the application at this point, you will have a basic iOS app with a status bar at the top, a navigation controller that contains a navigation bar with a default title, and a child controller that is completely white, as shown in the following screenshot:
Setting up a Navigation Controller
Perform the following steps to set up a Navigation Controller:
- Double-click on the
MainStoryboard.storyboardfile to open it in Xamarin Studio. - Remove the controller that was created by the project template.
- Drag a Navigation Controller element from the Toolbox pane on the right-hand side onto the storyboard.
- Notice that a default View Controller element was created as well as a Navigation Controller element.
- You will see a segue that connects the two controllers. We'll cover this concept in more detail later in the chapter.
- Save the storyboard file.
If you run the application at this point, you will have a basic iOS app with a status bar at the top, a navigation controller that contains a navigation bar with a default title, and a child controller that is completely white, as shown in the following screenshot:
Since the first screen of our application will be a login screen, let's begin by setting up the appropriate views in the storyboard file. We will implement the login screen using Xamarin Studio to write the C# code, and its iOS designer to create iOS layouts in our storyboard file.
Return to the project in Xamarin Studio and perform the following steps:
- Double-click on the
MainStoryboard.storyboardfile to open it in the iOS designer. - Select your view controller and click on the Properties pane and select the Widget tab.
- Enter
LoginControllerinto the Class field. - Notice that the
LoginControllerclass is generated for you. You can create aControllersfolder and move the file in it if you wish.
The following screenshot shows you what the controller's settings will look like in Xamarin Studio after the changes have been made:

Now let's modify the layout of the controller by performing the following steps:
- Double-click on the
MainStoryboard.storyboardfile a second time to return to the iOS designer. - Tap on the navigation bar and edit the Title field to read
Login. - Drag two text fields onto the controller. Position and size them appropriately for the username and password entries. You might also want to remove the default text to make the fields blank.
- For the second field, check the Secure Text Entry checkbox. This will set the control to hide the characters for the password field.
- You might also want to fill out the Placeholder field for
UsernameandPasswordrespectively. - Drag a button onto the controller. Set the button's Title to
Login. - Drag an activity indicator onto the controller. Check the Animating and Hidden checkboxes.
- Next, create an outlet for each of the controls by filling out the Name field. Name the outlets
username,password,login, andindicatorrespectively. - Save the storyboard file and take a look at
LoginController.designer.cs.
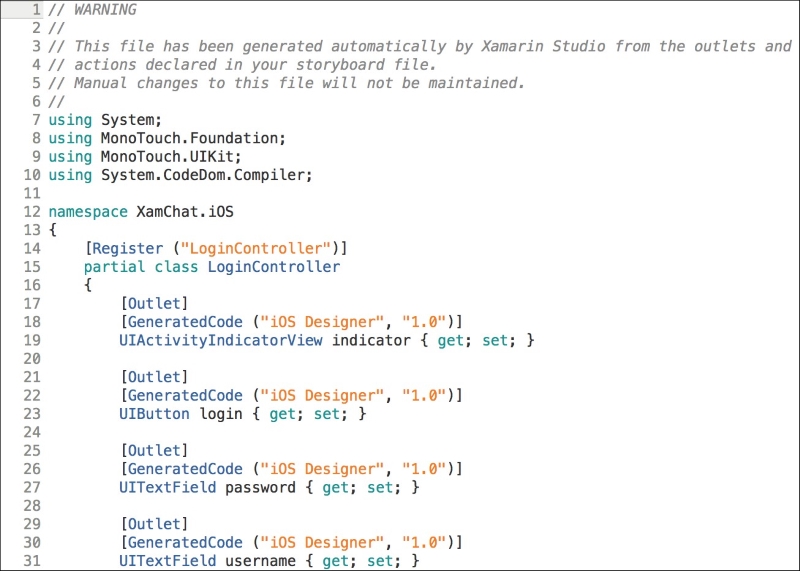
You will see that Xamarin Studio has generated properties for each of the outlets:
Go ahead and compile the application to make sure that everything is okay. At this point, we also need to add a reference to the XamChat.Core project created in the previous chapter.
Next, let's set up our iOS application to register all of its view models and other services that will be used throughout the application. We will use the ServiceContainer class that we created in Chapter 4, XamChat – a Cross-platform App, to set up the dependencies throughout our application. Open AppDelegate.cs and add the following method:
public override bool FinishedLaunching(UIApplication application,NSDictionary launchOptions)
{
  //View Models
  ServiceContainer.Register<LoginViewModel>(() =>new LoginViewModel());
  ServiceContainer.Register<FriendViewModel>(() =>new FriendViewModel());
  ServiceContainer.Register<RegisterViewModel>(() =>new RegisterViewModel());
  ServiceContainer.Register<MessageViewModel>(() =>new MessageViewModel());
  //Models
  ServiceContainer.Register<ISettings>(() =>new FakeSettings());
  ServiceContainer.Register<IWebService>(() =>new FakeWebService());

  return true;
}
Down the road, we will replace the fake services with the real ones. Now, let's add the login functionality to LoginController.cs. First, add LoginViewModel to a member variable at the top of the class as follows:
readonly LoginViewModel loginViewModel = ServiceContainer.Resolve<LoginViewModel>();
This will pull a shared instance of LoginViewModel into a local variable in the controller. This is the pattern that we will use throughout the module in order to pass a shared view model from one class to another.
Next, override ViewDidLoad to hook up the view model's functionality with the views set up in outlets as follows:
public override void ViewDidLoad()
{
  base.ViewDidLoad();
  login.TouchUpInside += async(sender, e) =>
  {
    loginViewModel.Username = username.Text;
    loginViewModel.Password = password.Text;
    try
    {
      await loginViewModel.Login();
      //TODO: navigate to a new screen
    }
    catch (Exception exc)
    {
      new UIAlertView("Oops!", exc.Message, null, "Ok").Show();
    }
  };
}
We'll add the code to navigate to a new screen later in the chapter.
Next, let's hook up the IsBusyChanged event to actually perform an action as follows:
public override void ViewWillAppear(bool animated)
{
  base.ViewWillAppear(animated);
  loginViewModel.IsBusyChanged += OnIsBusyChanged;
}
public override void ViewWillDisappear(bool animated)
{
  base.ViewWillDisappear(animated);
  loginViewModel.IsBusyChanged -= OnIsBusyChanged;
}
void OnIsBusyChanged(object sender, EventArgs e)
{
  username.Enabled =
    password.Enabled =
    login.Enabled =
    indicator.Hidden = !loginViewModel.IsBusy;
}
Now you might be wondering, why we subscribe to the event in this manner. The problem is that the LoginViewModel class will last through your application's lifetime, while the LoginController class will not. If we subscribed to the event in ViewDidLoad, but didn't unsubscribe later, then our application will have a memory leak. We also avoided using a lambda expression for the event since it would otherwise be impossible to unsubscribe the event. Note that we don't have the same problem with the TouchUpInside event on the button, since it will live in memory as long as the controller does. This is a common problem with events in C#, which is why it is a good idea to use the preceding pattern on iOS.
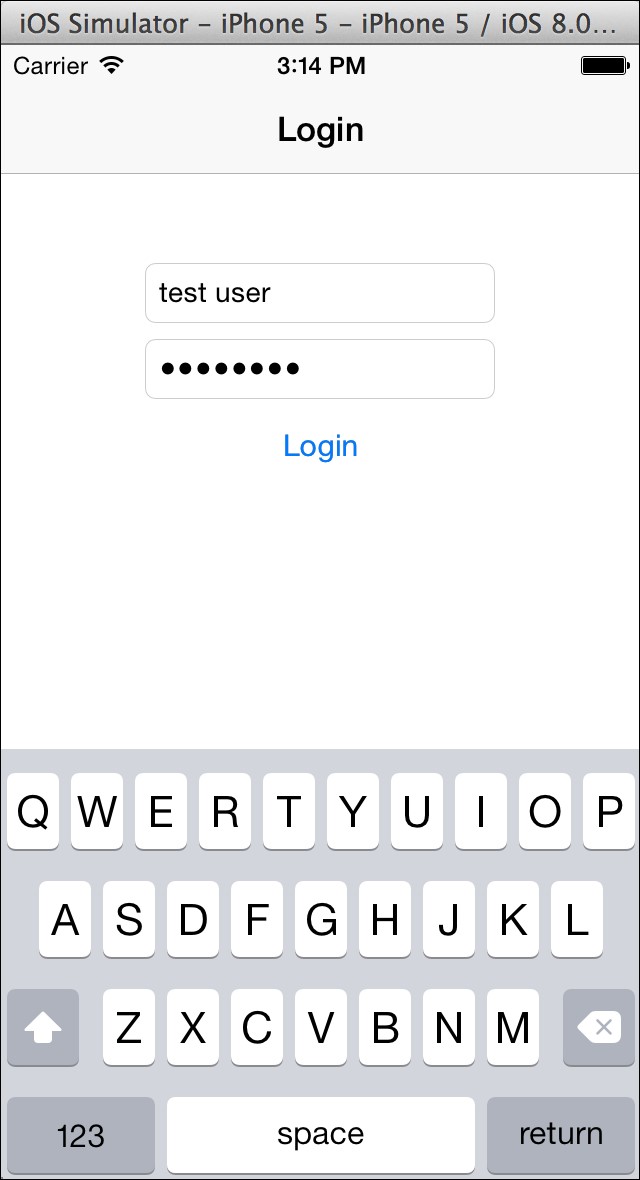
If you run the application now, you should be able to enter a username and password, as shown in the following screenshot. When you press Login, you should see the indicator appear and all the controls disabled. Your application will correctly be calling the shared code, and should function correctly when we add a real web service.
Creating a LoginController class
Return to the project in Xamarin Studio and perform the following steps:
- Double-click on the
MainStoryboard.storyboardfile to open it in the iOS designer. - Select your view controller and click on the Properties pane and select the Widget tab.
- Enter
LoginControllerinto the Class field. - Notice that the
LoginControllerclass is generated for you. You can create aControllersfolder and move the file in it if you wish.
The following screenshot shows you what the controller's settings will look like in Xamarin Studio after the changes have been made:
Now let's modify the layout of the controller by performing the following steps:
- Double-click on the
MainStoryboard.storyboardfile a second time to return to the iOS designer. - Tap on the navigation bar and edit the Title field to read
Login. - Drag two text fields onto the controller. Position and size them appropriately for the username and password entries. You might also want to remove the default text to make the fields blank.
- For the second field, check the Secure Text Entry checkbox. This will set the control to hide the characters for the password field.
- You might also want to fill out the Placeholder field for
UsernameandPasswordrespectively. - Drag a button onto the controller. Set the button's Title to
Login. - Drag an activity indicator onto the controller. Check the Animating and Hidden checkboxes.
- Next, create an outlet for each of the controls by filling out the Name field. Name the outlets
username,password,login, andindicatorrespectively. - Save the storyboard file and take a look at
LoginController.designer.cs.
You will see that Xamarin Studio has generated properties for each of the outlets:
Go ahead and compile the application to make sure that everything is okay. At this point, we also need to add a reference to the XamChat.Core project created in the previous chapter.
Next, let's set up our iOS application to register all of its view models and other services that will be used throughout the application. We will use the ServiceContainer class that we created in Chapter 4, XamChat – a Cross-platform App, to set up the dependencies throughout our application. Open AppDelegate.cs and add the following method:
public override bool FinishedLaunching(UIApplication application,NSDictionary launchOptions)
{
  //View Models
  ServiceContainer.Register<LoginViewModel>(() =>new LoginViewModel());
  ServiceContainer.Register<FriendViewModel>(() =>new FriendViewModel());
  ServiceContainer.Register<RegisterViewModel>(() =>new RegisterViewModel());
  ServiceContainer.Register<MessageViewModel>(() =>new MessageViewModel());
  //Models
  ServiceContainer.Register<ISettings>(() =>new FakeSettings());
  ServiceContainer.Register<IWebService>(() =>new FakeWebService());

  return true;
}
Down the road, we will replace the fake services with the real ones. Now, let's add the login functionality to LoginController.cs. First, add LoginViewModel to a member variable at the top of the class as follows:
readonly LoginViewModel loginViewModel = ServiceContainer.Resolve<LoginViewModel>();
This will pull a shared instance of LoginViewModel into a local variable in the controller. This is the pattern that we will use throughout the module in order to pass a shared view model from one class to another.
Next, override ViewDidLoad to hook up the view model's functionality with the views set up in outlets as follows:
public override void ViewDidLoad()
{
  base.ViewDidLoad();
  login.TouchUpInside += async(sender, e) =>
  {
    loginViewModel.Username = username.Text;
    loginViewModel.Password = password.Text;
    try
    {
      await loginViewModel.Login();
      //TODO: navigate to a new screen
    }
    catch (Exception exc)
    {
      new UIAlertView("Oops!", exc.Message, null, "Ok").Show();
    }
  };
}
We'll add the code to navigate to a new screen later in the chapter.
Next, let's hook up the IsBusyChanged event to actually perform an action as follows:
public override void ViewWillAppear(bool animated)
{
  base.ViewWillAppear(animated);
  loginViewModel.IsBusyChanged += OnIsBusyChanged;
}
public override void ViewWillDisappear(bool animated)
{
  base.ViewWillDisappear(animated);
  loginViewModel.IsBusyChanged -= OnIsBusyChanged;
}
void OnIsBusyChanged(object sender, EventArgs e)
{
  username.Enabled =
    password.Enabled =
    login.Enabled =
    indicator.Hidden = !loginViewModel.IsBusy;
}
Now you might be wondering, why we subscribe to the event in this manner. The problem is that the LoginViewModel class will last through your application's lifetime, while the LoginController class will not. If we subscribed to the event in ViewDidLoad, but didn't unsubscribe later, then our application will have a memory leak. We also avoided using a lambda expression for the event since it would otherwise be impossible to unsubscribe the event. Note that we don't have the same problem with the TouchUpInside event on the button, since it will live in memory as long as the controller does. This is a common problem with events in C#, which is why it is a good idea to use the preceding pattern on iOS.
If you run the application now, you should be able to enter a username and password, as shown in the following screenshot. When you press Login, you should see the indicator appear and all the controls disabled. Your application will correctly be calling the shared code, and should function correctly when we add a real web service.
Modifying the controller's layout
Now let's modify the layout of the controller by performing the following steps:
- Double-click on the
MainStoryboard.storyboardfile a second time to return to the iOS designer. - Tap on the navigation bar and edit the Title field to read
Login. - Drag two text fields onto the controller. Position and size them appropriately for the username and password entries. You might also want to remove the default text to make the fields blank.
- For the second field, check the Secure Text Entry checkbox. This will set the control to hide the characters for the password field.
- You might also want to fill out the Placeholder field for
UsernameandPasswordrespectively. - Drag a button onto the controller. Set the button's Title to
Login. - Drag an activity indicator onto the controller. Check the Animating and Hidden checkboxes.
- Next, create an outlet for each of the controls by filling out the Name field. Name the outlets
username,password,login, andindicatorrespectively. - Save the storyboard file and take a look at
LoginController.designer.cs.
You will see that Xamarin Studio has generated properties for each of the outlets:
Go ahead and compile the application to make sure that everything is okay. At this point, we also need to add a reference to the XamChat.Core project created in the previous chapter.
Next, let's set up our iOS application to register all of its view models and other services that will be used throughout the application. We will use the ServiceContainer class that we created in Chapter 4, XamChat – a Cross-platform App, to set up the dependencies throughout our application. Open AppDelegate.cs and add the following method:
public override bool FinishedLaunching(UIApplication application,NSDictionary launchOptions)
{
  //View Models
  ServiceContainer.Register<LoginViewModel>(() =>new LoginViewModel());
  ServiceContainer.Register<FriendViewModel>(() =>new FriendViewModel());
  ServiceContainer.Register<RegisterViewModel>(() =>new RegisterViewModel());
  ServiceContainer.Register<MessageViewModel>(() =>new MessageViewModel());
  //Models
  ServiceContainer.Register<ISettings>(() =>new FakeSettings());
  ServiceContainer.Register<IWebService>(() =>new FakeWebService());

  return true;
}
Down the road, we will replace the fake services with the real ones. Now, let's add the login functionality to LoginController.cs. First, add LoginViewModel to a member variable at the top of the class as follows:
readonly LoginViewModel loginViewModel = ServiceContainer.Resolve<LoginViewModel>();
This will pull a shared instance of LoginViewModel into a local variable in the controller. This is the pattern that we will use throughout the module in order to pass a shared view model from one class to another.
Next, override ViewDidLoad to hook up the view model's functionality with the views set up in outlets as follows:
public override void ViewDidLoad()
{
  base.ViewDidLoad();
  login.TouchUpInside += async(sender, e) =>
  {
    loginViewModel.Username = username.Text;
    loginViewModel.Password = password.Text;
    try
    {
      await loginViewModel.Login();
      //TODO: navigate to a new screen
    }
    catch (Exception exc)
    {
      new UIAlertView("Oops!", exc.Message, null, "Ok").Show();
    }
  };
}
We'll add the code to navigate to a new screen later in the chapter.
Next, let's hook up the IsBusyChanged event to actually perform an action as follows:
public override void ViewWillAppear(bool animated)
{
  base.ViewWillAppear(animated);
  loginViewModel.IsBusyChanged += OnIsBusyChanged;
}
public override void ViewWillDisappear(bool animated)
{
  base.ViewWillDisappear(animated);
  loginViewModel.IsBusyChanged -= OnIsBusyChanged;
}
void OnIsBusyChanged(object sender, EventArgs e)
{
  username.Enabled =
    password.Enabled =
    login.Enabled =
    indicator.Hidden = !loginViewModel.IsBusy;
}
Now you might be wondering, why we subscribe to the event in this manner. The problem is that the LoginViewModel class will last through your application's lifetime, while the LoginController class will not. If we subscribed to the event in ViewDidLoad, but didn't unsubscribe later, then our application will have a memory leak. We also avoided using a lambda expression for the event since it would otherwise be impossible to unsubscribe the event. Note that we don't have the same problem with the TouchUpInside event on the button, since it will live in memory as long as the controller does. This is a common problem with events in C#, which is why it is a good idea to use the preceding pattern on iOS.
If you run the application now, you should be able to enter a username and password, as shown in the following screenshot. When you press Login, you should see the indicator appear and all the controls disabled. Your application will correctly be calling the shared code, and should function correctly when we add a real web service.
Registering and subscribing view models and services
Next, let's set up our iOS application to register all of its view models and other services that will be used throughout the application. We will use the ServiceContainer class that we created in Chapter 4, XamChat – a Cross-platform App, to set up the dependencies throughout our application. Open AppDelegate.cs and add the following method:
public override bool FinishedLaunching(UIApplication application,NSDictionary launchOptions)
{
  //View Models
  ServiceContainer.Register<LoginViewModel>(() =>new LoginViewModel());
  ServiceContainer.Register<FriendViewModel>(() =>new FriendViewModel());
  ServiceContainer.Register<RegisterViewModel>(() =>new RegisterViewModel());
  ServiceContainer.Register<MessageViewModel>(() =>new MessageViewModel());
  //Models
  ServiceContainer.Register<ISettings>(() =>new FakeSettings());
  ServiceContainer.Register<IWebService>(() =>new FakeWebService());

  return true;
}
Down the road, we will replace the fake services with the real ones. Now, let's add the login functionality to LoginController.cs. First, add LoginViewModel to a member variable at the top of the class as follows:
readonly LoginViewModel loginViewModel = ServiceContainer.Resolve<LoginViewModel>();
This will pull a shared instance of LoginViewModel into a local variable in the controller. This is the pattern that we will use throughout the module in order to pass a shared view model from one class to another.
Next, override ViewDidLoad to hook up the view model's functionality with the views set up in outlets as follows:
public override void ViewDidLoad()
{
  base.ViewDidLoad();
  login.TouchUpInside += async(sender, e) =>
  {
    loginViewModel.Username = username.Text;
    loginViewModel.Password = password.Text;
    try
    {
      await loginViewModel.Login();
      //TODO: navigate to a new screen
    }
    catch (Exception exc)
    {
      new UIAlertView("Oops!", exc.Message, null, "Ok").Show();
    }
  };
}
We'll add the code to navigate to a new screen later in the chapter.
Next, let's hook up the IsBusyChanged event to actually perform an action as follows:
public override void ViewWillAppear(bool animated)
{
  base.ViewWillAppear(animated);
  loginViewModel.IsBusyChanged += OnIsBusyChanged;
}
public override void ViewWillDisappear(bool animated)
{
  base.ViewWillDisappear(animated);
  loginViewModel.IsBusyChanged -= OnIsBusyChanged;
}
void OnIsBusyChanged(object sender, EventArgs e)
{
  username.Enabled =
    password.Enabled =
    login.Enabled =
    indicator.Hidden = !loginViewModel.IsBusy;
}
Now you might be wondering, why we subscribe to the event in this manner. The problem is that the LoginViewModel class will last through your application's lifetime, while the LoginController class will not. If we subscribed to the event in ViewDidLoad, but didn't unsubscribe later, then our application will have a memory leak. We also avoided using a lambda expression for the event since it would otherwise be impossible to unsubscribe the event. Note that we don't have the same problem with the TouchUpInside event on the button, since it will live in memory as long as the controller does. This is a common problem with events in C#, which is why it is a good idea to use the preceding pattern on iOS.
If you run the application now, you should be able to enter a username and password, as shown in the following screenshot. When you press Login, you should see the indicator appear and all the controls disabled. Your application will correctly be calling the shared code, and should function correctly when we add a real web service.
A segue is a transition from one controller to another. In the same way, a storyboard file is a collection of controllers and their views attached together by segues. This, in turn, allows you to see the layouts of each controller and the general flow of your application at the same time.
There are just a few categories of segue, which are as follows:
- Push: This is used within a navigation controller. It pushes a new controller to the top of the navigation controller's stack. Push uses the standard animation technique for navigation controllers and is generally the most commonly used segue.
- Relationship: This is used to set a child controller of another controller. For example, the root controller of a navigation controller, container views, or split view controllers in an iPad application.
- Modal: On using this, a controller presented modally will appear on top of the parent controller. It will cover the entire screen until dismissed. There are several types of different transition animations available.
- Custom: This is a custom segue that includes an option for a custom class, which subclasses
UIStoryboardSegue. This gives you fine-grained control over the animation and how the next controller is presented.
Segues also use the following pattern while executing:
- The destination controller and its views are created.
- The segue object, a subclass of
UIStoryboardSegue, is created. This is normally only important for custom segues. - The
PrepareForSeguemethod is called on the source controller. This is a good place to run any custom code before a segue begins. - The segue's
Performmethod is called and the transition animation is started. This is where the bulk of the code resides for a custom segue.
In the Xamarin.iOS designer, you have the choice of either firing a segue automatically from a button or table view row, or just giving the segue an identifier. In the second case, you can start the segue yourself by calling the PerformSegue method on the source controller using its identifier.
Now, let's set up a new segue by setting up some aspects of our MainStoryboard.storyboard file by performing the following steps:
- Double-click on the
MainStoryboard.storyboardfile to open it in the iOS designer. - Add a new Table View Controller to the storyboard.
- Select your view controller and navigate to the Properties pane and the Widget tab.
- Enter
ConversationsControllerinto the Class field. - Scroll down under the View Controller section and enter Title of
Conversations. - Create a segue from
LoginControllertoConversationsControllerby clicking while holding Ctrl and dragging the blue line from one controller to the other. - Select the push segue from the popup that appears.
- Select the segue by clicking on it and give it an Identifier of
OnLogin. - Save the storyboard file.
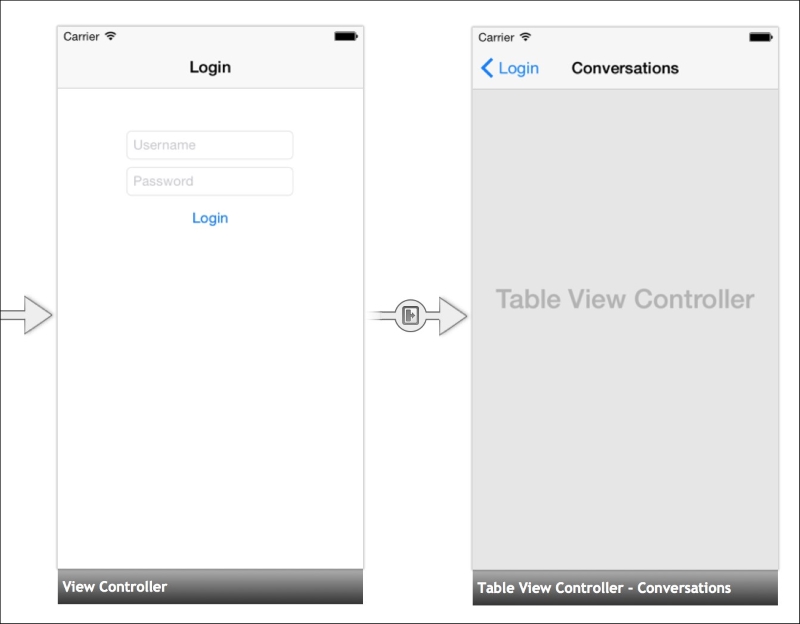
Your storyboard will look something similar to what is shown in the following screenshot:
Open LoginController.cs, and modify the line of code that we marked as TODO earlier in this chapter as follows:
PerformSegue("OnLogin", this);Now if you build and run the application, you will navigate to the new controller after a successful log in. The segue will be performed, and you will see the built-in animation provided by the navigation controller.
Next, let's set up the table view on the second controller. We are using a powerful class on iOS called UITableView. It is used in many situations and is very similar to the concept of a list view on other platforms. The UITableView class is controlled by another class called UITableViewSource. It has methods that you need to override to set up how many rows should exist and how these rows should be displayed on the screen.
Before we jump in and start coding, let's review the most commonly used methods on UITableViewSource, which are as follows:
RowsInSection: This method allows you to define the number of rows in a section. All the table views have a number of sections and rows. By default, there is only one section; however, it is a requirement to return the number of rows in a section.NumberOfSections: This is the number of sections in the table view.GetCell: This method must return a cell for each row and should be implemented. It is up to the developer to set up how a cell should look like; you can also implement code to recycle the cells as you scroll. Recycling cells will yield better performance while scrolling.TitleForHeader: This method, if overridden, is the simplest way to return a string for the title. Each section in a table view has a standard header view, by default.RowSelected: This method will be called when the user selects a row.
There are additional methods that you can override, but these will get you by in most situations. You can also set up custom headers and footers if you need to develop a custom styled table view.
Now, let's open the ConversationsController.cs file, and create a nested class inside ConversationsController as follows:
class TableSource : UITableViewSource
{
  const string CellName = "ConversationCell";
  readonly MessageViewModel messageViewModel = ServiceContainer.Resolve<MessageViewModel>();

  public override int RowsInSection(UITableView tableView, int section)
  {
    return messageViewModel.Conversations == null ?0 : messageViewModel.Conversations.Length;
  }
  public override UITableViewCell GetCell(UITableView tableView, NSIndexPath indexPath)
  {
    var conversation = messageViewModel.Conversations[indexPath.Row];
    var cell = tableView.DequeueReusableCell(CellName);
    if (cell == null)
    {
      cell = new UITableViewCell(UITableViewCellStyle.Default, CellName);
      cell.Accessory = UITableViewCellAccessory.DisclosureIndicator;
    }
    cell.TextLabel.Text = conversation.Username;
    return cell;
  }
}
We implemented the two required methods to set up a table view: RowsInSection and GetCell. We returned the number of conversations found on the view model and set up our cell for each row. We also used UITableViewCellAccessory.DisclosureIndicator to add an indicator for the users to know that they can click on the row.
Notice our implementation of recycling cells. Calling DequeueReusableCell with a cell identifier will return a null cell the first time around. If null, you should create a new cell using the same cell identifier. Subsequent calls to DequeueReusableCell will return an existing cell, enabling you to reuse it. You can also define the TableView cells in the storyboard file, which is useful for custom cells. Our cell here is very simple, so it is easier to define it from the code. Recycling cells is important on mobile platforms to preserve memory and provide the user with a very fluid scrolling table.
Next, we need to set up the TableView source on TableView. Add some changes to our ConversationsController class as follows:
readonly MessageViewModel messageViewModel = ServiceContainer.Resolve<MessageViewModel>();

public override void ViewDidLoad()
{
  base.ViewDidLoad();
  TableView.Source = new TableSource();
}
public async override void ViewWillAppear(bool animated)
{
  base.ViewWillAppear(animated);
  try
  {
    await messageViewModel.GetConversations();
    TableView.ReloadData();
  }
  catch(Exception exc)
  {
    new UIAlertView("Oops!", exc.Message, null, "Ok").Show();
  }
}
So when the view appears, we will load our list of conversations. Upon completion of this task, we'll reload the table view so that it displays our list of conversations. If you run the application, you'll see a few conversations appear in the table view after logging in, as shown in the following screenshot. Down the road, everything will operate in the same manner when we load the conversations from a real web service.

The next fairly important screen is that of our friends list. When creating a new conversation, the app will load a list of friends to start a conversation with. We'll follow a very similar pattern to load our list of conversations.
To begin, we'll create UIBarButtonItem that navigates to a new controller named FriendsController by performing the following steps:
- Double-click on the
MainStoryboard.storyboardfile to open it in the iOS designer. - Add a new Table View Controller to the storyboard.
- Select your view controller and click on the Properties pane and make sure you have selected the Widget tab.
- Enter
FriendsControllerin the Class field. - Scroll down to the View Controller section, enter
Friendsin the Title field. - Drag a Navigation Item from the Toolbox pane onto the
ConversationsController. - Create a new Bar Button Item element and place it in the top-right corner of the new navigation bar.
- In the Properties pane of the bar button, set its Identifier to Add. This will use the built-in plus button, which is commonly used throughout iOS applications.
- Create a segue from Bar Button Item to the
FriendsControllerby holding Ctrl and dragging the blue line from the bar button to the next controller. - Select the push segue from the popup that appears.
- Save the storyboard file.
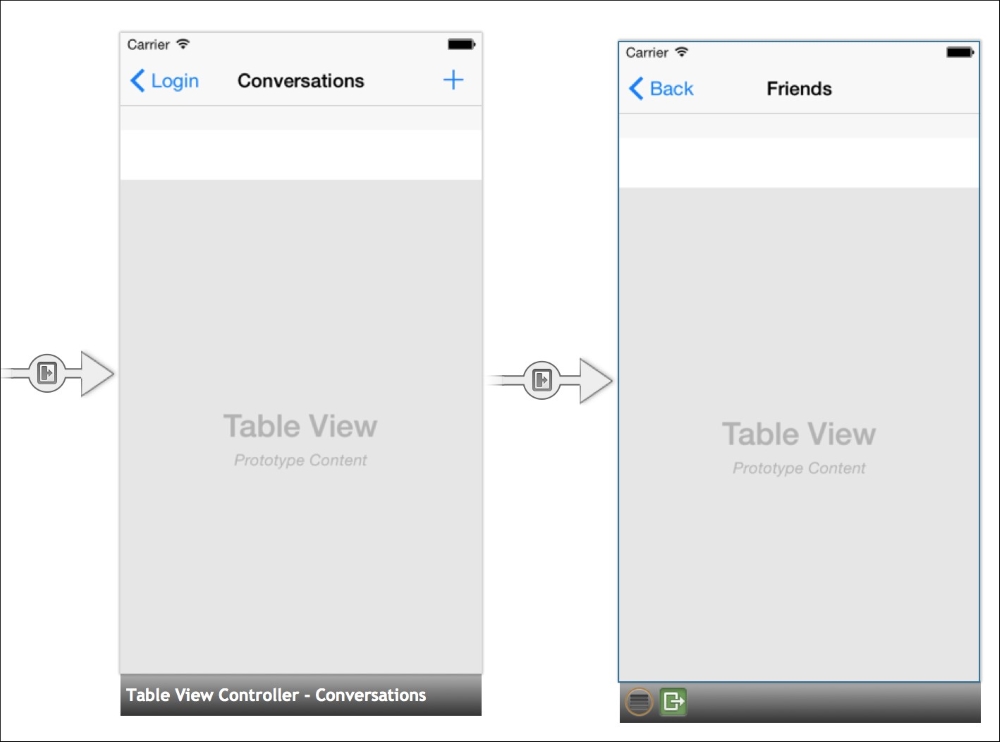
Your changes to the storyboard should look something similar to what is shown in the following screenshot:
You will see a new FriendsController class that Xamarin Studio has generated for you. If you compile and run the application, you'll see the new bar button item we created. Clicking on it will take you to the new controller.
Now, let's implement UITableViewSource to display our friends list. Start with a new nested class inside FriendsController as follows:
class TableSource : UITableViewSource
{
  const string CellName = "FriendCell";
  readonly FriendViewModel friendViewModel = ServiceContainer.Resolve<FriendViewModel>();

  public override int RowsInSection(UITableView tableView, int section)
  {
    return friendViewModel.Friends == null ?0 : friendViewModel.Friends.Length;
  }
  public override UITableViewCell GetCell(UITableView tableView, NSIndexPath indexPath)
  {
    var friend = friendViewModel.Friends[indexPath.Row];
    var cell = tableView.DequeueReusableCell(CellName);
    if (cell == null)
    {
      cell = new UITableViewCell(UITableViewCellStyle.Default, CellName);
      cell.AccessoryView = UIButton.FromType(UIButtonType.ContactAdd);
      cell.AccessoryView.UserInteractionEnabled = false;
    }
    cell.TextLabel.Text = friend.Username;
    return cell;
  }
}
Just as before, we implemented table cell recycling and merely set the text on the label for each friend. We used cell.AccessoryView to indicate to the user that each cell is clickable and starts a new conversation. We disabled the user interaction on the button just to allow the row to be selected when the user clicks on the button. Otherwise, we'd have to implement a click event for the button.
Next, we'll need to modify FriendsController in the same way as we did for conversations, as follows:
readonly FriendViewModel friendViewModel = ServiceContainer.Resolve<FriendViewModel>();
public override void ViewDidLoad()
{
base.ViewDidLoad();
TableView.Source = new TableSource();
}
public async override void ViewWillAppear(bool animated)
{
base.ViewWillAppear(animated);
try
{
await friendViewModel.GetFriends();
TableView.ReloadData();
}
catch(Exception exc)
{
new UIAlertView("Oops!", exc.Message, null, "Ok").Show();
}
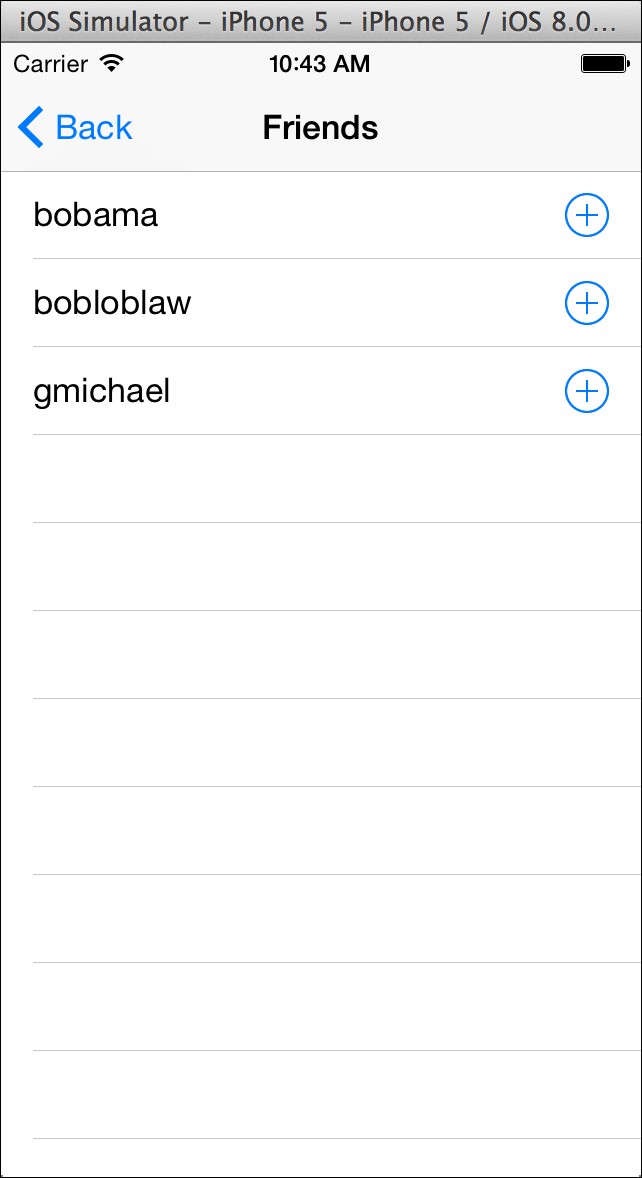
}This will function exactly as the conversations list. The controller will load the friends list asynchronously and refresh the table view. If you compile and run the application, you'll be able to navigate to the screen and view the sample friend list we created in Chapter 4, XamChat – a Cross-platform App, as shown in the following screenshot:
Now let's implement the screen to view a conversation or list of messages. We will try to model the screen after the built-in text message application on iOS. To do so, we will also cover the basics of how to create custom table view cells.
To start, we'll need a new MessagesController class to perform the following steps:
- Double-click on the
MainStoryboard.storyboardfile to open it in the iOS designer. - Add a new Table View Controller to the storyboard.
- Select your view controller and click on the Properties pane and make sure you have selected the Widget tab.
- Enter
MessagesControllerin the Class field. - Scroll down to the View Controller section, enter
Messagesin the Title field. - Create a segue from
ConversationsControllertoMessagesControllerby holding Ctrl and dragging the blue line from one controller to the other. - Select the push segue from the popup that appears. Enter the Identifier
OnConversationin the Properties pane. - Now, create two Table View Cells in the table view in
MessagesController. You can reuse the existing one created, by default. - Enter
MyMessageCellandTheirMessageCellrespectively into the Class field for each cell. - Set the Identifier to
MyCellandTheirCellrespectively on each cell. - Save the storyboard file.
Xamarin Studio will generate three files: MessagesController.cs, MyMessageCell.cs, and TheirMessageCell.cs. You might decide to keep things organized by creating a Views folder and moving the cells into it. Likewise, you can move the controller to a Controllers folder.
Now let's implement a base class for both these cells to inherit from:
public class BaseMessageCell : UITableViewCell
{
  public BaseMessageCell(IntPtr handle) : base(handle)
  {
  }
  public virtual void Update(Message message)
  {
  }
}
We will override the Update method later and take the appropriate action for each cell type. We need this class to make things easier while interacting with both the types of cells from UITableViewSource.
Now open MessagesController.cs and implement UITableViewSource inside a nested class, as follows:
class TableSource : UITableViewSource
{
  const string MyCellName = "MyCell";
  const string TheirCellName = "TheirCell";
  readonly MessageViewModel messageViewModel = ServiceContainer.Resolve<MessageViewModel>();
  readonly ISettings settings = ServiceContainer.Resolve<ISettings>();

  public override int RowsInSection(UITableView tableview, int section)
  {
    return messageViewModel.Messages == null ?0 : messageViewModel.Messages.Length;
  }
  public override UITableViewCell GetCell(UITableView tableView, NSIndexPath indexPath)
  {
    var message = messageViewModel.Messages [indexPath.Row];
    bool isMyMessage = message.UserId == settings.User.Id;
    var cell = tableView.DequeueReusableCell(isMyMessage ?MyCellName : TheirCellName) as BaseMessageCell;
    cell.Update(message);
    return cell;
  }
}
We added some logic to check whether a message is from a current user to decide on the appropriate table cell identifier. Since we have a base class for both cells, we can cast to BaseMessageCell and use its Update method.
Now let's make the changes to our MessagesController file to load our list of messages and display them:
readonly MessageViewModel messageViewModel = ServiceContainer.Resolve<MessageViewModel>();

public override void ViewDidLoad()
{
  base.ViewDidLoad();

  TableView.Source = new TableSource();
}
public async override void ViewWillAppear(bool animated)
{
  base.ViewWillAppear(animated);
  Title = messageViewModel.Conversation.Username;
  try
  {
    await messageViewModel.GetMessages();
    TableView.ReloadData();
  }
  catch (Exception exc)
  {
    new UIAlertView("Oops!", exc.Message, null, "Ok").Show();
  }
}
The only thing new here is where we set the Title property to the username of the conversation.
To complete our custom cells, we will need to make more changes in Xcode by performing the following steps:
- Double-click on the
MainStoryboard.storyboardfile to open it in the iOS designer. - Drag a new Label onto both the custom cells.
- Use some creativity to style both labels. I chose to make the text in
MyMessageCellblue andTheirMessageCellgreen. I set Alignment on the label to the right aligned inTheirMessageCell. - For the Name of each cell, enter
message. - Save the storyboard file and return.
Now add the following Update method to both MyMessageCell.cs and TheirMessageCell.cs:
public partial class MyMessageCell : BaseMessageCell
{
  public MyMessageCell (IntPtr handle) : base (handle)
  {
  }
  public override void Update(Message message)
  {
    this.message.Text = message.Text;
  }
}
It is a bit strange to have duplicated the code for each cell, but it is the simplest approach to take advantage of the outlets Xamarin Studio generated based on the storyboard file. You could also have chosen to use the same class for both cells (even with a different layout in Xcode); however, you then lose the ability to have different code in each cell.
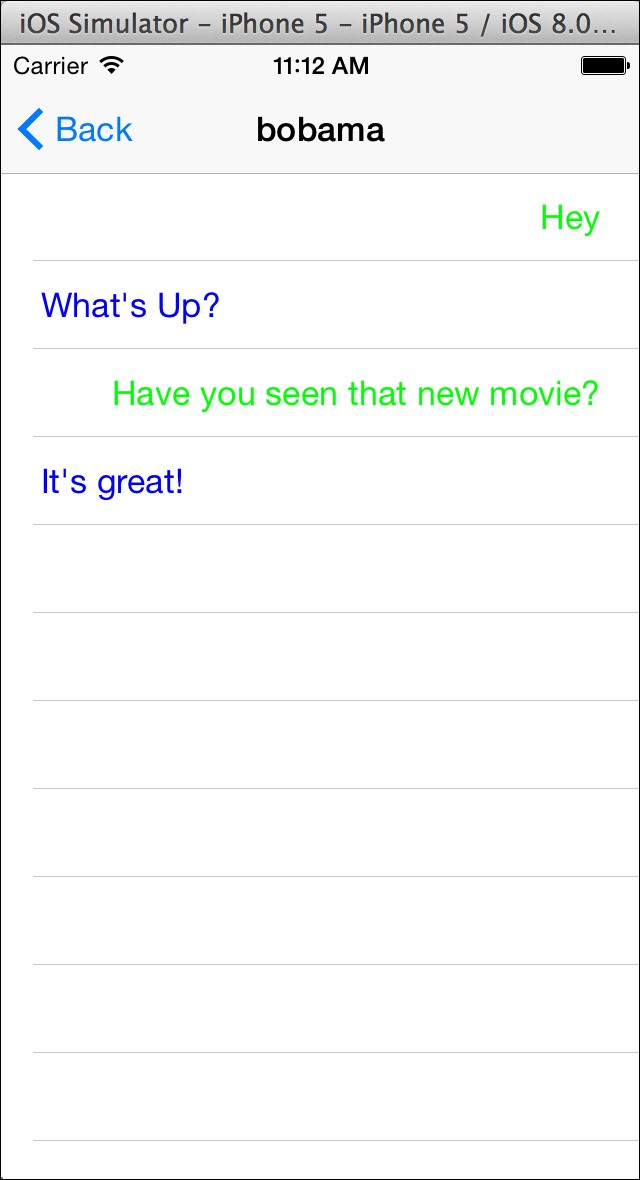
If you run the application now, you will be able to view the messages list, as displayed in the following screenshot:
For the final piece of our application, we need to implement some custom functionality that Apple doesn't provide with their APIs. We need to add a text field with a button that appears to be attached to the bottom of the table view. Most of this will require writing code and wiring up a lot of events.
Let's begin by adding some new member variables to our MessagesController class as follows:
UIToolbar toolbar;
UITextField message;
UIBarButtonItem send;
NSObject willShowObserver, willHideObserver;
We will place the text field and bar buttons inside the toolbar, as shown in the following code. The NSObject fields will be an example of iOS's event system called notifications. We'll see how these are used shortly:
public override void ViewDidLoad()
{
  base.ViewDidLoad();

  //Text Field
  message = new UITextField(new RectangleF(0, 0, 240, 32))
  {
    BorderStyle = UITextBorderStyle.RoundedRect,ReturnKeyType = UIReturnKeyType.Send,ShouldReturn = _ =>
      {
        Send();
        return false;
      },
  };
  //Bar button item
  send = new UIBarButtonItem("Send", UIBarButtonItemStyle.Plain,(sender, e) => Send());

  //Toolbar
  toolbar = new UIToolbar(new RectangleF(0, TableView.Frame.Height - 44,TableView.Frame.Width, 44));
  toolbar.Items = new UIBarButtonItem[]
  {
    new UIBarButtonItem(message),
    send
  };
  NavigationController.View.AddSubview(toolbar);

  TableView.Source = new TableSource();
  TableView.TableFooterView = new UIView(new RectangleF(0, 0, TableView.Frame.Width, 44))
  {
    BackgroundColor = UIColor.Clear,
  };
}
Much of this work involves setting up a basic UI. It is not something we can do inside Xcode, because it's a custom UI in this case. We create a text field, bar button item, and toolbar from C# and add them to our navigation controller's view. This will display the toolbar at the top of the table view, no matter where it is scrolled to. Another trick we used was to add a footer view to the table view, which is of the same height as the toolbar. This will simplify some animations that we'll set up later.
Now we will need to modify ViewWillAppear as follows:
public async override void ViewWillAppear(bool animated)
{
  base.ViewWillAppear(animated);

  Title = messageViewModel.Conversation.Username;

  //Keyboard notifications
  willShowObserver = UIKeyboard.Notifications.ObserveWillShow((sender, e) => OnKeyboardNotification(e));
  willHideObserver = UIKeyboard.Notifications.ObserveWillHide((sender, e) => OnKeyboardNotification(e));

  //IsBusy
  messageViewModel.IsBusyChanged += OnIsBusyChanged;
  try
  {
    await messageViewModel.GetMessages();
    TableView.ReloadData();
    message.BecomeFirstResponder();
  }
  catch (Exception exc)
  {
    new UIAlertView("Oops!", exc.Message, null, "Ok").Show();
  }
}
Most of these changes are straightforward, but notice our use of iOS notifications. Xamarin has provided a C# friendly way to subscribe to notifications. There is a static nested class named Notifications inside various UIKit classes that provide notifications. Otherwise, you would have to use the NSNotificationCenter class, which is not as easy to use. To unsubscribe from these events, we merely need to dispose NSObject that is returned.
So let's add an override for ViewWillDisapper to clean up these events, as follows:
public override void ViewWillDisappear(bool animated)
{
  base.ViewWillDisappear(animated);
  //Unsubcribe notifications
  if (willShowObserver != null)
  {
    willShowObserver.Dispose();
    willShowObserver = null;
  }
  if (willHideObserver != null)
  {
    willHideObserver.Dispose();
    willHideObserver = null;
  }
  //IsBusy
  messageViewModel.IsBusyChanged -= OnIsBusyChanged;
}
Next, let's set up our methods for these events, as follows:
void OnIsBusyChanged (object sender, EventArgs e)
{
  message.Enabled = send.Enabled = !messageViewModel.IsBusy;
}
void ScrollToEnd()
{
  TableView.ContentOffset = new PointF(0, TableView.ContentSize.Height -TableView.Frame.Height);
}
void OnKeyboardNotification (UIKeyboardEventArgs e)
{
  //Check if the keyboard is becoming visible
  bool willShow = e.Notification.Name == UIKeyboard.WillShowNotification;

  //Start an animation, using values from the keyboard
  UIView.BeginAnimations("AnimateForKeyboard");
  UIView.SetAnimationDuration(e.AnimationDuration);
  UIView.SetAnimationCurve(e.AnimationCurve);

  //Calculate keyboard height, etc.
  if (willShow)
  {
    var keyboardFrame = e.FrameEnd;
    var frame = TableView.Frame;
    frame.Height -= keyboardFrame.Height;
    TableView.Frame = frame;
    frame = toolbar.Frame;
    frame.Y -= keyboardFrame.Height;
    toolbar.Frame = frame;
  }
  else
  {
    var keyboardFrame = e.FrameBegin;
    var frame = TableView.Frame;
    frame.Height += keyboardFrame.Height;
    TableView.Frame = frame;
    frame = toolbar.Frame;
    frame.Y += keyboardFrame.Height;
    toolbar.Frame = frame;
  }
  //Commit the animation
  UIView.CommitAnimations();
  ScrollToEnd();
}
That is quite a bit of code, but not too difficult. OnIsBusyChanged is used to disable some of our views while it is loading. ScrollToEnd is a quick method to scroll the table view to the end. We need this for the sake of usability. Some math is required because Apple does not provide a built-in method for this.
On the other hand, OnKeyboardNotification has quite a lot going on. We used the built-in animation system for iOS to set up an animation when the keyboard appears or hides. We use this to move views around for the onscreen keyboard. Using the animation system is quite easy; call UIView.BeginAnimations, modify some views, and then finish up with UIView.CommitAnimations. We also used a few more values from the keyboard to time our animation identically with the keyboard's animations.
Last but not least, we need to implement a function to send a new message as follows:
async void Send()
{
//Just hide the keyboard if they didn't type anything
if (string.IsNullOrEmpty(message.Text))
{
message.ResignFirstResponder();
return;
}
//Set the text, send the message
messageViewModel.Text = message.Text;
await messageViewModel.SendMessage();
//Clear the text field & view model
message.Text = messageViewModel.Text = string.Empty;
//Reload the table
TableView.ReloadData();
//Hide the keyboard
message.ResignFirstResponder();
//Scroll to end, to see the new message
ScrollToEnd();
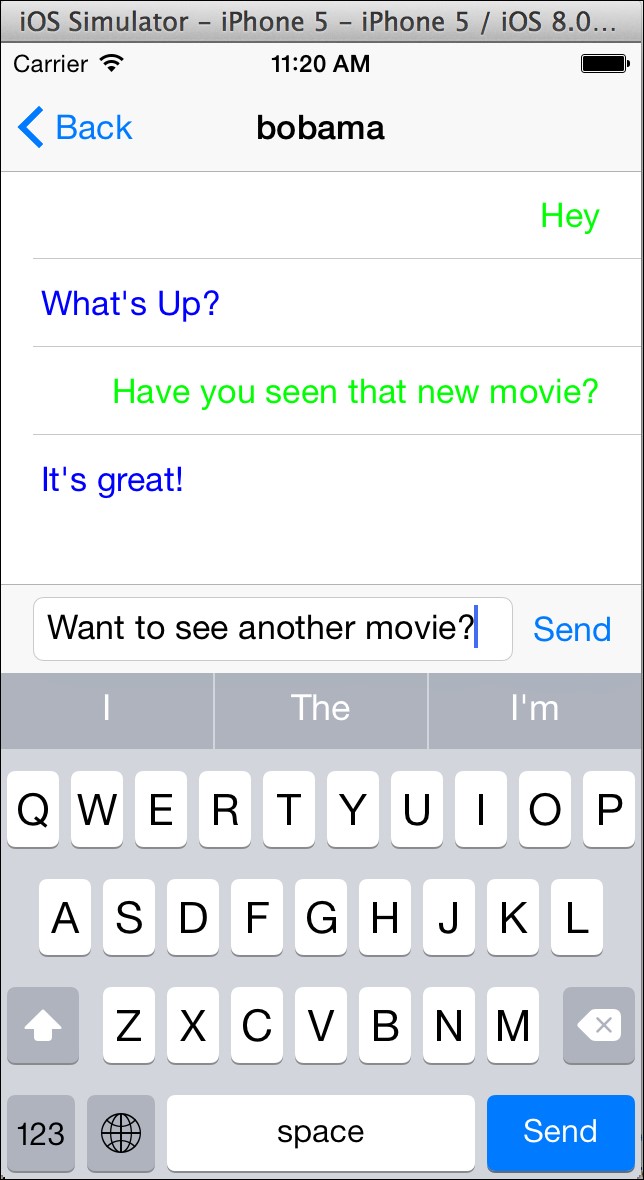
}This code is also fairly straightforward. After sending the message, we merely need to reload the table, hide the keyboard, and then make sure we scroll to the bottom to see the new message, as shown in the following screenshot. Using the async keyword makes this easy.
In this chapter, we covered the basic settings that Apple and Xamarin provide for developing iOS applications. This includes the Info.plist file and project options in Xamarin Studio. We covered UINavigationController, the basic building block for navigation in iOS applications, and implemented a login screen complete with username and password fields. Next, we covered iOS segues and the UITableView class. We implemented the friends list screen using UITableView, and the messages list screen, also using UITableView. Lastly, we added a custom UI functionality; a custom toolbar floating at the bottom of the messages list.
After completing this chapter, you will have a partially functional iOS version of XamChat. You will have a deeper understanding of the iOS platform and tools, and fairly good knowledge to apply to building your own iOS applications. Take it upon yourself to implement the remaining screens that we did not cover in the chapter. If you get lost, feel free to review the full sample application included with this module. In the next chapter, we will develop the Android UI for XamChat using the native Android APIs. A lot of our steps will be very similar to what we did on iOS, and we will be working mainly with the View layer of the MVVM design pattern.