

The best way to truly learn a programming skill, in my opinion, is to take on a simple project that requires you to exercise that skill. This gives new developers a project where they can focus on the concepts they are trying to learn without the overhead of fixing bugs or following customer requirements. To increase our understanding of Xamarin and cross-platform development, let's develop a simple app called XamChat for iOS and Android.
In this chapter, we will cover the following topics:
- Our sample application concept
- The Model layer of our application
- Mocking a web service
- The ViewModel layer of our application
- Writing unit tests
The concept is simple: a chat application that uses a standard Internet connection as an alternative to send text messages. There are several popular applications like this on the Apple App Store, probably due to the cost of text messaging and support for devices such as the iPod Touch or iPad. This will be a neat real-world example that can be useful for users, and will cover specific topics in developing applications for iOS and Android.
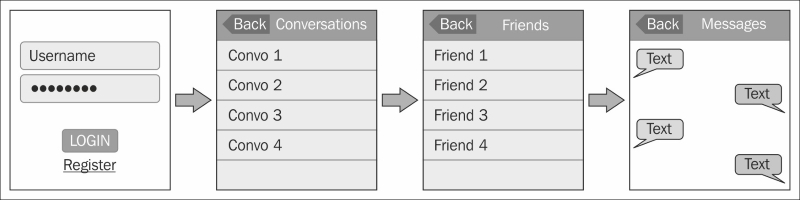
Before we start with the development, let's list the set of screens that we'll need:
- Login / sign up: This screen will include a standard login and sign-up process for the user
- List of conversations: This screen will include a button to start a new conversation
- List of friends: This screen will provide a way to add new friends when we start a new conversation
- Conversation: This screen will have a list of messages between you and another user, and an option to reply
So a quick wireframe layout of the application will help you grasp a better understanding of the layout of the app. The following figure shows you the set of screens to be included in your app:
Since we have a good idea of what the application is, the next step is to develop the business objects, or Model layer, of this application. Let's start by defining a few classes that will contain the data to be used throughout the app. It is recommended, for the sake of organization, to add these to a Models folder in your project. This is the bottom layer of the MVVM design pattern.
Let's begin with a class that represents a user. The class can be created as follows:
public class User
{
  public string Id { get; set; }
  public string Username { get; set; }
  public string Password { get; set; }
}
Pretty straightforward so far; let's move on to create classes representing a conversation and a message as follows:
public class Conversation
    {
        public string Id { get; set; }
        public string UserId { get; set; }
        public string Username { get; set; }
        public string LastMessage { get; set; }
    }
public class Message
    {
        public string Id { get; set; }
        public string ConversationId { get; set; }
        public string UserId { get; set; }
        public string Username { get; set; }
        public string Text { get; set; }
        public DateTime Date { get; set; }
}
Notice that we are using strings as identifiers for the various objects. This will simplify our integration with Azure Mobile Services in the later chapters. UserId is the value that will be set by the application to change the user that the object is associated with.
Now, let's go ahead and set up our solution by performing the following steps:
- Start by creating a new solution and a new Portable Library project.
- Name the project
XamChat.Coreand the solutionXamChat. - You can also choose to use a Shared Project for this project, but I chose to use a portable class library because it encourages better programming practices in general.
Many times when developing a mobile application, you might need to begin the development of your application before the real backend web service is available. To prevent the development from halting entirely, a good approach would be to develop a mock version of the service. This is also helpful when you need to write unit tests, or just need to add a real backend to your app later.
First, let's break down the operations our app will perform against a web server. The operations are as follows:
- Log in with a username and password.
- Register a new account.
- Get the user's list of friends.
- Add friends by their usernames.
- Get a list of the existing conversations for the user.
- Get a list of messages in a conversation.
- Send a message.
Now let's define an interface that offers a method for each scenario. The method is as follows:
public interface IWebService
{
  Task<User> Login(string username, string password);
  Task<User> Register(User user);
  Task<User[]> GetFriends(string userId);
  Task<User> AddFriend(string userId, string username);
  Task<Conversation[]> GetConversations(string userId);
  Task<Message[]> GetMessages(string conversationId);
  Task<Message> SendMessage(Message message);
}
As you can see, we're simplifying any asynchronous communication with a web service by leveraging the Task Parallel Library (TPL) from the .NET base class libraries.
Since communicating with a web service can be a lengthy process, it is always a good idea to use the Task<T> class for these operations. Otherwise, you can inadvertently run a lengthy task on the user interface thread, which will prevent user input during the operation. Task is definitely needed for web requests, since users could be using a cellular Internet connection on iOS and Android, and it will give us the ability to use the async and await keywords down the road.
Now let's implement a fake service that implements this interface. Place classes such as FakeWebService in the Fakes folder of the project. Let's start with the class declaration and the first method of the interface:
public class FakeWebService
{
  public int SleepDuration { get; set; }

  public FakeWebService()
  {
    SleepDuration = 1;
  }
  private Task Sleep()
  {
    return Task.Delay(SleepDuration);
  }
  public async Task<User> Login(string username, string password)
  {
    await Sleep();
    return new User { Id = "1", Username = username };
  }
}
We started off with a SleepDuration property to store a number in milliseconds. This is used to simulate an interaction with a web server, which can take some time. It is also useful for changing the SleepDuration value in different situations. For example, you might want to set this to a small number when writing unit tests so that the tests execute quickly.
Next, we implemented a simple Sleep method to return a task that introduces a delay of a number of milliseconds. This method will be used throughout the fake service to cause a delay on each operation.
Finally, the Login method merely used an await call on the Sleep method and returned a new User object with the appropriate Username. For now, any username or password combination will work; however, you might wish to write some code here to check specific credentials.
Now, let's implement a few more methods to continue our FakeWebService class as follows:
public async Task<User> Register(User user)
{
  await Sleep();

  return user;
}
public async Task<User[]> GetFriends(string userId)
{
  await Sleep();

  return new[]
  {
    new User { Id = "2", Username = "bobama" },
    new User { Id = "3", Username = "bobloblaw" },
    new User { Id = "4", Username = "gmichael" },
  };
}
public async Task<User> AddFriend(string userId, string username)
{
  await Sleep();
  return new User { Id = "5", Username = username };
}
For each of these methods, we used exactly the same pattern as the Login method. Each method will delay and return some sample data. Feel free to mix the data with your own values.
Now, let's implement the GetConversations method required by the interface as follows:
public async Task<Conversation[]> GetConversations(string userId)
        {
            await Sleep();

            return new[]
            {
                new Conversation { Id = "1", UserId = "2", Username = "bobama", LastMessage = "Hey!" },
                new Conversation { Id = "1", UserId = "3", Username = "bobloblaw", LastMessage = "Have you seen that new movie?" },
                new Conversation { Id = "1", UserId = "4", Username = "gmichael", LastMessage = "What?" },
            };
        }
Basically, we just create a new array of the Conversation objects with arbitrary IDs. We also make sure to match up the UserId values with the IDs we have used on the User objects so far.
Next, let's implement GetMessages to retrieve a list of messages as follows:
public async Task<Message[]> GetMessages(string conversationId)
        {
            await Sleep();

            return new[]
            {
                new Message
                {
                    Id = "1",
                    ConversationId = conversationId,
                    UserId = "2",
                    Text = "Hey",
                    Date = DateTime.Now.AddMinutes(-15),
                },
                new Message
                {
                    Id = "2",
                    ConversationId = conversationId,
                    UserId = "1",
                    Text = "What's Up?",
                    Date = DateTime.Now.AddMinutes(-10),
                },
                new Message
                {
                    Id = "3",
                    ConversationId = conversationId,
                    UserId = "2",
                    Text = "Have you seen that new movie?",
                    Date = DateTime.Now.AddMinutes(-5),
                },
                new Message
                {
                    Id = "4",
                    ConversationId = conversationId,
                    UserId = "1",
                    Text = "It's great!",
                    Date = DateTime.Now,
                },
            };
        }
Once again, we are adding some arbitrary data here, and mainly making sure that UserId and ConversationId match our existing data so far.
And finally, we will write one more method to send a message, as follows:
public async Task<Message> SendMessage(Message message)
{
  await Sleep();

  return message;
}
Most of these methods are very straightforward. Note that the service doesn't have to work perfectly; it should merely complete each operation successfully with a delay. Each method should also return test data of some kind to be displayed in the UI. This will give us the ability to implement our iOS and Android applications while filling in the web service later.
Next, we need to implement a simple interface for persisting application settings. Let's define an interface named ISettings as follows:
public interface ISettings
{
  User User { get; set; }
  void Save();
}
We are making ISettings synchronous, but you might want to set up the Save method to be asynchronous and return Task if you plan on storing settings in the cloud. We don't really need this with our application since we will only be saving our settings locally.
Later on, we'll implement this interface on each platform using Android and iOS APIs. For now, let's just implement a fake version that will be used later when we write unit tests. We will implement the interface with the following lines of code:
public class FakeSettings : ISettings
{
public User User { get; set; }
public void Save() { }
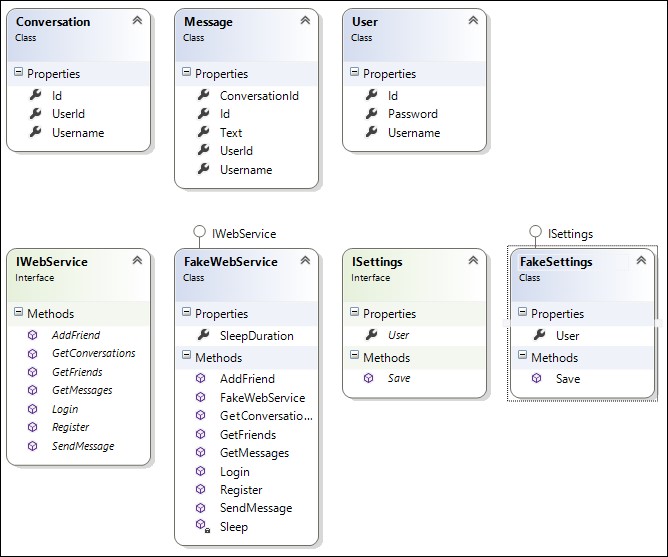
}Note that the fake version doesn't actually need to do anything; we just need to provide a class that will implement the interface and not throw any unexpected errors.
This completes the Model layer of the application. Here is a final class diagram of what we have implemented so far:
Now that we have our Model layer implemented, we can move on to write the ViewModel layer. The ViewModel layer will be responsible for presenting each operation to the UI and offering properties to be filled out by the View layer. Other common responsibilities of this layer are input validation and simple logic to display busy indicators.
At this point, it would be a good idea to include the ServiceContainer class from the previous chapter in our XamChat.Core project, as we will be using it throughout our ViewModel layer to interact with the Model layer. We will be using it as a simple option to support dependency injection and Inversion of Control. However, you can use another library of your preference for this.
Normally, we start off by writing a base class for all the ViewModel layers within our project. This class always has the functionalities shared by all the classes. It's a good place to put some parts of the code that are used by all the methods in the classes; for example, notification changes, methods, or similar instances.
Place the following code snippet in a new ViewModels folder within your project:
public class BaseViewModel
{
  protected readonly IWebService service = ServiceContainer.Resolve<IWebService>();
  protected readonly ISettings settings = ServiceContainer.Resolve<ISettings>();

  public event EventHandler IsBusyChanged = delegate { };

  private bool isBusy = false;
  public bool IsBusy
  {
    get { return isBusy; }
    set
    {
      isBusy = value;
      IsBusyChanged(this, EventArgs.Empty);
    }
  }
}
The BaseViewModel class is a great place to place any common functionality that you plan on reusing throughout your application. For this app, we only need to implement some functionality to indicate whether the ViewModel layer is busy. We provided a property and an event that the UI will be able to subscribe to and display a wait indicator on the screen. We also added some fields for the services that will be needed. Another common functionality that could be added would be validation for user inputs; however, we don't really need it for this application.
Now that we have a base class for all of the ViewModel layers, we can implement a ViewModel layer for the first screen in our application, the Login screen.
Now let's implement a LoginViewModel class as follows:
public class LoginViewModel : BaseViewModel
{
  public string Username { get; set; }
  public string Password { get; set; }
  public async Task Login()
  {
    if (string.IsNullOrEmpty(Username))
      throw new Exception("Username is blank.");

    if (string.IsNullOrEmpty(Password))
      throw new Exception("Password is blank.");

    IsBusy = true;
    try
    {
      settings.User = await service.Login(Username, Password);
      settings.Save();
    }
    finally
    {
      IsBusy = false;
    }
  }
}
In this class, we implemented the following:
- We subclassed
BaseViewModelto get access toIsBusyand the fields that contain common services - We added the
UsernameandPasswordproperties to be set by the View layer - We added a
Userproperty to be set when the login process is completed - We implemented a
Loginmethod to be called from View, with validation on theUsernameandPasswordproperties - We set
IsBusyduring the call to theLoginmethod onIWebService - We set the
Userproperty by awaiting the result fromLoginon the web service
Basically, this is the pattern that we'll follow for the rest of the ViewModel layers in the application. We provide properties for the View layer to be set by the user's input, and methods to call for various operations. If it is a method that could take some time, such as a web request, you should always return Task and use the async and await keywords.
Since we have finished writing our ViewModel class to log in, we will now need to create one for the user's registration.
Let's implement another ViewModel layer to register a new user:
public class RegisterViewModel : BaseViewModel
{
  public string Username { get; set; }
  public string Password { get; set; }
  public string ConfirmPassword { get; set; }
}
These properties will handle inputs from the user. Next, we need to add a Register method as follows:
public async Task Register()
{
  if (string.IsNullOrEmpty(Username))
    throw new Exception("Username is blank.");
  if (string.IsNullOrEmpty(Password))
    throw new Exception("Password is blank.");
  if (Password != ConfirmPassword)
    throw new Exception("Passwords don't match.");
  IsBusy = true;
  try
  {
    settings.User = await service.Register(new User { Username = Username, Password = Password, });
    settings.Save();
  }
  finally
  {
    IsBusy = false;
  }
}
The RegisterViewModel class is very similar to the LoginViewModel class, but has an additional ConfirmPassword property for the UI to be set. A good rule to follow for when to split the ViewModel layer's functionality is to always create a new class when the UI has a new screen. This helps you keep your code clean and somewhat follow the Single Responsibility Principal (SRP) for your classes. The SRP states that a class should only have a single purpose or responsibility. We'll try to follow this concept to keep our classes small and organized, which can be more important than usual when sharing code across platforms.
Next on the list is a ViewModel layer to work with a user's friend list. We will need a method to load a user's friend list and add a new friend.
Now let's implement the FriendViewModel as follows:
public class FriendViewModel : BaseViewModel
{
  public User[] Friends { get; private set; }
  public string Username { get; set; }
}
Now we'll need a method to load friends. This method is as follows:
public async Task GetFriends()
{
  if (settings.User == null)
    throw new Exception("Not logged in.");

  IsBusy = true;
  try
  {
    Friends = await service.GetFriends(settings.User.Id);
  }
  finally
  {
    IsBusy = false;
  }
}
Finally, we'll need a method to add a new friend and then update the list of friends contained locally:
public async Task AddFriend()
{
  if (settings.User == null)
    throw new Exception("Not logged in.");

  if (string.IsNullOrEmpty(Username))
    throw new Exception("Username is blank.");

  IsBusy = true;
  try
  {
    var friend = await service.AddFriend(settings.User.Id, Username);

    //Update our local list of friends
    var friends = new List<User>();
    if (Friends != null)
      friends.AddRange(Friends);
    friends.Add(friend);

    Friends = friends.OrderBy(f => f.Username).ToArray();
  }
  finally
  {
    IsBusy = false;
  }
}
Again, this class is fairly straightforward. The only thing new here is that we added some logic to update the list of friends and sort them within our client application and not the server. You can also choose to reload the complete list of friends if you have a good reason to do so.
Our final required ViewModel layer will handle messages and conversations. We need to create a way to load conversations and messages and send a new message.
Let's start implementing our MessageViewModel class as follows:
public class MessageViewModel : BaseViewModel
{
  public Conversation[] Conversations { get; private set; }
  public Conversation Conversation { get; set; }
  public Message[] Messages { get; private set; }
  public string Text { get; set; }
}
Next, let's implement a method to retrieve a list of conversations as follows:
public async Task GetConversations()
{
  if (settings.User == null)
    throw new Exception("Not logged in.");

  IsBusy = true;
  try
  {
    Conversations = await service.GetConversations(settings.User.Id);
  }
  finally
  {
    IsBusy = false;
  }
}
Similarly, we need to retrieve a list of messages within a conversation. We will need to pass the conversation ID to the service as follows:
public async Task GetMessages()
{
  if (Conversation == null)
    throw new Exception("No conversation.");

  IsBusy = true;
  try
  {
    Messages = await service.GetMessages(Conversation.Id);
  }
  finally
  {
    IsBusy = false;
  }
}
Finally, we need to write some code to send a message and update the local list of messages as follows:
public async Task SendMessage()
{
  if (settings.User == null)
    throw new Exception("Not logged in.");

  if (Conversation == null)
    throw new Exception("No conversation.");

  if (string.IsNullOrEmpty (Text))
    throw new Exception("Message is blank.");

  IsBusy = true;
  try
  {
    var message = await service.SendMessage(new Message
    {
      UserId = settings.User.Id,ConversationId = Conversation.Id,
      Text = Text
    });
    //Update our local list of messages
    var messages = new List<Message>();
    if (Messages != null)
      messages.AddRange(Messages);
    messages.Add(message);

    Messages = messages.ToArray();
  }
  finally
  {IsBusy = false;
  }
}
This concludes the ViewModel layer of our application and the entirety of the shared code used on iOS and Android. For the MessageViewModel class, you could have also chosen to put the GetConversations and Conversations properties in their own class, since they can be considered as a separate responsibility, but it is not really necessary.
Here is the final class diagram of our ViewModel layer:
Implementing our LoginViewModel class
Now that we have a base class for all of the ViewModel layers, we can implement a ViewModel layer for the first screen in our application, the Login screen.
Now let's implement a LoginViewModel class as follows:
public class LoginViewModel : BaseViewModel
{
  public string Username { get; set; }
  public string Password { get; set; }
  public async Task Login()
  {
    if (string.IsNullOrEmpty(Username))
      throw new Exception("Username is blank.");

    if (string.IsNullOrEmpty(Password))
      throw new Exception("Password is blank.");

    IsBusy = true;
    try
    {
      settings.User = await service.Login(Username, Password);
      settings.Save();
    }
    finally
    {
      IsBusy = false;
    }
  }
}
In this class, we implemented the following:
- We subclassed
BaseViewModelto get access toIsBusyand the fields that contain common services - We added the
UsernameandPasswordproperties to be set by the View layer - We added a
Userproperty to be set when the login process is completed - We implemented a
Loginmethod to be called from View, with validation on theUsernameandPasswordproperties - We set
IsBusyduring the call to theLoginmethod onIWebService - We set the
Userproperty by awaiting the result fromLoginon the web service
Basically, this is the pattern that we'll follow for the rest of the ViewModel layers in the application. We provide properties for the View layer to be set by the user's input, and methods to call for various operations. If it is a method that could take some time, such as a web request, you should always return Task and use the async and await keywords.
Since we have finished writing our ViewModel class to log in, we will now need to create one for the user's registration.
Let's implement another ViewModel layer to register a new user:
public class RegisterViewModel : BaseViewModel
{
  public string Username { get; set; }
  public string Password { get; set; }
  public string ConfirmPassword { get; set; }
}
These properties will handle inputs from the user. Next, we need to add a Register method as follows:
public async Task Register()
{
  if (string.IsNullOrEmpty(Username))
    throw new Exception("Username is blank.");
  if (string.IsNullOrEmpty(Password))
    throw new Exception("Password is blank.");
  if (Password != ConfirmPassword)
    throw new Exception("Passwords don't match.");
  IsBusy = true;
  try
  {
    settings.User = await service.Register(new User { Username = Username, Password = Password, });
    settings.Save();
  }
  finally
  {
    IsBusy = false;
  }
}
The RegisterViewModel class is very similar to the LoginViewModel class, but has an additional ConfirmPassword property for the UI to be set. A good rule to follow for when to split the ViewModel layer's functionality is to always create a new class when the UI has a new screen. This helps you keep your code clean and somewhat follow the Single Responsibility Principal (SRP) for your classes. The SRP states that a class should only have a single purpose or responsibility. We'll try to follow this concept to keep our classes small and organized, which can be more important than usual when sharing code across platforms.
Next on the list is a ViewModel layer to work with a user's friend list. We will need a method to load a user's friend list and add a new friend.
Now let's implement the FriendViewModel as follows:
public class FriendViewModel : BaseViewModel
{
  public User[] Friends { get; private set; }
  public string Username { get; set; }
}
Now we'll need a method to load friends. This method is as follows:
public async Task GetFriends()
{
  if (settings.User == null)
    throw new Exception("Not logged in.");

  IsBusy = true;
  try
  {
    Friends = await service.GetFriends(settings.User.Id);
  }
  finally
  {
    IsBusy = false;
  }
}
Finally, we'll need a method to add a new friend and then update the list of friends contained locally:
public async Task AddFriend()
{
  if (settings.User == null)
    throw new Exception("Not logged in.");

  if (string.IsNullOrEmpty(Username))
    throw new Exception("Username is blank.");

  IsBusy = true;
  try
  {
    var friend = await service.AddFriend(settings.User.Id, Username);

    //Update our local list of friends
    var friends = new List<User>();
    if (Friends != null)
      friends.AddRange(Friends);
    friends.Add(friend);

    Friends = friends.OrderBy(f => f.Username).ToArray();
  }
  finally
  {
    IsBusy = false;
  }
}
Again, this class is fairly straightforward. The only thing new here is that we added some logic to update the list of friends and sort them within our client application and not the server. You can also choose to reload the complete list of friends if you have a good reason to do so.
Our final required ViewModel layer will handle messages and conversations. We need to create a way to load conversations and messages and send a new message.
Let's start implementing our MessageViewModel class as follows:
public class MessageViewModel : BaseViewModel
{
  public Conversation[] Conversations { get; private set; }
  public Conversation Conversation { get; set; }
  public Message[] Messages { get; private set; }
  public string Text { get; set; }
}
Next, let's implement a method to retrieve a list of conversations as follows:
public async Task GetConversations()
{
  if (settings.User == null)
    throw new Exception("Not logged in.");

  IsBusy = true;
  try
  {
    Conversations = await service.GetConversations(settings.User.Id);
  }
  finally
  {
    IsBusy = false;
  }
}
Similarly, we need to retrieve a list of messages within a conversation. We will need to pass the conversation ID to the service as follows:
public async Task GetMessages()
{
  if (Conversation == null)
    throw new Exception("No conversation.");

  IsBusy = true;
  try
  {
    Messages = await service.GetMessages(Conversation.Id);
  }
  finally
  {
    IsBusy = false;
  }
}
Finally, we need to write some code to send a message and update the local list of messages as follows:
public async Task SendMessage()
{
  if (settings.User == null)
    throw new Exception("Not logged in.");

  if (Conversation == null)
    throw new Exception("No conversation.");

  if (string.IsNullOrEmpty (Text))
    throw new Exception("Message is blank.");

  IsBusy = true;
  try
  {
    var message = await service.SendMessage(new Message
    {
      UserId = settings.User.Id,ConversationId = Conversation.Id,
      Text = Text
    });
    //Update our local list of messages
    var messages = new List<Message>();
    if (Messages != null)
      messages.AddRange(Messages);
    messages.Add(message);

    Messages = messages.ToArray();
  }
  finally
  {IsBusy = false;
  }
}
This concludes the ViewModel layer of our application and the entirety of the shared code used on iOS and Android. For the MessageViewModel class, you could have also chosen to put the GetConversations and Conversations properties in their own class, since they can be considered as a separate responsibility, but it is not really necessary.
Here is the final class diagram of our ViewModel layer:
Implementing our RegisterViewModel class
Since we have finished writing our ViewModel class to log in, we will now need to create one for the user's registration.
Let's implement another ViewModel layer to register a new user:
public class RegisterViewModel : BaseViewModel
{
  public string Username { get; set; }
  public string Password { get; set; }
  public string ConfirmPassword { get; set; }
}
These properties will handle inputs from the user. Next, we need to add a Register method as follows:
public async Task Register()
{
  if (string.IsNullOrEmpty(Username))
    throw new Exception("Username is blank.");
  if (string.IsNullOrEmpty(Password))
    throw new Exception("Password is blank.");
  if (Password != ConfirmPassword)
    throw new Exception("Passwords don't match.");
  IsBusy = true;
  try
  {
    settings.User = await service.Register(new User { Username = Username, Password = Password, });
    settings.Save();
  }
  finally
  {
    IsBusy = false;
  }
}
The RegisterViewModel class is very similar to the LoginViewModel class, but has an additional ConfirmPassword property for the UI to be set. A good rule to follow for when to split the ViewModel layer's functionality is to always create a new class when the UI has a new screen. This helps you keep your code clean and somewhat follow the Single Responsibility Principal (SRP) for your classes. The SRP states that a class should only have a single purpose or responsibility. We'll try to follow this concept to keep our classes small and organized, which can be more important than usual when sharing code across platforms.
Next on the list is a ViewModel layer to work with a user's friend list. We will need a method to load a user's friend list and add a new friend.
Now let's implement the FriendViewModel as follows:
public class FriendViewModel : BaseViewModel
{
  public User[] Friends { get; private set; }
  public string Username { get; set; }
}
Now we'll need a method to load friends. This method is as follows:
public async Task GetFriends()
{
  if (settings.User == null)
    throw new Exception("Not logged in.");

  IsBusy = true;
  try
  {
    Friends = await service.GetFriends(settings.User.Id);
  }
  finally
  {
    IsBusy = false;
  }
}
Finally, we'll need a method to add a new friend and then update the list of friends contained locally:
public async Task AddFriend()
{
  if (settings.User == null)
    throw new Exception("Not logged in.");

  if (string.IsNullOrEmpty(Username))
    throw new Exception("Username is blank.");

  IsBusy = true;
  try
  {
    var friend = await service.AddFriend(settings.User.Id, Username);

    //Update our local list of friends
    var friends = new List<User>();
    if (Friends != null)
      friends.AddRange(Friends);
    friends.Add(friend);

    Friends = friends.OrderBy(f => f.Username).ToArray();
  }
  finally
  {
    IsBusy = false;
  }
}
Again, this class is fairly straightforward. The only thing new here is that we added some logic to update the list of friends and sort them within our client application and not the server. You can also choose to reload the complete list of friends if you have a good reason to do so.
Our final required ViewModel layer will handle messages and conversations. We need to create a way to load conversations and messages and send a new message.
Let's start implementing our MessageViewModel class as follows:
public class MessageViewModel : BaseViewModel
{
  public Conversation[] Conversations { get; private set; }
  public Conversation Conversation { get; set; }
  public Message[] Messages { get; private set; }
  public string Text { get; set; }
}
Next, let's implement a method to retrieve a list of conversations as follows:
public async Task GetConversations()
{
  if (settings.User == null)
    throw new Exception("Not logged in.");

  IsBusy = true;
  try
  {
    Conversations = await service.GetConversations(settings.User.Id);
  }
  finally
  {
    IsBusy = false;
  }
}
Similarly, we need to retrieve a list of messages within a conversation. We will need to pass the conversation ID to the service as follows:
public async Task GetMessages()
{
  if (Conversation == null)
    throw new Exception("No conversation.");

  IsBusy = true;
  try
  {
    Messages = await service.GetMessages(Conversation.Id);
  }
  finally
  {
    IsBusy = false;
  }
}
Finally, we need to write some code to send a message and update the local list of messages as follows:
public async Task SendMessage()
{
  if (settings.User == null)
    throw new Exception("Not logged in.");

  if (Conversation == null)
    throw new Exception("No conversation.");

  if (string.IsNullOrEmpty (Text))
    throw new Exception("Message is blank.");

  IsBusy = true;
  try
  {
    var message = await service.SendMessage(new Message
    {
      UserId = settings.User.Id,ConversationId = Conversation.Id,
      Text = Text
    });
    //Update our local list of messages
    var messages = new List<Message>();
    if (Messages != null)
      messages.AddRange(Messages);
    messages.Add(message);

    Messages = messages.ToArray();
  }
  finally
  {IsBusy = false;
  }
}
This concludes the ViewModel layer of our application and the entirety of the shared code used on iOS and Android. For the MessageViewModel class, you could have also chosen to put the GetConversations and Conversations properties in their own class, since they can be considered as a separate responsibility, but it is not really necessary.
Here is the final class diagram of our ViewModel layer:
Implementing our FriendViewModel class
Next on the list is a ViewModel layer to work with a user's friend list. We will need a method to load a user's friend list and add a new friend.
Now let's implement the FriendViewModel as follows:
public class FriendViewModel : BaseViewModel
{
  public User[] Friends { get; private set; }
  public string Username { get; set; }
}
Now we'll need a method to load friends. This method is as follows:
public async Task GetFriends()
{
  if (settings.User == null)
    throw new Exception("Not logged in.");

  IsBusy = true;
  try
  {
    Friends = await service.GetFriends(settings.User.Id);
  }
  finally
  {
    IsBusy = false;
  }
}
Finally, we'll need a method to add a new friend and then update the list of friends contained locally:
public async Task AddFriend()
{
  if (settings.User == null)
    throw new Exception("Not logged in.");

  if (string.IsNullOrEmpty(Username))
    throw new Exception("Username is blank.");

  IsBusy = true;
  try
  {
    var friend = await service.AddFriend(settings.User.Id, Username);

    //Update our local list of friends
    var friends = new List<User>();
    if (Friends != null)
      friends.AddRange(Friends);
    friends.Add(friend);

    Friends = friends.OrderBy(f => f.Username).ToArray();
  }
  finally
  {
    IsBusy = false;
  }
}
Again, this class is fairly straightforward. The only thing new here is that we added some logic to update the list of friends and sort them within our client application and not the server. You can also choose to reload the complete list of friends if you have a good reason to do so.
Our final required ViewModel layer will handle messages and conversations. We need to create a way to load conversations and messages and send a new message.
Let's start implementing our MessageViewModel class as follows:
public class MessageViewModel : BaseViewModel
{
  public Conversation[] Conversations { get; private set; }
  public Conversation Conversation { get; set; }
  public Message[] Messages { get; private set; }
  public string Text { get; set; }
}
Next, let's implement a method to retrieve a list of conversations as follows:
public async Task GetConversations()
{
  if (settings.User == null)
    throw new Exception("Not logged in.");

  IsBusy = true;
  try
  {
    Conversations = await service.GetConversations(settings.User.Id);
  }
  finally
  {
    IsBusy = false;
  }
}
Similarly, we need to retrieve a list of messages within a conversation. We will need to pass the conversation ID to the service as follows:
public async Task GetMessages()
{
  if (Conversation == null)
    throw new Exception("No conversation.");

  IsBusy = true;
  try
  {
    Messages = await service.GetMessages(Conversation.Id);
  }
  finally
  {
    IsBusy = false;
  }
}
Finally, we need to write some code to send a message and update the local list of messages as follows:
public async Task SendMessage()
{
  if (settings.User == null)
    throw new Exception("Not logged in.");

  if (Conversation == null)
    throw new Exception("No conversation.");

  if (string.IsNullOrEmpty (Text))
    throw new Exception("Message is blank.");

  IsBusy = true;
  try
  {
    var message = await service.SendMessage(new Message
    {
      UserId = settings.User.Id,ConversationId = Conversation.Id,
      Text = Text
    });
    //Update our local list of messages
    var messages = new List<Message>();
    if (Messages != null)
      messages.AddRange(Messages);
    messages.Add(message);

    Messages = messages.ToArray();
  }
  finally
  {IsBusy = false;
  }
}
This concludes the ViewModel layer of our application and the entirety of the shared code used on iOS and Android. For the MessageViewModel class, you could have also chosen to put the GetConversations and Conversations properties in their own class, since they can be considered as a separate responsibility, but it is not really necessary.
Here is the final class diagram of our ViewModel layer:
Implementing our MessageViewModel class
Our final required ViewModel layer will handle messages and conversations. We need to create a way to load conversations and messages and send a new message.
Let's start implementing our MessageViewModel class as follows:
public class MessageViewModel : BaseViewModel
{
  public Conversation[] Conversations { get; private set; }
  public Conversation Conversation { get; set; }
  public Message[] Messages { get; private set; }
  public string Text { get; set; }
}
Next, let's implement a method to retrieve a list of conversations as follows:
public async Task GetConversations()
{
  if (settings.User == null)
    throw new Exception("Not logged in.");

  IsBusy = true;
  try
  {
    Conversations = await service.GetConversations(settings.User.Id);
  }
  finally
  {
    IsBusy = false;
  }
}
Similarly, we need to retrieve a list of messages within a conversation. We will need to pass the conversation ID to the service as follows:
public async Task GetMessages()
{
  if (Conversation == null)
    throw new Exception("No conversation.");

  IsBusy = true;
  try
  {
    Messages = await service.GetMessages(Conversation.Id);
  }
  finally
  {
    IsBusy = false;
  }
}
Finally, we need to write some code to send a message and update the local list of messages as follows:
public async Task SendMessage()
{
if (settings.User == null)
throw new Exception("Not logged in.");
if (Conversation == null)
throw new Exception("No conversation.");
if (string.IsNullOrEmpty (Text))
throw new Exception("Message is blank.");
IsBusy = true;
try
{
var message = await service.SendMessage(new Message
{
UserId = settings.User.Id,ConversationId = Conversation.Id,
Text = Text
});
//Update our local list of messages
var messages = new List<Message>();
if (Messages != null)
messages.AddRange(Messages);
messages.Add(message);
Messages = messages.ToArray();
}
finally
{IsBusy = false;
}
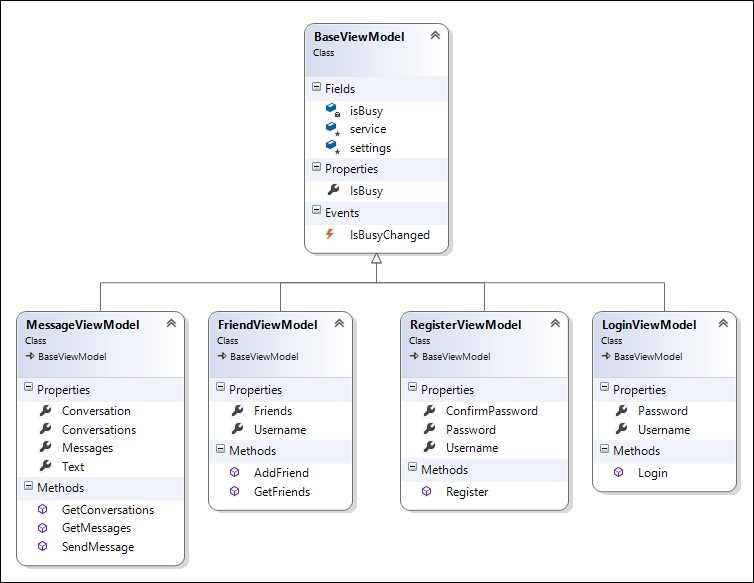
}This concludes the ViewModel layer of our application and the entirety of the shared code used on iOS and Android. For the MessageViewModel class, you could have also chosen to put the GetConversations and Conversations properties in their own class, since they can be considered as a separate responsibility, but it is not really necessary.
Here is the final class diagram of our ViewModel layer:
Since all the code we've written so far is not dependent on the user interface, we can easily write unit tests against our classes. This step is generally taken after the first implementation of a ViewModel class. Proponents of Test Driven Development (TDD) would recommend writing tests first and implementing things afterward, so choose which method is best for you. In either case, it is a good idea to write tests against your shared code before you start using them from the View layer, so that you can catch bugs before they hold up your development on the UI.
Xamarin projects take advantage of an open source testing framework called NUnit. It was originally derived from a Java testing framework called JUnit, and it is the de-facto standard for unit testing C# applications. Xamarin Studio provides several project templates for writing tests with NUnit.
Let's set up a new project for unit tests by performing the following steps:
- Add a new NUnit Library Project to your solution, which is found under the C# section.
- Name the project
XamChat.Teststo keep things consistent. - Next, let's set the library to a Mono/.NET 4.5 project under Project Options, then navigate to Build | General | Target Framework.
- Right-click on Project References and choose Edit References.
- Under the Projects tab, add a reference to XamChat.Core.
- Now, open the
Test.csfile and you will notice the following required attributes that make up a unit test using NUnit:using NUnit.Framework: This attribute is the main statement to be used to work with NUnit[TestFixture]: This decorates a class to indicate that the class has a list of methods for running tests[Test]: This decorates a method to indicate a test
In addition to the required C# attributes, there are several others that are useful for writing tests, and they are as follows:
[TestFixtureSetUp]: This decorates a method that runs before all the tests contained within a text fixture class.[SetUp]: This decorates a method that runs before each test in a test fixture class.[TearDown]: This decorates a method that runs after each test in a test fixture class.[TestFixtureTearDown]: This decorates a method that runs after all the tests in a text fixture class have been completed.[ExpectedException]: This decorates a method that is intended to throw an exception. It is useful for test cases that are supposed to fail.[Category]: This decorates a test method and can be used to organize different tests; for example, you might categorize them as fast and slow tests.
The next concept to learn about writing tests with NUnit is how to write assertions. An assertion is a method that will throw an exception if a certain value is not true. It will cause a test to fail and give a descriptive explanation as to what happened. NUnit has a couple of different sets of APIs for assertions; however, we will use the more readable and fluent versions of the APIs.
The basic syntax of a fluent-style API is using the Assert.That method. The following example this:
Assert.That(myVariable, Is.EqualTo(0));
Likewise, you can assert the opposite:
Assert.That(myVariable, Is.Not.EqualTo(0));
Or any of the following:
Assert.That(myVariable, Is.GreaterThan(0));Assert.That(myBooleanVariable, Is.True);Assert.That(myObject, Is.Not.Null);
Feel free to explore the APIs. With code completion in Xamarin Studio, you should be able to discover useful static members or methods on the Is class to use within your tests.
Before we begin writing specific tests for our application, let's write a static class and method to create a global setup to be used throughout our tests. You can rewrite Test.cs as follows:
public static class Test
{
  public static void SetUp()
  {
    ServiceContainer.Register<IWebService>(() =>new FakeWebService { SleepDuration = 0 });
    ServiceContainer.Register<ISettings>(() =>new FakeSettings());
  }
}
We'll use this method throughout our tests to set up fake services in our Model layer. Additionally, this replaces the existing services so that our tests execute against new instances of these classes. This is a good practice in unit testing to guarantee that no old data is left behind from a previous test. Also, notice that we set SleepDuration to 0. This will make our tests run very quickly.
We will begin by creating a ViewModels folder in our test project and adding a class named LoginViewModelTests as follows:
[TestFixture]
public class LoginViewModelTests
{
  LoginViewModel loginViewModel;
  ISettings settings;
  [SetUp]
  public void SetUp()
  {
    Test.SetUp();
    settings = ServiceContainer.Resolve<ISettings>();
    loginViewModel = new LoginViewModel();
  }
  [Test]
  public async Task LoginSuccessfully()
  {
    loginViewModel.Username = "testuser";
    loginViewModel.Password = "password";
    await loginViewModel.Login();
    Assert.That(settings.User, Is.Not.Null);
  }
}
Notice our use of a SetUp method. We recreate the objects used in every test to make sure that no old data is left over from the previous test runs. Another point to note is that you must return a Task when using async/await in a test method. Otherwise, NUnit would not be able to know when a test completes.
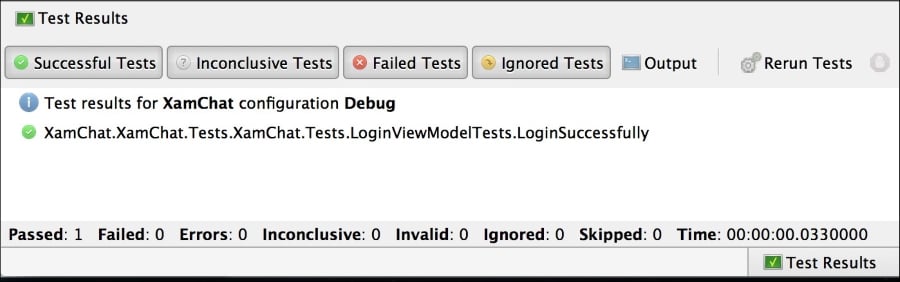
To run the test, use the NUnit menu found docked to the right of Xamarin Studio, by default. Go ahead and run the test using the Run Test button that has a gear icon. You will get a successful result similar to what is shown in the following screenshot:
You can also view the Test Results pane, which will show you the extended details if a test fails, as shown in the following screenshot:
To see what happens when a test fails, go ahead and modify your test to assert against an incorrect value as follows:
//Change Is.Not.Null to Is.Null
Assert.That(settings.User, Is.Null);
You will get a very descriptive error in the Test Results pane, as shown in the following screenshot:
Now let's implement another test for the LoginViewModel class; let's make sure that we get the appropriate outcome if the username and password fields are blank. The test is implemented as follows:
[Test]
public async Task LoginWithNoUsernameOrPassword()
{
  //Throws an exception
  await loginViewModel.Login();
}
If we run the test as it is, we will get an exception and the test will fail. Since we expect an exception to occur, we can decorate the method to make the test pass only if an exception occurs as follows:
[Test,
  ExpectedException(typeof(Exception),
  ExpectedMessage = "Username is blank.")]
More tests are included with the sample code along with this module. It is recommended that you write tests against each public operation on each ViewModel class. Additionally, write tests for any validation or other important business logic. I would also recommend that you write tests against the Model layer; however, this is not needed in our project yet since we only have fake implementations.
Setting up a new project for unit tests
Let's set up a new project for unit tests by performing the following steps:
- Add a new NUnit Library Project to your solution, which is found under the C# section.
- Name the project
XamChat.Teststo keep things consistent. - Next, let's set the library to a Mono/.NET 4.5 project under Project Options, then navigate to Build | General | Target Framework.
- Right-click on Project References and choose Edit References.
- Under the Projects tab, add a reference to XamChat.Core.
- Now, open the
Test.csfile and you will notice the following required attributes that make up a unit test using NUnit:using NUnit.Framework: This attribute is the main statement to be used to work with NUnit[TestFixture]: This decorates a class to indicate that the class has a list of methods for running tests[Test]: This decorates a method to indicate a test
In addition to the required C# attributes, there are several others that are useful for writing tests, and they are as follows:
[TestFixtureSetUp]: This decorates a method that runs before all the tests contained within a text fixture class.[SetUp]: This decorates a method that runs before each test in a test fixture class.[TearDown]: This decorates a method that runs after each test in a test fixture class.[TestFixtureTearDown]: This decorates a method that runs after all the tests in a text fixture class have been completed.[ExpectedException]: This decorates a method that is intended to throw an exception. It is useful for test cases that are supposed to fail.[Category]: This decorates a test method and can be used to organize different tests; for example, you might categorize them as fast and slow tests.
The next concept to learn about writing tests with NUnit is how to write assertions. An assertion is a method that will throw an exception if a certain value is not true. It will cause a test to fail and give a descriptive explanation as to what happened. NUnit has a couple of different sets of APIs for assertions; however, we will use the more readable and fluent versions of the APIs.
The basic syntax of a fluent-style API is using the Assert.That method. The following example this:
Assert.That(myVariable, Is.EqualTo(0));
Likewise, you can assert the opposite:
Assert.That(myVariable, Is.Not.EqualTo(0));
Or any of the following:
Assert.That(myVariable, Is.GreaterThan(0));Assert.That(myBooleanVariable, Is.True);Assert.That(myObject, Is.Not.Null);
Feel free to explore the APIs. With code completion in Xamarin Studio, you should be able to discover useful static members or methods on the Is class to use within your tests.
Before we begin writing specific tests for our application, let's write a static class and method to create a global setup to be used throughout our tests. You can rewrite Test.cs as follows:
public static class Test
{
  public static void SetUp()
  {
    ServiceContainer.Register<IWebService>(() =>new FakeWebService { SleepDuration = 0 });
    ServiceContainer.Register<ISettings>(() =>new FakeSettings());
  }
}
We'll use this method throughout our tests to set up fake services in our Model layer. Additionally, this replaces the existing services so that our tests execute against new instances of these classes. This is a good practice in unit testing to guarantee that no old data is left behind from a previous test. Also, notice that we set SleepDuration to 0. This will make our tests run very quickly.
We will begin by creating a ViewModels folder in our test project and adding a class named LoginViewModelTests as follows:
[TestFixture]
public class LoginViewModelTests
{
  LoginViewModel loginViewModel;
  ISettings settings;
  [SetUp]
  public void SetUp()
  {
    Test.SetUp();
    settings = ServiceContainer.Resolve<ISettings>();
    loginViewModel = new LoginViewModel();
  }
  [Test]
  public async Task LoginSuccessfully()
  {
    loginViewModel.Username = "testuser";
    loginViewModel.Password = "password";
    await loginViewModel.Login();
    Assert.That(settings.User, Is.Not.Null);
  }
}
Notice our use of a SetUp method. We recreate the objects used in every test to make sure that no old data is left over from the previous test runs. Another point to note is that you must return a Task when using async/await in a test method. Otherwise, NUnit would not be able to know when a test completes.
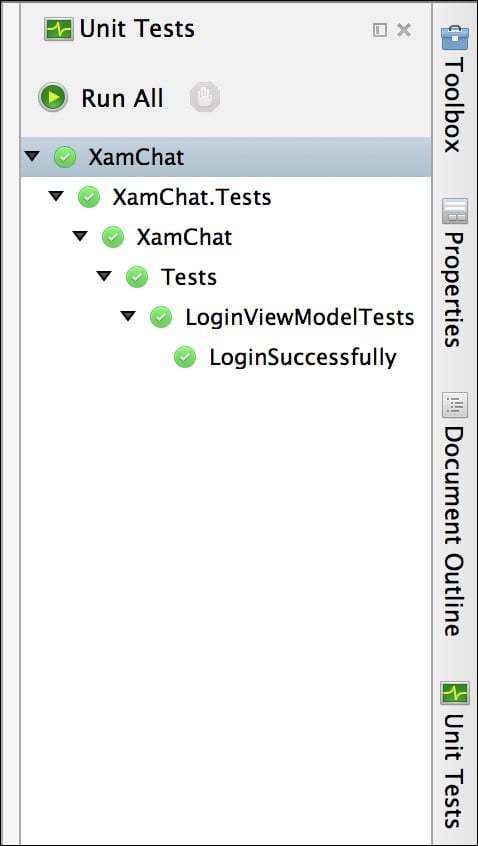
To run the test, use the NUnit menu found docked to the right of Xamarin Studio, by default. Go ahead and run the test using the Run Test button that has a gear icon. You will get a successful result similar to what is shown in the following screenshot:
You can also view the Test Results pane, which will show you the extended details if a test fails, as shown in the following screenshot:
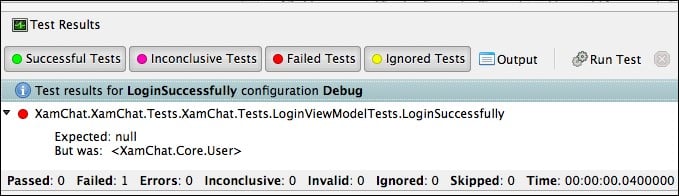
To see what happens when a test fails, go ahead and modify your test to assert against an incorrect value as follows:
//Change Is.Not.Null to Is.Null
Assert.That(settings.User, Is.Null);
You will get a very descriptive error in the Test Results pane, as shown in the following screenshot:
Now let's implement another test for the LoginViewModel class; let's make sure that we get the appropriate outcome if the username and password fields are blank. The test is implemented as follows:
[Test]
public async Task LoginWithNoUsernameOrPassword()
{
  //Throws an exception
  await loginViewModel.Login();
}
If we run the test as it is, we will get an exception and the test will fail. Since we expect an exception to occur, we can decorate the method to make the test pass only if an exception occurs as follows:
[Test,
  ExpectedException(typeof(Exception),
  ExpectedMessage = "Username is blank.")]
More tests are included with the sample code along with this module. It is recommended that you write tests against each public operation on each ViewModel class. Additionally, write tests for any validation or other important business logic. I would also recommend that you write tests against the Model layer; however, this is not needed in our project yet since we only have fake implementations.
Writing assertions
The next concept to learn about writing tests with NUnit is how to write assertions. An assertion is a method that will throw an exception if a certain value is not true. It will cause a test to fail and give a descriptive explanation as to what happened. NUnit has a couple of different sets of APIs for assertions; however, we will use the more readable and fluent versions of the APIs.
The basic syntax of a fluent-style API is using the Assert.That method. The following example this:
Assert.That(myVariable, Is.EqualTo(0));
Likewise, you can assert the opposite:
Assert.That(myVariable, Is.Not.EqualTo(0));
Or any of the following:
Assert.That(myVariable, Is.GreaterThan(0));Assert.That(myBooleanVariable, Is.True);Assert.That(myObject, Is.Not.Null);
Feel free to explore the APIs. With code completion in Xamarin Studio, you should be able to discover useful static members or methods on the Is class to use within your tests.
Before we begin writing specific tests for our application, let's write a static class and method to create a global setup to be used throughout our tests. You can rewrite Test.cs as follows:
public static class Test
{
  public static void SetUp()
  {
    ServiceContainer.Register<IWebService>(() =>new FakeWebService { SleepDuration = 0 });
    ServiceContainer.Register<ISettings>(() =>new FakeSettings());
  }
}
We'll use this method throughout our tests to set up fake services in our Model layer. Additionally, this replaces the existing services so that our tests execute against new instances of these classes. This is a good practice in unit testing to guarantee that no old data is left behind from a previous test. Also, notice that we set SleepDuration to 0. This will make our tests run very quickly.
We will begin by creating a ViewModels folder in our test project and adding a class named LoginViewModelTests as follows:
[TestFixture]
public class LoginViewModelTests
{
  LoginViewModel loginViewModel;
  ISettings settings;
  [SetUp]
  public void SetUp()
  {
    Test.SetUp();
    settings = ServiceContainer.Resolve<ISettings>();
    loginViewModel = new LoginViewModel();
  }
  [Test]
  public async Task LoginSuccessfully()
  {
    loginViewModel.Username = "testuser";
    loginViewModel.Password = "password";
    await loginViewModel.Login();
    Assert.That(settings.User, Is.Not.Null);
  }
}
Notice our use of a SetUp method. We recreate the objects used in every test to make sure that no old data is left over from the previous test runs. Another point to note is that you must return a Task when using async/await in a test method. Otherwise, NUnit would not be able to know when a test completes.
To run the test, use the NUnit menu found docked to the right of Xamarin Studio, by default. Go ahead and run the test using the Run Test button that has a gear icon. You will get a successful result similar to what is shown in the following screenshot:
You can also view the Test Results pane, which will show you the extended details if a test fails, as shown in the following screenshot:
To see what happens when a test fails, go ahead and modify your test to assert against an incorrect value as follows:
//Change Is.Not.Null to Is.Null
Assert.That(settings.User, Is.Null);
You will get a very descriptive error in the Test Results pane, as shown in the following screenshot:
Now let's implement another test for the LoginViewModel class; let's make sure that we get the appropriate outcome if the username and password fields are blank. The test is implemented as follows:
[Test]
public async Task LoginWithNoUsernameOrPassword()
{
  //Throws an exception
  await loginViewModel.Login();
}
If we run the test as it is, we will get an exception and the test will fail. Since we expect an exception to occur, we can decorate the method to make the test pass only if an exception occurs as follows:
[Test,
  ExpectedException(typeof(Exception),
  ExpectedMessage = "Username is blank.")]
More tests are included with the sample code along with this module. It is recommended that you write tests against each public operation on each ViewModel class. Additionally, write tests for any validation or other important business logic. I would also recommend that you write tests against the Model layer; however, this is not needed in our project yet since we only have fake implementations.
In this chapter, we went through the concept of building a sample application called XamChat. We also implemented the core business objects for the application in the Model layer. Since we do not have a server to support this application yet, we implemented a fake web service. This gives you the flexibility to move forward with the app without building a server application. We also implemented the ViewModel layer. This layer will expose operations in a simple way to the View layer. Finally, we wrote tests covering the code we've written so far using NUnit. Writing tests against shared code in a cross-platform application can be very important, as it is the backbone of more than one application.
After completing this chapter, you should have completed the shared library for our cross-platform application in its entirety. You should have a very firm grasp on our application's architecture and its distinct Model and ViewModel layers. You should also have a good understanding of how to write fake versions of parts of your application that you might not be ready to implement yet. In the next chapter, we will implement the iOS version of XamChat.