

In the previous chapters, you learned about the many different machine learning concepts and algorithms that can help us with better and more efficient decision-making. However, machine learning techniques are not limited to offline applications and analyses, and they can be the predictive engine of your web services. For example, popular and useful applications of machine learning models in web applications include spam detection in submission forms, search engines, recommendation systems for media or shopping portals, and many more.
In this chapter, you will learn how to embed a machine learning model into a web application that can not only classify but also learn from data in real-time. The topics that we will cover are as follows:
- Saving the current state of a trained machine learning model
- Using SQLite databases for data storage
- Developing a web application using the popular Flask web framework
- Deploying a machine learning application to a public web server
Training a machine learning model can be computationally quite expensive, as we have seen in Chapter 8, Applying Machine Learning to Sentiment Analysis. Surely, we don't want to train our model every time we close our Python interpreter and want to make a new prediction or reload our web application? One option for model persistence is Python's in-built pickle module (https://docs.python.org/3.4/library/pickle.html), which allows us to serialize and de-serialize Python object structures to compact byte code, so that we can save our classifier in its current state and reload it if we want to classify new samples without needing to learn the model from the training data all over again. Before you execute the following code, please make sure that you have trained the out-of-core logistic regression model from the last section of Chapter 8, Applying Machine Learning to Sentiment Analysis, and have it ready in your current Python session:
>>> import pickle
>>> import os
>>> dest = os.path.join('movieclassifier', 'pkl_objects')
>>> if not os.path.exists(dest):
... os.makedirs(dest)
>>> pickle.dump(stop,
... open(os.path.join(dest, 'stopwords.pkl'),'wb'),
... protocol=4)
>>> pickle.dump(clf,
... open(os.path.join(dest, 'classifier.pkl'), 'wb'),
... protocol=4)Using the preceding code, we created a movieclassifier directory where we will later store the files and data for our web application. Within this movieclassifier directory, we created a pkl_objects subdirectory to save the serialized Python objects to our local drive. Via pickle's dump method, we then serialized the trained logistic regression model as well as the stop word set from the NLTK library so that we don't have to install the NLTK vocabulary on our server. The dump method takes as its first argument the object that we want to pickle, and for the second argument we provided an open file object that the Python object will be written to. Via the wb argument inside the open function, we opened the file in binary mode for pickle, and we set protocol=4 to choose the latest and most efficient pickle protocol that has been added to Python 3.4. (If you have problems using protocol 4, please check if you are using the latest Python 3 version install. Alternatively, you may consider choosing a lower protocol number)
Note
Our logistic regression model contains several NumPy arrays, such as the weight vector, and a more efficient way to serialize NumPy arrays is to use the alternative joblib library. To ensure compatibility with the server environment that we will use in later sections, we will use the standard pickle approach. If you are interested, you can find more information about joblib at https://pypi.python.org/pypi/joblib.
We don't need to pickle the HashingVectorizer, since it does not need to be fitted. Instead, we can create a new Python script file, from which we can import the vectorizer into our current Python session. Now, copy the following code and save it as vectorizer.py in the movieclassifier directory:
from sklearn.feature_extraction.text import HashingVectorizer
import re
import os
import pickle
cur_dir = os.path.dirname(__file__)
stop = pickle.load(open(
os.path.join(cur_dir,
'pkl_objects',
'stopwords.pkl'), 'rb'))
def tokenizer(text):
text = re.sub('<[^>]*>', '', text)
emoticons = re.findall('(?::|;|=)(?:-)?(?:\)|\(|D|P)',
text.lower())
text = re.sub('[\W]+', ' ', text.lower()) \
+ ' '.join(emoticons).replace('-', '')
tokenized = [w for w in text.split() if w not in stop]
return tokenized
vect = HashingVectorizer(decode_error='ignore',
n_features=2**21,
preprocessor=None,
tokenizer=tokenizer)After we have pickled the Python objects and created the vectorizer.py file, it would now be a good idea to restart our Python interpreter or IPython Notebook kernel to test if we can deserialize the objects without error. However, please note that unpickling data from an untrusted source can be a potential security risk since the pickle module is not secure against malicious code. From your terminal, navigate to the movieclassifier directory, start a new Python session and execute the following code to verify that you can import the vectorizer and unpickle the classifier:
>>> import pickle
>>> import re
>>> import os
>>> from vectorizer import vect
>>> clf = pickle.load(open(
... os.path.join('pkl_objects',
... 'classifier.pkl'), 'rb'))After we have successfully loaded the vectorizer and unpickled the classifier, we can now use these objects to pre-process document samples and make predictions about their sentiment:
>>> import numpy as np
>>> label = {0:'negative', 1:'positive'}
>>> example = ['I love this movie']
>>> X = vect.transform(example)
>>> print('Prediction: %s\nProbability: %.2f%%' %\
... (label[clf.predict(X)[0]],
... np.max(clf.predict_proba(X))*100))
Prediction: positive
Probability: 91.56%Since our classifier returns the class labels as integers, we defined a simple Python dictionary to map those integers to their sentiment. We then used the HashingVectorizer to transform the simple example document into a word vector X. Finally, we used the predict method of the logistic regression classifier to predict the class label as well as the predict_proba method to return the corresponding probability of our prediction. Note that the predict_proba method call returns an array with a probability value for each unique class label. Since the class label with the largest probability corresponds to the class label that is returned by the predict call, we used the np.max function to return the probability of the predicted class.
In this section, we will set up a simple SQLite database to collect optional feedback about the predictions from users of the web application. We can use this feedback to update our classification model. SQLite is an open source SQL database engine that doesn't require a separate server to operate, which makes it ideal for smaller projects and simple web applications. Essentially, a SQLite database can be understood as a single, self-contained database file that allows us to directly access storage files. Furthermore, SQLite doesn't require any system-specific configuration and is supported by all common operating systems. It has gained a reputation for being very reliable as it is used by popular companies, such as Google, Mozilla, Adobe, Apple, Microsoft, and many more. If you want to learn more about SQLite, I recommend you visit the official website at http://www.sqlite.org.
Fortunately, following Python's batteries included philosophy, there is already an API in the Python standard library, sqlite3, which allows us to work with SQLite databases (for more information about sqlite3, please visit https://docs.python.org/3.4/library/sqlite3.html).
By executing the following code, we will create a new SQLite database inside the movieclassifier directory and store two example movie reviews:
>>> import sqlite3
>>> import os
>>> conn = sqlite3.connect('reviews.sqlite')
>>> c = conn.cursor()
>>> c.execute('CREATE TABLE review_db'\
... ' (review TEXT, sentiment INTEGER, date TEXT)')
>>> example1 = 'I love this movie'
>>> c.execute("INSERT INTO review_db"\
... " (review, sentiment, date) VALUES"\
... " (?, ?, DATETIME('now'))", (example1, 1))
>>> example2 = 'I disliked this movie'
>>> c.execute("INSERT INTO review_db"\
... " (review, sentiment, date) VALUES"\
... " (?, ?, DATETIME('now'))", (example2, 0))
>>> conn.commit()
>>> conn.close()Following the preceding code example, we created a connection (conn) to an SQLite database file by calling sqlite3's connect method, which created the new database file reviews.sqlite in the movieclassifier directory if it didn't already exist. Please note that SQLite doesn't implement a replace function for existing tables; you need to delete the database file manually from your file browser if you want to execute the code a second time. Next, we created a cursor via the cursor method, which allows us to traverse over the database records using the powerful SQL syntax. Via the first execute call, we then created a new database table, review_db. We used this to store and access database entries. Along with review_db, we also created three columns in this database table: review, sentiment, and date. We used these to store two example movie reviews and respective class labels (sentiments). Using the SQL command DATETIME('now'), we also added date-and timestamps to our entries. In addition to the timestamps, we used the question mark symbols (?) to pass the movie review texts (example1 and example2) and the corresponding class labels (1 and 0) as positional arguments to the execute method as members of a tuple. Lastly, we called the commit method to save the changes that we made to the database and closed the connection via the close method.
To check if the entries have been stored in the database table correctly, we will now reopen the connection to the database and use the SQL SELECT command to fetch all rows in the database table that have been committed between the beginning of the year 2015 and today:
>>> conn = sqlite3.connect('reviews.sqlite')
>>> c = conn.cursor()
>>> c.execute("SELECT * FROM review_db WHERE date"\
... " BETWEEN '2015-01-01 00:00:00' AND DATETIME('now')")
>>> results = c.fetchall()
>>> conn.close()
>>> print(results)
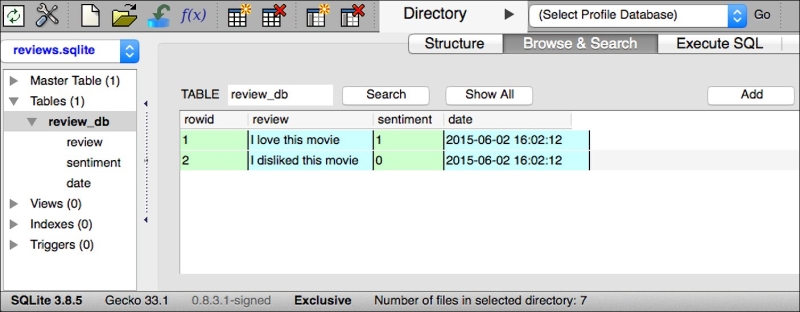
[('I love this movie', 1, '2015-06-02 16:02:12'), ('I disliked this movie', 0, '2015-06-02 16:02:12')]Alternatively, we could also use the free Firefox browser plugin SQLite Manager (available at https://addons.mozilla.org/en-US/firefox/addon/sqlite-manager/), which offers a nice GUI interface for working with SQLite databases as shown in the following screenshot:
After we have prepared the code to classify movie reviews in the previous subsection, let's discuss the basics of the Flask web framework to develop our web application. After Armin Ronacher's initial release of Flask in 2010, the framework has gained huge popularity over the years and examples of popular applications that make use of Flask include LinkedIn and Pinterest. Since Flask is written in Python, it provides us Python programmers with a convenient interface for embedding existing Python code such as our movie classifier.
Note
Flask is also known as microframework, which means that its core is kept lean and simple but can be easily extended with other libraries. Although the learning curve of the lightweight Flask API is not nearly as steep as those of other popular Python web frameworks, such as Django, I encourage you to take a look at the official Flask documentation at http://flask.pocoo.org/docs/0.10/ to learn more about its functionality.
If the Flask library is not already installed in your current Python environment, you can simply install it via pip from your terminal (at the time of writing, the latest stable release was Version 0.10.1):
pip install flask
In this subsection, we will develop a very simple web application to become more familiar with the Flask API before we implement our movie classifier. First, we create a directory tree:
1st_flask_app_1/
app.py
templates/
first_app.htmlThe app.py file will contain the main code that will be executed by the Python interpreter to run the Flask web application. The templates directory is the directory in which Flask will look for static HTML files for rendering in the web browser. Let's now take a look at the contents of app.py:
from flask import Flask, render_template
app = Flask(__name__)
@app.route('/')
def index():
return render_template('first_app.html')
if __name__ == '__main__':
app.run()In this case, we run our application as a single module, thus we initialized a new Flask instance with the argument __name__ to let Flask know that it can find the HTML template folder (templates) in the same directory where it is located. Next, we used the route decorator (@app.route('/')) to specify the URL that should trigger the execution of the index function. Here, our index function simply renders the HTML file first_app.html, which is located in the templates folder. Lastly, we used the run function to only run the application on the server when this script is directly executed by the Python interpreter, which we ensured using the if statement with __name__ == '__main__'.
Now, let's take a look at the contents of the first_app.html file. If you are not familiar with the HTML syntax yet, I recommend you visit http://www.w3schools.com/html/default.asp for useful tutorials for learning the basics of HTML.
<!doctype html>
<html>
<head>
<title>First app</title>
</head>
<body>
<div>Hi, this is my first Flask web app!</div>
</body>
</html>Here, we have simply filled an empty HTML template file with a div element (a block level element) that contains the sentence: Hi, this is my first Flask web app!. Conveniently, Flask allows us to run our apps locally, which is useful for developing and testing web applications before we deploy them on a public web server. Now, let's start our web application by executing the command from the terminal inside the 1st_flask_app_1 directory:
python3 app.py
We should now see a line such as the following displayed in the terminal:
* Running on http://127.0.0.1:5000/
This line contains the address of our local server. We can now enter this address in our web browser to see the web application in action. If everything has executed correctly, we should now see a simple website with the content: Hi, this is my first Flask web app!.
In this subsection, we will extend our simple Flask web application with HTML form elements to learn how to collect data from a user using the WTForms library (https://wtforms.readthedocs.org/en/latest/), which can be installed via pip:
pip install wtforms
This web app will prompt a user to type in his or her name into a text field, as shown in the following screenshot:
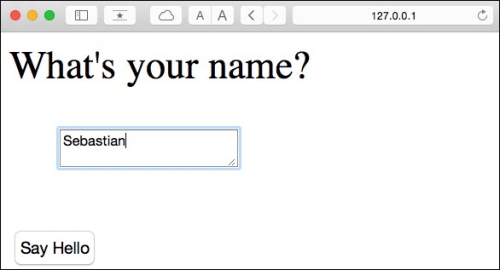
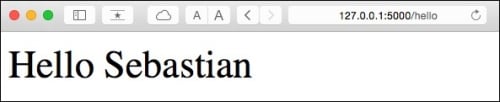
After the submission button (Say Hello) has been clicked and the form is validated, a new HTML page will be rendered to display the user's name.
The new directory structure that we need to set up for this application looks like this:
1st_flask_app_2/
app.py
static/
style.css
templates/
_formhelpers.html
first_app.html
hello.htmlThe following are the contents of our modified app.py file:
from flask import Flask, render_template, request
from wtforms import Form, TextAreaField, validators
app = Flask(__name__)
class HelloForm(Form):
sayhello = TextAreaField('',[validators.DataRequired()])
@app.route('/')
def index():
form = HelloForm(request.form)
return render_template('first_app.html', form=form)
@app.route('/hello', methods=['POST'])
def hello():
form = HelloForm(request.form)
if request.method == 'POST' and form.validate():
name = request.form['sayhello']
return render_template('hello.html', name=name)
return render_template('first_app.html', form=form)
if __name__ == '__main__':
app.run(debug=True)Using wtforms, we extended the index function with a text field that we will embed in our start page using the TextAreaField class, which automatically checks whether a user has provided valid input text or not. Furthermore, we defined a new function, hello, which will render an HTML page hello.html if the form has been validated. Here, we used the POST method to transport the form data to the server in the message body. Finally, by setting the argument debug=True inside the app.run method, we further activated Flask's debugger. This is a useful feature for developing new web applications.
Now, we will implement a generic macro in the file _formhelpers.html via the Jinja2 templating engine, which we will later import in our first_app.html file to render the text field:
{% macro render_field(field) %}
<dt>{{ field.label }}
<dd>{{ field(**kwargs)|safe }}
{% if field.errors %}
<ul class=errors>
{% for error in field.errors %}
<li>{{ error }}</li>
{% endfor %}
</ul>
{% endif %}
</dd>
{% endmacro %}An in-depth discussion about the Jinja2 templating language is beyond the scope of this book. However, you can find a comprehensive documentation of the Jinja2 syntax at http://jinja.pocoo.org.
Next, we set up a simple Cascading Style Sheets (CSS) file, style.css, to demonstrate how the look and feel of HTML documents can be modified. We have to save the following CSS file, which will simply double the font size of our HTML body elements, in a subdirectory called static, which is the default directory where Flask looks for static files such as CSS. The code is as follows:
body {
font-size: 2em;
}The following are the contents of the modified first_app.html file that will now render a text form where a user can enter a name:
<!doctype html>
<html>
<head>
<title>First app</title>
<link rel="stylesheet" href="{{ url_for('static', filename='style.css') }}">
</head>
<body>
{% from "_formhelpers.html" import render_field %}
<div>What's your name?</div>
<form method=post action="/hello">
<dl>
{{ render_field(form.sayhello) }}
</dl>
<input type=submit value='Say Hello' name='submit_btn'>
</form>
</body>
</html>In the header section of first_app.html, we loaded the CSS file. It should now alter the size of all text elements in the HTML body. In the HTML body section, we imported the form macro from _formhelpers.html and we rendered the sayhello form that we specified in the app.py file. Furthermore, we added a button to the same form element so that a user can submit the text field entry.
Lastly, we create a hello.html file that will be rendered via the line return render_template('hello.html', name=name) inside the hello function, which we defined in the app.py script to display the text that a user submitted via the text field. The code is as follows:
<!doctype html>
<html>
<head>
<title>First app</title>
<link rel="stylesheet" href="{{ url_for('static', filename='style.css') }}">
</head>
<body>
<div>Hello {{ name }}</div>
</body>
</html>Having set up our modified Flask web application, we can run it locally by executing the following command from the app's main directory and we can view the result in our web browser at http://127.0.0.1:5000/:
python3 app.py
Note
If you are new to web development, some of those concepts may seem very complicated at first sight. In that case, I encourage you to simply set up the preceding files in a directory on your hard drive and examine them closely. You will see that the Flask web framework is actually pretty straightforward and much simpler than it might initially appear! Also, for more help, don't forget to look at the excellent Flask documentation and examples at http://flask.pocoo.org/docs/0.10/.
Our first Flask web application
In this subsection, we will develop a very simple web application to become more familiar with the Flask API before we implement our movie classifier. First, we create a directory tree:
1st_flask_app_1/
app.py
templates/
first_app.htmlThe app.py file will contain the main code that will be executed by the Python interpreter to run the Flask web application. The templates directory is the directory in which Flask will look for static HTML files for rendering in the web browser. Let's now take a look at the contents of app.py:
from flask import Flask, render_template
app = Flask(__name__)
@app.route('/')
def index():
return render_template('first_app.html')
if __name__ == '__main__':
app.run()In this case, we run our application as a single module, thus we initialized a new Flask instance with the argument __name__ to let Flask know that it can find the HTML template folder (templates) in the same directory where it is located. Next, we used the route decorator (@app.route('/')) to specify the URL that should trigger the execution of the index function. Here, our index function simply renders the HTML file first_app.html, which is located in the templates folder. Lastly, we used the run function to only run the application on the server when this script is directly executed by the Python interpreter, which we ensured using the if statement with __name__ == '__main__'.
Now, let's take a look at the contents of the first_app.html file. If you are not familiar with the HTML syntax yet, I recommend you visit http://www.w3schools.com/html/default.asp for useful tutorials for learning the basics of HTML.
<!doctype html>
<html>
<head>
<title>First app</title>
</head>
<body>
<div>Hi, this is my first Flask web app!</div>
</body>
</html>Here, we have simply filled an empty HTML template file with a div element (a block level element) that contains the sentence: Hi, this is my first Flask web app!. Conveniently, Flask allows us to run our apps locally, which is useful for developing and testing web applications before we deploy them on a public web server. Now, let's start our web application by executing the command from the terminal inside the 1st_flask_app_1 directory:
python3 app.py
We should now see a line such as the following displayed in the terminal:
* Running on http://127.0.0.1:5000/
This line contains the address of our local server. We can now enter this address in our web browser to see the web application in action. If everything has executed correctly, we should now see a simple website with the content: Hi, this is my first Flask web app!.
In this subsection, we will extend our simple Flask web application with HTML form elements to learn how to collect data from a user using the WTForms library (https://wtforms.readthedocs.org/en/latest/), which can be installed via pip:
pip install wtforms
This web app will prompt a user to type in his or her name into a text field, as shown in the following screenshot:
After the submission button (Say Hello) has been clicked and the form is validated, a new HTML page will be rendered to display the user's name.
The new directory structure that we need to set up for this application looks like this:
1st_flask_app_2/
app.py
static/
style.css
templates/
_formhelpers.html
first_app.html
hello.htmlThe following are the contents of our modified app.py file:
from flask import Flask, render_template, request
from wtforms import Form, TextAreaField, validators
app = Flask(__name__)
class HelloForm(Form):
sayhello = TextAreaField('',[validators.DataRequired()])
@app.route('/')
def index():
form = HelloForm(request.form)
return render_template('first_app.html', form=form)
@app.route('/hello', methods=['POST'])
def hello():
form = HelloForm(request.form)
if request.method == 'POST' and form.validate():
name = request.form['sayhello']
return render_template('hello.html', name=name)
return render_template('first_app.html', form=form)
if __name__ == '__main__':
app.run(debug=True)Using wtforms, we extended the index function with a text field that we will embed in our start page using the TextAreaField class, which automatically checks whether a user has provided valid input text or not. Furthermore, we defined a new function, hello, which will render an HTML page hello.html if the form has been validated. Here, we used the POST method to transport the form data to the server in the message body. Finally, by setting the argument debug=True inside the app.run method, we further activated Flask's debugger. This is a useful feature for developing new web applications.
Now, we will implement a generic macro in the file _formhelpers.html via the Jinja2 templating engine, which we will later import in our first_app.html file to render the text field:
{% macro render_field(field) %}
<dt>{{ field.label }}
<dd>{{ field(**kwargs)|safe }}
{% if field.errors %}
<ul class=errors>
{% for error in field.errors %}
<li>{{ error }}</li>
{% endfor %}
</ul>
{% endif %}
</dd>
{% endmacro %}An in-depth discussion about the Jinja2 templating language is beyond the scope of this book. However, you can find a comprehensive documentation of the Jinja2 syntax at http://jinja.pocoo.org.
Next, we set up a simple Cascading Style Sheets (CSS) file, style.css, to demonstrate how the look and feel of HTML documents can be modified. We have to save the following CSS file, which will simply double the font size of our HTML body elements, in a subdirectory called static, which is the default directory where Flask looks for static files such as CSS. The code is as follows:
body {
font-size: 2em;
}The following are the contents of the modified first_app.html file that will now render a text form where a user can enter a name:
<!doctype html>
<html>
<head>
<title>First app</title>
<link rel="stylesheet" href="{{ url_for('static', filename='style.css') }}">
</head>
<body>
{% from "_formhelpers.html" import render_field %}
<div>What's your name?</div>
<form method=post action="/hello">
<dl>
{{ render_field(form.sayhello) }}
</dl>
<input type=submit value='Say Hello' name='submit_btn'>
</form>
</body>
</html>In the header section of first_app.html, we loaded the CSS file. It should now alter the size of all text elements in the HTML body. In the HTML body section, we imported the form macro from _formhelpers.html and we rendered the sayhello form that we specified in the app.py file. Furthermore, we added a button to the same form element so that a user can submit the text field entry.
Lastly, we create a hello.html file that will be rendered via the line return render_template('hello.html', name=name) inside the hello function, which we defined in the app.py script to display the text that a user submitted via the text field. The code is as follows:
<!doctype html>
<html>
<head>
<title>First app</title>
<link rel="stylesheet" href="{{ url_for('static', filename='style.css') }}">
</head>
<body>
<div>Hello {{ name }}</div>
</body>
</html>Having set up our modified Flask web application, we can run it locally by executing the following command from the app's main directory and we can view the result in our web browser at http://127.0.0.1:5000/:
python3 app.py
Note
If you are new to web development, some of those concepts may seem very complicated at first sight. In that case, I encourage you to simply set up the preceding files in a directory on your hard drive and examine them closely. You will see that the Flask web framework is actually pretty straightforward and much simpler than it might initially appear! Also, for more help, don't forget to look at the excellent Flask documentation and examples at http://flask.pocoo.org/docs/0.10/.
Form validation and rendering
In this subsection, we will extend our simple Flask web application with HTML form elements to learn how to collect data from a user using the WTForms library (https://wtforms.readthedocs.org/en/latest/), which can be installed via pip:
pip install wtforms
This web app will prompt a user to type in his or her name into a text field, as shown in the following screenshot:
After the submission button (Say Hello) has been clicked and the form is validated, a new HTML page will be rendered to display the user's name.
The new directory structure that we need to set up for this application looks like this:
1st_flask_app_2/
app.py
static/
style.css
templates/
_formhelpers.html
first_app.html
hello.htmlThe following are the contents of our modified app.py file:
from flask import Flask, render_template, request
from wtforms import Form, TextAreaField, validators
app = Flask(__name__)
class HelloForm(Form):
sayhello = TextAreaField('',[validators.DataRequired()])
@app.route('/')
def index():
form = HelloForm(request.form)
return render_template('first_app.html', form=form)
@app.route('/hello', methods=['POST'])
def hello():
form = HelloForm(request.form)
if request.method == 'POST' and form.validate():
name = request.form['sayhello']
return render_template('hello.html', name=name)
return render_template('first_app.html', form=form)
if __name__ == '__main__':
app.run(debug=True)Using wtforms, we extended the index function with a text field that we will embed in our start page using the TextAreaField class, which automatically checks whether a user has provided valid input text or not. Furthermore, we defined a new function, hello, which will render an HTML page hello.html if the form has been validated. Here, we used the POST method to transport the form data to the server in the message body. Finally, by setting the argument debug=True inside the app.run method, we further activated Flask's debugger. This is a useful feature for developing new web applications.
Now, we will implement a generic macro in the file _formhelpers.html via the Jinja2 templating engine, which we will later import in our first_app.html file to render the text field:
{% macro render_field(field) %}
<dt>{{ field.label }}
<dd>{{ field(**kwargs)|safe }}
{% if field.errors %}
<ul class=errors>
{% for error in field.errors %}
<li>{{ error }}</li>
{% endfor %}
</ul>
{% endif %}
</dd>
{% endmacro %}An in-depth discussion about the Jinja2 templating language is beyond the scope of this book. However, you can find a comprehensive documentation of the Jinja2 syntax at http://jinja.pocoo.org.
Next, we set up a simple Cascading Style Sheets (CSS) file, style.css, to demonstrate how the look and feel of HTML documents can be modified. We have to save the following CSS file, which will simply double the font size of our HTML body elements, in a subdirectory called static, which is the default directory where Flask looks for static files such as CSS. The code is as follows:
body {
font-size: 2em;
}The following are the contents of the modified first_app.html file that will now render a text form where a user can enter a name:
<!doctype html>
<html>
<head>
<title>First app</title>
<link rel="stylesheet" href="{{ url_for('static', filename='style.css') }}">
</head>
<body>
{% from "_formhelpers.html" import render_field %}
<div>What's your name?</div>
<form method=post action="/hello">
<dl>
{{ render_field(form.sayhello) }}
</dl>
<input type=submit value='Say Hello' name='submit_btn'>
</form>
</body>
</html>In the header section of first_app.html, we loaded the CSS file. It should now alter the size of all text elements in the HTML body. In the HTML body section, we imported the form macro from _formhelpers.html and we rendered the sayhello form that we specified in the app.py file. Furthermore, we added a button to the same form element so that a user can submit the text field entry.
Lastly, we create a hello.html file that will be rendered via the line return render_template('hello.html', name=name) inside the hello function, which we defined in the app.py script to display the text that a user submitted via the text field. The code is as follows:
<!doctype html>
<html>
<head>
<title>First app</title>
<link rel="stylesheet" href="{{ url_for('static', filename='style.css') }}">
</head>
<body>
<div>Hello {{ name }}</div>
</body>
</html>Having set up our modified Flask web application, we can run it locally by executing the following command from the app's main directory and we can view the result in our web browser at http://127.0.0.1:5000/:
python3 app.py
Note
If you are new to web development, some of those concepts may seem very complicated at first sight. In that case, I encourage you to simply set up the preceding files in a directory on your hard drive and examine them closely. You will see that the Flask web framework is actually pretty straightforward and much simpler than it might initially appear! Also, for more help, don't forget to look at the excellent Flask documentation and examples at http://flask.pocoo.org/docs/0.10/.
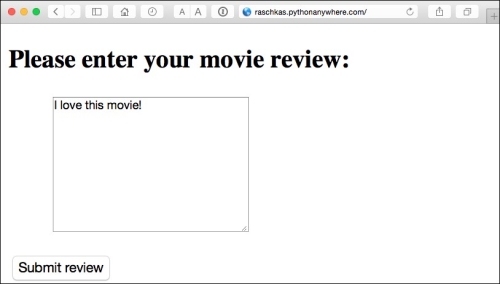
Now that we are somewhat familiar with the basics of Flask web development, let's advance to the next step and implement our movie classifier into a web application. In this section, we will develop a web application that will first prompt a user to enter a movie review, as shown in the following screenshot:
After the review has been submitted, the user will see a new page that shows the predicted class label and the probability of the prediction. Furthermore, the user will be able to provide feedback about this prediction by clicking on the Correct or Incorrect button, as shown in the following screenshot:
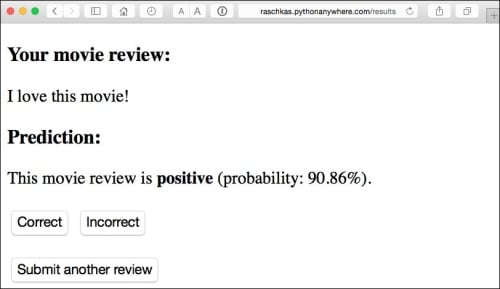
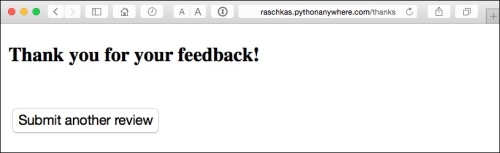
If a user clicked on either the Correct or Incorrect button, our classification model will be updated with respect to the user's feedback. Furthermore, we will also store the movie review text provided by the user as well as the suggested class label, which can be inferred from the button click, in a SQLite database for future reference. The third page that the user will see after clicking on one of the feedback buttons is a simple thank you screen with a Submit another review button that redirects the user back to the start page. This is shown in the following screenshot:
Before we take a closer look at the code implementation of this web application, I encourage you to take a look at the live demo that I uploaded at http://raschkas.pythonanywhere.com to get a better understanding of what we are trying to accomplish in this section.
To start with the big picture, let's take a look at the directory tree that we are going to create for this movie classification app, which is shown here:
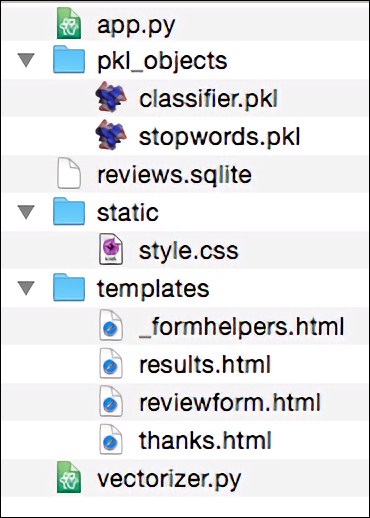
In the previous section of this chapter, we already created the vectorizer.py file, the SQLite database reviews.sqlite, and the pkl_objects subdirectory with the pickled Python objects.
The app.py file in the main directory is the Python script that contains our Flask code, and we will use the review.sqlite database file (which we created earlier in this chapter) to store the movie reviews that are being submitted to our web app. The templates subdirectory contains the HTML templates that will be rendered by Flask and displayed in the browser, and the static subdirectory will contain a simple CSS file to adjust the look of the rendered HTML code.
Since the app.py file is rather long, we will conquer it in two steps. The first section of app.py imports the Python modules and objects that we are going to need, aswell as the code to unpickle and set up our classification model:
from flask import Flask, render_template, request
from wtforms import Form, TextAreaField, validators
import pickle
import sqlite3
import os
import numpy as np
# import HashingVectorizer from local dir
from vectorizer import vect
app = Flask(__name__)
######## Preparing the Classifier
cur_dir = os.path.dirname(__file__)
clf = pickle.load(open(os.path.join(cur_dir,
'pkl_objects/classifier.pkl'), 'rb'))
db = os.path.join(cur_dir, 'reviews.sqlite')
def classify(document):
label = {0: 'negative', 1: 'positive'}
X = vect.transform([document])
y = clf.predict(X)[0]
proba = np.max(clf.predict_proba(X))
return label[y], proba
def train(document, y):
X = vect.transform([document])
clf.partial_fit(X, [y])
def sqlite_entry(path, document, y):
conn = sqlite3.connect(path)
c = conn.cursor()
c.execute("INSERT INTO review_db (review, sentiment, date)"\
" VALUES (?, ?, DATETIME('now'))", (document, y))
conn.commit()
conn.close()This first part of the app.py script should look very familiar to us by now. We simply imported the HashingVectorizer and unpickled the logistic regression classifier. Next, we defined a classify function to return the predicted class label as well as the corresponding probability prediction of a given text document. The train function can be used to update the classifier given that a document and a class label are provided. Using the sqlite_entry function, we can store a submitted movie review in our SQLite database along with its class label and timestamp for our personal records. Note that the clf object will be reset to its original, pickled state if we restart the web application. At the end of this chapter, you will learn how to use the data that we collect in the SQLite database to update the classifier permanently.
The concepts in the second part of the app.py script should also look quite familiar to us:
app = Flask(__name__)
class ReviewForm(Form):
moviereview = TextAreaField('',
[validators.DataRequired(),
validators.length(min=15)])
@app.route('/')
def index():
form = ReviewForm(request.form)
return render_template('reviewform.html', form=form)
@app.route('/results', methods=['POST'])
def results():
form = ReviewForm(request.form)
if request.method == 'POST' and form.validate():
review = request.form['moviereview']
y, proba = classify(review)
return render_template('results.html',
content=review,
prediction=y,
probability=round(proba*100, 2))
return render_template('reviewform.html', form=form)
@app.route('/thanks', methods=['POST'])
def feedback():
feedback = request.form['feedback_button']
review = request.form['review']
prediction = request.form['prediction']
inv_label = {'negative': 0, 'positive': 1}
y = inv_label[prediction]
if feedback == 'Incorrect':
y = int(not(y))
train(review, y)
sqlite_entry(db, review, y)
return render_template('thanks.html')
if __name__ == '__main__':
app.run(debug=True)We defined a ReviewForm class that instantiates a TextAreaField, which will be rendered in the reviewform.html template file (the landing page of our web app). This, in turn, is rendered by the index function. With the validators.length(min=15) parameter, we require the user to enter a review that contains at least 15 characters. Inside the results function, we fetch the contents of the submitted web form and pass it on to our classifier to predict the sentiment of the movie classifier, which will then be displayed in the rendered results.html template.
The feedback function may look a little bit complicated at first glance. It essentially fetches the predicted class label from the results.html template if a user clicked on the Correct or Incorrect feedback button, and transforms the predicted sentiment back into an integer class label that will be used to update the classifier via the train function, which we implemented in the first section of the app.py script. Also, a new entry to the SQLite database will be made via the sqlite_entry function if feedback was provided, and eventually the thanks.html template will be rendered to thank the user for the feedback.
Next, let's take a look at the reviewform.html template, which constitutes the starting page of our application:
<!doctype html>
<html>
<head>
<title>Movie Classification</title>
</head>
<body>
<h2>Please enter your movie review:</h2>
{% from "_formhelpers.html" import render_field %}
<form method=post action="/results">
<dl>
{{ render_field(form.moviereview, cols='30', rows='10') }}
</dl>
<div>
<input type=submit value='Submit review' name='submit_btn'>
</div>
</form>
</body>
</html>Here, we simply imported the same _formhelpers.html template that we defined in the Form validation and rendering section earlier in this chapter. The render_field function of this macro is used to render a TextAreaField where a user can provide a movie review and submit it via the Submit review button displayed at the bottom of the page. This TextAreaField is 30 columns wide and 10 rows tall.
Our next template, results.html, looks a little bit more interesting:
<!doctype html>
<html>
<head>
<title>Movie Classification</title>
<link rel="stylesheet" href="{{ url_for('static', filename='style.css') }}">
</head>
<body>
<h3>Your movie review:</h3>
<div>{{ content }}</div>
<h3>Prediction:</h3>
<div>This movie review is <strong>{{ prediction }}</strong>
(probability: {{ probability }}%).</div>
<div id='button'>
<form action="/thanks" method="post">
<input type=submit value='Correct' name='feedback_button'>
<input type=submit value='Incorrect' name='feedback_button'>
<input type=hidden value='{{ prediction }}' name='prediction'>
<input type=hidden value='{{ content }}' name='review'>
</form>
</div>
<div id='button'>
<form action="/">
<input type=submit value='Submit another review'>
</form>
</div>
</body>
</html>First, we inserted the submitted review as well as the results of the prediction in the corresponding fields {{ content }}, {{ prediction }}, and {{ probability }}. You may notice that we used the {{ content }} and {{ prediction }} placeholder variables a second time in the form that contains the Correct and Incorrect buttons. This is a workaround to POST those values back to the server to update the classifier and store the review in case the user clicks on one of those two buttons. Furthermore, we imported a CSS file (style.css) at the beginning of the results.html file. The setup of this file is quite simple; it limits the width of the contents of this web app to 600 pixels and moves the Incorrect and Correct buttons labeled with the div id button down by 20 pixels:
body{
width:600px;
}
#button{
padding-top: 20px;
}This CSS file is merely a placeholder, so please feel free to adjust it to adjust the look and feel of the web app to your liking.
The last HTML file we will implement for our web application is the thanks.html template. As the name suggests, it simply provides a nice thank you message to the user after providing feedback via the Correct or Incorrect button. Furthermore, we put a Submit another review button at the bottom of this page, which will redirect the user to the starting page. The contents of the thanks.html file are as follows:
<!doctype html>
<html>
<head>
<title>Movie Classification</title>
</head>
<body>
<h3>Thank you for your feedback!</h3>
<div id='button'>
<form action="/">
<input type=submit value='Submit another review'>
</form>
</div>
</body>
</html>Now, it would be a good idea to start the web app locally from our terminal via the following command before we advance to the next subsection and deploy it on a public web server:
python3 app.py
After we have finished testing our app, we also shouldn't forget to remove the debug=True argument in the app.run() command of our app.py script.
After we have tested the web application locally, we are now ready to deploy our web application onto a public web server. For this tutorial, we will be using the PythonAnywhere web hosting service, which specializes in the hosting of Python web applications and makes it extremely simple and hassle-free. Furthermore, PythonAnywhere offers a beginner account option that lets us run a single web application free of charge.
To create a new PythonAnywhere account, we visit the website at https://www.pythonanywhere.com and click on the Pricing & signup link that is located in the top-right corner. Next, we click on the Create a Beginner account button where we need to provide a username, password, and a valid e-mail address. After we have read and agreed to the terms and conditions, we should have a new account.
Unfortunately, the free beginner account doesn't allow us to access the remote server via the SSH protocol from our command-line terminal. Thus, we need to use the PythonAnywhere web interface to manage our web application. But before we can upload our local application files to the server, need to create a new web application for our PythonAnywhere account. After we clicking on the Dashboard button in the top-right corner, we have access to the control panel shown at the top of the page. Next, we click on the Web tab that is now visible at the top of the page. We proceed by clicking on the Add a new web app button on the left, which lets us create a new Python 3.4 Flask web application that we name movieclassifier.
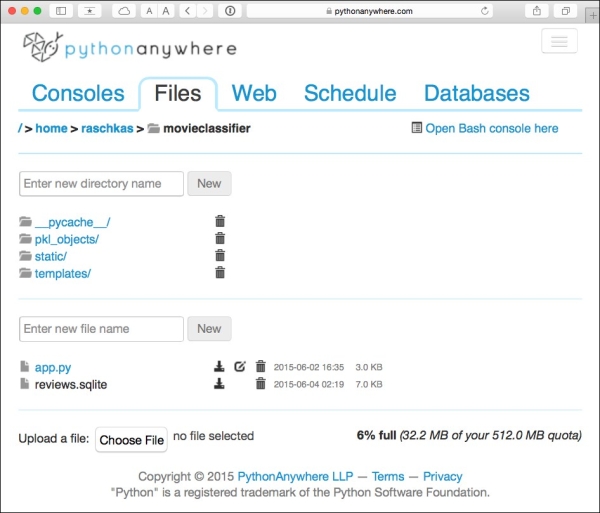
After creating a new application for our PythonAnywhere account, we head over to the Files tab to upload the files from our local movieclassifier directory using the PythonAnywhere web interface. After uploading the web application files that we created locally on our computer, we should have a movieclassifier directory in our PythonAnywhere account. It contains the same directories and files as our local movieclassifier directory has, as shown in the following screenshot:
Lastly, we head over to the Web tab one more time and click on the Reload <username>.pythonanywhere.com button to propagate the changes and refresh our web application. Finally, our web app should now be up and running and publicly available via the address <username>.pythonanywhere.com.
Note
Unfortunately, web servers can be quite sensitive to the tiniest problems in our web app. If you are experiencing problems with running the web application on PythonAnywhere and are receiving error messages in your browser, you can check the server and error logs which can be accessed from the Web tab in your PythonAnywhere account to better diagnose the problem.
While our predictive model is updated on-the-fly whenever a user provides feedback about the classification, the updates to the clf object will be reset if the web server crashes or restarts. If we reload the web application, the clf object will be reinitialized from the classifier.pkl pickle file. One option to apply the updates permanently would be to pickle the clf object once again after each update. However, this would become computationally very inefficient with a growing number of users and could corrupt the pickle file if users provide feedback simultaneously. An alternative solution is to update the predictive model from the feedback data that is being collected in the SQLite database. One option would be to download the SQLite database from the PythonAnywhere server, update the clf object locally on our computer, and upload the new pickle file to PythonAnywhere. To update the classifier locally on our computer, we create an update.py script file in the movieclassifier directory with the following contents:
import pickle
import sqlite3
import numpy as np
import os
# import HashingVectorizer from local dir
from vectorizer import vect
def update_model(db_path, model, batch_size=10000):
conn = sqlite3.connect(db_path)
c = conn.cursor()
c.execute('SELECT * from review_db')
results = c.fetchmany(batch_size)
while results:
data = np.array(results)
X = data[:, 0]
y = data[:, 1].astype(int)
classes = np.array([0, 1])
X_train = vect.transform(X)
clf.partial_fit(X_train, y, classes=classes)
results = c.fetchmany(batch_size)
conn.close()
return None
cur_dir = os.path.dirname(__file__)
clf = pickle.load(open(os.path.join(cur_dir,
'pkl_objects',
'classifier.pkl'), 'rb'))
db = os.path.join(cur_dir, 'reviews.sqlite')
update_model(db_path=db, model=clf, batch_size=10000)
# Uncomment the following lines if you are sure that
# you want to update your classifier.pkl file
# permanently.
# pickle.dump(clf, open(os.path.join(cur_dir,
# 'pkl_objects', 'classifier.pkl'), 'wb')
# , protocol=4)The update_model function will fetch entries from the SQLite database in batches of 10,000 entries at a time unless the database contains fewer entries. Alternatively, we could also fetch one entry at a time by using fetchone instead of fetchmany, which would be computationally very inefficient. Using the alternative fetchall method could be a problem if we are working with large datasets that exceed the computer or server's memory capacity.
Now that we have created the update.py script, we could also upload it to the movieclassifier directory on PythonAnywhere and import the update_model function in the main application script app.py to update the classifier from the SQLite database every time we restart the web application. In order to do so, we just need to add a line of code to import the update_model function from the update.py script at the top of app.py:
# import update function from local dir from update import update_model
We then need to call the update_model function in the main application body:
…
if __name__ == '__main__':
update_model(filepath=db, model=clf, batch_size=10000)
…Updating the movie review classifier
While our predictive model is updated on-the-fly whenever a user provides feedback about the classification, the updates to the clf object will be reset if the web server crashes or restarts. If we reload the web application, the clf object will be reinitialized from the classifier.pkl pickle file. One option to apply the updates permanently would be to pickle the clf object once again after each update. However, this would become computationally very inefficient with a growing number of users and could corrupt the pickle file if users provide feedback simultaneously. An alternative solution is to update the predictive model from the feedback data that is being collected in the SQLite database. One option would be to download the SQLite database from the PythonAnywhere server, update the clf object locally on our computer, and upload the new pickle file to PythonAnywhere. To update the classifier locally on our computer, we create an update.py script file in the movieclassifier directory with the following contents:
import pickle
import sqlite3
import numpy as np
import os
# import HashingVectorizer from local dir
from vectorizer import vect
def update_model(db_path, model, batch_size=10000):
conn = sqlite3.connect(db_path)
c = conn.cursor()
c.execute('SELECT * from review_db')
results = c.fetchmany(batch_size)
while results:
data = np.array(results)
X = data[:, 0]
y = data[:, 1].astype(int)
classes = np.array([0, 1])
X_train = vect.transform(X)
clf.partial_fit(X_train, y, classes=classes)
results = c.fetchmany(batch_size)
conn.close()
return None
cur_dir = os.path.dirname(__file__)
clf = pickle.load(open(os.path.join(cur_dir,
'pkl_objects',
'classifier.pkl'), 'rb'))
db = os.path.join(cur_dir, 'reviews.sqlite')
update_model(db_path=db, model=clf, batch_size=10000)
# Uncomment the following lines if you are sure that
# you want to update your classifier.pkl file
# permanently.
# pickle.dump(clf, open(os.path.join(cur_dir,
# 'pkl_objects', 'classifier.pkl'), 'wb')
# , protocol=4)The update_model function will fetch entries from the SQLite database in batches of 10,000 entries at a time unless the database contains fewer entries. Alternatively, we could also fetch one entry at a time by using fetchone instead of fetchmany, which would be computationally very inefficient. Using the alternative fetchall method could be a problem if we are working with large datasets that exceed the computer or server's memory capacity.
Now that we have created the update.py script, we could also upload it to the movieclassifier directory on PythonAnywhere and import the update_model function in the main application script app.py to update the classifier from the SQLite database every time we restart the web application. In order to do so, we just need to add a line of code to import the update_model function from the update.py script at the top of app.py:
# import update function from local dir from update import update_model
We then need to call the update_model function in the main application body:
…
if __name__ == '__main__':
update_model(filepath=db, model=clf, batch_size=10000)
…In this chapter, you learned about many useful and practical topics that extend our knowledge of machine learning theory. You learned how to serialize a model after training and how to load it for later use cases. Furthermore, we created a SQLite database for efficient data storage and created a web application that lets us make our movie classifier available to the outside world.
Throughout this book, we have really discussed a lot about machine learning concepts, best practices, and supervised models for classification. In the next chapter, we will take a look at another subcategory of supervised learning, regression analysis, which lets us predict outcome variables on a continuous scale, in contrast to the categorical class labels of the classification models that we have been working with so far.