

Using pandas to process vaccine-adverse events
We will be introducing pandas with a concrete bioinformatics data analysis example: we will be studying data from the Vaccine Adverse Event Reporting System (VAERS, https://vaers.hhs.gov/). VAERS, which is maintained by the US Department of Health and Human Services, includes a database of vaccine-adverse events going back to 1990.
VAERS makes data available in comma-separated values (CSV) format. The CSV format is quite simple and can even be opened with a simple text editor (be careful with very large file sizes as they may crash your editor) or a spreadsheet such as Excel. pandas can work very easily with this format.
Getting ready
First, we need to download the data. It is available at https://vaers.hhs.gov/data/datasets.html. Please download the ZIP file: we will be using the 2021 file; do not download a single CSV file only. After downloading the file, unzip it, and then recompress all the files individually with gzip –9 *csv to save disk space.
Feel free to have a look at the files with a text editor, or preferably with a tool such as less (zless for compressed files). You can find documentation for the content of the files at https://vaers.hhs.gov/docs/VAERSDataUseGuide_en_September2021.pdf.
If you are using the Notebooks, code is provided at the beginning of them so that you can take care of the necessary processing. If you are using Docker, the base image is enough.
The code can be found in Chapter02/Pandas_Basic.py.
How to do it...
Follow these steps:
- Let’s start by loading the main data file and gathering the basic statistics:
vdata = pd.read_csv(
    "2021VAERSDATA.csv.gz", encoding="iso-8859-1")
vdata.columns
vdata.dtypes
vdata.shape
We start by loading the data. In most cases, there is no need to worry about the text encoding as the default, UTF-8, will work, but in this case, the text encoding is legacy iso-8859-1. Then, we print the column names, which start with VAERS_ID, RECVDATE, STATE, AGE_YRS, and so on. They include 35 entries corresponding to each of the columns. Then, we print the types of each column. Here are the first few entries:
VAERS_ID          int64
RECVDATE         object
STATE            object
AGE_YRS         float64
CAGE_YR         float64
CAGE_MO         float64
SEX              object
By doing this, we get the shape of the data: (654986, 35). This means 654,986 rows and 35 columns. You can use any of the preceding strategies to get the information you need regarding the metadata of the table.
- Now, let’s explore the data:
vdata.iloc[0]
vdata = vdata.set_index("VAERS_ID")
vdata.loc[916600]
vdata.head(3)
vdata.iloc[:3]
vdata.iloc[:5, 2:4]
There are many ways we can look at the data. We will start by inspecting the first row, based on location. Here is an abridged version:
VAERS_ID                                       916600
RECVDATE                                       01/01/2021
STATE                                          TX
AGE_YRS                                        33.0
CAGE_YR                                        33.0
CAGE_MO                                        NaN
SEX                                            F
…
TODAYS_DATE                                          01/01/2021
BIRTH_DEFECT                                  NaN
OFC_VISIT                                     Y
ER_ED_VISIT                                       NaN
ALLERGIES                                       Pcn and bee venom
After we index by VAERS_ID, we can use one ID to get a row. We can use 916600 (which is the ID from the preceding record) and get the same result.
Then, we retrieve the first three rows. Notice the two different ways we can do so:
- Using the
headmethod - Using the more general array specification; that is,
iloc[:3]
Finally, we retrieve the first five rows, but only the second and third columns –iloc[:5, 2:4]. Here is the output:
          AGE_YRS  CAGE_YR
VAERS_ID
916600       33.0     33.0
916601       73.0     73.0
916602       23.0     23.0
916603       58.0     58.0
916604       47.0     47.0
- Let’s do some basic computations now, namely computing the maximum age in the dataset:
vdata["AGE_YRS"].max()
vdata.AGE_YRS.max()
The maximum value is 119 years. More importantly than the result, notice the two dialects for accessing AGE_YRS (as a dictionary key and as an object field) for the access columns.
- Now, let’s plot the ages involved:
vdata["AGE_YRS"].sort_values().plot(use_index=False)
vdata["AGE_YRS"].plot.hist(bins=20)
This generates two plots (a condensed version is shown in the following step). We use pandas plotting machinery here, which uses Matplotib underneath.
- While we have a full recipe for charting with Matplotlib (Introducing Matplotlib for chart generation), let’s have a sneak peek here by using it directly:
import matplotlib.pylot as plt
fig, ax = plt.subplots(1, 2, sharey=True)
fig.suptitle("Age of adverse events")
vdata["AGE_YRS"].sort_values().plot(
    use_index=False, ax=ax[0],
    xlabel="Obervation", ylabel="Age")
vdata["AGE_YRS"].plot.hist(bins=20, orientation="horizontal")
This includes both figures from the previous steps. Here is the output:
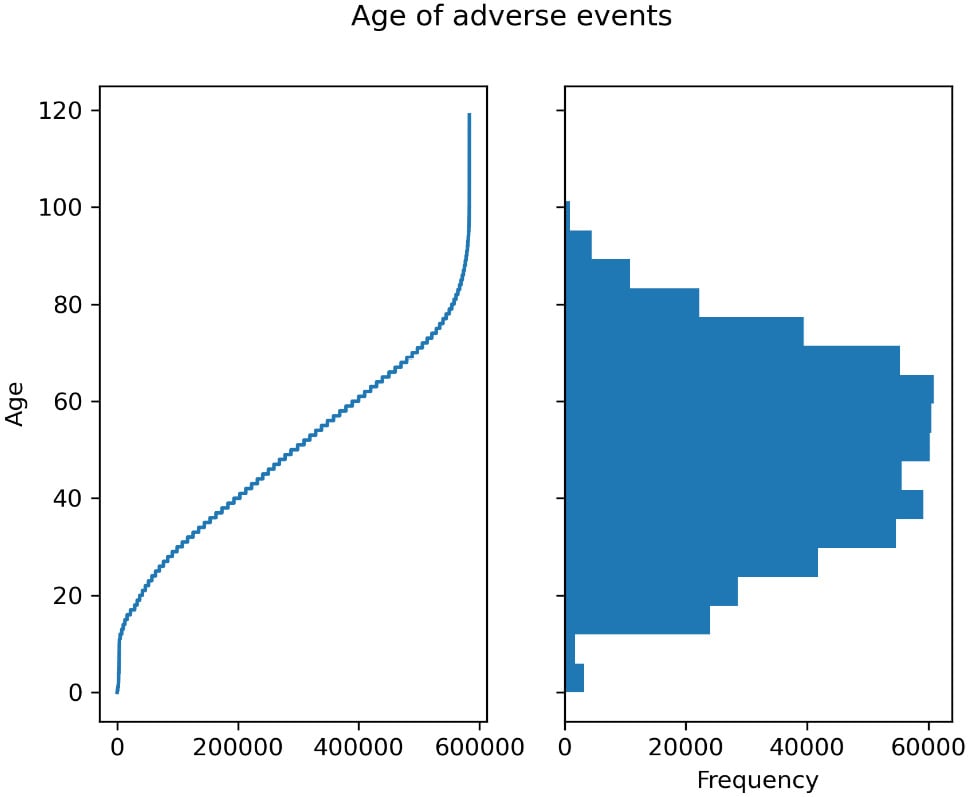
Figure 2.1 – Left – the age for each observation of adverse effect; right – a histogram showing the distribution of ages
- We can also take a non-graphical, more analytical approach, such as counting the events per year:
vdata["AGE_YRS"].dropna().apply(lambda x: int(x)).value_counts()
The output will be as follows:
50     11006
65     10948
60     10616
51     10513
58     10362
      ...
- Now, let’s see how many people died:
vdata.DIED.value_counts(dropna=False)
vdata["is_dead"] = (vdata.DIED == "Y")
The output of the count is as follows:
NaN    646450
Y        8536
Name: DIED, dtype: int64
Note that the type of DIED is not a Boolean. It’s more declarative to have a Boolean representation of a Boolean characteristic, so we create is_dead for it.
Tip
Here, we are assuming that NaN is to be interpreted as False. In general, we must be careful with the interpretation of NaN. It may mean False or it may simply mean – as in most cases – a lack of data. If that were the case, it should not be converted into False.
- Now, let’s associate the individual data about deaths with the type of vaccine involved:
dead = vdata[vdata.is_dead]
vax = pd.read_csv("2021VAERSVAX.csv.gz", encoding="iso-8859-1").set_index("VAERS_ID")
vax.groupby("VAX_TYPE").size().sort_values()
vax19 = vax[vax.VAX_TYPE == "COVID19"]
vax19_dead = dead.join(vax19)
After we get a DataFrame containing just deaths, we must read the data that contains vaccine information. First, we must do some exploratory analysis of the types of vaccines and their adverse events. Here is the abridged output:
           …
HPV9         1506
FLU4         3342
UNK          7941
VARZOS      11034
COVID19    648723
After that, we must choose just the COVID-related vaccines and join them with individual data.
- Finally, let’s see the top 10 COVID vaccine lots that are overrepresented in terms of deaths and how many US states were affected by each lot:
baddies = vax19_dead.groupby("VAX_LOT").size().sort_values(ascending=False)
for I, (lot, cnt) in enumerate(baddies.items()):
    print(lot, cnt, len(vax19_dead[vax19_dead.VAX_LOT == lot].groupby""STAT"")))
    if i == 10:
        break
The output is as follows:
Unknown 254 34
EN6201 120 30
EN5318 102 26
EN6200 101 22
EN6198 90 23
039K20A 89 13
EL3248 87 17
EL9261 86 21
EM9810 84 21
EL9269 76 18
EN6202 75 18
There’s more...
The preceding data about vaccines and lots is not completely correct; we will cover some data analysis pitfalls in the next recipe.
In the Introducing Matplotlib for chart generation recipe, we will introduce Matplotlib, a chart library that provides the backend for pandas plotting. It is a fundamental component of Python’s data analysis ecosystem.
See also
The following is some extra information that may be useful:
- While the first three recipes of this chapter are enough to support you throughout this book, there is plenty of content available on the web to help you understand pandas. You can start with the main user guide, which is available at https://pandas.pydata.org/docs/user_guide/index.html.
- If you need to plot data, do not forget to check the visualization part of the guide since it is especially helpful: https://pandas.pydata.org/docs/user_guide/visualization.html.