
There are several options to protect your investment in Windows and Fusion, both within and outside of the VM. Snapshots, anti-virus, encryption, shared or mirrored folders, and backups are all great ways of keeping your data safe, but there are some considerations to be made when thinking about your VM's protection.
The way I see it, there are two main things that need protection: Your VM and Your Data.
Your VM means Windows system files and installed applications; the "virtual computer" itself, if you will. Your Data refers to the stuff inside Windows that matters most to you: your documents, files, pictures, and so on.
AutoProtect is a feature for automatically taking snapshots, so you don't have to think about it. You can also specify how many to keep on hand at a given time, as well as how often to take new snapshots.
AutoProtect is good in small doses. It causes a performance hit when the snapshot tree is too deep, relative to the speed of your hard disk. Most folks should disable this if they're experiencing performance issues. Using the methods I'll demonstrate, you can keep your data automatically protected without needing this feature. The AutoProtect feature settings are shown in the following screenshot:

VMware Fusion can also optionally encrypt the virtual disk, making the VM inaccessible from the Mac side in the event of someone stealing your Mac. In practical use, it makes it so you have to type a password every time the VM boots.
VM-level encryption, as shown in the following screenshot, is good if you really need to prevent someone else from accessing your data within Windows on your Mac, and it is catastrophic if you forget the password (your data is completely unrecoverable without it; that's the point!).

Most folks probably don't need this level of security, but if this specific type of data encryption is a requirement, Fusion obliges.
Time Machine backups are also important to consider because they work very well for normal files. Unfortunately, Time Machine treats .vmdk files like normal ones, and won't back up every file every time it runs (only the files that have changed). This means when it does take backups, the files end up being scattered across the entire history of the Time Machine drive, and therefore it is very difficult to put back together when something goes wrong.
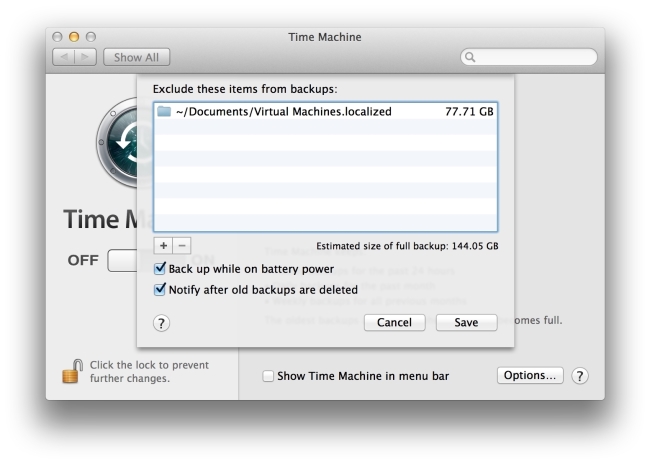
So, Time Machine is good for Your Data and bad for Your VM, and it is therefore worth excluding Time Machine backups. This is done in your Mac's Time Machine feature in System Preferences, as shown in the following screenshot:
Finally, there are shared and mirrored folders, an amazing feature of Fusion.
In Windows, you have special virtual folders: Desktop, Documents, Downloads, Music, Movies, and Pictures. Your Mac has those folders too. Mirrored folders perform some magic to remap those "virtual folders" in Windows to a virtual network, shared from the Mac's equivalent folders. Plainly, it makes the Windows special folders live on the Mac instead of just inside your virtual machine (and its associated .vmdk files).
Personally, I prefer to mirror just my Documents folder. I save documents within Windows to the My Documents folder, and they end up in the Documents folder on the Mac. Then, Time Machine takes over and backs up the files just like they were normal files on the Mac (because, well, they are). This goes for things such as QuickBooks data, Office documents, Auto CAD files, and even video game save files.
With all these considerations, I present an approach which will keep both Your VM and Your Data safe without taking a performance or security hit.
To protect Your VM, the first thing to do is make sure your Virtual Machines folder is excluded from Time Machine backups. This is done by navigating to System Preferences | Time Machine on your Mac. Click on Options and then on + to add the Virtual Machines folder to be excluded, which is in the Documents folder. Fusion may have already set this for you when it was installing.
This of course means we must manually back up the VM, but that's the whole point. To do this, you'll need an external hard drive with sufficient free space. You can use your Time Machine drive (and indeed, I do), just not the Time Machine application itself.
To protect Your Data, we will use Shared Folders and Mirrored Folders to get your important data out of Windows where it can be safely backed up with Time Machine like the rest of the files on your Mac.
As we discussed earlier, there's Your VM and Your Data. Let's explore how to keep each of those safe independently.
As I mentioned earlier, your virtual machine is a series of files saved in your Documents folder, and it contains all of your Windows applications.
A good time to make a backup of Your VM is right after you've installed all of your applications and configured your user account the way you like it.
To do this, simply follow these steps:
Use Finder to navigate to
~/Documents/Virtual Machines.Select your virtual machine and copy it to your external hard drive by dragging-and-dropping it.
When you need to restore your virtual machine, you can either play the VM from your external hard drive by just double-clicking on it or you can drag it back to your
Virtual Machinesfolder on your Mac.
Now that Your VM is protected, let's protect Your Data.
Follow these steps:
Go to your virtual machine's Settings and click on Sharing Settings….
Click on the checkbox beside one of the folders you wish to mirror, as shown in the following screenshot:

You can also click on + and add a different folder to share. In Windows, folders added here show up as the
Z:drive.