
We already talked about USB pass-through during our printer discussion, but it's worth noting that you can do much more than just pass printers through to Windows; you can pass just about any USB device that the Mac detects.
Your Mac has more to offer than just USB devices, however; there's a built-in FaceTime camera in all modern MacBook and MacBook Pro's, and there are also Bluetooth devices.
Also, while Fusion prevents this by default, you can even connect a keyboard and mouse to Windows via USB or Bluetooth. This is great in the following scenario: your Mac will be connected to two displays (or your MacBook will be connected to a secondary display), and you can have Windows on one screen with Mac on the other. You will have a dedicated keyboard and mouse for Windows, and a dedicated keyboard and mouse (or built-in keyboard and track-pad) connected to the Mac.
A word of caution on this… there's a reason it's not enabled by default! If you give Windows your only keyboard and mouse connected to the Mac via USB pass-through, you will take it completely away from the Mac, trapping you in Windows! Only use this if you have a second keyboard and mouse that you can dedicate to Windows.
You can even connect devices that don't normally work on a Mac into Windows, so long as the USB cable connecting it works and the device is picked up by the Mac.
Your Mac can detect a device even if it isn't designed to work on a Mac and lacks driver support (unless it or the USB cable is damaged of course). So, to reiterate, the device doesn't need to be supported on the Mac for it to be able to run in Windows. This is one of the really great reasons for using Fusion in the first place. You have some older hardware that only runs on Windows 95, so you put that in a virtual machine, plug your sewing machine into the Mac, and pass it on down to Windows.
I know I keep poking at the sewing machine, but believe it or not, that was a very popular use case with customers when I was in the Fusion Support team at VMware, and many of them only worked on Windows 95 or XP, so it makes for a great example. Folks used special "embroidery" software to make interesting patterns and then print to the sewing/embroidery machine. No Mac support? No problem!
In this recipe, we'll walk through connecting the FaceTime camera and an external keyboard to Windows. The keyboard process can be repeated to add a dedicated mouse if you wish; the process is the same, and the modify VMX step only needs to be completed once.
To do this, you'll obviously need an extra USB or Bluetooth keyboard and mouse, and a Mac with a FaceTime (or the older iSight) camera.
This is a pretty exciting recipe. Here, we'll show you how to have one computer behave completely like two independent computers; the Holy Grail of VMware Fusion's possibilities!
Connecting the FaceTime camera is extremely simple, so we'll look at that first. Follow these steps:
Make sure Windows is running.
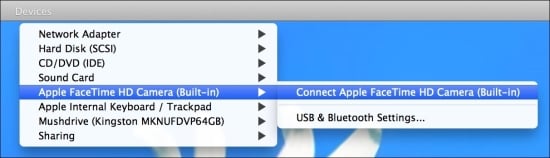
Click on Devices from the Fusion window toolbar.
Click on Apple FaceTime HD Camera (Built-In), as shown in the following screenshot (yours may read slightly different depending on your Mac model, I'm using a Mid 2012 Retina MacBook Pro). Or, from your Mac's menu bar, navigate to Virtual Machine | USB & Bluetooth | Connect Apple FaceTime HD Camera (Built-In).
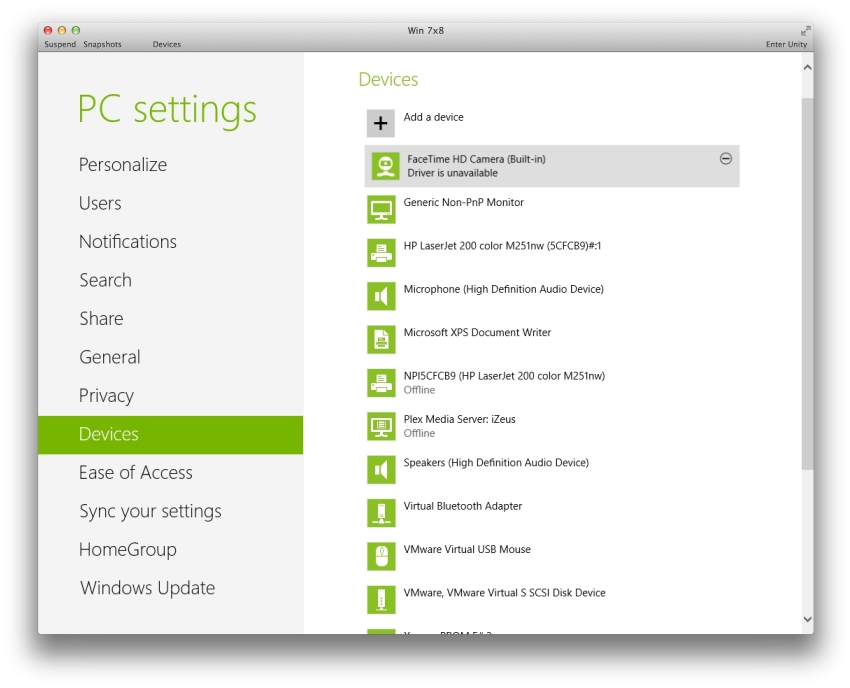
Windows now goes through a quick driver installation process. In Windows 8, it's fast and transparent. In the PC Settings window, however, it shows Driver is unavailable, as shown in the following screenshot, but that didn't prevent me from using the camera app or anything else that needed a webcam.