
Introducing Azure Pipelines and its components
Azure Pipelines is a CI/CD platform for building, testing, and deploying your code to a live application. First, let’s take a look at its key components.
Exploring the key components
There are some key concepts that you need to understand when creating an Azure pipeline:
- An agent is the software that runs a job within a server. It can be a Microsoft-hosted agent or a self-hosted agent.
- A pipeline is a workflow process for CI/CD for your application development. It can define your idea of how to build, test, integrate, and deploy your project.
- A trigger is an action that calls a pipeline to run.
- A stage is a flow of defined jobs in a pipeline, and each stage can have one or more jobs. The benefit of using a stage is that you can rerun job(s) under it. This means you do not need to rerun the whole pipeline. For example, let’s say the developer creates a pipeline containing two stages: the build stage and the deployment stage. If the deployment stage fails, then they can only rerun the failed job under the deployment stage.
- A job is a group of one or more steps set in a stage. It is useful when you need to run a set of steps in a different operating system environment.
- A step can be a task or script and is the smallest piece of a pipeline:
- A task is a pre-defined script that your idea can define.
- A script is an action that uses the command-line interface (CLI), PowerShell, or Bash. It depends on the operating system agent that you choose for a job. For example, if you use a command line to run on a Linux agent, it will use a bash script. PowerShell runs on a macOS agent and will use a PowerShell core for cross-platform scripts.
- A target is a destination of the pipeline. It can be Azure Artifacts, an Azure resource service (such as Azure App Services, Azure Functions, Azure Container Apps, Azure Kubernetes Services, and so on), or invoke a REST API such as webhooks on Microsoft Teams.
Now, let’s look at how these components interact with each other:
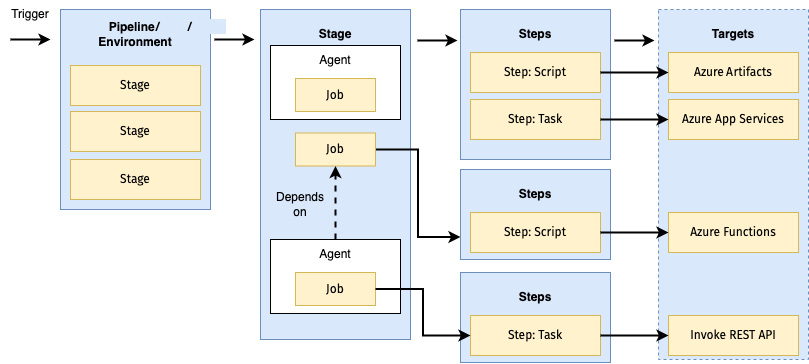
Figure 1.2 – Key components
This section described the meaning of and relationship between key objects. Before we take a more in-depth look at the different aspects of this platform, let’s learn how we can start using it.
Signing up for Azure Pipelines
Two methods can be used for signing up:
- Sign up with a Microsoft account: To do this, complete the following steps:
- Go to https://azure.microsoft.com/en-us/services/devops/pipelines.
- Click on Start free.
- Log in with your Microsoft account.
- Enter a name for your organization.
- You must always log in to your organization using
https://dev.azure.com/{your-organization}.
- Sign up with a GitHub account: To do this, complete the following steps:
- Go to https://azure.microsoft.com/en-us/services/devops/pipelines.
- Click on Start free with GitHub.
- Log in with your GitHub account.
- Enter a name for your organization.
- You must always log in to your organization using https://dev.azure.com/
{your-organization}.
Once you’ve signed up for an Azure Pipelines account, you are ready to create a new project for building your code and release the built code to the live application.
Creating a new project
Creating a new project is the first step after you sign up, before creating any CI/CD pipeline. Upon creating a project, you can set project visibility:
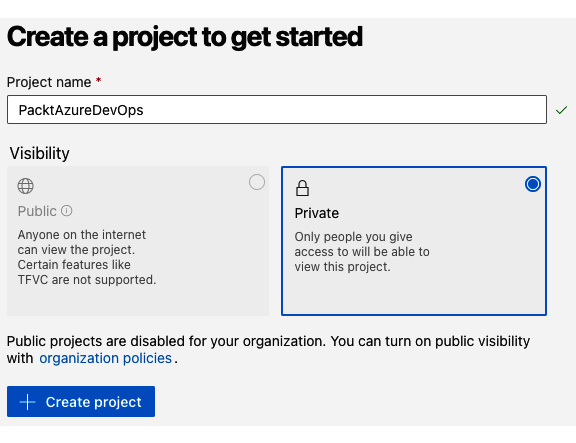
Figure 1.3 – Creating a new project
You can enter a project name and select Visibility, then click Create project.
Inviting team members
When you need to work with a team, you must add a new member by inviting one or more team members. Follow these steps to invite a team member:
- Click on your project’s name in the web portal and click Project settings:
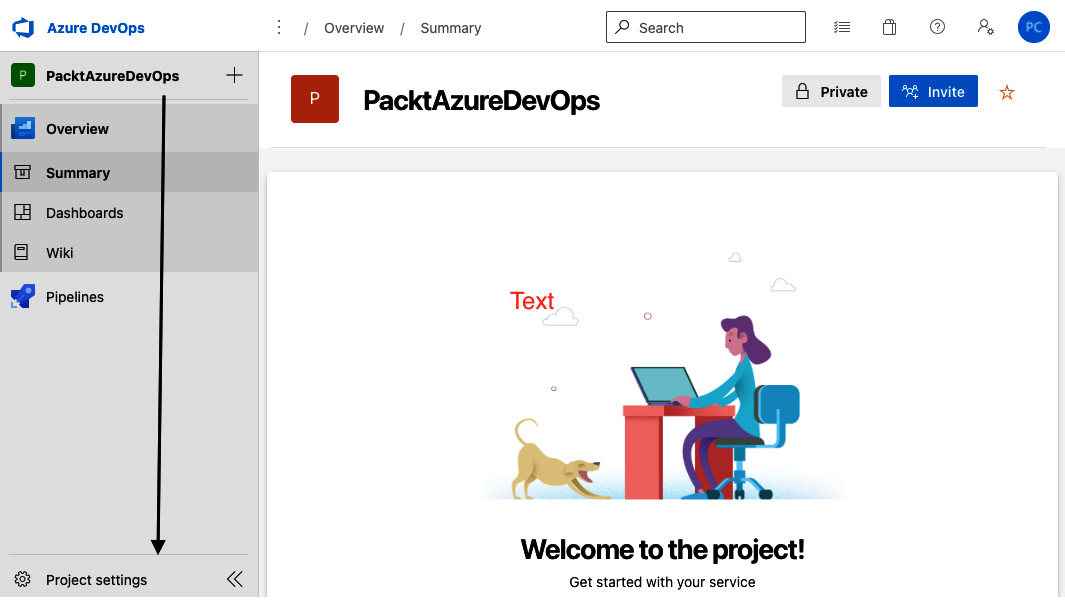
Figure 1.4 – Project settings
- Select Teams | Add:
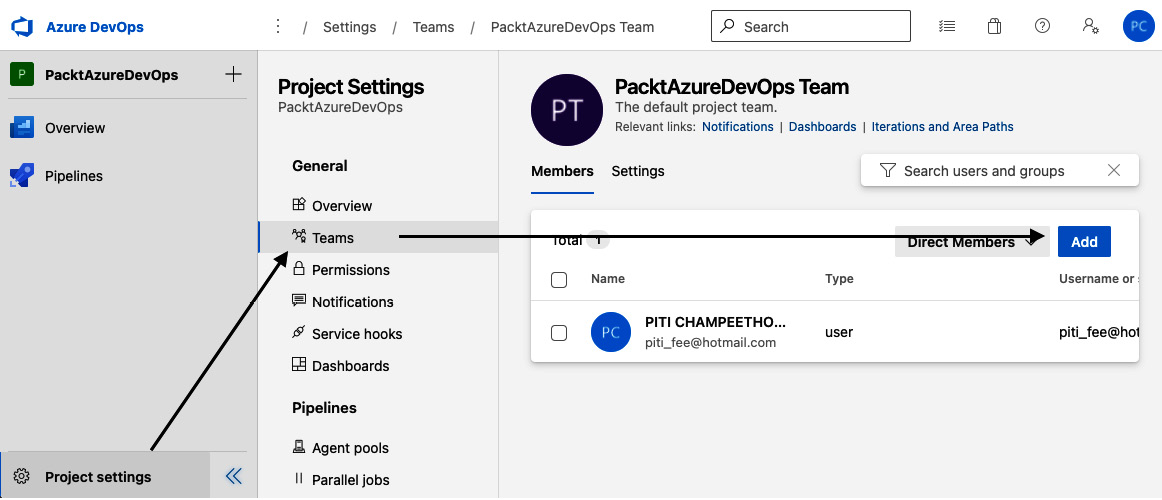
Figure 1.5 – Adding a new team member
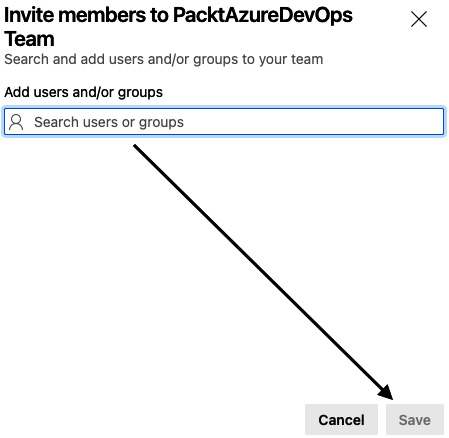
Figure 1.6 – Inviting team members
Now that you’ve invited your collaborators to join your project, let’s delve into how we can start using this service.
Creating Azure pipelines
There are two ways to create Azure pipelines:
- Using the Classic interface (create Azure pipelines from the web Azure DevOps portal) while following these basic steps:
- Configure Azure Pipelines to use your Azure Repos Git repository.
- Use Azure Pipelines to create and configure your build and release pipeline using drag and drop from the Azure DevOps portal.
- Push your code to your version control repository. The pipeline will be automatically initiated by the default trigger and the defined tasks will be executed.
- Using YAML syntax (create YAML files and commit them to the code repository) while following these basic steps:
- Configure Azure Pipelines to use your Azure Repos Git repository.
- Edit your
azure-pipelines.ymlfile by defining your custom build. - Push your code to your version control repository. This action runs the default trigger.
Let’s illustrate the Azure Pipelines YAML method for ease of understanding:

Figure 1.7 – Azure Pipelines YAML steps
There are different pipeline features available for both these methods, with some available for both and others only featuring in one. We’ll look at these in detail in the next section.
Feature availability
Some pipeline features are only available when using the classic interface or YAML. The following table displays which features are available for which of these methods:
|
Feature |
YAML |
Classic |
Description |
|
Agents |
Yes |
Yes |
To define the resource where the pipeline can run. |
|
Approvals |
Yes |
Yes |
To define the validation steps for additional checking before completing a deployment stage. |
|
Artifacts |
Yes |
Yes |
To define the library packages for publishing or consuming different package types. |
|
Caching |
Yes |
Yes |
To define an additional task to reduce the build time by allowing outputs or downloaded dependencies to store them on the agents and reuse them again. |
|
Conditions |
Yes |
Yes |
To define the specific conditions before running a job. |
|
Container jobs |
Yes |
No |
To define the specific jobs to run in a container. |
|
Demands |
Yes |
Yes |
To define the specific pipeline to ensure requirements are met before a pipeline stage is run. |
|
Dependencies |
Yes |
Yes |
To define specific requirements for validation before running the next job or stage. |
|
Deployment groups |
No |
Yes |
To define a logical group for the code that will be deployed to the target machines. |
|
Deployment group jobs |
Yes |
Yes |
To define a job to release to a deployment group. |
|
Deployment jobs |
Yes |
No |
To define the deployment steps. |
|
Environment |
Yes |
No |
To define a collection of resources targeted for deployment. |
|
Gates |
Yes |
Yes |
To support automatic collection and evaluation of external health signals before completing a release stage. Available with classic release only. |
|
Jobs |
Yes |
Yes |
To define the execution sequence of a set of steps. |
|
Service connections |
Yes |
Yes |
To define a connection to a remote service required to execute tasks in a job. |
|
Service containers |
Yes |
No |
To define a service that you can use to manage the life cycle of a containerized service. |
|
Stages |
Yes |
Yes |
To define flow jobs within a pipeline. |
|
Task groups |
No |
Yes |
To define a set of sequence tasks as a single reusable task. |
|
Tasks |
Yes |
Yes |
To define the building blocks that construct a pipeline. |
|
Templates |
Yes |
No |
To define reusable content, logic, and parameters. |
|
Triggers |
Yes |
Yes |
To define a specific event that causes a pipeline to run. |
|
Variables |
Yes |
Yes |
To define a value for data replacement and pass it to the pipeline. |
|
Variable groups |
Yes |
Yes |
To define the storage of values that you want to control and make available across multiple pipelines. |
Table 1.1 – Pipeline features
Apart from these features, there are source version control repositories that Azure Pipelines can connect to. We’ll look at these in detail in the next section.
Availability of source version control repositories
YAML pipelines only support some version control repositories. The following table displays which version control repositories can support which method:
|
Repository |
YAML |
Classic Interface |
|
Azure Repos |
Yes |
Yes |
|
GitHub |
Yes |
Yes |
|
GitHub Enterprise Server |
Yes |
Yes |
|
Bitbucket Cloud |
Yes |
Yes |
|
Bitbucket Server |
No |
Yes |
|
Subversion |
No |
Yes |
Table 1.2 – Comparing repositories
In this section, we discussed all the available features of Azure Pipelines. In the next section, we will convert the key components of Azure Pipelines into a YAML structure to manage it better.
Understanding the YAML structure of Azure Pipelines
Usually, creating a file called azure-pipelines.yml will help you remember which YAML file is used for azure-pipelines in the source code repository. The basic Azure Pipelines YAML structure is as follows:
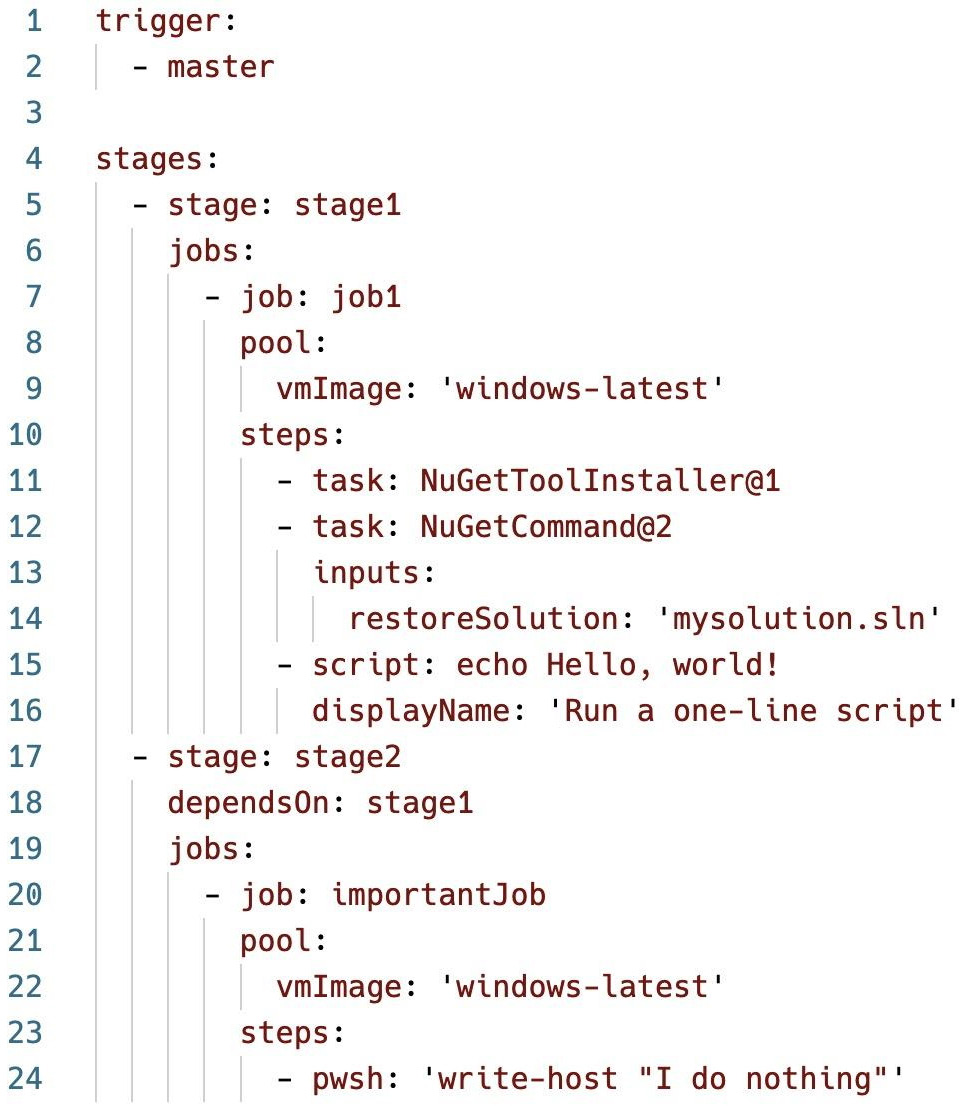
Figure 1.8 – azure-pipelines.yml file
The azure-pipelines.yml file in this example contains a typical structure:
- There are two stages,
stage1andstage2, and each stage contains ajobstep. - Lines 1-2 show the pipeline runs when the developer pushes changes on the main (
master) branch. - Lines 8-9 and 21-22 show the pipeline uses a Microsoft-hosted agent with the
windows-latestoperating system image. - Line 11 is a pre-created script for using the NuGet library. You can access this script in the
ch1folder in this book’s GitHub repository. - Line 12 is a pre-created script for using the NuGet command line.
- Line 15 is a command line to run the
echocommand. - Line 24 is a PowerShell Core script that is cross-platform.
As you can see, the basic YAML structure is rather simple to understand. Once you’ve prepared the YAML file, you can see the status for running it. We will discuss this in the next section.
Viewing the Azure pipelines' status
The Azure pipelines' status is displayed on the Azure DevOps web portal under the running pipeline:
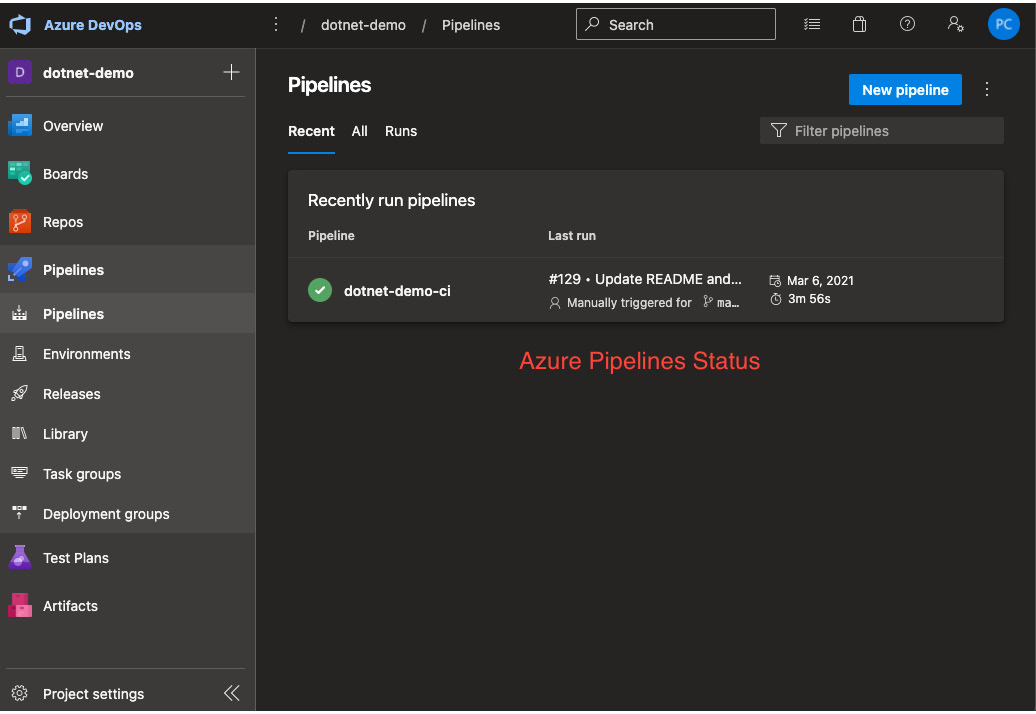
Figure 1.9 – The Azure pipelines' status
Clicking on the current pipeline status row will take you to the historical status of the pipeline. Two colors are used to indicate the status: green and red. These indicate successful and failed pipelines, respectively.
This section described all the components and their relationships. In the next section, you will understand the key differences between Azure Pipelines and other commonly used CI/CD tools.