

Building our first EC2 instances in the Amazon cloud
In this section, we will use the AWS cloud console and CloudShell command line to provision EC2 instances running in the Amazon cloud—Linux and Windows VMs, step by step. Note that the user interface may change, but the procedures are similar.
Before we can launch an EC2 instance, we need to create an AWS account first. Amazon offers a free tier account for new cloud learners to provision some basic cloud resources, but you will need a credit card to sign up for an AWS account. Since your credit card is involved, there are three things to keep in mind with your AWS 12-digit account, as follows:
- Enable multi-factor authentication (MFA) to protect your account
- You can log in to the console with your email address, but be aware that this is the root user, which has the superpower to provision any resources globally
- Clean up all/any cloud resources you have provisioned after completing the labs
Having signed up for an AWS account, you are ready to move to the next phase—launching EC2 instances using the cloud console or CloudShell.
Launching EC2 instances in the AWS cloud console
Logging in to the AWS console at console.aws.amazon.com, you can search for EC2 services and launch an EC2 instance by taking the following nine steps:
- Select the software of the EC2 instance: Think of it just like selecting software (OS and other applications) when purchasing a physical desktop or laptop PC.
In AWS, the software image for an EC2 instance is called an Amazon Machine Image (AMI), which is a template that is used to launch an EC2 instance. Amazon provides AMIs in Windows, Linux, and other operating systems, customized with some other software pre-installed:
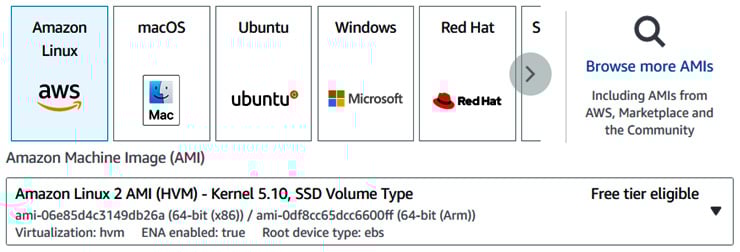
Figure 1.3 – Selecting an AMI
As shown in Figure 1.3, we have chosen the Amazon Linux 2 AMI, which is a customized Linux OS tuned for optimal performance on AWS and easy integration with AWS services, and it is free-tier eligible.
In many enterprises, AMI images are standardized to be used as seeds to deploy EC2 instances—we call them golden images. A production AMI includes all the packages, patches, and applications that are needed to deploy EC2 instances in production and will be managed with secure version-control management systems.
- Select the hardware configuration of the EC2 instance: This is just like selecting hardware—the number of CPUs, RAM, and HD sizes when purchasing a physical desktop or laptop PC. In AWS, the hardware selection is to choose the right EC2 instance type—Amazon has categorized the EC2 hardware configurations into various instance types, such as General Purpose, Compute Optimized, Memory Optimized, and so on, based on business use cases. Some AWS EC2 instance types are shown in Figure 1.4:
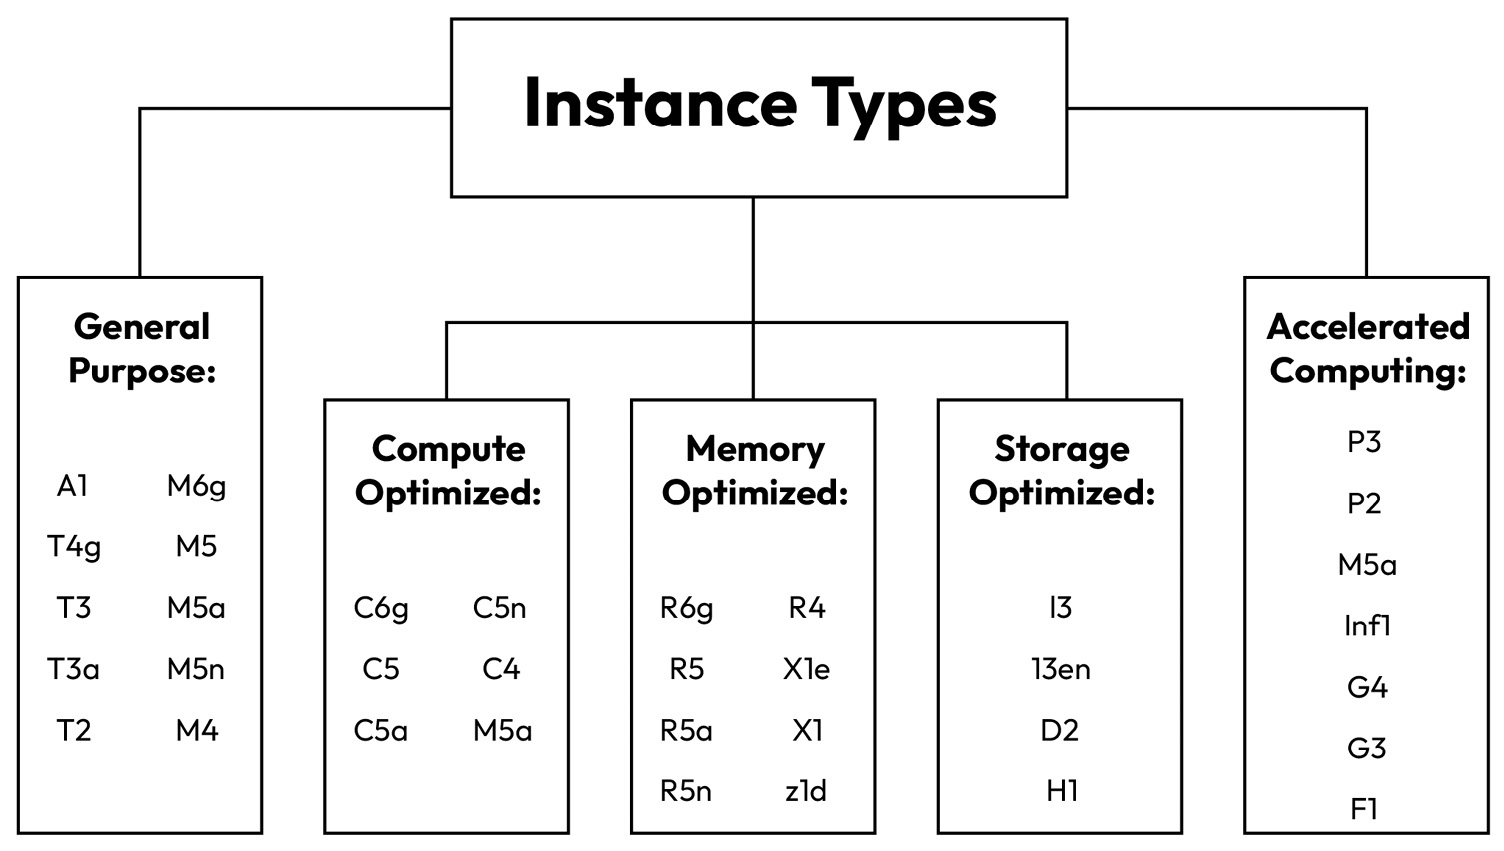
Figure 1.4 – EC2 instance types
Each instance type is specified by a category, family series, generation number, and configuration size. For example, the p2.8xlarge instance type can be used for an Accelerated Computing use case, where p is the instance family series, 2 is the instance generation, and 8xlarge indicates its size is 8 times the p2.large instance type.
We will choose t2.micro, which is inexpensive and free-tier eligible, for our EC2 instances.
- Specify the EC2 instance’s network settings: This is like subscribing to an Internet Service Provider (ISP) for our home PC to connect to a network and the internet. In the AWS cloud, the basic network unit is called a Virtual Private Cloud (VPC), and Amazon has provided a default VPC and subnets in each region. At this time, we will take the default setting—our first EC2 instance will be placed into the default VPC/subnet and be assigned a public IP address to make it internet-accessible.
- Optionally attach an AWS Identity and Access Management (IAM) role to the EC2 instance: This is something very different from traditional concepts but is very useful for software/applications running on the EC2 instance to interact with other AWS services.
With IAM, you can specify who can access which resources with what permissions. An IAM role can be created and assigned with permissions to access other AWS resources, such as reading an Amazon Simple Storage Service (Amazon S3) bucket. By attaching the IAM role to an EC2 instance, all applications running on the EC2 instance will have the same permissions as that role. For example, we can create an IAM role, assign it read/write access to an S3 bucket, and attach the role to an EC2 instance, then all the applications running on the EC2 instance will have read/write access to the S3 bucket. Figure 1.5 shows the concept of attaching an IAM role to an EC2 instance:
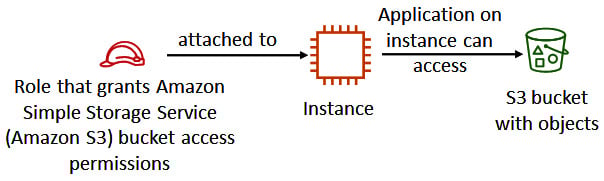
Figure 1.5 – Attaching an IAM role to an EC2 instance
- Optionally specify a user data script to the EC2 instance: User data scripts can be used to customize the runtime environment of the EC2 instance—it executes the first time the instance starts. I have had experience using the EC2 user data script—at a time when the Linux system admin left my company and no one in the company was able to access a Linux instance sitting in the AWS cloud. While there exist many ways to rescue this situation, one interesting solution we used was to generate a new key pair (public key and private key), stop the instance, and leverage the instance’s user data script to append the new public key to the
EC2-useruser’s Secure Shell (SSH) profile, during the instance starting process. With the new public key added to the EC2 instance, theec2-useruser can SSH into the instance with the new private key. - Optionally attach additional storage volumes to the EC2 instance: This can be thought of as buying and adding additional disk drives to our PC at home. For each volume, we need to specify the size of the disk (in GB) and the volume type (hardware types), and whether encryption should be used for the volume.
- Optionally assign a tag to the EC2 instance: A tag is a label that we can assign to an AWS resource, and it consists of a key and an optional value. With tags, we attach metadata to cloud resources such as an EC2 instance. There are many potential benefits of tagging in managing cloud resources, such as filtering, automation, cost allocation and chargeback, and access control.
- Setting a Security Group (SG) for the EC2 instance: Just like configuring firewalls on our home routers to manage access to our home PCs, an SG is a set of firewall rules that control traffic to and from our EC2 instance. With an SG, we can create rules that specify the source (for example, an IP address or another SG), the port number, and the protocol, such as HTTP/HTTPS, SSH (port
22), or Internet Control Message Protocol (ICMP). For example, if we use the EC2 instance to host a web server, then the SG will need an SG rule to open ports forhttp(80) andhttps(443). Note that SGs exist outside of the instance’s guest OS—traffic to the instance can be controlled by both SGs and guest OS firewall settings. - Specify an existing key pair or create a new key pair for the EC2 instance: A key pair consists of a public key that AWS stores on the instance and a private key file that you download and store on your local computer for remote access. When you try to connect to the instance, the keys from both ends are matched to authenticate the remote user/connections. For Windows instances, we need to decrypt the key pair to obtain the administrator password for logging in to the EC2 instance remotely. For Linux instances, we utilize the private key and use SSH to securely connect to the cloud instance. Note that the only chance to download an EC2 key pair is during the instance creation time. If you’ve lost the key pair, you cannot recover it. The only workaround is to create an AMI of the existing instance, and then launch a new instance with the AMI and a new key pair. Also, note that there are two formats for an EC2 key pair when you save it to the local computer: the
.pemformat is used on Linux-based terminals including Mac, and the.ppkformat is used for Windows.
Following the preceding nine steps, we have provisioned our first EC2 instance—a Linux VM in the AWS cloud. Following the same procedure, let us launch a Windows VM. The only difference is that in step 1, we choose the Microsoft Windows operating system— specifically, Microsoft Windows Server 2022 Base—as shown in Figure 1.6, which is also free-tier eligible:
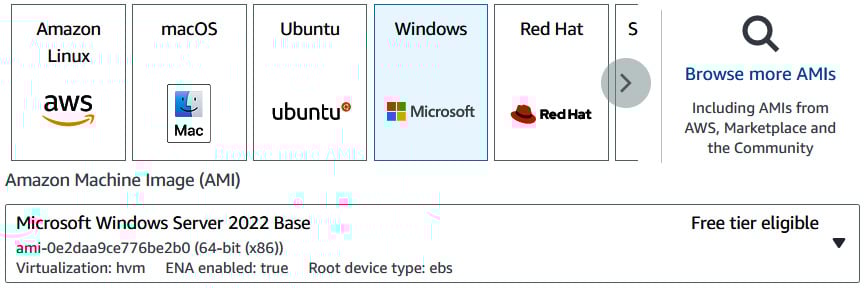
Figure 1.6 – Selecting Microsoft Windows as the operating system
So far, we have created two EC2 instances in our AWS cloud—one Linux VM and one Windows VM—via the AWS Management console.
Launching EC2 instances using CloudShell
We can also launch EC2 instances using the command line in CloudShell, which is a browser-based, pre-authenticated shell that you can launch directly from the AWS Management Console. Next are detailed steps to create an EC2 Windows instance in the us-west-2 Region:
- From the AWS console, launch CloudShell by clicking the CloudShell sign, as shown in Figure 1.7:

Figure 1.7 – Launching CloudShell from the AWS console
- Find the AWS AMI image ID in the
us-west-2region, with the following CloudShell command – the results are shown in Figure 1.8:
[cloudshell-user]$ aws ec2 describe-images --region us-west-2
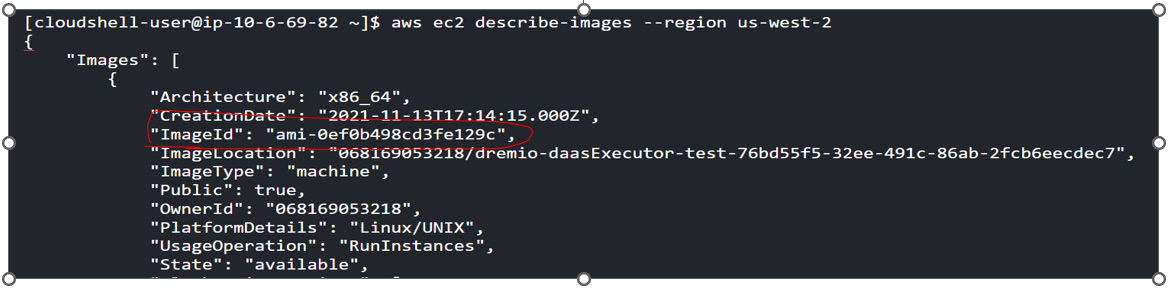
Figure 1.8 – Finding the Linux AMI image ID
- Find the SG name we created in the previous section, as shown in Figure 1.9:
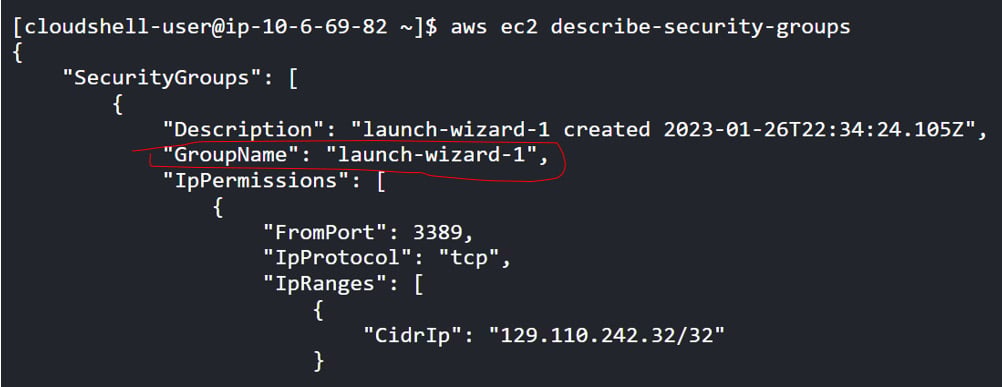
Figure 1.9 – Finding the SG name
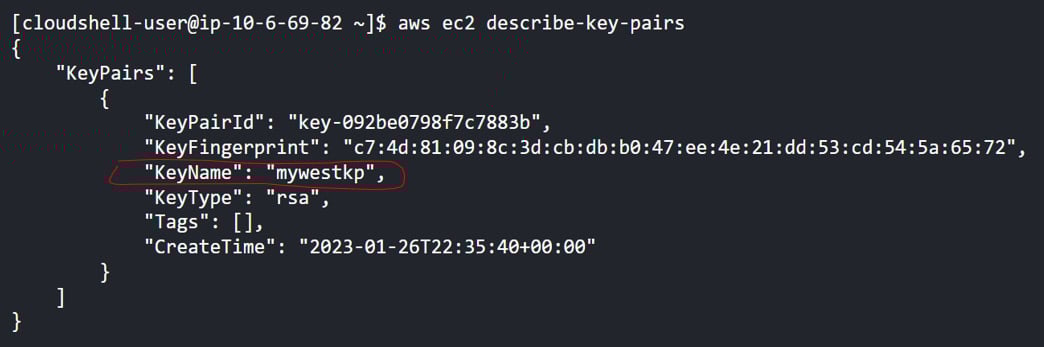
Figure 1.10 – Finding the key pair name
- Create an EC2 instance in the
us-west-2region, using theaws ec2 run-instancescommand, with the following configurations we obtained from the previous steps. A screenshot is shown in Figure 1.11. The instance ID is called out from the output
AMI:
ami-0ef0b498cd3fe129c
SG:
launch-wizard-1
Key pair:
mywestkp
Instance type:
t2.micro
aws ec2 run-instances --image-id ami-0ef0b498cd3fe129c --count 1 --instance-type t2.micro --key-name mywestkp --security-groups launch-wizard-1 --region us-west-2
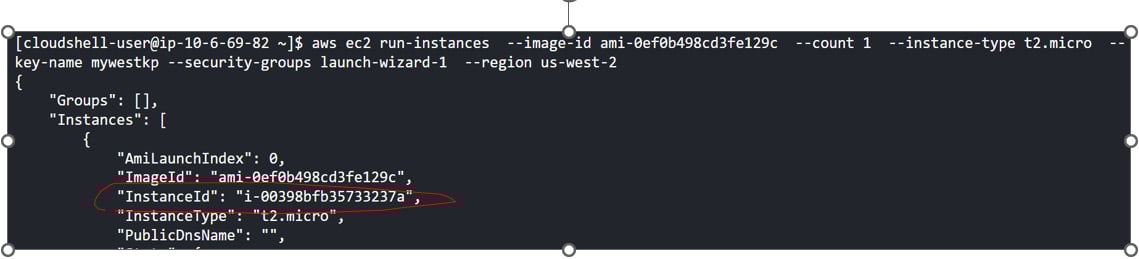
Figure 1.11 – Launching an EC2 instance
- Examine the details of the instance from its
InstanceIdvalue. As shown in Figure 1.12, the instance has a public IP address of35.93.143.38:

Figure 1.12 – Finding the EC2 instance’s public IP address
So far, we have created another EC2 instance using CloudShell with command lines. Note that CloudShell allows us to provision any cloud resources using lines of code, and we will provide more examples in the rest of the book.
Logging in to the EC2 instances
After the instances are created, how do we access them?
SSH is a cryptographic network protocol for operating network services securely over an unsecured network. We can use SSH to access the Linux EC2 instance. PuTTY is a free and open source terminal emulator, serial console, and network file transfer application. We will download PuTTY and use it to connect to the Linux VM in the AWS cloud, as shown in Figure 1.13:
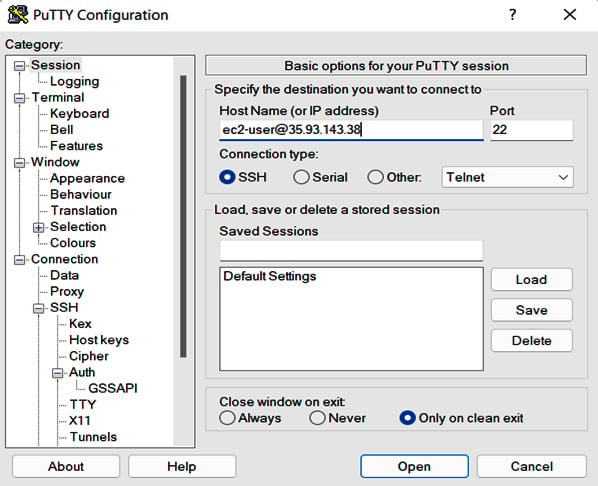
Figure 1.13 – Using PuTTY to connect to the Linux instance
As shown in Figure 1.13, we entered [email protected] in the Host Name (or IP address) field. ec2-user is a default user created in the guest Linux OS, and 35.93.143.38 is the public IP of the EC2 instance. Note we need to open the SSH port (22) in the EC2 instance’s SG to allow traffic from our remote machine, as discussed in step 8 of the Launching EC2 instances in the AWS cloud console section earlier in the chapter.
We also need to provide the key pair in the PuTTY Configuration window by going to Connection | SSH | Auth, as shown in Figure 1.14:
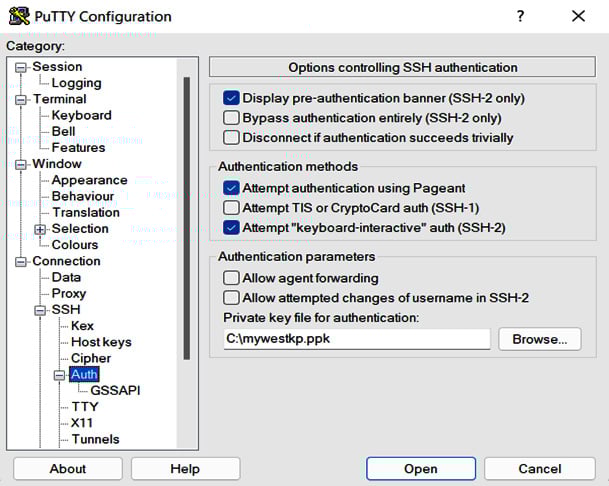
Figure 1.14 – Entering the key pair in PuTTY
Click Open, and you will be able to SSH into the Linux instance now. As shown in Figure 1.15, we have SSH-ed into the cloud EC2 instance:
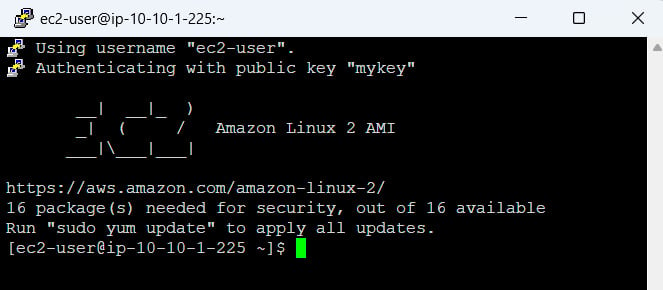
Figure 1.15 – SSH-ing into ec2-1 from the internet
Since we are using a Windows terminal to connect to the remote Linux instance, the key pair format is .ppk. If you are using a Mac or another Linux-based terminal, you will need to use the .pem format. These two formats can be converted using the open source software PuTTYgen, which is part of the PuTTY family.
With a Linux-based terminal including Mac, use the following command to connect to the cloud Linux EC2 instance:
ssh -i keypair.pem [email protected]
keypair.pem is the key pair file in .pem format. Make sure it’s set to the right permission using the chomd 400 keypair.pem Linux command. [email protected] is user@EC2’s public IP address. The default user may change to ubuntu if the EC2 instance is an Ubuntu Linux distribution.
For the Windows EC2 instance, just as we access another PC at our home using Remote Desktop Protocol (RDP), a proprietary protocol developed by Microsoft that provides a user with a graphical interface to connect to another computer over a network connection, we use RDP to log in to the Windows EC2 instance in the AWS cloud. By default, RDP client software is installed on our desktop or laptop, and the Windows EC2 instance has RDP server software running, so it becomes very handy to connect our desktop/laptop to the Windows VM in the cloud. One extra step is that we need to decrypt the administrator’s password from the key pair we downloaded during the instance launching process, by going to the AWS console’s EC2 dashboard and clicking Instance | Connect | RDP Client.