Sign In Start Free Trial
Account

Add to playlist

Create a Playlist

Modal Close icon
You need to login to use this feature.
  • Book Overview & Buying Codeless Deep Learning with KNIME
  • Table Of Contents Toc
Codeless Deep Learning with KNIME

Codeless Deep Learning with KNIME

By : Kathrin Melcher, Rosaria Silipo
4.5 (10)
close
close
Codeless Deep Learning with KNIME

Codeless Deep Learning with KNIME

4.5 (10)
By: Kathrin Melcher, Rosaria Silipo

Overview of this book

KNIME Analytics Platform is an open source software used to create and design data science workflows. This book is a comprehensive guide to the KNIME GUI and KNIME deep learning integration, helping you build neural network models without writing any code. It’ll guide you in building simple and complex neural networks through practical and creative solutions for solving real-world data problems. Starting with an introduction to KNIME Analytics Platform, you’ll get an overview of simple feed-forward networks for solving simple classification problems on relatively small datasets. You’ll then move on to build, train, test, and deploy more complex networks, such as autoencoders, recurrent neural networks (RNNs), long short-term memory (LSTM), and convolutional neural networks (CNNs). In each chapter, depending on the network and use case, you’ll learn how to prepare data, encode incoming data, and apply best practices. By the end of this book, you’ll have learned how to design a variety of different neural architectures and will be able to train, test, and deploy the final network.
Table of Contents (16 chapters)
close
close
1
Section 1: Feedforward Neural Networks and KNIME Deep Learning Extension
6
Section 2: Deep Learning Networks
12
Section 3: Deployment and Productionizing

Installing KNIME Deep Learning – Keras Integration

In this section, you will learn how to install and set up KNIME Deep Learning - Keras Integration in order to train neural networks in KNIME Analytics Platform.

KNIME Analytics Platform consists of a software core and several provided extensions and integrations. Such extensions and integrations are provided by the KNIME community and extend the original software core through a variety of data science functionalities, including advanced algorithms for AI.

The KNIME extension of interest here is called KNIME Deep Learning – Keras Integration. It offers a codeless GUI-based integration of the Keras library, while using TensorFlow as its backend. This means that a number of functions from Keras libraries have been wrapped into KNIME nodes, within KNIME's classic, easy-to-use visual dialog window. Due to this integration, you can read, write, create, train, and execute deep learning networks without writing code.

Another deep learning integration that's available is called KNIME Deep Learning - TensorFlow Integration. This extension allows you to convert Keras models into TensorFlow models, as well as read, execute, and write TensorFlow models.

TensorFlow is an open source library provided by Google that includes a number of deep learning paradigms. TensorFlow functions can run on single devices, as well as on multiple CPUs and multiple GPUs. This parallel calculation feature is the key to speeding up the computationally intensive training that's required for deep learning networks.

However, using the TensorFlow library within Python can prove quite complicated, even for an expert Python programmer or a deep learning pro. Thus, a number of simplified interfaces have been developed on top of TensorFlow that expose a subset of its functions and parameters. The most successful of such TensorFlow-based libraries is Keras. However, even Keras still requires some programming skills. The KNIME Deep Learning – Keras Integration puts the KNIME GUI on top of the Keras libraries that are available, mostly eliminating the need to code.

To make the KNIME Deep Learning – Keras Integration work, a few pieces of the puzzle need to be installed:

  • The Keras and TensorFlow nodes
  • The Python environment

Let's start with the first piece: installing the Keras and TensorFlow nodes.

Installing the Keras and TensorFlow Nodes

To add nodes to the Node Repository, you must install a few extensions and integrations.

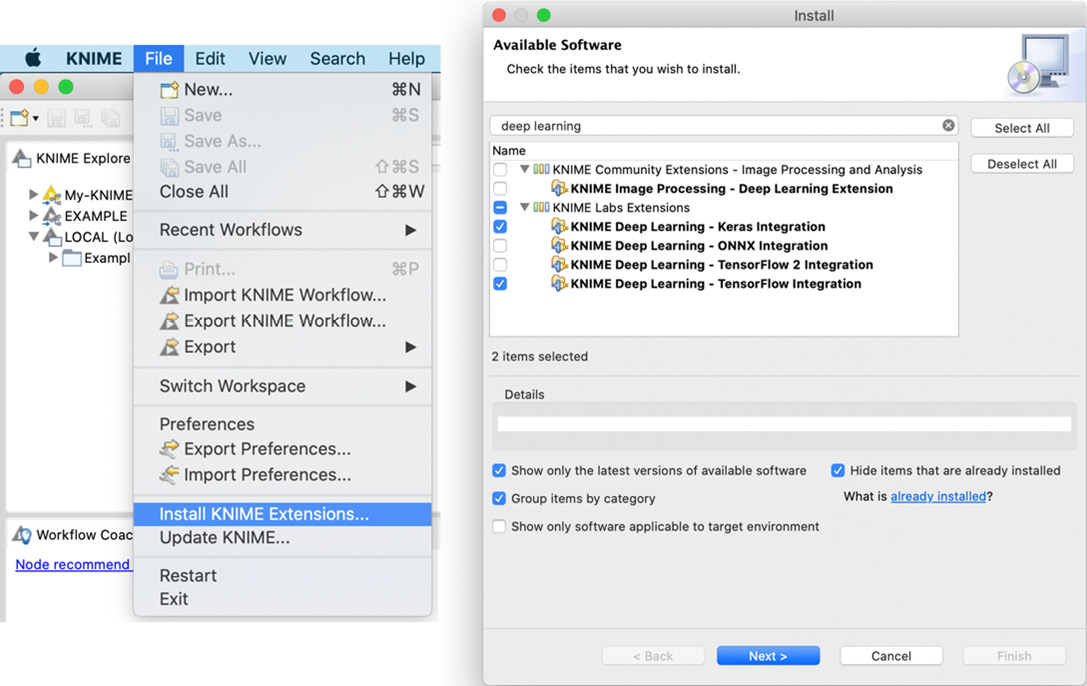
You can install them from within KNIME Analytics Platform by clicking on File from the top menu and selecting Install KNIME Extension…. This opens the dialog shown in Figure 1.18:

Figure 1.18 – Dialog for installing extensions

Figure 1.18 – Dialog for installing extensions

From this new dialog, you can select the extensions and integrations you want to install. Using the search bar at the top is helpful for filtering the available extensions and integrations.

Tip

Another way you can install extensions is by dragging and dropping them from the KNIME Hub.

To install the Keras and TensorFlow nodes that will be used in the case studies described in this book, you need to select the following:

  • KNIME Deep Learning – Keras Integration
  • KNIME Deep Learning – TensorFlow Integration

Then, press the Next button, accept the terms and conditions, and click Finish. Once the installation is done, you need to restart KNIME Analytics Platform.

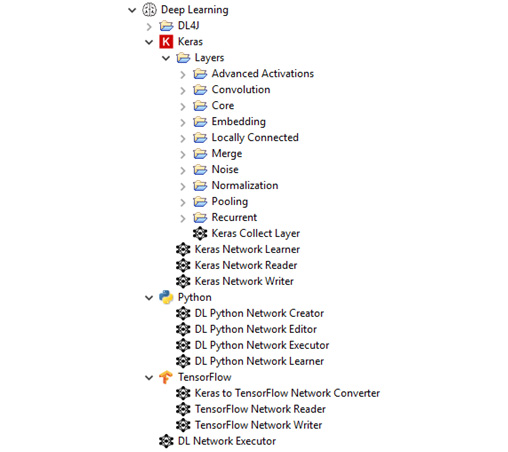
At this point, you should have the Keras and TensorFlow nodes in your Node Repository (Figure 1.19):

Figure 1.19 – Installed deep learning nodes in the Node Repository

Figure 1.19 – Installed deep learning nodes in the Node Repository

A large number of nodes implement neural layers: the nodes for input and dropout layers can be found in the Core sub-category, the nodes for LSTM layers can be found in Recurrent, and the nodes for embedding layers can be found in Embedding. Then, there are the Learner, Reader, and Writer nodes, which can be used to train, load, and store a network, respectively. All these nodes have a configuration window and don't require any coding. The Python deep learning nodes allow you to define, train, execute, and edit networks using Python code. The last subcategory contains TensorFlow-based nodes.

Next, we need to set up the Python environment.

Setting up the Python Environment

The KNIME Keras Integration and the KNIME TensorFlow Integration depend on an existing Python installation, which requires certain Python dependencies to be installed.

Similar to the KNIME Python Integration, the KNIME Deep Learning Integration uses Anaconda to manage Python environments. If you have already installed Anaconda for, for example, the KNIME Python Integration, you can skip the first step.

Let's get started:

  1. First, get and install the latest Anaconda version (Anaconda ≥ 2019.03, conda ≥ 4.6.2) from https://www.anaconda.com/products/individual. On the Anaconda download page, you can choose between Anaconda with Python 3.x or Python 2.x. Either one should work (if you're not sure, we suggest selecting Python 3).
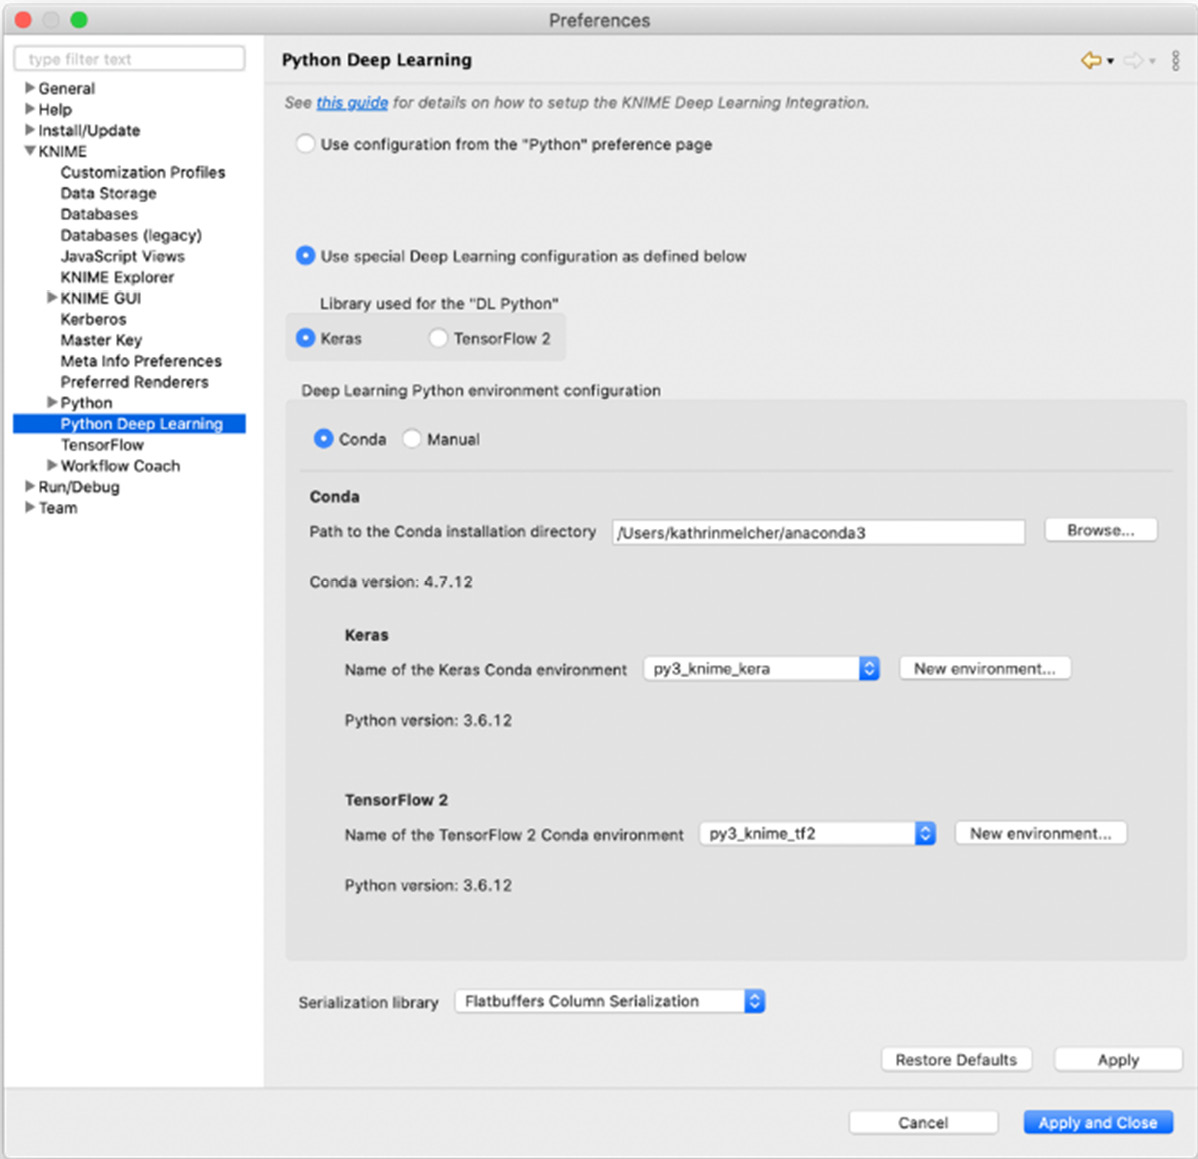
  2. Next, we need to create an environment with the correct libraries installed. To do so, from within KNIME Analytics Platform, open the Python Deep Learning preferences. From here, do the following:
  3. First, select File -> Preferences from the top menu. This will open a new dialog with a list on the left.
  4. From the dialog, select KNIME -> Python Deep Learning.

    You should now see a dialog like that in Figure 1.20:

    Figure 1.20 – Python Deep Learning preference page

    Figure 1.20 – Python Deep Learning preference page

    From this page, create some Conda environments with the correct packages installed for Keras or TensorFlow 2. For the case studies in this book, it will be sufficient to set up an environment for Keras.

  5. To create and set up a new environment, enable Use special Deep Learning configuration and set Keras to Library used for DL Python. Next, enable Conda and provide the path to your Conda installation directory.
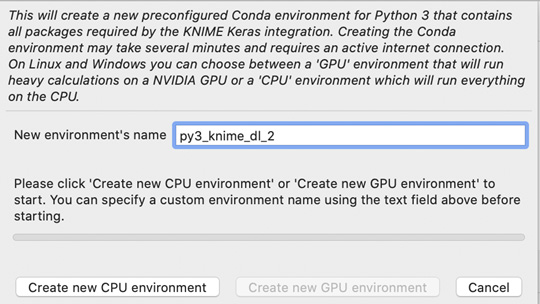
  6. In addition, to create a new environment for Keras, click on the New environment… button in the Keras framework.

    This opens a new dialog, as in Figure 1.21, where you can set the new environment's name:

    Figure 1.21 – Dialog for setting the new environment's name

    Figure 1.21 – Dialog for setting the new environment's name

  7. Click on the Create new CPU environment or Create new GPU environment button to create a new environment for using either a CPU or GPU, if available.

Now, you can get started. In this section, you were introduced to the most convenient way of setting up a Python environment. Other options can be found in the KNIME documentation: https://docs.knime.com/2019-06/deep_learning_installation_guide/index.html#keras-integration.

CONTINUE READING
83
Tech Concepts
36
Programming languages
73
Tech Tools
Icon Unlimited access to the largest independent learning library in tech of over 8,000 expert-authored tech books and videos.
Icon Innovative learning tools, including AI book assistants, code context explainers, and text-to-speech.
Icon 50+ new titles added per month and exclusive early access to books as they are being written.
Codeless Deep Learning with KNIME
notes
bookmark Notes and Bookmarks search Search in title playlist Add to playlist download Download options font-size Font size

Change the font size

margin-width Margin width

Change margin width

day-mode Day/Sepia/Night Modes

Change background colour

Close icon Search
Country selected

Close icon Your notes and bookmarks

Confirmation

Modal Close icon
claim successful

Buy this book with your credits?

Modal Close icon
Are you sure you want to buy this book with one of your credits?
Close
YES, BUY

Submit Your Feedback

Modal Close icon
Modal Close icon
Modal Close icon