

A realistic lens flare can be achieved within the Reach profile by being "physically correct" and performing a check of each frame to confirm that the source of light is, at least partially, visible from the camera's point of view. (Tests involving whether something is in line of sight from something else are commonly referred to as occlusion tests.)
The bad news is, that without the benefit of hardware accelerated occlusion testing like the HiDef profile's OcclusionQuery class can offer, this test can be beyond the processing resources available to a game (especially one running on either mobile or older hardware).
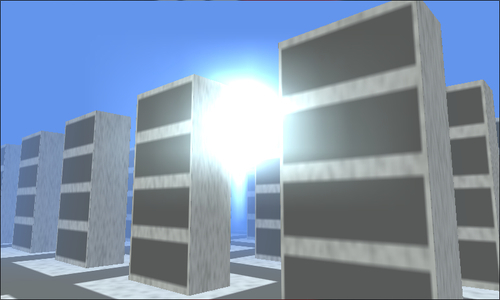
The good news is that we do have a relatively cheap alternative that may just provide enough approximation for a game, and no one need be the wiser that the "proper" technique wasn't used, as the following illustration of the approximation in use demonstrates:
For this special effect, we're going to need an image that will form the basis of our glow. The image can be a simple white circle that fades out to complete transparency, as shown in the following illustration, but don't be afraid to make things even more visually interesting and swap it out for a more complex image later.

To create a lens flare within the Reach profile:
1. Start by creating a new class to hold the lens flare behavior:
class ReachLensFlare
{
2. Inside the new class, define some instance variables to hold details concerning the appearance of the glow:
Texture2D glow;
Vector2 glowOrigin;
float glowScale = 0.25f;
Vector2 lightPosition;
public Vector3 LightDirection = Vector3.Normalize(new Vector3(0.5f, -0.1f, 0.5f));
3. Next, define some instance variables to hold details concerning the rendering of the glow:
SpriteBatch spriteBatch;
GraphicsDevice graphicsDevice;
RenderTarget2D flareTarget;
List<RenderTarget2D> blurTargets;
Viewport flareViewport;
public BasicEffect ShadowCaptureEffect;
4. Then, add a constructor:
public ReachLensFlare(GraphicsDevice graphicsDevice, ContentManager content)
{
5. Next, load the glow image details:
glow = content.Load<Texture2D>(@"lensflare/glow");
glowOrigin = new Vector2(glow.Width, glow.Height) / 2;
6. We now need to pre-calculate the size of the screen onto which the glow is going to be displayed:
flareViewport = new Viewport(0,0,
graphicsDevice.Viewport.Bounds.Width / 8,
graphicsDevice.Viewport.Height /8);
7. Define the render targets, which will aid in the final composition of the overall effect:
this.graphicsDevice = graphicsDevice;
spriteBatch = new SpriteBatch(graphicsDevice);
var pp = graphicsDevice.PresentationParameters;
flareTarget = new RenderTarget2D(graphicsDevice,
flareViewport.Width,
flareViewport.Height,
false,
pp.BackBufferFormat,
pp.DepthStencilFormat);
blurTargets = new List<RenderTarget2D>()
{
new RenderTarget2D(graphicsDevice,
3, 5,
false,
pp.BackBufferFormat,
pp.DepthStencilFormat),
new RenderTarget2D(graphicsDevice,
7 ,4,
false,
pp.BackBufferFormat,
pp.DepthStencilFormat),
new RenderTarget2D(graphicsDevice,
5, 9,
false,
pp.BackBufferFormat,
pp.DepthStencilFormat),
new RenderTarget2D(graphicsDevice,
15, 10,
false,
pp.BackBufferFormat,
pp.DepthStencilFormat),
new RenderTarget2D(graphicsDevice,
33, 43,
false,
pp.BackBufferFormat,
pp.DepthStencilFormat),
new RenderTarget2D(graphicsDevice,
90, 90,
false,
pp.BackBufferFormat,
pp.DepthStencilFormat)
};
8. Complete the constructor with the effect that will be used to mask out any portions of the lens flare that are blocked by scenery:
ShadowCaptureEffect = new BasicEffect(graphicsDevice)
{
DiffuseColor = Vector3.Zero,
};
9. Next, add an
Update()method to the class:public void Update(GameTime gameTime, Matrix view, Matrix projection) {10. Add in a check to determine if the lens flare is visible at all where the player is currently looking:
view.Translation = Vector3.Zero;
var projectedPosition = flareViewport.Project(
-LightDirection, projection,
view, Matrix.Identity);
if ((projectedPosition.Z < 0) || (projectedPosition.Z > 1))
{
return;
}
11. If the lens flare is visible from the player's point of view, complete the
Update()method by storing the light's screen space position:lightPosition = new Vector2(projectedPosition.X, projectedPosition.Y);
12. Create a method to begin the process of capturing the silhouette of the scene:
public void BeginShadowCapture()
{
13. Set the render target, clear the silhouette to black, and place the glow image in the background; ready to be possibly covered by scene elements:
graphicsDevice.SetRenderTarget(flareTarget);
graphicsDevice.Clear(Color.Black);
spriteBatch.Begin();
spriteBatch.Draw(
glow, lightPosition, null, Color.White, 0,
glowOrigin, glowScale, SpriteEffects.None, 0);
spriteBatch.End();
14. Create the method to complete the silhouette capture and apply some blur:
public void EndShadowCapture()
{
15. Paint the captured silhouette scene onto each of the blur targets:
foreach (var blurTarget in blurTargets)
{
graphicsDevice.SetRenderTarget(blurTarget);
spriteBatch.Begin(
SpriteSortMode.Deferred,
BlendState.Opaque,
SamplerState.AnisotropicClamp, null, null);
spriteBatch.Draw(
flareTarget,
blurTarget.Bounds,
Color.LightBlue);
spriteBatch.End();
}
16. Paint the blur targets onto the final target:
graphicsDevice.SetRenderTarget(flareTarget);
graphicsDevice.Clear(Color.Black);
spriteBatch.Begin(
SpriteSortMode.Deferred,
BlendState.Additive,
SamplerState.AnisotropicClamp,
null, null);
foreach (var blurTarget in blurTargets)
{
spriteBatch.Draw(
blurTarget,
flareTarget.Bounds,
Color.White);
}
spriteBatch.End();
graphicsDevice.SetRenderTarget(null);
17. Add a
Draw()method to render the final target on screen:public void Draw() { spriteBatch.Begin( SpriteSortMode.Deferred, BlendState.Additive, SamplerState.AnisotropicClamp, null, null); spriteBatch.Draw( flareTarget, graphicsDevice.Viewport.Bounds, Color.White); spriteBatch.End(); }18. Next in our game code, we add an instance variable for the new lens flare:
ReachLensFlare reachLensFlare;
19. Initialize an instance of the lens flare in the
LoadContent()method:reachLensFlare = new ReachLensFlare(GraphicsDevice, Content);
20. Inside the
Draw()method, there are two parts. The first part is where we draw the elements of the game scene which are likely to block out the lens flare as the player moves through the scene. Here's an example of the required call to the lens flare, followed by a rendering of the scene with the silhouette effect:reachLensFlare.BeginShadowCapture(); // draw scene here. // e.g. here's some building and ground objects // being rendered via their own custom Draw methods foreach (var building in buildings) { building.Draw(camera, reachLensFlare.ShadowCaptureEffect); } ground.Draw(camera, reachLensFlare.ShadowCaptureEffect); reachLensFlare.EndShadowCapture();21. The second part of the rendering process is drawing the scene normally, followed by a call to render the now fully formed lens flare:
GraphicsDevice.Clear(Color.CornflowerBlue);
foreach (var building in buildings)
{
building.Draw(camera);
}
ground.Draw(camera);
reachLensFlare.Draw();
The lens flare class works by drawing a silhouette of the scene in front of the light source, our glow image, and then applying various levels of blurring until we achieve a "flare" appearance.
In the constructor of the lens flare class, we can see the elements of this strategy being set up with the loading of the glow image and the creation of some render targets, which will be used later to facilitate blurring.
Also note the creation of the shadow effect, which when used in the drawing of game objects, will make them appear as solid black shapes, perfect for our silhouette needs.
Moving down to the Update() method, the calculation of the glow position in screen space can be spotted. In this case, we're taking advantage of the Project() method on the ViewPort class, which is conveniently designed to do that very calculation for us.
Note
To simulate the sun's distance and size, the view has been altered so that the glow is always just in front of the camera. This step is not required if the lens flare being displayed is in place of something a lot closer, such as a lamp or headlight.
Finally, we have the three methods that form the working heart of the lens flare.
The
BeginShadowCapture()method sets the render target, so that any rendering performed from this point onwards will be diverted into theflareTarget. It clears the contents of the render target to black, and draws the glow image.Next is the
EndShadowCapture()method, which is called by the game after the scene has finished being drawn onto the render target. This is where the blurring process takes place.The captured image in the render target is drawn onto each of the blur render targets, and then all of the blur render targets are combined back into one image.
A combination of the low resolution of each one of the blur render targets, along with the smoothed sampling method used in their combination, gives us our desired blurred effect.
The
Draw()method performs the important act of actually drawing the newly created blurred glow on the screen.
Note
SpriteBatch alters a few GraphicsDevice settings when it renders to the screen, and this can cause strange side effects in the appearance of any 3D graphics rendered afterwards. If your 3D world stops rendering correctly, be sure to reset the GraphicsDevice.BlendState and GraphicsDevice.DepthStencilState properties upon completing any SpriteBatch operations.
This technique for producing lens flares will probably need to be fine-tuned in your game on a case-by-case basis, to achieve the best result and avoid any distracting artifacts produced during its construction.
Altering the resolutions and tints of the blur render targets can make a significant difference to how convincing the effect is.