

If there's one thing I really appreciate, it's explosions that have a visceral and almost palpable presence in a game.
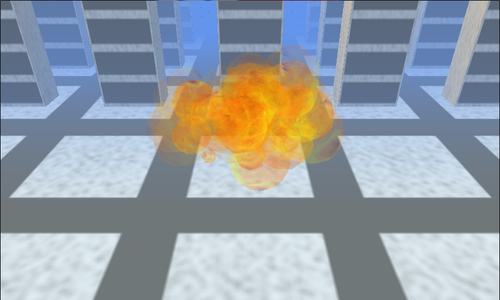
Much of the presence of an explosion tends to come from the more subtle in-game artifacts, such as a deep, complex, sound design and shaking of the camera, and for a lot of games this is more than enough. But sometimes, something that is a little more satisfying is required visually, such as the rolling fireball covered in this recipe and pictured in the following illustration:
In this special effect, you'll need a textured sphere with a flame or lava appearance.
In the following code, there are references to a GeometricBuffer class that can be substituted with any other sort of mesh container. You can find the details of how to construct this kind of mesh programmatically in Chapter 3, Procedural Modeling.
A textured sphere mesh from a modeling package would work equally well.
To create an explosion within the Reach profile:
1. As with other particle-based effects, we begin with a new particle class:
class ReachExplosionParticle
{
2. Start the new class by adding some instance variables to hold its position, age, and other details:
public Microsoft.Xna.Framework.Matrix World;
public float Size;
public float HorizontalAngle;
public float HorizontalOffset;
public float VerticleOffset;
public float Roll;
public float Age;
public float AgeDelta;
3. Next, define the class that will render each particle:
class ReachExplosionParticleDisplay
{
4. Add some instance-level variables to hold the mesh, effect, and lifetime details of the particle displayed:
GeometricBuffer<VertexPositionNormalTexture> sphereBuffer;
BasicEffect sphereEffect;
Curve alphaCurve;
Curve lightCurve;
5. Create a constructor to initialize everything:
public ReachExplosionParticleDisplay(
GeometricBuffer<VertexPositionNormalTexture> sphereBuffer,
BasicEffect sphereEffect)
{
this.sphereBuffer = sphereBuffer;
this.sphereEffect = sphereEffect;
alphaCurve = new Curve();
alphaCurve.Keys.Add(new CurveKey(0, 0.75f));
alphaCurve.Keys.Add(new CurveKey(0.125f, 0.5f));
alphaCurve.Keys.Add(new CurveKey(0.35f, 0.125f));
alphaCurve.Keys.Add(new CurveKey(1f, 0f));
lightCurve = new Curve();
lightCurve.Keys.Add(new CurveKey(0, 1f));
lightCurve.Keys.Add(new CurveKey(0.2f, 1f));
lightCurve.Keys.Add(new CurveKey(1f, 0.25f));
}
6. Add the
Draw()method to render the particles and finish the class:internal void Draw( Matrix view, Matrix projection, Matrix world, float age) { sphereEffect.View = view; sphereEffect.Projection = projection; sphereEffect.World = world; sphereEffect.Alpha = alphaCurve.Evaluate(age); sphereEffect.DiffuseColor = Vector3.One * lightCurve.Evaluate(age); sphereBuffer.Draw(sphereEffect); }7. Create a new class to orchestrate all the particles and their displays:
class ReachExplosion
{
8. Add the instance-level variables to hold the display renderer, the particles, and some animation settings:
ReachExplosionParticleDisplay particleDisplay;
List<ReachExplosionParticle> particles;
Random random = new Random();
Curve horizontalRateCurve;
Curve verticleRateCurve;
private bool exploding;
9. Initialize everything in a constructor:
public ReachExplosion(
GraphicsDevice graphicsDevice,
ContentManager content)
{
particleDisplay = ReachExplosionParticleDisplayFactory.Create(
graphicsDevice, content);
particles = new List<ReachExplosionParticle>();
for (var index = 0; index < 100; index++)
{
particles.Add(new ReachExplosionParticle());
}
horizontalRateCurve = new Curve();
horizontalRateCurve.Keys.Add(new CurveKey(0, 0f));
horizontalRateCurve.Keys.Add(new CurveKey(0.025f, 0.8f));
horizontalRateCurve.Keys.Add(new CurveKey(0.25f, 1f));
verticleRateCurve = new Curve();
verticleRateCurve.Keys.Add(new CurveKey(0.2f, 0.1f));
verticleRateCurve.Keys.Add(new CurveKey(0.3f, 0.25f));
}
10. Create a variable and a method to indicate when things should start exploding:
public void Explode()
{
foreach (var particle in particles)
{
Reset(particle);
}
exploding = true;
}
11. Add the ability to reset particles back to an initial position ready to explode:
private void Reset(ReachExplosionParticle particle)
{
particle.Size = (float)random.NextDouble() * 0.2f;
particle.HorizontalAngle = (float)random.NextDouble() *
MathHelper.TwoPi;
particle.HorizontalOffset = (float)random.NextDouble() *
0.5f;
particle.Roll = ((0.4f *
(float)random.NextDouble()) +
0.6f) * 2f * MathHelper.TwoPi;
particle.VerticleOffset = (0.2f *
(float)random.NextDouble());
particle.Age = 0f;
particle.AgeDelta = ((0.6f *
(float)random.NextDouble()) + 0.4f);
}
12. Update the state of all the particles through the addition of an
Update()method:public void Update(GameTime gameTime) { if (!exploding) { return; } var liveParticleCount = 0; foreach (var particle in particles) { if (particle.Age > 1) { continue; } particle.Age += particle.AgeDelta * (float)gameTime.ElapsedGameTime.TotalSeconds; particle.VerticleOffset += verticleRateCurve.Evaluate(particle.Age) * (float)gameTime.ElapsedGameTime.TotalSeconds * 5f; particle.Roll += (float)gameTime.ElapsedGameTime.TotalSeconds; var horizontalOffset = horizontalRateCurve.Evaluate(particle.Age) * particle.HorizontalOffset * Vector3.Backward; var verticleOffset = Vector3.Up * particle.VerticleOffset; particle.World = Matrix.CreateScale(particle.Size) * Matrix.CreateRotationX(particle.Roll) * Matrix.CreateTranslation(horizontalOffset) * Matrix.CreateRotationY(particle.HorizontalAngle) * Matrix.CreateTranslation(verticleOffset); liveParticleCount++; } exploding = liveParticleCount > 0; }13. And completing the class, we come to rendering the particles onscreen:
public void Draw(
Matrix view,
Matrix projection,
GameTime gameTime)
{
if (!exploding)
{
return;
}
foreach (var particle in particles)
{
if (particle.Age > 1)
{
continue;
}
particleDisplay.Draw(
view,
projection,
particle.World,
particle.Age);
}
}
14. To complete the example, add a factory class to create a new instance of the particle mesh. Here's an example using the
GeometricBufferclasses from Chapter 3, Procedural Modeling:class ReachExplosionParticleDisplayFactory { public static ReachExplosionParticleDisplay Create(GraphicsDevice graphicsDevice, ContentManager content) { var sphereEffect = new BasicEffect(graphicsDevice) { SpecularColor = Color.Black.ToVector3(), DiffuseColor = Color.White.ToVector3(), Texture = content.Load<Texture2D>("lava"), TextureEnabled = true }; var factory = new VertexPositionNormalTextureGeometricBufferFactory(); var radius = 1f; var vStep = -MathHelper.Pi / 8f; var uStep = -MathHelper.TwoPi / 8f; for (var v = MathHelper.PiOver2; v > -MathHelper.PiOver2; v += vStep) { var nextV = v + vStep; var vY = radius * (float)Math.Sin(v); var nextVY = (float)Math.Sin(nextV); var bandRadius = radius * (float)Math.Cos(v); var nextBandRadius = radius * (float)Math.Cos(nextV); var top = new Vector3( bandRadius, vY, bandRadius); var bottom = new Vector3( nextBandRadius, nextVY, nextBandRadius); for (var u = MathHelper.Pi; u > -MathHelper.Pi; u += uStep) { var nextU = u + uStep; var uX = (float)Math.Sin(u); var nextUX = (float)Math.Sin(nextU); var uZ = (float)Math.Cos(u); var nextUZ = (float)Math.Cos(nextU); var right = new Vector3(uX, 1f, uZ); var left = new Vector3(nextUX, 1f, nextUZ); var topLeft = top * left; var topRight = top * right; var bottomRight = bottom * right; var bottomLeft = bottom * left; var textureLeft = (float)( (nextU + MathHelper.Pi) / MathHelper.TwoPi); var textureRight = (float)( (u + MathHelper.Pi) / MathHelper.TwoPi); var textureTop = 1f - (float)( (v + MathHelper.PiOver2) / Math.PI); var textureBottom = 1f - (float)( (nextV + MathHelper.PiOver2) / Math.PI); var topLeftNormal = Vector3.Normalize(topLeft); var topRightNormal = Vector3.Normalize(topRight); var bottomRightNormal = Vector3.Normalize(bottomRight); var bottomLeftNormal = Vector3.Normalize(bottomLeft); factory.AddPane( topLeft, new Vector2(textureLeft, textureTop), topLeftNormal, topRight, new Vector2(textureRight, textureTop), topRightNormal, bottomRight, new Vector2(textureRight, textureBottom), bottomRightNormal, bottomLeft, new Vector2(textureLeft, textureBottom), bottomLeftNormal); } } var sphereBuffer = factory.Create(graphicsDevice); sphereBuffer.IsTextureTransparent = true; return new ReachExplosionParticleDisplay( sphereBuffer, sphereEffect); } }
The heart of the ReachExplosion class lies with the use of the XNA Curve class.
Via the Curve class, we can take the relatively random nature of the particle stream and mold it into the visually satisfying shape of a gaseous explosion.
Two instances of the Curve class are created within the constructor of the ReachExplosion class.
The first curve determines the shape of the explosion by expanding or contracting the distance between each particle and the center of the explosion. The second curve determines how quickly the particles rise.
Another two instances of the Curve class can be observed in the ReachExplosionParticleDisplay class controlling the luminescence and transparency of each particle, thereby simulating the particle's transition from flame, to smoke, to thin air.
Just like in film, the difference between a convincing explosion and one less so can usually be found not in the explosion itself, but in the impact it has on the world around it.
A deep bass explosion sound along with a small shake of the virtual camera, possibly also achieved via the Curve class, would go a long way towards enhancing the realism of this effect.