

All 3D models consist of a collection of points in space called vertices. These vertices (singular: vertex) define the shape of the model when combined. Each vertex is a coordinate in space, represented in vector form. They can, however, also contain further information, such as the following:
Color
Normal
Texture coordinates
Anything else you need to draw the model
These vertices are used by the GPU to draw the model; however, the GPU by itself has no way of understanding how they relate to each other, and how to draw the correct model. This is resolved by arranging vertices into the most basic shape possible: a triangle. If you consider that one vertex alone as a point, which along with a second forms a line, then a third vertex creates a triangle, which is the simplest polygon you can create. The GPU can then draw these triangles by taking the vertices, three at a time, and using those values to generate an area to draw.
A model created in a 3D editing program can have thousands of these vertices, all forming triangles that define the final shape. The following diagram shows one such instance:

The more vertices drawn, the more work the GPU has to do, and the larger impact on performance a model takes. There is also no point drawing vertices that are completely hidden by other triangles on the same model.
This is where backface culling comes into play. Backface culling allows the GPU to only draw triangles facing the camera, saving time on triangles that are on the other side of the object and usually invisible. Now how would you determine if a triangle is on the back of an object, when the object could have any orientation, and the camera could be in any position?
This is done by ensuring that all triangles facing the camera have their vertices specified in a clockwise-winding order, which is demonstrated in the diagram that follows. When sent to the GPU, the order is evaluated and if the vertices are submitted in a counter-clockwise fashion, they are discarded as they should be facing away from the camera, and are most likely hidden.
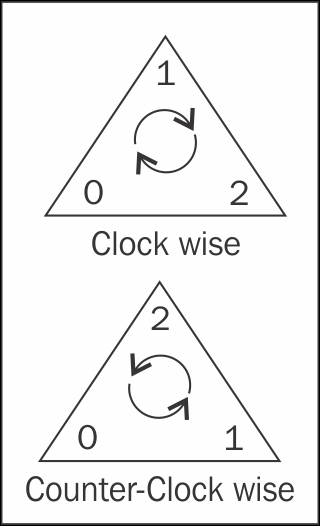
Winding order
This can be disabled or changed using the custom states that are set on the GPU. By disabling or reversing the winding order that gets culled, you can tailor the behavior of the backface culling system to allow for different rendering techniques.