
We can also use a gamepad instead of a mouse to solve the exercise. Its usage is easier and more attractive to those children who have manual dyspraxia.
We will use a USB gamepad, similar to the one used by the Sony Playstation 3 game console. We want to control the mouse pointer using the gamepad's right-hand side mini stick.
We have to configure the gamepad driver to map its left mini stick to the mouse pointer.
Note
The student needs a USB gamepad with 4 axes and 2 mini sticks in order to complete the following exercise. This example is based on Windows operating systems.
1. Connect the USB gamepad to the computer and install its driver if you haven't already done so.
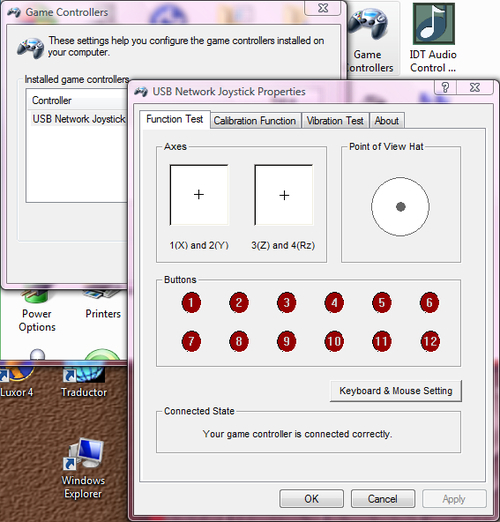
2. Go to Control Panel | Game controllers. Select the gamepad in the game controllers list and click on Properties (some drivers show the generic name USB Network Joystick). A dialog box will show the buttons for the gamepad, the mini sticks axes and the Point of View Hat (POV), as shown in the following picture:
3. Disable the analog mode (the analog mode LED should be turned off). The gamepad must be in digital mode in order to allow us to map the right-hand side mini stick to the mouse's buttons.
4. You can test the relationship between the button numbers shown on the screen and the gamepad's pressed buttons using the aforementioned dialog box.
5. Click on the Keyboard & Mouse Setting button. A new dialog box will appear. It will allow you to change the gamepad mode and map its buttons to your mouse buttons.
6. Activate the checkboxes Keyboard & Mouse mode and POV to arrow.
7. Select Left mouse button in the Key 1 combo box.
8. The values should be similar to the ones shown in the next screenshot:
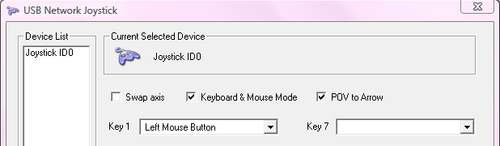
9. Click on OK.
10. Move the gamepad's left mini stick. The mouse pointer should change its position as the mini stick moves.
11. Control the gamepad's POV. The mouse pointer should change its position as it is pressed in different directions.
12. Press the gamepad's action button number 1 (on the upper right-hand side). It should work as the mouse's left button.
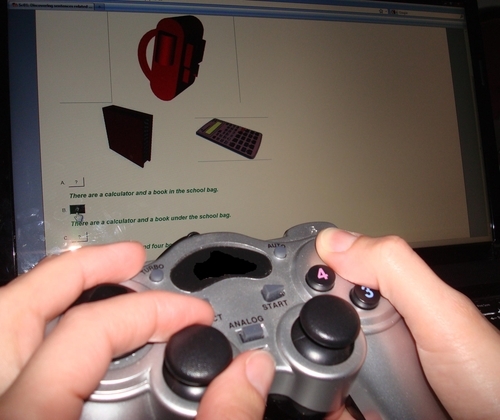
13. Run the discovering sentences activity as a student, following the previously explained steps. This time, use the gamepad instead of the mouse, as shown in the next image:
We configured the gamepad driver to map one of its mini sticks and one action button to the mouse pointer and the left mouse button. Therefore, you were able to execute the exercise using the gamepad without problems.
Children with manual dyspraxia have difficulties in coordinating and sequencing the movements for tasks such as gestures, pointing, and sign language. Therefore, the gamepad's sticks can help them to focus on moving a big mouse pointer on the screen and solve these exercises.
Note
Sometimes, a gamepad isn't the most convenient device. However, it is cheap and easy to find in any computer-related store. We can configure gamepads as previously explained and we will be able to offer students different ways to move the mouse pointer. The same technique can be used for joysticks and flightsticks.
The gamepad is a complex input device. It usually offers many action buttons and two mini sticks, as shown in the following image (top view):
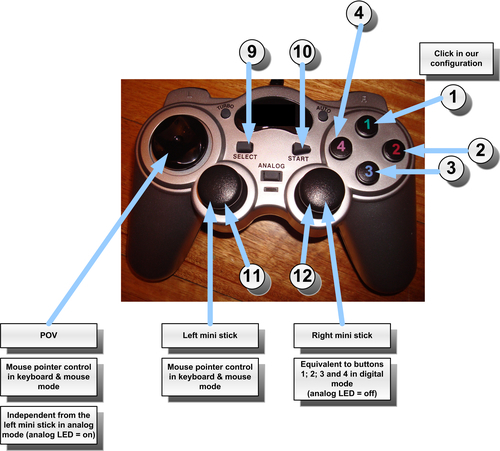
Each button number can be assigned to a different keyboard key or mouse button. Thus, we can take advantage of the 12 action buttons in this kind of gamepad.
Note
The action buttons 11 and 12 are triggered when the player pushes the mini stick (like clicking with a mouse button).
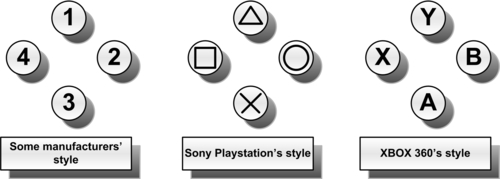
Depending on the manufacturer and the model, its four action buttons on the right-hand side can show different symbols or numbers, as shown in the following diagram:
You can also take advantage of the gamepad in the matching composite pictures exercise.
Configure the gamepad's mapping to simplify the drag-and-drop process used to solve the exercise.
Run the exercise as a student and create new versions of this exercise using different pictures, sentences, and color schemes.