Book Image

Wearable-Tech Projects with the Raspberry Pi Zero

By : Jon Witts
Book Image

Wearable-Tech Projects with the Raspberry Pi Zero

By: Jon Witts

Overview of this book

With Wearable-Tech Projects with the Raspberry Pi Zero, you will begin with learning how to install the required software for your upcoming projects. You will also learn how to control electronic devices with the GPIOZero Python library. Next, you will be creating some stylish wearable-tech projects such as a motion-reactive LED cap and a Tweet-activated LED T-shirt. Toward the end of the book, you will be creating some useful health and fitness wearable-tech projects; these will help you monitor your heart rate, track your movements with GPS, and count your footsteps with your own pedometer. By the end of the book, you will have created a range of wearable-tech projects and learned enough about your Raspberry Pi Zero that you should be able to adapt these projects further or come up with your own creations!
Table of Contents (10 chapters)

Headless access

For all of the projects in this book, we will not be connecting directly to our Pi, as it will be installed into various different objects and will need to run without a keyboard, mouse, or monitor attached. This is known as running a computer headless. To effectively do this, we need a method to connect to our Pi remotely so that we can perform the programming we need to do without having to attach bulky devices to it. This is where Pi Zero W really comes into its own; the integrated Wi-Fi means that we can connect to the Pi over a Wi-Fi network without having to add any additional hardware.

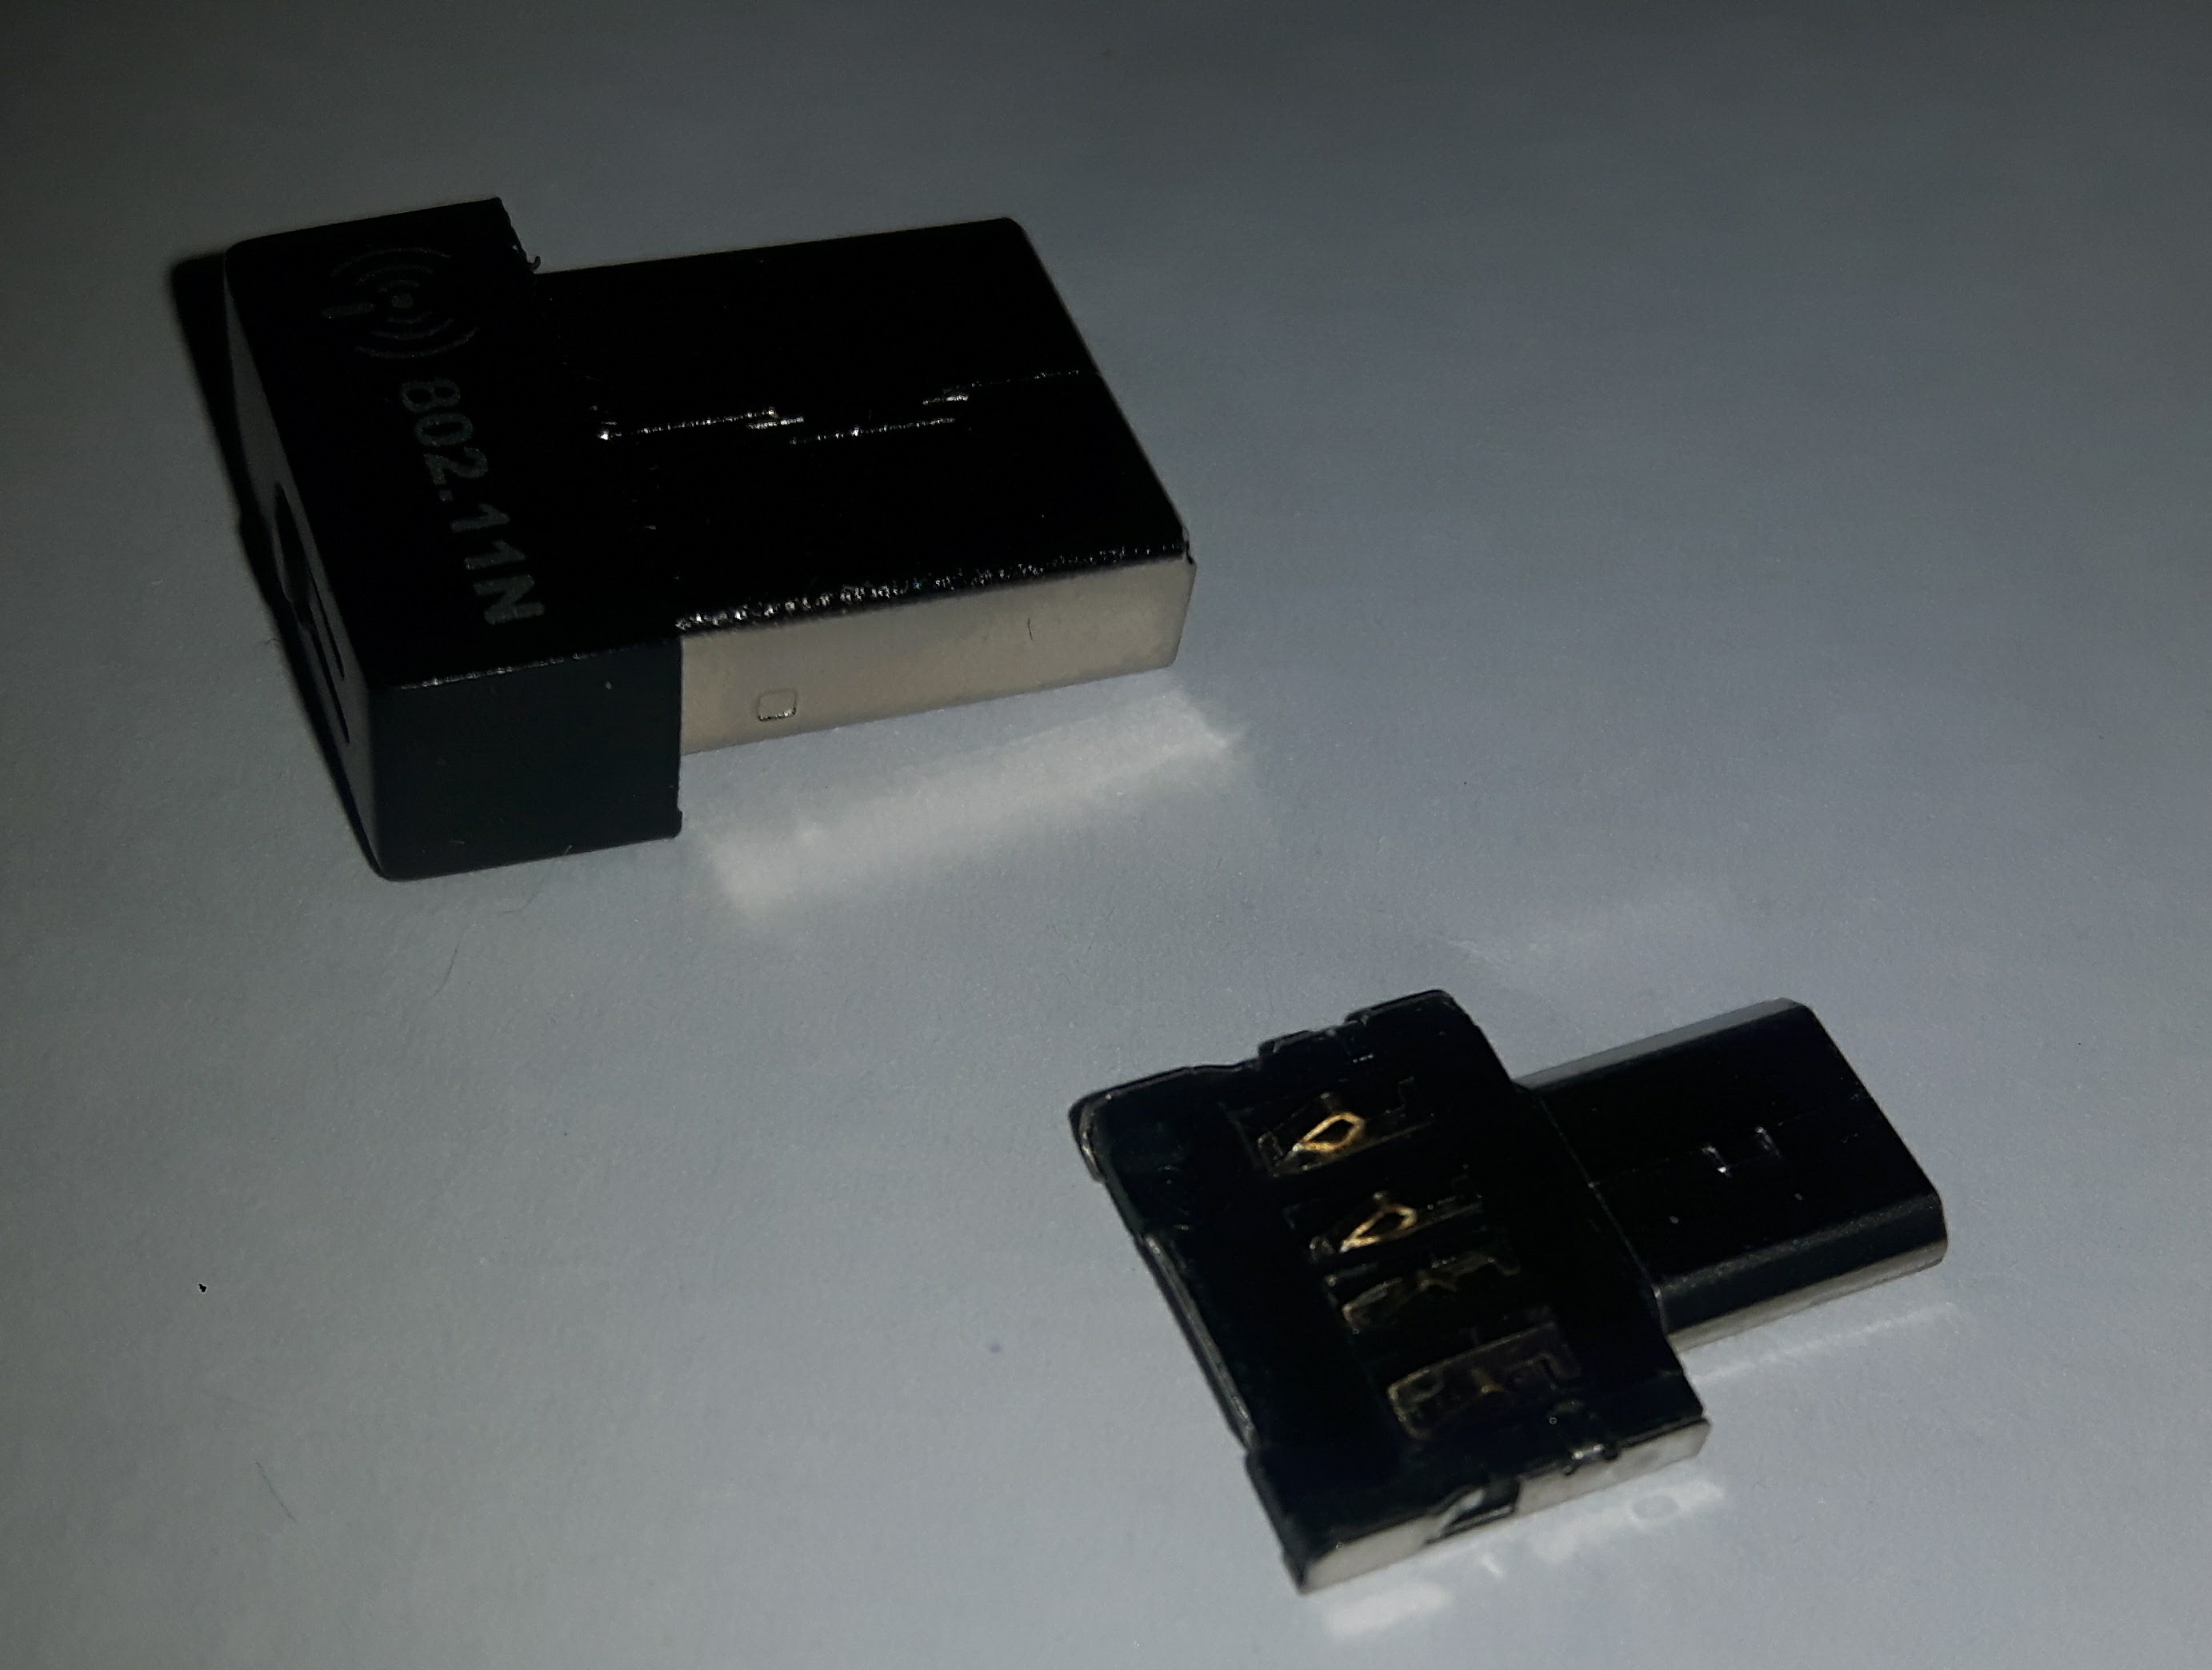
If you are using a Raspberry Pi other than Pi Zero W or Pi 3, then you will need to add a Wi-Fi dongle to your Pi to be able to connect to it remotely. If it is a Pi Zero 1.1 or 1.3 that you are using, then you will also need a USB micro shim as shown here. You can pick these up for a few pounds from many online retailers:

There are a couple of things we will need to do to get our Raspberry Pi SD card ready for remote access; fortunately the Raspberry Pi Foundation has tried to make these as straightforward as possible for us.

Enabling SSH access

We are going to use Secure Shell (SSH) to remotely connect to our Pi. As the default password of the Raspberry Pi Raspbian OS is well known, and as more and more Internet of Things devices are being made with the Raspberry Pi computers, the decision was made by the Raspberry Pi Foundation that SSH should be disabled by default, requiring a user to select to turn it on before its first use. If you are running your Pi connected to a keyboard and monitor, then this is easily done by making use of the raspi-config utility. The Foundation has also given us a way to enable SSH for those running their Raspberry Pi computers in headless mode.

To turn on SSH for a Pi that you are going to run headless, all you need to do is create an empty file (with no file extension) named SSH on the boot partition of your Pi's SD card. When you first boot your Raspberry Pi, SSH will then be enabled and the file removed from the boot partition of the SD card. As the boot partition is a FAT32 formatted partition, it can be read from and written to by any operating system. More details can be found on the official Raspberry Pi documentation: https://www.raspberrypi.org/documentation/remote-access/ssh/

Setting up your Wi-Fi network

To be able to connect to our Raspberry Pi Zero, we are going to need a working network connection. We will be using the Pi Zero W's Wi-Fi network for this. If you are using a Pi without built-in Wi-Fi, then these instructions will still work, you will just need to connect a USB Wi-Fi dongle to your Pi first.

We have been given a straightforward method of configuring our Wi-Fi connection when using our Pi in headless mode too. If we create a file called wpa_supplicant.conf in the boot partition of our Pi's SD card, upon first boot, this file is copied into the /etc/wpa_supplicant/ directory and used to configure the Wi-Fi settings for the Pi. However, this file must contain a valid set of configuration details, or your Pi will not connect to your Wi-Fi.

Here is an example of a wpa_supplicant.conf file setup to connect to the Wi-Fi network called mywifinetwork with a connection password of mypassword. You should obviously change these to match the details of your Wi-Fi network when writing your file. You can read more about the different configurations you can add to this file over at the Raspberry Pi's official documentation pages at https://www.raspberrypi.org/documentation/configuration/wireless/wireless-cli.md:

network={
ssid="mywifinetwork"
psk="mypassword"
}

It is worth double checking the format and details entered here, as any mistakes in this file will stop your Pi Zero from joining your wireless network.

Connecting to your Pi

Now that we have set up SSH access and our Wi-Fi network, we can start up our Pi Zero and connect to it from another computer remotely. As we are using the Jessie Lite version of Raspbian; there is no X-server to provide a desktop, therefore VNC connections are not an option. How you connect to your Pi using SSH will depend upon which operating system you are using for your computer or laptop. Once you have established a SSH connection, the steps for each future project are the same regardless of the operating system your computer is running.

Insert your SD card you previously prepared into your Pi Zero and then connect a micro USB power supply to the port labelled PWR, as shown in the following picture. All being well, you should see the green activity LED flashing as your Pi Zero boots up for the first time.

However, before we can begin to connect, you will need to discover the IP address that your Wi-Fi network has assigned to your Pi. There are a number of different ways of doing this, and the way which works for you will largely depend upon your network. The method that I usually use at home, is to connect to my home router's web interface and view the Attached Devices page. This will be different for each router and may or may not exist! My router page looks like the next picture. By default, your Raspberry Pi will show up with the host-name of RASPBERRYPI. You can change this once you get the remote access to the Pi. If you can not find out DHCP address leases from your router in this manner, then the Raspberry Pi documentation has some other methods that you can use to find the IP address of your headless Pi at https://www.raspberrypi.org/documentation/remote-access/ip-address.md:

You can see that on my router, my Pi Zero has been assigned an IP address of 192.168.1.61. Now, we know the IP address of our Pi, we can access it from our other computer or laptop.

When connecting to a host via SSH for the first time, it is normal to be warned that the authenticity of the host can not be established. If you get this warning after you have connected to a device previously, this could indicate that your SSH connection is being intercepted, or someone has changed the SSH keys on your Pi!

SSH from Windows

To connect to your Pi Zero using SSH from the a Windows operating system, you will need to download a small tool called PuTTY. This is freely available at http://www.chiark.greenend.org.uk/~sgtatham/putty/latest.html. Download either the 32 bit or 64 bit installer, whichever is appropriate to your Windows system, and then run the installer.

Once installed, run PuTTY and enter the IP address of your Raspberry Pi into the Host Name field and click on Open, as shown in the following screenshot:

As this is your first time connecting to your Pi Zero over SSH with this PuTTY install, you will be presented with a PuTTY Security Alert window about the server's host key not being cached. This is normal, so just click on Yes. A terminal window will then open and ask you to log in. Enter pi for the username and raspberry for the password. You will then be logged in to your Pi remotely. You can now move on to the Final setup section.

Highlighting any text with your mouse in the PuTTY terminal window copies it to your Windows clipboard, and right-clicking on the PuTTY terminal window pastes the contents of your Windows clipboard into PuTTY.

SSH from macOS

To connect to your Pi Zero using SSH from the macOS operating system, you will need to use the Terminal application. You can locate this by opening finder and going to Applications and then opening the Utilities folder. Once you have located the Terminal application, double-click on it to open it. Enter the following command to connect to your Pi Zero via SSH:

ssh [email protected]

You need to change the IP address in this code to match the IP your Pi has been assigned. You will then be presented with a warning, The authenticity of host '192.168.1.61' can't be established...—this is normal when you connect to a host for the first time over SSH, and you can safely type yes to continue connecting.

You will now be prompted to enter the password; type raspberry and press Enter. You are now connected to your Pi Zero via SSH and can move on to the Final setup section of this chapter.

SSH from Linux

To connect to your Pi Zero using SSH from a Linux operating system, you will need to use your system Terminal. Type the following command:

ssh [email protected]

You should obviously replace the IP address with the IP address that your Pi has been assigned. As this is the first time you are connecting to your Pi over SSH from your computer, you will be asked whether you want to accept the ECDSA key fingerprint. This is normal on a first connection and nothing to worry about. Type yes and press Enter to continue connecting. You will then be prompted to enter the password for your Pi. Enter the default password of raspberry and press Enter.

When you type your password, you will not be shown any asterisks to indicate how many characters you have typed; type carefully!

You are now logged into your Pi Zero via SSH, move on to the Final Set up section of this chapter, to get your Pi ready to be used to start making our wearable-tech projects!

Final setup

Now that we have a remote connection to our Pi Zero, there are a few final setup steps to carry out so we are ready to start looking at our projects. The first thing we are going to do is to change our password to access our Pi. The default password is well known, and it is not a good idea to leave any password set as its default. Secondly, we will change the hostname of our Pi so that it is easily recognizable on our network as our Pi for these projects. Finally, we will install some of the basic software packages we are going to need for the projects in this book and also ensure that the other software already installed on the Pi is up-to-date.

Changing your password

To change your password, enter the following command into your SSH connection:

passwd

You will be asked to enter your current password (raspberry) and then asked to enter a new password twice. All being well, you should see a message like the one in the next screenshot. After changing a password over an SSH connection, I always open another SSH connection to my Pi and check whether I can successfully connect using my new password before I close the connection:

Changing the hour hostname

To change the hostname of our Pi Zero, we are going to make use of the raspi-config tool. Type the following command into your SSH connection:

sudo raspi-config

This will bring up the following menu:

Select option 2 using your cursor keys and press Enter to select it. Read and take note of the rules for allowed hostnames, and press Enter to select your new hostname. I am calling mine wearablepi. Once you have entered your new hostname, press Enter to save it. Press your Tab key twice to select <Finish> on the raspi-config menu and press Enter to close raspi-config. You will be prompted to reboot your Pi Zero. Press Enter with <Yes> selected, and your Pi Zero will reboot.

When your Pi Zero reboots, it should now show on your router's Attached Devices list, with its new hostname.

Reconnect to your Pi Zero via SSH and move onto the next section.

Downloading the example code

Detailed steps to download the code bundle are mentioned in the Preface of this book. The code bundle for the book is also hosted on GitHub at: https://github.com/PacktPublishing/Wearable-Tech-Projects-with-the-Raspberry-Pi-Zero. We also have other code bundles from our rich catalog of books and videos available at: https://github.com/PacktPublishing/. Check them out!

Installing basic software

We now need to update our existing software and install a few more bits of software ready for our projects. To update our existing software, type the following command into your Pi Zero:

sudo apt-get update

You should see multiple lines of information appear across your SSH connection, as your Pi Zero updates its information about what software packages are available to it:

To upgrade your existing software packages, type the following command:

sudo apt-get dist-upgrade

This command will make your Pi Zero check to see whether there are any updated software packages available for you to install. If there are, it will ask you to confirm. If prompted to, press Y to install your updates and wait for the process to complete.

We are now going to install a couple of new pieces of software, which do not come as standard on the Jessie Lite image, but this we will need for our projects. Type the following code to install the required software:

sudo apt-get install python3 python3-gpiozero python3-pip

Your Pi Zero will then calculate all the other packages it needs to install to get these three pieces of software working. Enter Y and press Enter to begin the installation process. Installing new software and updates on a Pi Zero can take some time, but be patient and it will finish soon enough!

Once this completes, we now have the basic software we need to start on our projects.