

Git is the most widely used version control system. According to the Git official website, it is a distributed version control system capable of handling everything from small- to large-sized projects with speed and efficiency.
Git is available for all major operating systems. For Windows, an executable setup file is provided that can be used to install Git and use it in the command line. On OS X, Git comes already installed, but if it is not found, it can be downloaded from their official website. To install Git on Debian/Ubuntu, just issue the following command in the terminal:
sudo apt-get install git
After installation, issue the following command to check whether it is properly installed:
git –version
Then, we will see the current installed version of Git.
For a better understanding of Git, we will start with a test project. Our test project name is packt-git. For this project, we also created a GitHub repository named packt-git, where will push our project files.
First, we will initialize Git in our project by issuing the following command:
git init
The preceding command will initialize an empty Git repository in our project root directory, and the head will be kept on the master branch, which is the default branch for every Git repository. It will create a hidden .git directory that will contain all the information about the repository. Next, we will add a remote repository that we will create on GitHub. I created a test repository at GitHub that has the URL https://github.com/altafhussain10/packt-git.git.
Now, issue the following command to add the GitHub repository to our empty repository:
git remote add origion https://github.com/altafhussain10/packt-git.git
Now, create a README.md file at your project root and add some content to it. The README.md file is used to display the repository information and other details about the repository at Git. This file is also used to display instructions regarding how to use the repository and/or the project for which this repository is created.
Now, issue the following command to see the status of our Git repository:
git status
This command will display the status of the repository, as can be seen in the following screenshot:
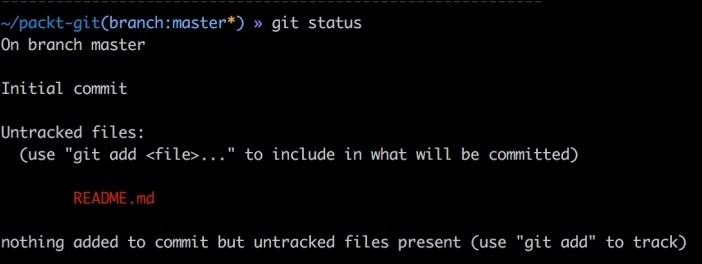
As can be seen in the preceding screenshot, we have an untracked file in our repository that is not committed yet. First, we will add the files to be tracked by issuing the following command in the terminal:
git add README.md
The git add command updates the index using the current contents found in the working tree. This command adds all the changes made to the path. There are some options that can be used to add some specific changes. The previous command we used will only add the README.md file to the track in the repository. So, if we want to track all the files, then we will use the following command:
git add
This will start tracking all the files in the current working directory or at the root of the current branch. Now, if we want to track some specific files, such as all files with the .php extension, then we can use it as follows:
git add '*.php
This will add all the files with the .php extension to track.
Next, we will commit changes or additions to our repository using the following command:
git commit –m "Initial Commit"
The git commit command commits all the changes to the local repository. The -m flag specifies any log message to commit. Remember that the changes are only committed to the local repository.
Now, we will push the changes to our remote repository using the following command:
git push –u origion master
The preceding command will push all the changes from the local repository to the remote repository or origin. The -u flag is used to set the upstream, and it links our local repo to our remote central repo. As we pushed our changes for the first time, we have to use the -u option. After this, we can just use the following command:
git push
This will push all the changes to the main repository of the current branch at which we are.
New branches are always required during development. If any kind of changes are required, it is good to create a new branch for these changes. Then, make all the changes on this branch and finally commit, merge, and push them to the remote origin.
To better understand this, let's suppose we want to fix an issue in the login page. The issue is about validation errors. We will name our new branch login_validation_errors_fix. It is good practice to give a more understandable name to branches. Also, we would like to create this new branch from the master branch head. This means that we want the new branch to inherit all the data from the master branch. So, if we are not at the master branch, we have to use the following command to switch to the master branch:
git checkout master
The preceding command will switch us to the master branch no matter which branch we are at. To create the branch, issue the following command in the terminal:
git branch login_validation_errors_fix
Now, our new branch is created from the master branch head, so all the changes should be made to this new branch. After all the changes and fixes are done, we have to commit the changes to the local and remote repositories. Note that we did not create the new branch in our remote repository. Now, let's commit the changes using the following command:
git commit -a -m "Login validation errors fix"
Note that we did not use git add to add the changes or new additions. To automatically commit our changes, we used the -a option in commit, which will add all the files automatically. If git add is used, then there is no need to use the -a option in commit. Now, our changes are committed to the local repository. We will need to push the changes to the remote origin. Issue the following command in the terminal:
git push -u origion login_validation_errors_fix
The preceding command will create a new branch at the remote repository, set the tracking of the same local branch to the remote branch, and push all the changes to it.
Now, we want to merge the changes with our master branch. First, we need to switch to our master branch using the following command:
git checkout master
Next, we will issue the following commands to merge our new branch login_validation_errors_fix with the master branch:
git checkout master
git merge login_validation_errors_fix
git push
It is important to switch to the branch to which we want to merge our new branch. After this, we need to use the git merge branch_to_merge syntax to merge this branch with the current branch. Finally, we can just push to the remote origin. Now, if we take a look at our remote repository, we will see the new branch and also the changes in our master branch.
Sometimes, we need to work on a project that is hosted on a repository. For this, we will first clone this repository, which will download the complete repository to our local system, and then create a local repository for this remote repository. The rest of the working is the same as we discussed before. To clone a repository, we should first know the remote repository web address. Let's say that we want to clone the PHPUnit repository. If we go to the GitHub repository for PHPUnit, we will see the web address of the repository at the upper right-hand side, as shown in the screenshot that follows:

The URL just after the HTTPS button is the web address for this repository. Copy this URL and use the following command to clone this repository:
git clone https://github.com/sebastianbergmann/phpunit.git
This will start downloading the repository. After it is completed, we will have a PHPUnit folder that will have the repository and all its files. Now, all the operations mentioned in the preceding topics can be performed.
One of the most powerful features of Git is webhooks. Webhooks are events that are fired when a specific action occurs on the repository. If an event or hook for the Push request is made, then this hook will be fired every time a push is made to this repository.
To add a webhook to a repository, click on the Settings link for the repository in the upper right-hand side. In the new page, on the left-hand side, we will have a Webhooks and Services link. Click on it, and we will see a page similar to the following one:
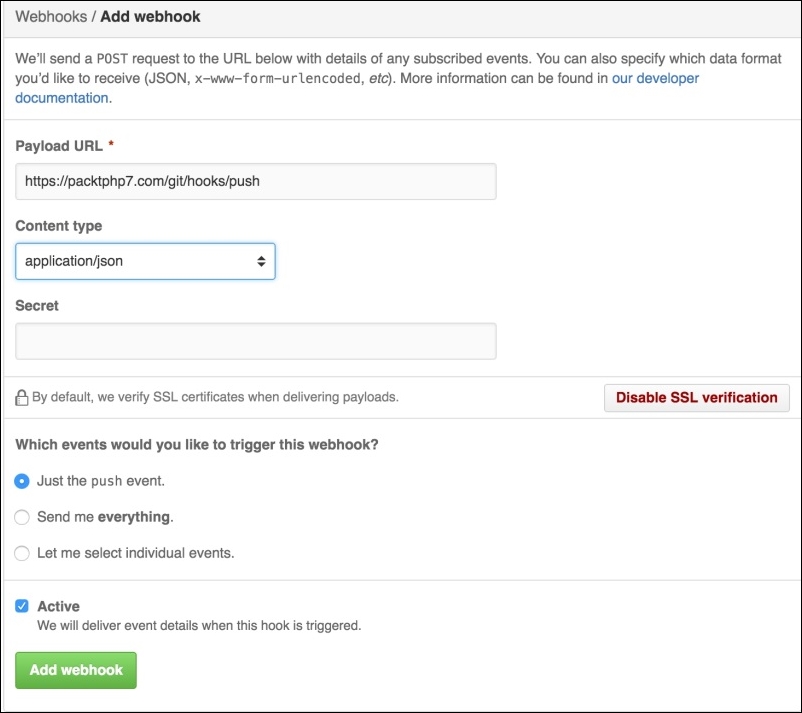
As can be seen in the preceding screenshot, we have to enter a payload URL, which will be called every time our selected event is fired. In Content type, we will select the data format in which the payload will be sent to our URL. In the events section, we can select whether we want only push events or all the events; we can select multiple events for which we want this hook to be fired. After saving this hook, it will be fired every time the selected event occurs.
Webhooks are mostly used for deployment. When the changes are pushed and if there is a webhook for the push event, the specific URL is called. Then, this URL executes some command to download the changes and processes them on the local server and places them at the appropriate place. Also, webhooks are used for continues integration and to deploy to cloud services.
There are several tools that can be used to manage Git repositories. GitHub provides its own tool called GitHub Desktop that can be used to manage GitHub repositories. This can be used to create new repositories, see the history, and push, pull, and clone repositories. It provides every feature that we can use in the command line. The screenshot that follows shows our test packt-git repository:
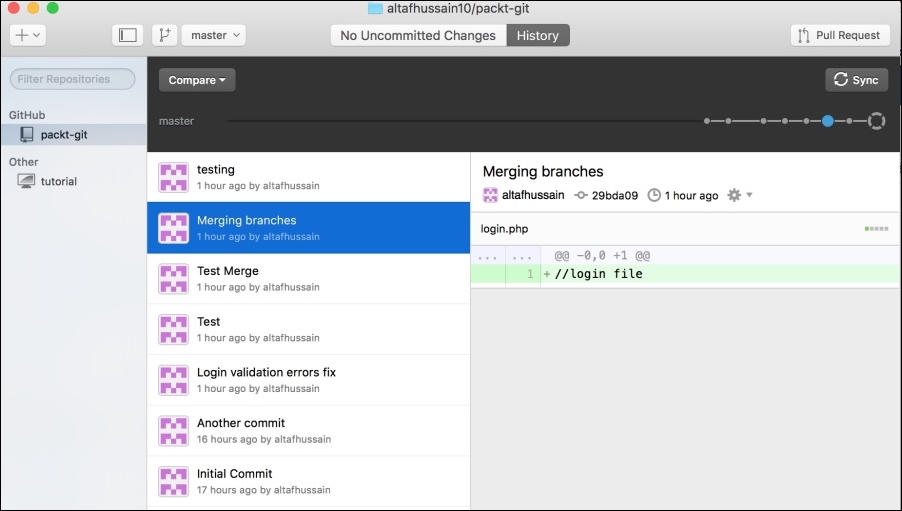
Note
GitHub Desktop can be downloaded from https://desktop.github.com/ and is available for Mac and Windows only. Also, GitHub Desktop can be only used with GitHub unless some hacks are used to make it work with other repositories, such as GitLab or Bitbucket.
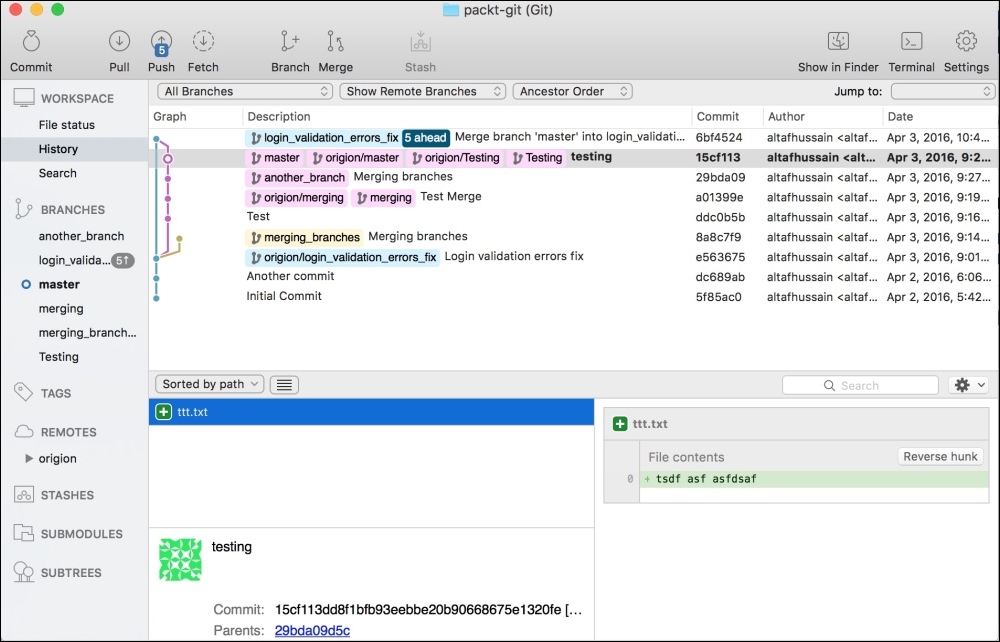
Another powerful tool is SourceTree. SourceTree can be used with GitHub, GitLab, and Bitbucket easily. It provides complete features to manage repositories, pull, push, commit, merge, and other actions. SourceTree provides a very powerful and beautiful graph tool for the branches and commits. The following is a screenshot for SourceTree that is used to connect with our packt-git test repository:
Besides the previous two nice tools, every development IDE provides version control systems with full support and also provides features such as different colors for modified and newly added files.
Note
Git is a powerful tool; it can't be covered in this appendix. There are several books available, but Git Book is a very good place to start. This can be downloaded in different formats from https://git-scm.com/book/en/v2 or can be read online.