

Perhaps the most important change in the history of JSF is the release of JSF 2.0. JSF 1.0 was the initial release of the framework, and it was a bit rough around the edges. Therefore, JSF 1.1 and JSF 1.2 were subsequently released to address some of the minor shortcomings of the framework and to provide enhancements to support developers.
JSF 2.0, however, is a significant step forward in the evolution of the JSF framework, with several important new features and improvements, including:
A simplified navigation mapping convention
A web resource loading mechanism for images, stylesheets, JavaScript files, and so on
Facelets is now integrated into the core JSF framework
The new "composite" JSF tag library for creating composite components
Built-in support for adding Ajax capabilities to UI components with
<f:ajax>
Let's look at how each of these features work. This is not intended to provide complete coverage, but rather a brief introduction to JSF 2.0.
Before JSF 2.0, and without the benefit of the Seam framework, JSF developers needed to declare each managed bean in faces-config.xml. Maintaining two separate files for one application artifact (the managed bean) adds overhead to the JSF development cycle. Therefore, a number of new annotations were added to simplify and centralize JSF configuration metadata into managed bean classes themselves:
@ManagedBean:This annotation must be applied before the managed bean Java class declaration and replaces the<managed-bean>element infaces-config.xml.@ManagedProperty:This annotation must be applied before the instance variable of a JSF managed bean property and replaces the<managed-property>element infaces-config.xml.@RequestScoped, @SessionScoped, @ApplicationScoped, @NoneScoped, @ViewScoped, and@CustomScoped:One of these annotations may be applied before the managed bean Java class declaration. These annotations replace the<managed-bean-scope>element and enable applications to define custom bean scopes.
These new annotations eliminate the need to use XML to declare managed beans. Therefore, our faces-config.xml file now looks like so. Notice that the<faces-config> XML element now has the version "2.0" and references a different XSD file. Also notice the absence of any managed bean declarations.
faces-config.xml (JSF 2.0)
<?xml version="1.0" encoding="UTF-8"?>
<faces-config xmlns=http://java.sun.com/xml/ns/javaee
xmlns:xsi=http://www.w3.org/2001/XMLSchema-instance
xsi:schemaLocation=http://java.sun.com/xml/ns/javaee http://java.sun.com/xml/ns/javaee/web-facesconfig_2_0.xsd
version="2.0">
<application>
<resource-bundle>
<base-name>messages</base-name>
<var>bundle</var>
</resource-bundle>
<locale-config>
<default-locale>en</default-locale>
<supported-locale>fr</supported-locale>
<supported-locale>es</supported-locale>
</locale-config>
</application>
<converter>
<description>This converter handles conversion between String and Country objects.</description>
<display-name>Country Converter</display-name>
<converter-id>countryConverter</converter-id>
<converter-class>jsf2.converter.CountryConverter </converter-class>
</converter>
<validator>
<description>This birthdate validator checks a date to make sure it is within the last 120 years.</description>
<display-name>Custom Date Validator</display-name>
<validator-id>customDateValidator</validator-id>
<validator-class>jsf2.validator.CustomDateValidator </validator-class>
</validator>
</faces-config>
Our managed bean classes are now annotated as follows:
package jsf2.bean;
import javax.faces.bean.ManagedBean;
import javax.faces.bean.RequestScoped;
@ManagedBean
@RequestScoped
public class BackingBean {
...
}
CustomerBean.java
package jsf2.bean;
new JSF annotations, JSF 2.0new JSF annotations, JSF 2.0aboutimport javax.faces.bean.ManagedBean;
import javax.faces.bean.SessionScoped;
@ManagedBean
@SessionScoped
public class CustomerBean {
...
}
The JSF 2.0 release introduces a simplified navigation mapping convention that can also reduce XML configuration. Instead of declaring navigation rules and outcomes in faces-config.xml and then referencing these outcomes in the action attributes of the JSF tags for command buttons and links, we can now simply specify the view ID (the file name without the file extension) and the JSF framework will infer the correct view from the action attribute.
The more verbose style of navigation mapping from JSF 1.x is demonstrated below.
faces-confi g.xml
<navigation-rule>
<navigation-case>
<from-view-id>/shoppingCart.jsf</from-view-id>
<outcome>checkout</outcome>
<to-view-id>/checkout.jsf</to-view-id>
</navigation-case>
</navigation-rule>
The simpler, convention-based navigation mapping style from JSF 2.0 is demonstrated next. It is functionally equivalent to the previous example, but does not require any navigation rules to be declared in faces-config.xml.
shoppingCart.jsf
<h:commandButton value="Checkout" action="checkout" />
When the Checkout button is pressed, the JSF framework looks for a view in the same directory as shoppingCart.jsf named checkout.jsf (or whatever file extension is used for the javax.faces.FACELETS_VIEW_MAPPINGS context parameter in web.xml) and navigates to that view after processing the event.
If the destination view is in another directory, we can use a leading slash / character to specify an absolute path to the view.
We can also indicate that a redirect is required like so:
<h:commandButton value="Checkout" action="checkout?faces-redirect=true" />
One of the enhancements to JSF 2.0 is a resource loading mechanism for web page artifacts, such as images, cascading style sheets, and JavaScript files; resources such as these can be packaged inside a web application's root directory or a JAR file.
To include resources in a web application, we must create a folder named resources below the Web root folder. To include resources in a JAR file, we must create a folder named resources below the META-INF folder of the JAR file. Any files under the resources directory can be loaded by JSF at request time. The organization of files below the resources directory is up to the developer. A good practice is to create the following directory structure for static resources:
/resources/css: Cascading stylesheets (
*.css)/resources/images: Image files (
*.gif, *.jpg, *.png,and so on)/resources/javascript: JavaScript files (
*.js)/resources/media: Flash files and other multimedia (
*.swf, *.mp3, and so on)/resources/components: Composite JSF components (
*.xhtml- covered in next section)
One of the advantages of this feature is the ability to reference classpath resources using EL expressions. JSF 2.0 introduces a new implicit object to the JSF EL, the "resource" map. This map can be used to obtain resources for rendering at request time, as shown in the following example:
<h:graphicImage value="#{resource['images:icon.gif']" />
The map argument in the EL expression is a String literal specifying the resource library followed by a colon character followed by the resource name. The resource library is the directory below the resources directory. The resource name is the filename of the resource.
An alternative to using the resources implicit EL object is to use the new library and name attributes of the<h:graphicImage>, <h:outputScript>, and<h:outputStylesheet> JSF tags. Therefore, the following example is functionally equivalent to the previous one:
<h:graphicImage library="images" name="icon.gif" />
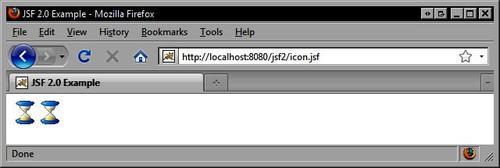
The HTML produced by this example is as follows. Notice that the src attribute value is identical for both images.
<!DOCTYPE html PUBLIC "-//W3C//DTD XHTML 1.0 Transitional//EN" http://www.w3.org/TR/xhtml1/DTD/xhtml1-transitional.dtd>
<html xmlns=http://www.w3.org/1999/xhtml>
<head>
<meta http-equiv="Content-Type" content="text/html; charset=utf-8" />
<title>JSF 2.0 Example</title>
</head>
<body>
<img src="/jsf2/javax.faces.resource/icon.gif.jsf?ln=images" /> <img src="/jsf2/javax.faces.resource/icon.gif.jsf?ln=images" />
</body>
</html>
Another great feature of JSF 2.0 is that the Facelets view definition framework that we know and love, is now integrated into the core JSF framework. This means that a separate jsf-facelets.jar file is no longer needed when deploying a JSF 2.0 application, and specifying the FaceletViewHandler in the<view-handler> element in faces-config.xml is also no longer necessary provided that the version attribute of the faces-config element in faces-config.xml is set to "2.0".
One of the coolest features of JSF 2.0 is the ability to create composite components using declarative markup. We can now create advanced UI components that are composed of other UI components without writing any Java code.
One of the principles emphasized in JSF 2.0 is convention over configuration. This means that we can spend more time actually building JSF applications, and less time writing configuration files. This is especially apparent with the new JSF 2.0 composite components feature.
JSF 2.0 introduces a new tag library named "composite" for declaring composite components. A composite component can be a typical Facelets XHTML document that uses special tags to declare a component interface and a component implementation. The following "Hello World" example demonstrates the key concepts behind how to create a composite UI component.
/resources/components/helloworld/hello.xhtml
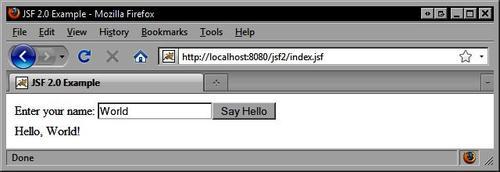
<!DOCTYPE html PUBLIC "-//W3C//DTD XHTML 1.0 Transitional//EN" http://www.w3.org/TR/xhtml1/DTD/xhtml1-transitional.dtd>
<html xmlns=http://www.w3.org/1999/xhtml xmlns:h=http://java.sun.com/jsf/html xmlns:composite=http://java.sun.com/jsf/composite>

<head>
<meta http-equiv="Content-Type" content="text/html; charset=utf-8" />
<title>JSF 2.0 Example</title>
</head>
<body>
<!-- Component interface -->
<composite:interface>
<composite:attribute name="name" />
<composite:attribute name="actionListener"
method-signature="void sayHello(javax.faces.event. ActionEvent)" />
</composite:interface>

<!-- Component implementation -->
<composite:implementation>
<h:form>
<h:panelGrid>
<h:panelGroup>
<h:outputLabel value="Enter your name: " />
<h:inputText value="#{cc.attrs.name}" />
<h:commandButton value="Say Hello" actionListener="#{cc.attrs.actionListener}" />
</h:panelGroup>
<h:outputText value="Hello, #{cc.attrs.name}!" rendered="#{cc.attrs.name ne null}" />
</h:panelGrid>
</h:form>
</composite:implementation>

</body>
</html>
Let's discuss the previous example in detail. First, notice the path of the filename. The file for our composite component is named /resources/components/helloworld/hello.xhtml. The helloworld directory of the file defines the tag library, and the file name (without the file extension) defines our tag name. Simply by creating the file we are effectively declaring a new tag named "hello" in our "helloworld" custom tag library.
Next, notice the declaration of the "composite" XML namespace to import the new composite components tag library. This tag library provides JSF infrastructural support that enable developers to declare composite components.
Next, notice that the<body> tag contains two child tags, a<composite:interface> tag and a<composite:implementation> tag. The code outside these tags will not be used, but by defining our component in a complete XHTML document we can edit the document more easily with typical web authoring tools.
The<composite:interface> tag is responsible for specifying the composite component's interface. Think of the attribute names and values that will be accepted by our custom tag. In our example, the "hello" tag has two attributes, a name attribute and an actionListener attribute. Also notice that the actionListener attribute expects a JSF EL method expression that resolves to a Java method with the signature void sayHello(javax.faces.event.ActionEvent). This signature is interpreted by the JSF framework to mean "any void method that accepts a javax.faces.event.ActionEvent parameter". The name of the method is not important, and the parameter variable is not specified.
The<composite:implementation> tag is responsible for defining the implementation details of our composite component. Here we can see that the component will render an<h:form> tag that contains an<h:panelGrid> tag with a label, text field, command button, and text message. Notice that we are using a new implicit EL object named "cc" for "composite component". The attrs property of the cc object is a map that has as its keys the names of the attributes we specified in our<composite:interface> declaration. The values of the map are the values assigned to the attributes (if any) when our composite component is used in a JSF view. Essentially, we are "passing through" any literal values or EL expressions specified by the page author to the components used in our composite component implementation.
Now that we understand how to define composite components, let's look at how to use them in a JSF view. In the following example, we render a simple Facelets page that includes a new namespace we have not seen before. Notice the declaration of the "helloworld" namespace. The URL for this namespace is http://java.sun.com/jsf/composite/components/helloworld. The important part of this URL is http://java.sun.com/jsf/composite. JSF will simply try to resolve the URL by looking for a composite component library below our /resources directory that has a folder structure that matches the part of the URL that remains when the "composite" namespace URL is removed.
So our "helloworld" namespace declaration instructs the framework to look for a folder named /resources/components/helloworld in the root of our web application. All composite component libraries follow this naming convention. As long as the directory structure and the namespace declaration are consistent, JSF will be able to locate our composite components.
Next we declare our<helloworld:hello> tag and set some of its attributes. Here we can use the typical JSF EL value expressions and method expressions that we are accustomed to using. Remember that the JSF composite component infrastructure will pass along the EL expressions to the actual underlying UI components (the text field and command button).
index.jsf
<!DOCTYPE html PUBLIC "-//W3C//DTD XHTML 1.0 Transitional//EN" "http://www.w3.org/TR/xhtml1/DTD/xhtml1-transitional.dtd">
<html xmlns="http://www.w3.org/1999/xhtml" xmlns:h="http://java.sun.com/jsf/html" xmlns:ui="http://java.sun.com/jsf/facelets" xmlns:helloworld= "http://java.sun.com/jsf/composite/components/helloworld">
<head>
<meta http-equiv="Content-Type" content="text/html; charset=utf-8" />
<title>JSF 2.0 Example</title>
</head>
<body>
<helloworld:hello name="#{backingBean.name}" actionListener="#{backingBean.sayHello}" />
</body>
</html>
The result of requesting this page in the browser is shown in the next screenshot. Thanks to JSF 2.0 composite components, we are now able to reuse and combine UI components in new and interesting ways to create new components, without writing a single line of Java code.
Solving the Ajax problem is one of the crowning achievements of JSF 2.0. One of the problems with the numerous Ajax-enabled JSF component libraries available today is that they cannot be combined together, due to conflicts between their respective Ajax JavaScript libraries. The JSF Expert Group recognized this problem and spent considerable effort to find a working solution.
After consultations with the OpenAjax Alliance—an independent organization made up of vendors and open source software developers that is committed to the standardization and interoperability of Ajax solutions—the JSF framework now has its own Ajax JavaScript namespace. What this means is that JSF component developers can now use a single Ajax JavaScript API to ensure the compatibility of their components with those from other developers.
In addition to standardizing Ajax for the JSF framework, JSF 2.0 introduces another cool feature: the<f:ajax> tag. This new tag has been added to the JSF Core tag library and provides behavior similar to the<a4j:support> tag from the Ajax4jsf tag library. Like the<a4j:support> tag, the<f:ajax> tag can also add Ajax capabilities to other JSF components, even those that have no built-in Ajax behavior.
The<f:ajax> tag has a number of attributes, but we will focus on three of them to get a better understanding of how this tag can be used. Let's enhance our "Hello World" composite component example by adding Ajax behavior to our form. Notice that we have created a new composite component file for this example named helloAjax.xhtml. With minor exceptions, it is identical to the previous example.
/resources/components/helloworld/helloAjax.xhtml
<!DOCTYPE html PUBLIC "-//W3C//DTD XHTML 1.0 Transitional//EN" "http://www.w3.org/TR/xhtml1/DTD/xhtml1-transitional.dtd">
<html xmlns="http://www.w3.org/1999/xhtml" xmlns:f="http://java.sun.com/jsf/core" xmlns:h="http://java.sun.com/jsf/html" xmlns:ui="http://java.sun.com/jsf/facelets" xmlns:composite="http://java.sun.com/jsf/composite">
<head>
<meta http-equiv="Content-Type" content="text/html; charset=utf-8" />
<title>JSF 2.0 Example</title>
</head>
<body>
<!-- Component interface -->
<f@ajax> tag<f@ajax> tagabout<composite:interface>
<composite:attribute name="name" />
<composite:attribute name="actionListener"
method-signature="void sayHello(javax.faces.event. ActionEvent)" />
</composite:interface>
<!-- Component implementation -->
<composite:implementation>
<h:form>
<h:panelGrid>
<h:panelGroup>
<h:outputLabel value="Enter your name: " />
<h:inputText id="input" value="#{cc.attrs.name}" />
<h:commandButton value="Say Hello" actionListener="#{cc.attrs.actionListener}">
<f:ajax execute="@this input" render="text" />

</h:commandButton>
</h:panelGroup>
<h:panelGroup id="text">
<h:outputText value="Hello, #{cc.attrs.name}!" rendered="#{cc.attrs.name ne null}" />
</h:panelGroup>
</h:panelGrid>
</h:form>
</composite:implementation>
</body>
</html>
Notice the<f:ajax> tag nested inside the<h:commandButton> tag. As we know, using Ajax is a two-step process; the first step is to define which components should be included in the request, and the second step is to define which components should be updated in the view when the Ajax request is complete. The<f:ajax> tag in the previous example has an execute attribute that specifies which components should be included in the Ajax request. In this way it is similar to the process attribute of the<a4j:support> tag. Here we specify the value @this input for the execute attribute. The keyword "@this" is part of a small set of reserved keywords which are new in JSF 2.0, and implies the parent UI component (the command button in this case). The "input" value is the ID of the text field component.
As we can see, the execute attribute accepts a space-separated list of keywords and/or component identifiers and indicates which components should be processed in the request. In this scenario, the text field's value will be submitted to the server, and the command button's actionListener method will be invoked on the server during the JSF request processing lifecycle. We could have simply specified @form in the execute attribute to indicate that the form all its child components are to be included in the Ajax request, but this example takes a more fine-grained approach to Ajax communication which also gives us the opportunity to learn more about the new<f:ajax> tag.
Next, notice the render attribute on the<f:ajax> tag. This attribute is similar to the reRender attribute of the<a4j:support> tag. Like the execute attribute, the render attribute accepts a space-separated list of keywords and/or component identifiers to indicate which component(s) should be updated in the view when the Ajax request is completed. In this example, we specify that the<h:panelGroup> tag containing the text message should be rendered.
Note that we had to move the component identifier from the<h:outputText> tag to the<h:panelGroup> tag because the<h:outputText> tag is not rendered unless the user enters a value, therefore when the user clicks the button for the first time, an Ajax request is sent and the view is only partially updated, but as the text message was not rendered the first time, JSF is unable to update that component in the view. By specifying the parent component, we are able to dynamically update the text message in the view and work around this issue.
The JSF page that uses our new and improved Ajaxified "Hello World" composite component is very similar to the previous example. As we can see from the source code below, the only difference is the use of the<helloworld:helloAjax> tag instead of the<helloworld:hello> tag. Once again, convention over configuration is the rule here, and JSF knows where to look to find our newly defined composite component. It will search for a file named helloAjax.xhtml in the /resources/components/helloworld directory at the root of our web application.
<!DOCTYPE html PUBLIC "-//W3C//DTD XHTML 1.0 Transitional//EN" "http://www.w3.org/TR/xhtml1/DTD/xhtml1-transitional.dtd">
<html xmlns="http://www.w3.org/1999/xhtml" xmlns:h="http://java.sun.com/jsf/html" xmlns:ui="http://java.sun.com/jsf/facelets" xmlns:helloworld="http://java.sun.com/jsf/composite/components/helloworld">
<h:head>
<meta http-equiv="Content-Type" content="text/html; charset=utf-8" />
<title>JSF 2.0 Example</title>
</h:head>
<body>
<helloworld:helloAjax name="#{backingBean.name}" actionListener="#{backingBean.sayHello}" />
</body>
</html>
To summarize, JSF 2.0 introduces a number of excellent new features that significantly enhance JSF development, such as new JSF annotations added to ease configuration, simpler navigation mapping, a Web resource loading mechanism, direct integration of the Facelets framework, composite components, and built-in Ajax support. Now that we have covered what's new in JSF 2.0, let's look at another exciting development in the JSF ecosystem: the PrimeFaces component library.