

The very first step in Android development and security testing is to learn to install and configure the Android SDK and ADB. The software development kit (SDK) for Android comes in two installable versions; Android Studio and the standalone SDK tools. This recipe primarily uses Android Studio and later provides additional information about standalone SDK tools.
Android Debug Bridge (ADB) is a very useful tool, which can connect to Android devices and emulators and is used to perform debugging and security testing for mobile applications.
Note
Whenever we use the words "Android devices" in this book, this means Android smartphones and tablets.
Navigate to https://developer.android.com and download either Android Studio or standalone SDK tools. You will also require JDK v7 or newer.
Let's set up using the first method, Android Studio:
Go to http://developer.android.com/sdk/index.html and download the latest Android Studio.
Once you have downloaded the Android Studio installer file, the installer guides you through the next steps and you just have to follow the instructions.
Android SDK and ABD are installed as part of the default installation. Unless you deselect these, they will be installed.
Note
AVD stands for Android Virtual Device, which in turn refers to the Android emulator. Emulators provide a virtualized setup to test, run, and debug Android applications. These are especially useful in cases where hardware devices are not available. Most development testing works using emulators. We will use an emulator in the next recipe.
Note the Android Studio and SDK installation paths. You will need them repeatedly in setup:
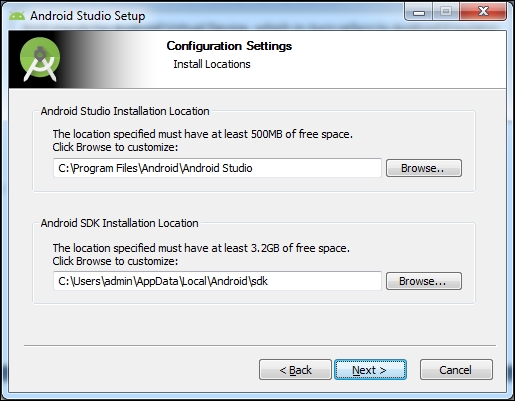
Once Android Studio is installed, run it. It will guide you through the next set of instructions. It downloads the Android SDK tools, which may take up to 4 hours depending upon the Internet speed.
The development environment is ready. Take a moment to make yourself familiar with the SDK installation directory (the path shown in the preceding screenshot). There are a few quick things you must know:
SDK Manager: This is used to manage Android packages and can be used to install or uninstall newer/older versions as required.

AVD Manager: This is used to manage AVD. Use it to create a few emulators that we will use at the appropriate time.

Now run one of the emulators to test whether the installed setup is working well. An emulator takes 2-3 minutes to start up, so be patient and if the installation has gone well, the emulator should be up and running. (Please refer to the next recipe if you want to look at the emulator screenshot now.)
platform-tools: This folder contains useful tools such as ADB, SQLite3, and so on. We will use these tools in various recipes throughout this book.
tools: This folder contains batch files and other executables. We will mostly use
emulator.exe, as well as other.exefiles in this folder.
There is an alternative way to develop in Android, as many people prefer other IDEs. In such cases, the standalone SDK tools can be downloaded. This provides the SDK tools required for application development and these tools can be invoked from the command line.
These standalone tools are also useful for pentesters and black hats, for quick analysis of underlying, application-related stuff. A lot of the time, application development is not needed and there is a need to debug; in such cases, the standalone SDK tools can be used.