
Unfortunately, Windows 8 and 8.1 are not easily available as non-upgrade .iso files. To use the tools provided by Microsoft, you actually need Windows to begin with. It's easy enough if you have bought a retail disk, but if not, you'll have to use Windows to create a bootable .iso file of Windows 8 anyway. In almost all cases, Microsoft expects you to already have Windows to go to Windows 8 or 8.1.
Further, more because not every application might be ready for Windows 8, to get the best of both worlds, what we'll do instead is essentially install both in such a way that we can switch between the two at will.
We'll do this by installing Windows 7 from the download of a clean-install ISO, taking a snapshot (or a linked clone if you're using Fusion Professional) and then upgrading it to Windows 8. You can even take another snapshot after Windows 8 has finished installing, upgrade to Windows 8.1, and have another point in time to go back to, or just go to Windows 8.1 without a second snapshot. The choice is yours, and it really depends on your needs.
If you have Fusion Professional, again, you can use the new linked clone feature instead of snapshots to conserve disk space.
To install Windows 8 in VMware Fusion, you'll need the following:
An Apple Macintosh computer with VMware Fusion 6 installed
4 GB of RAM (8 GB or more recommended for native performance)
35 GB of hard disk space to complete the installation alone
Recommended at least 50 GB of free space to accommodate the VM's natural growth
Operating system installation media (disk or disk image) for Windows 7 and Windows 8
For this recipe, we start with Windows 7 and then upgrade to Windows 8. We'll take a snapshot before upgrading to Windows 8 so that we can use Windows 7 when we need to.
You can download the Windows 7 "Trial" install image directly from the official Microsoft repository and save it to your Mac's Downloads folder, available at http://msft.digitalrivercontent.net/win/X17-59186.iso.
Note
Downloading the Windows 7 Trial .iso file from Microsoft (via Digital River) is legal and free of charge. Otherwise, you can use your Windows 7 Retail installation media.
For Windows 8, purchase the download directly from www.microsoftstore.com and access the download and the license key through your Microsoft Store account. It is quick and easy to get access to the download, and we'll do this within the same Windows 7 Trial virtual machine that we're about to create.
Since you should already have Fusion installed, let's get right to it.
Follow these steps:
The first thing to do is to launch VMware Fusion and create a new virtual machine using the Windows 7 Trial
.isofile that we have downloaded from Microsoft, as shown in the following screenshot:
Walking through each of the steps to install Windows is beyond the scope of this book, but you can follow the process using the following resources:
Creating a new virtual machine in Fusion from http://kb.vmware.com/kb/1011677
Using the step-by-step process on my YouTube channel, available at www.youtube.com/mikeroysoft
Choose your Windows 7
.isofile or physical DVD with the Choose a disk or disk image button and choose Windows 7 x64 as the Operating System type. If you use the download link I provided, the filename isX17-59186.iso.Use the Customize Settings option to save the virtual machine and set the CPU and RAM settings before starting the installation. If your Mac has 8 GB or more of RAM and a quad-core CPU, to make Windows 8 perform at its best, I recommend setting the number of Processors to 2 processor cores and setting the RAM to 4096 MB (4 GB ), as shown in the following screenshot. If your Mac has only 4 GB of RAM and a dual core CPU, assign 2048 MB (2 GB) of RAM and 1 processor core to the virtual machine.

The reasoning is simple: give Windows enough resources to do the work it needs to do, but keep enough on the Mac to keep the rest of the computer running smoothly.
After you start the virtual machine for the first time, when the Windows 7 installer asks, perform the following steps:
Create your username and password when prompted.
Do not enter a license key. Make sure Automatically activate windows when I'm online is unchecked.
Let the installer complete. Once the installer has completed and you have access to the Windows 7 desktop, now is the time to take a snapshot.
Take a snapshot or a linked clone. We can later go back to this point in time and switch between using Windows 7 and Windows 8. We'll discuss this in detail in the Much ado about snapshots (Intermediate) recipe. To take a snapshot, simply click on the Snapshots button as shown in the following screenshot:

Now, click on the Take button, as shown in the following screenshot:

Windows 7 is installed, and we now have a snapshot; so, now we can go ahead and upgrade to Windows 8. Ultimately, if we want to use Windows 7, we'll need to license it. If you have a retail license for Windows 7, this is a perfect way to use it. If you have an OEM license (one that came with a PC), it might be better if you convert your existing PC, which is covered in a later recipe, and upgrade that to Windows 8 or 8.1.
We have seen what the Snapshots screen looks like. Taking a snapshot is as easy as a click of a button. Note that to take a linked clone, the virtual machine must be powered off and not suspended.
You can also take a linked clone if you are using Fusion Professional.
Note
Attack of the clones
Clones are a new feature of Fusion 6 Professional, and work just like they do in VMware Workstation or vSphere, for those familiar with these platforms. There are two kinds of clones: linked clones and full clones.
A linked clone is a new virtual machine that uses an existing virtual machine as its "base image", also called a parent. It does not alter the original, but does read from it when it's running, so the original must be in the folder where it was when the linked clone was created. If it goes missing, the linked clone will not be able to start and will ask you to find the parent VM.
A full clone is a complete copy of a virtual machine, and does not require the original to be present. You can choose to preserve settings, such as IP address and MAC address, or have them given new properties at boot.
Clones are effectively treated as completely independent virtual machines; however, linked clones must be able to reach their parent virtual machine in order to work. They do not use the snapshot editor to be managed; however, each clone can even have its own independent snapshot tree using the snapshot editor.
Simply right-click on the virtual machine from the VM Library window and select Create Linked Clone..., as shown in the following screenshot:

The clone shows up in the virtual machine library like any other virtual machine, and can even be running at the same time as its parent VM.
Follow these steps:
Inside Windows 7, download and run the Windows 8 or 8.1 installer from your Microsoft Store account.
To look up your order, obtain your license key and access the download. You can visit your account page at www.microsoftstore.com.
Run the
Windows 8 Setup.exeinstaller from inside the virtual machine to upgrade your Windows 7 installation to Windows 8 or 8.1.When prompted, enter your license key and begin the download process, as shown in the following screenshot:

If you interrupt the process, it will resume when you start the installer again without having to re-enter the license key. Handy!
From here on, the rest of the installation is automated. So, just sit back and wait to personalize!
During the personalization process, I recommend customizing the installation as follows:
Turn on sharing.
Turn off Windows Update. (You could keep it on, but in a VM, it's best to do this manually.)
Turn all settings and other options off They may be OK for a desktop machine, but for a virtual machine, they're best left off.
Allow the installer to complete the upgrade. It may take some time depending on your Internet connection, as it's downloading the whole OS on the fly from Microsoft as it installs. The VM might also reboot once or twice, so just sit tight until everything is finished and you're at your shiny new Windows 8 desktop.
Once it resumes, it should come up as the Metro-UI-Laden Windows 8. Congratulations! the upgrade is nearly complete.
Once the installer has finished and you've rebooted to the new Windows 8 desktop, power off the virtual machine and change the OS type to Windows 8 x64, as follows:
In the menu bar, click on Virtual Machine and click on Shutdown.
Navigate to Settings | General.
Click on OS and change it to Windows 8 x64. Click on Change when it prompts.
Close the Settings window and launch the VM by clicking on the big Play button.
When it finishes booting Windows 8, we can install or upgrade VMware Tools:
In the Mac menu bar, navigate to Virtual Machine | Install VMware Tools and select Install (if prompted). Windows will ask what to do about the
D:drive, as shown in the following screenshot: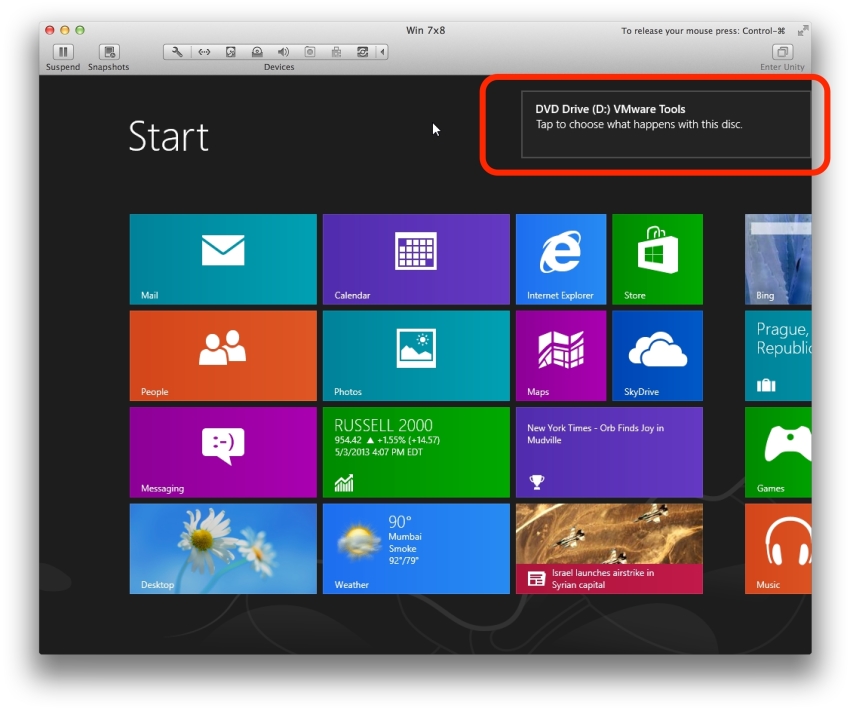
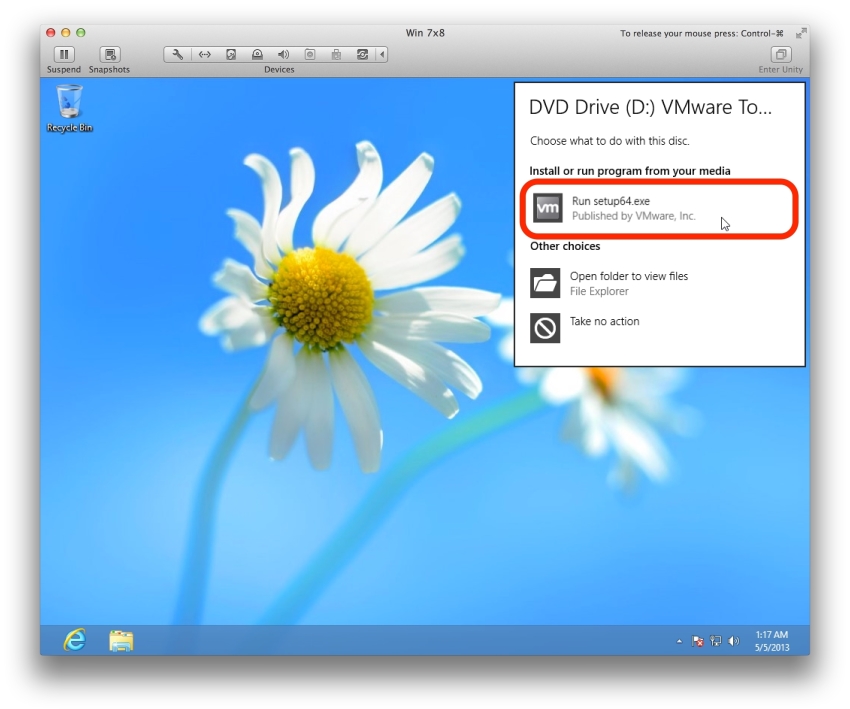
Windows will prompt for action. Click on Run setup64.exe as shown in the following screenshot:
Click on the Typical tools installer. The virtual machine will restart.
Once the VM restarts, Windows 8 is installed and ready to go!
At this point, you can also upgrade to Windows 8.1 by following the instructions available at http://windows.microsoft.com/en-us/windows-8/update-from-windows-8-tutorial.
Remember, you can take a snapshot (or a clone with Fusion Professional) now so that you can always go back to this fresh installation state, even after you upgrade to Windows 8.1!
You do not need to do anything special to the Windows 7 .iso files; they can be used as they are.
Windows 7 Professional English 64-bit available at http://msft.digitalrivercontent.net/win/X17-59186.iso
Windows 8.1 Upgrade instructions available at http://windows.microsoft.com/en-us/windows-8/update-from-windows-8-tutorial