

In this chapter, we will not actually start with the development phase. Instead, we will study the basics of websites to learn Django, namely, the project and application creation. In this chapter, we will also:
- Learn how to use regular expressions
- Create your first URLs
- Create your first view
- Test your application
At the end of the chapter, we will have created our first web page that will display Hello World!.
In the previous chapter, we edited the settings.py file to configure our Django project. We will edit settings.py again to add a new parameter. The following line must be present in settings.py:
ROOT_URLCONF = 'Work_manager.urls'
This parameter will define the Python file that will contain all the URLs of our site. We have already spoken about the previous file as it is in the Work_manager folder. The syntax that is used to define the ROOT_URLCONF variable means that Django takes the URLs in the urls.py file contained in the Workmanager package to the root of the project.
The routing of our application will be based on this file. The routing defines how the client request will be treated based on the URL sent.
In fact, when the controller receives the client request, it will go in the urls.py file and check whether the URL is a customer's request and use the corresponding view.
For example, in the following URL, Django will look for the search string in urls.py to know what action to take: http://localhost/search.
This is what the urls.py file looks like, as it is created by Django when creating the project:
from django.conf.urls import patterns, include, url
from django.contrib import admin
admin.autodiscover()
urlpatterns = patterns('',
    # Examples:
    # url(r'^$', 'Work_msanager.views.home', name='home'),
    # url(r'^blog/', include('blog.urls')),
    url(r'^admin/', include(admin.site.urls)),
)
We will detail the components of this file:
- The first line imports the functions commonly used in the management of URLs.
- The next two lines are useful to the administration module. We will comment by adding
#at the beginning of the line. These lines will be explained in a later chapter. - The remaining lines define the URLs in the
urlpatternsvariable. We will also review the URL starting withurl (r '^ admin.
After having received a request from a web client, the controller goes through the list of URLs linearly and checks whether the URL is correct with regular expressions. If it is not in conformity, the controller keeps checking the rest of the list. If it is in conformity, the controller will call the method of the corresponding view by sending the parameters in the URL. If you want to write URLs, you must first know the basics of regular expressions.
Regular expressions are like a small language in itself. Despite their complex and inaccessible air, they can manipulate the strings with great flexibility. They comprise a sequence of characters to define a pattern.
We will not explore all the concepts of regular expressions in this book, because it would require several chapters and divert us from the main goal of this book. Practice your regular expressions before you write your first URLs; many sites help you train on regular expressions. Search for Online regex matcher, and you will find pages to check your regular expressions through JavaScript. You can further explore regular expressions through the book, Mastering Regular Expressions Python, Packt Publishing, written by Félix López. There is a practical tool to visualize regular expressions. This tool is called Regexper and was created by Jeff Avallone. We will use this to represent regular expressions as a diagram.
The following sections explore the patterns used, functions, and an example to help you understand regular expressions better.
Uninterpreted characters, such as letters and digits, in a regular expression mean that they are present in the string and must be placed in exactly the same order.
For example, the regular expression test01 will validate the test01, dktest01, and test0145g strings but won't validate test10 or tste01.
The regular expression test-reg will validate a test-regex but not test-aregex or testregex:
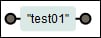
A visual representation of the test01 regular expression
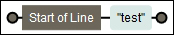
To check whether a string must be present at the beginning or the end of the line, you must use the ^ and $ characters. If ^ is present at the beginning of the string, the validation will be done at the beginning of the chain. It works in the same way for $ at the end.
The following are some examples:


In a regular expression, the dot (.) means "any character". So, when you validate characters that cannot be inferred, the dot is used. If you try to validate a dot in your speech, use the escape character, \.
The following are examples:


To validate the characters, you can use character classes. A character class is enclosed in square brackets and contains all the allowed characters. To validate all the numbers and letters in a location, you must use [0123456789a]. For example, ^tes[t0e]$ will only validate the three chains: test, tes0, and tese.
You can also use the following predefined classes:
[0-9]is equivalent to[0123456789][a-z]matches all the letters,[abcdefghijklmnopqrstuvwxyz][A-Z]matches all uppercase letters[a-zA-Z]matches all the letters
The following are the shortcuts:
\dis equivalent to[0-9]\wis equivalent to[a-zA-Z0-9_][0-9]is equivalent to[0123456789]
Everything that we have studied until now is the elements that define one and only one character. To validate a character one or more times, you must use braces {x, y}, where x defines the minimum number of occurrences and y is the maximum number of occurrences. If one of them is not specified, you will have an undefined value. For example, if you forget to include an element in {2,}, it means that the character must be present at least twice.
The following are some examples:
^test{2, 3}$only validatestesttandtesttt:
^tests{0,1}$only validatestestandtests
. ^ {1} $validates all the channels except one: the empty string
The following are the shortcuts:
*is equivalent to{0}?is equivalent to{0, 1}+is equivalent to{1}
Regular expressions are very powerful and will be very useful even outside of programming with Django.
The uninterpreted characters
Uninterpreted characters, such as letters and digits, in a regular expression mean that they are present in the string and must be placed in exactly the same order.
For example, the regular expression test01 will validate the test01, dktest01, and test0145g strings but won't validate test10 or tste01.
The regular expression test-reg will validate a test-regex but not test-aregex or testregex:
A visual representation of the test01 regular expression
To check whether a string must be present at the beginning or the end of the line, you must use the ^ and $ characters. If ^ is present at the beginning of the string, the validation will be done at the beginning of the chain. It works in the same way for $ at the end.
The following are some examples:
In a regular expression, the dot (.) means "any character". So, when you validate characters that cannot be inferred, the dot is used. If you try to validate a dot in your speech, use the escape character, \.
The following are examples:
To validate the characters, you can use character classes. A character class is enclosed in square brackets and contains all the allowed characters. To validate all the numbers and letters in a location, you must use [0123456789a]. For example, ^tes[t0e]$ will only validate the three chains: test, tes0, and tese.
You can also use the following predefined classes:
[0-9]is equivalent to[0123456789][a-z]matches all the letters,[abcdefghijklmnopqrstuvwxyz][A-Z]matches all uppercase letters[a-zA-Z]matches all the letters
The following are the shortcuts:
\dis equivalent to[0-9]\wis equivalent to[a-zA-Z0-9_][0-9]is equivalent to[0123456789]
Everything that we have studied until now is the elements that define one and only one character. To validate a character one or more times, you must use braces {x, y}, where x defines the minimum number of occurrences and y is the maximum number of occurrences. If one of them is not specified, you will have an undefined value. For example, if you forget to include an element in {2,}, it means that the character must be present at least twice.
The following are some examples:
^test{2, 3}$only validatestesttandtesttt:^tests{0,1}$only validatestestandtests. ^ {1} $validates all the channels except one: the empty string
The following are the shortcuts:
*is equivalent to{0}?is equivalent to{0, 1}+is equivalent to{1}
Regular expressions are very powerful and will be very useful even outside of programming with Django.
The beginning and the end of the line
To check whether a string must be present at the beginning or the end of the line, you must use the ^ and $ characters. If ^ is present at the beginning of the string, the validation will be done at the beginning of the chain. It works in the same way for $ at the end.
The following are some examples:
In a regular expression, the dot (.) means "any character". So, when you validate characters that cannot be inferred, the dot is used. If you try to validate a dot in your speech, use the escape character, \.
The following are examples:
To validate the characters, you can use character classes. A character class is enclosed in square brackets and contains all the allowed characters. To validate all the numbers and letters in a location, you must use [0123456789a]. For example, ^tes[t0e]$ will only validate the three chains: test, tes0, and tese.
You can also use the following predefined classes:
[0-9]is equivalent to[0123456789][a-z]matches all the letters,[abcdefghijklmnopqrstuvwxyz][A-Z]matches all uppercase letters[a-zA-Z]matches all the letters
The following are the shortcuts:
\dis equivalent to[0-9]\wis equivalent to[a-zA-Z0-9_][0-9]is equivalent to[0123456789]
Everything that we have studied until now is the elements that define one and only one character. To validate a character one or more times, you must use braces {x, y}, where x defines the minimum number of occurrences and y is the maximum number of occurrences. If one of them is not specified, you will have an undefined value. For example, if you forget to include an element in {2,}, it means that the character must be present at least twice.
The following are some examples:
^test{2, 3}$only validatestesttandtesttt:^tests{0,1}$only validatestestandtests. ^ {1} $validates all the channels except one: the empty string
The following are the shortcuts:
*is equivalent to{0}?is equivalent to{0, 1}+is equivalent to{1}
Regular expressions are very powerful and will be very useful even outside of programming with Django.
The any character regular expression
In a regular expression, the dot (.) means "any character". So, when you validate characters that cannot be inferred, the dot is used. If you try to validate a dot in your speech, use the escape character, \.
The following are examples:
To validate the characters, you can use character classes. A character class is enclosed in square brackets and contains all the allowed characters. To validate all the numbers and letters in a location, you must use [0123456789a]. For example, ^tes[t0e]$ will only validate the three chains: test, tes0, and tese.
You can also use the following predefined classes:
[0-9]is equivalent to[0123456789][a-z]matches all the letters,[abcdefghijklmnopqrstuvwxyz][A-Z]matches all uppercase letters[a-zA-Z]matches all the letters
The following are the shortcuts:
\dis equivalent to[0-9]\wis equivalent to[a-zA-Z0-9_][0-9]is equivalent to[0123456789]
Everything that we have studied until now is the elements that define one and only one character. To validate a character one or more times, you must use braces {x, y}, where x defines the minimum number of occurrences and y is the maximum number of occurrences. If one of them is not specified, you will have an undefined value. For example, if you forget to include an element in {2,}, it means that the character must be present at least twice.
The following are some examples:
^test{2, 3}$only validatestesttandtesttt:^tests{0,1}$only validatestestandtests. ^ {1} $validates all the channels except one: the empty string
The following are the shortcuts:
*is equivalent to{0}?is equivalent to{0, 1}+is equivalent to{1}
Regular expressions are very powerful and will be very useful even outside of programming with Django.
Character classes
To validate the characters, you can use character classes. A character class is enclosed in square brackets and contains all the allowed characters. To validate all the numbers and letters in a location, you must use [0123456789a]. For example, ^tes[t0e]$ will only validate the three chains: test, tes0, and tese.
You can also use the following predefined classes:
[0-9]is equivalent to[0123456789][a-z]matches all the letters,[abcdefghijklmnopqrstuvwxyz][A-Z]matches all uppercase letters[a-zA-Z]matches all the letters
The following are the shortcuts:
\dis equivalent to[0-9]\wis equivalent to[a-zA-Z0-9_][0-9]is equivalent to[0123456789]
Everything that we have studied until now is the elements that define one and only one character. To validate a character one or more times, you must use braces {x, y}, where x defines the minimum number of occurrences and y is the maximum number of occurrences. If one of them is not specified, you will have an undefined value. For example, if you forget to include an element in {2,}, it means that the character must be present at least twice.
The following are some examples:
^test{2, 3}$only validatestesttandtesttt:^tests{0,1}$only validatestestandtests. ^ {1} $validates all the channels except one: the empty string
The following are the shortcuts:
*is equivalent to{0}?is equivalent to{0, 1}+is equivalent to{1}
Regular expressions are very powerful and will be very useful even outside of programming with Django.
Validating the number of characters
Everything that we have studied until now is the elements that define one and only one character. To validate a character one or more times, you must use braces {x, y}, where x defines the minimum number of occurrences and y is the maximum number of occurrences. If one of them is not specified, you will have an undefined value. For example, if you forget to include an element in {2,}, it means that the character must be present at least twice.
The following are some examples:
^test{2, 3}$only validatestesttandtesttt:^tests{0,1}$only validatestestandtests. ^ {1} $validates all the channels except one: the empty string
The following are the shortcuts:
*is equivalent to{0}?is equivalent to{0, 1}+is equivalent to{1}
Regular expressions are very powerful and will be very useful even outside of programming with Django.
One of the interesting features of Django is to contain a development server. Indeed, during the development phase of the site, the developer does not need to set up a web server. However, when you put the site into production, you will need to install a real web server because it is not for use in production.
Indeed, the Django server is not secure and can hardly bear a heavy load. This does not mean that your site will be slow and full of flaws; it just means that you have to go through a real web server into production.
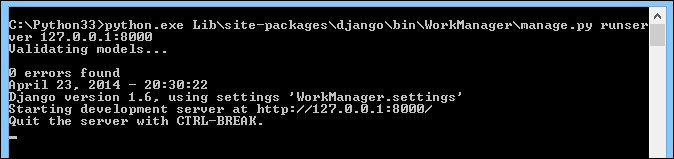
To use the development server, we need to use the manage.py runserver command file. We must launch the command prompt and put ourselves in the project root (use the cd command to browse folders) to execute the command:
manage.py runserver 127.0.0.1:8000
This command starts the Django development server. Let's explain the control step by step:
- The
runserverparameter starts the development server. 127.0.0.1is our internal IP address to the network adapter. This means that our server will listen and respond only to the computer on which it is launched. If we were in a local network and wanted to make our website available on computers other than ours, we would enter our local IP address instead of127.0.0.1. The value127.0.0.1is the default value of the parameter.8000defines the listening port of the server. This setting is useful to run multiple web servers on a single computer.
If the command is executed correctly, the window should show us the message, 0 errors found, as shown in the following screenshot:
To see the result, we must open our browser and enter the following URL: http://localhost:8000.
Django confirms that our development environment is functional by displaying the following message:

This message also means that we have no specified URL. We will add two URLs to our file:
url (r'^$', 'TasksManager.views.index.page),
url (r'^index$', 'TasksManager.views.index.page')
Tip
You should consistently get to know about bugs in Django, especially on the GitHub page for Django: https://github.com/django.
In the URLs that we enter, we define the first parameter (regular expression) that will validate the URL. We will discuss the second argument in the following chapter.
Let's go back to our browser and refresh the page with the F5 key. Django will display a ViewDoesNotExist at /
error.
This means that our module does not exist. You must study your errors; in this example, we had an error. With this error, we will directly fix the part that does not work.
Another problem that we regularly encounter is the 404 Page not found error. We can generate it by typing the http://localhost:8000/test404 URL in our browser. This error means that no URL has been validating the test404 string.
We must pay attention to errors because seeing and resolving them can save us a lot of time.
Now that we have created our URL and interpreted by the routing system, we must ensure that a view (which is a controller in the MVC pattern) meets the customer's demand.
This is the function of the second parameter of the URLs present in urls.py. This parameter will define the method that will play the role of a view. Take, for example, our first URL:
url (r'^$', 'TasksManager.views.index.page'),
Firstly, as we have seen when studying regular expressions, this URL will be valid only if we browse the http://localhost:8000 URL. The second parameter in the URL means that in the index.py file, there is a method called page that will process the request. The index.py file is located in the views package at the root of the TasksManager application.
When we want a folder to be recognized as a package by Python, we need to create a folder that contains the __init__.py file that we can leave blank.
You can choose another structure to store your views. You must choose the structure that best fits your project. Have a long-term vision of your project in order to define quality architecture from the first line of code.
In our index.py file, we will create a method called page(). This method will return an HTML page to the client. The page is being returned by the HTTP protocol, so we will use the HttpResponse() function and its importation. The argument of this HttpResponse() function returns the HTML content that we will return to the browser. To simplify reading this example, we do not use a proper HTML structure, because we just return Hello world! to the client, as shown in the following code:
# - * - Coding: utf -8 - * -
from django.http import HttpResponse
# View for index page.
def page (request) :
 return HttpResponse ("Hello world!" )
As we can see in the previous example, we added a comment before our page() method. Comments are very important. They help you understand your code very quickly.
We also set the encoding of the UTF-8 characters. This will improve our application's compatibility with other languages. We do not necessarily indicate it later in the book, but it is advisable to use it.
To test our first page, we will have to use the runserver command, which we saw earlier in this chapter. To do this, you must run the command and refresh your page, http://localhost:8000, in your browser.
If you see Hello World! appear in your browser without an error, it means that you have followed the previous steps. If you have forgotten something, do not hesitate to find your error on the Internet; others have probably been through the same.
However, we must improve our view because at the moment, we do not respect the MVC model. We will create a template to separate the HTML of Python code and have more flexibility.
In this chapter, we studied the basics of regular expressions. It is a powerful tool to use to manipulate strings. We learned how to manipulate the system routing URL. We also created our first view that returns a string to the client. In the next chapter, we will learn how to create maintainable templates with Django.