

Sessions are variables stored by the server according to the user. On many websites, it is useful to keep user data as an identifier, a basket, or a configuration item. For this, Django stores this information in the database. It then randomly generates a string as a hash code that is transmitted to the client as a cookie. This way of working allows you to store a lot of information about the user while minimizing the exchange of data between the server and client, for example, the type of identifier that the server can generate.
In this chapter, we will do the following:
- Study how session variables work with the Django framework
- Learn how to create and retrieve a session variable
- Study session variables with a practical and useful example
- Make ourselves aware of the safety of using session variables
Firebug is a plugin for Firefox. This is a handy tool for a web developer; it allows you to do the following:
- Display the JavaScript console to read errors
- Read and edit the HTML code of the page from the browser
- View the cookies used by the website consulted
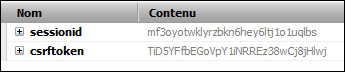
Cookies realized with Firebug
In this screenshot realized with Firebug, we notice that we have two cookies:
The following is a screenshot of the table where session data is stored:

Sessions are very useful, especially for authentication systems. Indeed, in many cases, when a user connects to a website, we record their identifier in the session variable. Thus, with each HTTP request, the user sends this identifier to inform the site about their status. This is also an essential system to make the administration module work, which we will see in a later chapter. However, sessions have a disadvantage if they are not regularly removed: they take more space in the database. To use sessions in Django, the django.contrib.sessions.middleware.SessionMiddleware middleware must be enabled and the browser must accept cookies.
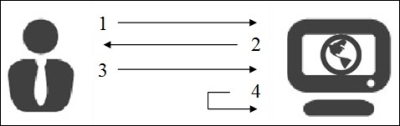
The life cycle of a session is explained as follows:
- The user who does not have any session makes an HTTP request to the website.
- The server generates a session identifier and sends it to the browser along with the page requested by the user.
- Whenever the browser makes a request, it will automatically send the session identifier.
- Depending on the configuration of the system administrator, the server periodically checks if there are expired sessions. If this is the case, it may be deleted.
With Django, storage in a database, generation of the hash code, and exchanges with the client will be transparent. Sessions are stored in the context represented by the request variable. To save a value in a session variable, we must use the following syntax:
request.session['session_var_name'] = "Value"
Once the session variable is registered, you must use the following syntax to recover it:
request.session['session_var_name']
To use these lines, we have to be sure to interact with the request context. Indeed, in some cases, such as CBV, we do not have simple access to the request context.
In this example, we will show a practical example of using session variables. In general, a developer consults the tasks to be done. He/she selects one task, studies it, and then realizes and notes the time spent. We will store the identifier of the last task accessed in a session variable, and we will display it at the top of the tasks list to be carried out.
For this, we will no longer use the DetailView CBV to display the details of a task, but we will use a real view. First, we must define the URL that will allow us to see our view. For this, we will modify the task_detail URL with the following code:
url (r'^task_detail_(?P<pk>\d+)$', 'TasksManager.views.task_detail.page', name="task_detail"),
We will create our view in the views/task_detail.py file with the following code:
from django.shortcuts import render
from TasksManager.models import Task
from django.http import HttpResponseRedirect
from django.core.urlresolvers import reverse
def page(request, pk):
  check_task = Task.objects.filter(id = pk)
  # This line is used to retrieve a queryset of the elements whose ID property matches to the parameter pk sent to the URL. We will use this queryset in the following line : task = check_task.get().

  try:
  # This is used to define an error handling exception to the next line.
    task = check_task.get()
    # This line is used to retrieve the record in the queryset.
  except (Task.DoesNotExist, Task.MultipleObjectsReturned):
  # This allows to process the two kind of exceptions: DoesNotExist and MultipleObjectsReturned. The DoesNotExist exception type is raised if the queryset has no records. The MultipleObjectsReturned exception type is raised if queryset contains multiple records.
    return HttpResponseRedirect(reverse('public_empty'))
    # This line redirects the user if an exception is thrown. We could also redirect to an error page.
  else:
    request.session['last_task'] = task.id
    # This line records the ID property of the task in a session variable named last_task.
    #In this line, we use the same template that defines the form CBV DetailView. Without having to modify the template, we send our task in a variable named object.
  return render(request, 'en/public/task_detail.html', {'object' : task})
We will then create a list of the tasks with the ListView CBV. To do this, we must add the following URL to the urls.py file:
url (r'^task_list$', 'TasksManager.views.task_list.page', name="task_list"),
The corresponding view for this URL is as follows:
from django.shortcuts import render
from TasksManager.models import Task
from django.core.urlresolvers import reverse
def page(request):
  tasks_list = Task.objects.all()
  # This line is used to retrieve all existing tasks databases.
  last_task = 0
  # In this line, we define last_task variable with a null value without generating a bug when using the render() method.
  if 'last_task' in request.session:
  # This line is used to check whether there is a session variable named last_task.
    last_task = Task.objects.get(id = request.session['last_task'])
    # In this line, we get the recording of the last task in our last_task variable.
    tasks_list = tasks_list.exclude(id = request.session['last_task'])
    # In this line, we exclude the last task for the queryset to not have duplicates.
  return render(request, 'en/public/tasks_list.html', {'tasks_list': tasks_list, 'last_task' : last_task})
We will then create the template for our list. This example will be complete because this list will create, read, update, and delete tasks. The following code must be placed in the tasks_list.html file:
{% extends "base.html" %}
{% block title_html %}
  Tasks list
{% endblock %}
{% block article_content %}
  <table>
  <tr>
    <th>Title</th>
    <th>Description</th>
    <th colspan="2"><a href="{% url "create_task" %}">Create</a></th>
  </tr>
  {% if last_task %}
  <!-- This line checks to see if we have a record in the last_task variable. If this variable has kept the value 0, the condition will not be validated. In this way, the last accessed task will display at the beginning of the list.-->
    <tr class="important">
      <td><a href="{% url "task_detail" last_task.id %}">{{ last_task.title }}</a></td>
      <td>{{ last_task.description|truncatechars:25 }}</td>
      <td><a href="{% url "update_task" last_task.id %}">Edit</a></td>
      <td><a href="{% url "task_delete" last_task.id %}">Delete</a></td>
    </tr>
  {% endif %}
  {% for task in tasks_list %}
  <!-- This line runs through the rest of the tasks and displays. -->
    <tr>
      <td><a href="{% url "task_detail" task.id %}">{{ task.title }}</a></td>
      <td>{{ task.description|truncatechars:25 }}</td>
      <td><a href="{% url "update_task" task.id %}">Edit</a></td>
      <td><a href="{% url "task_delete" task.id %}">Delete</a></td>
    </tr>
  {% endfor %}
  </table>
{% endblock %}
For this example to be complete, we must add the following lines in the style.css file that we have created:
tr.important td {
  font-weight:bold;
}
These lines are used to highlight the row of the last task consulted.
Session variables are not modifiable by the user because they are stored by the server, unless if in your website you choose to store data sent by the client. However, there is a type of flaw that uses the system session. Indeed, if a user cannot change their session variables, they may try to usurp another user session.
We will imagine a realistic attack scenario. We are in a company that uses a website to centralize e-mails and the schedule of each employee. An employee we appoint, Bob, is very interested in one of his colleagues, Alicia. He wants to read her e-mails to learn more about her. One day, when she goes to take her coffee in the break room, Bob sits at Alicia's computer. Like all employees, he uses the same password to ease administration, and he can easily connect to Alicia's PC. Luckily, the browser has been left open. Besides, the browser periodically contacts the server to see if new messages have arrived so that the session does not have time to expire. He downloads a tool such as Firebug that allows him to read cookies. He retrieves the hash, erases the traces, and returns to his computer. He changes the ID session cookies in his browser; therefore, he has access to all the information about Alicia. Moreover, when there is no encryption, this kind of attack can be done remotely in a local network that sniffs network traffic. This is called session fixation. To protect ourselves from this kind of attack, it is possible to take a few measures:
- Encrypt communications between the server and client with SSL, for example.
- Ask the user to enter a password before they can access sensitive information, such as banking information.
- Conduct an audit of the IP address and session number. Disconnect the user if he/she changes his/her IP address. Notwithstanding this measure, the attacker can perform an IP spoofing to usurp the IP's victim.
In this chapter, we managed to save data related to a user. This data is stored for the whole duration of the session. It cannot be modified directly by the user.
We also studied the safety sessions. Keep in mind that a user session can be stolen by an attacker. Depending on the size of the project, it is necessary to take measures to secure the website.
In the next chapter, we will learn how to use the authentication module. It will allow us to create users and restrict access to certain pages to the logged-in users.