

We all know about HTML forms. This is a <form> tag that contains the <input> and <select> tags. The user can fill in or edit these items and return them to the server. This is the preferred way to store data provided by the client. Frameworks such as Django seized the HTML form to make it better.
A Django form is inherited from the Form class object. It is an object in which we will set properties. These properties will be the fields in the form, and we will define their type.
In this chapter, we will learn how to do the following:
- Create an HTML form
- Handle the data sent by a form
- Create a Django form
- Validate and manipulate data sent from a Django form
- Create forms based on models
- Customize error messages and use widgets
The advantages of Django forms are as follows:
- Protection against CSRF vulnerabilities can be easily implemented. We'll talk about CSRF vulnerabilities thereafter.
- Data validation is automatic.
- Forms are easily customizable.
But the best way to compare a standard HTML form and a Django form is to practice it with an example: the form to add a developer.
In this section, we will show you how to add a developer without using Django forms. This example will show the time that can be saved by using Django.
Add the following URL to your urls.py file:
url(r'^create-developer$', 'TasksManager.views.create_developer.page', name="create_developer"),
We will create a template before the view. Indeed, we are going to fill the view with the template that contains the form. We do not put all the fields in the model because the code is too long. It is better to learn using shorter code. The following is our template in template/en/public/create_developer.html:
{% extends "base.html" %}
{% block title_html %}
  Create Developer
{% endblock %}
{% block h1 %}
  Create Developer
{% endblock %}
{% block article_content %}
  <form method="post" action="{% url "create_developer" %}" >
    <table>
      <tr>
        <td>Name</td>
        <td>
          <input type="text" name="name" />
        </td>
      </tr>
      <tr>
        <td>Login</td>
        <td>
          <input type="text" name="login" />
        </td>
      </tr>
      <tr>
        <td>Password</td>
        <td>
          <input type="text" name="password" />
        </td>
      </tr>
      <tr>
        <td>Supervisor</td>
        <td>
          <select name="supervisor">
            {% for supervisor in supervisors_list %}
              <option value="{{ supervisor.id }}">{{ supervisor.name }}</option>
            {% endfor %}
          </select>
        </td>
      </tr>
      <tr>
        <td></td>
        <td>
          <input type="submit" value="Valid" />
          </td>
      </tr>
    </table>
  </form>
{% endblock %}
Note that the template is impressive and yet it is a minimalist form.
The following screenshot shows the web page that we will create:
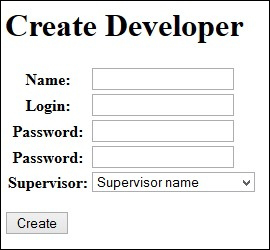
The view that will process this form will be as follows. Save the view in the file views/create_developer.py:
from django.shortcuts import render
from django.http import HttpResponse
from TasksManager.models import Supervisor, Developer
# View for create_developer
def page(request):
  error = False
  # If form has posted
  if request.POST:
  # This line checks if the data was sent in POST. If so, this means that the form has been submitted and we should treat it.
    if 'name' in request.POST:
    # This line checks whether a given data named name exists in the POST variables.
      name = request.POST.get('name', '')
      # This line is used to retrieve the value in the POST dictionary. Normally, we perform filters to recover the data to avoid false data, but it would have required many lines of code.
    else:
      error=True
    if 'login' in request.POST:
      login = request.POST.get('login', '')
    else:
      error=True
    if 'password' in request.POST:
      password = request.POST.get('password', '')
    else:
      error=True
    if 'supervisor' in request.POST:
      supervisor_id = request.POST.get('supervisor', '')
    else:
      error=True
    if not error:
      # We must get the supervisor
      supervisor = Supervisor.objects.get(id = supervisor_id)
      new_dev = Developer(name=name, login=login, password=password, supervisor=supervisor)
      new_dev.save()
      return HttpResponse("Developer added")
    else:
      return HttpResponse("An error has occured")
  else:
      supervisors_list = Supervisor.objects.all()
      return render(request, 'en/public/create_developer.html',
      'supervisors_list':supervisors_list})
In this view, we haven't even checked whether the supervisor exists. Even if the code is functional, note that it requires a lot of lines and we haven't verified the contents of the transmitted data.
We used the HttpResponse() method so that we do not have to create additional templates. We also have no details about client errors when a field is entered incorrectly.
If you want to verify whether your code works properly, do not forget to check the data in the administration module.
To try this form, you can add the following line in the block article_content of the index.html file:
<a href="{% url "create_developer" %}">Create developer</a>Django forms work with an object that inherits from the Form class. This object will handle much of the work we have done manually in the previous example.
When displaying the form, it will generate the contents of the form template. We may change the type of field that the object sends to the template if needed.
While receiving the data, the object will check the contents of each form element. If there is an error, the object will send a clear error to the client. If there is no error, we are certain that the form data is correct.
Cross-Site Request Forgery (CSRF) is an attack that targets a user who is loading a page that contains a malicious request. The malicious script uses the authentication of the victim to perform unwanted actions, such as changing data or access to sensitive data.
The following steps are executed during a CSRF attack:
- Script injection by the attacker.
- An HTTP query is performed to get a web page.
- Downloading the web page that contains the malicious script.
- Malicious script execution.
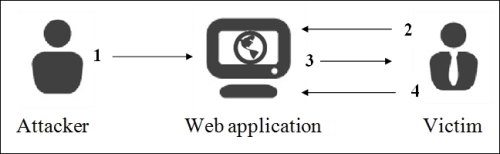
In this kind of attack, the hacker can also modify information that may be critical for the users of the website. Therefore, it is important for a web developer to know how to protect their site from this kind of attack, and Django will help with this.
To re-enable CSRF protection, we must edit the settings.py file and uncomment the following line:
'django.middleware.csrf.CsrfViewMiddleware',
This protection ensures that the data that has been sent is really sent from a specific property page. You can check this in two easy steps:
- When creating an HTML or Django form, we insert a CSRF token that will store the server. When the form is sent, the CSRF token will be sent too.
- When the server receives the request from the client, it will check the CSRF token. If it is valid, it validates the request.
Do not forget to add the CSRF token in all the forms of the site where protection is enabled. HTML forms are also involved, and the one we have just made does not include the token. For the previous form to work with CSRF protection, we need to add the following line in the form of tags and <form> </form>:
{% csrf_token %}We will first write the view that contains the form because the template will display the form defined in the view. Django forms can be stored in other files as forms.py at the root of the project file. We include them directly in our view because the form will only be used on this page. Depending on the project, you must choose which architecture suits you best. We will create our view in the views/create_developer.py file with the following lines:
from django.shortcuts import render
from django.http import HttpResponse
from TasksManager.models import Supervisor, Developer
from django import forms
# This line imports the Django forms package
class Form_inscription(forms.Form):
# This line creates the form with four fields. It is an object that inherits from forms.Form. It contains attributes that define the form fields.
name = forms.CharField(label="Name", max_length=30)
login = forms.CharField(label="Login", max_length=30)
password = forms.CharField(label="Password", widget=forms.PasswordInput)
supervisor = forms.ModelChoiceField(label="Supervisor", queryset=Supervisor.objects.all())
# View for create_developer
def page(request):
if request.POST:
form = Form_inscription(request.POST)
# If the form has been posted, we create the variable that will contain our form filled with data sent by POST form.
if form.is_valid():
# This line checks that the data sent by the user is consistent with the field that has been defined in the form.
name = form.cleaned_data['name']
# This line is used to retrieve the value sent by the client. The collected data is filtered by the clean() method that we will see later. This way to recover data provides secure data.
login = form.cleaned_data['login']
password = form.cleaned_data['password']
supervisor = form.cleaned_data['supervisor']
# In this line, the supervisor variable is of the Supervisor type, that is to say that the returned data by the cleaned_data dictionary will directly be a model.
new_developer = Developer(name=name, login=login, password=password, email="", supervisor=supervisor)
new_developer.save()
return HttpResponse("Developer added")
else:
return render(request, 'en/public/create_developer.html', {'form' : form})
# To send forms to the template, just send it like any other variable. We send it in case the form is not valid in order to display user errors:
else:
form = Form_inscription()
# In this case, the user does not yet display the form, it instantiates with no data inside.
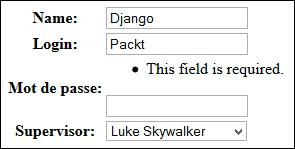
return render(request, 'en/public/create_developer.html', {'form' : form})This screenshot shows the display of the form with the display of an error message:
We set the template for this view. The template will be much shorter:
{% extends "base.html" %}
{% block title_html %}
  Create Developer
{% endblock %}
{% block h1 %}
  Create Developer
{% endblock %}
{% block article_content %}
  <form method="post" action="{% url "create_developer" %}" >
    {% csrf_token %}
    <!-- This line inserts a CSRF token. -->
    <table>
      {{ form.as_table }}
    <!-- This line displays lines of the form.-->
    </table>
    <p><input type="submit" value="Create" /></p>
  </form>
{% endblock %}
As the complete form operation is in the view, the template simply executes the as_table() method to generate the HTML form.
The previous code displays data in tabular form. The three methods to generate an HTML form structure are as follows:
So, we quickly wrote a secure form with error handling and CSRF protection through Django forms. In the Appendix, Cheatsheet, you can find the different possible fields in a form.
CSRF protection
Cross-Site Request Forgery (CSRF) is an attack that targets a user who is loading a page that contains a malicious request. The malicious script uses the authentication of the victim to perform unwanted actions, such as changing data or access to sensitive data.
The following steps are executed during a CSRF attack:
- Script injection by the attacker.
- An HTTP query is performed to get a web page.
- Downloading the web page that contains the malicious script.
- Malicious script execution.
In this kind of attack, the hacker can also modify information that may be critical for the users of the website. Therefore, it is important for a web developer to know how to protect their site from this kind of attack, and Django will help with this.
To re-enable CSRF protection, we must edit the settings.py file and uncomment the following line:
'django.middleware.csrf.CsrfViewMiddleware',
This protection ensures that the data that has been sent is really sent from a specific property page. You can check this in two easy steps:
- When creating an HTML or Django form, we insert a CSRF token that will store the server. When the form is sent, the CSRF token will be sent too.
- When the server receives the request from the client, it will check the CSRF token. If it is valid, it validates the request.
Do not forget to add the CSRF token in all the forms of the site where protection is enabled. HTML forms are also involved, and the one we have just made does not include the token. For the previous form to work with CSRF protection, we need to add the following line in the form of tags and <form> </form>:
{% csrf_token %}We will first write the view that contains the form because the template will display the form defined in the view. Django forms can be stored in other files as forms.py at the root of the project file. We include them directly in our view because the form will only be used on this page. Depending on the project, you must choose which architecture suits you best. We will create our view in the views/create_developer.py file with the following lines:
from django.shortcuts import render
from django.http import HttpResponse
from TasksManager.models import Supervisor, Developer
from django import forms
# This line imports the Django forms package
class Form_inscription(forms.Form):
# This line creates the form with four fields. It is an object that inherits from forms.Form. It contains attributes that define the form fields.
  name = forms.CharField(label="Name", max_length=30)
  login      = forms.CharField(label="Login", max_length=30)
  password   = forms.CharField(label="Password", widget=forms.PasswordInput)
  supervisor = forms.ModelChoiceField(label="Supervisor", queryset=Supervisor.objects.all())
# View for create_developer
def page(request):
  if request.POST:
    form = Form_inscription(request.POST)
    # If the form has been posted, we create the variable that will contain our form filled with data sent by POST form.
    if form.is_valid():
    # This line checks that the data sent by the user is consistent with the field that has been defined in the form.
      name          = form.cleaned_data['name']
    # This line is used to retrieve the value sent by the client. The collected data is filtered by the clean() method that we will see later. This way to recover data provides secure data.
      login         = form.cleaned_data['login']
      password      = form.cleaned_data['password']
      supervisor    = form.cleaned_data['supervisor']
      # In this line, the supervisor variable is of the Supervisor type, that is to say that the returned data by the cleaned_data dictionary will directly be a model.
      new_developer = Developer(name=name, login=login, password=password, email="", supervisor=supervisor)
      new_developer.save()
      return HttpResponse("Developer added")
    else:
      return render(request, 'en/public/create_developer.html', {'form' : form})
      # To send forms to the template, just send it like any other variable. We send it in case the form is not valid in order to display user errors:
    else:
    form = Form_inscription()
    # In this case, the user does not yet display the form, it instantiates with no data inside.
    return render(request, 'en/public/create_developer.html', {'form' : form})
This screenshot shows the display of the form with the display of an error message:
We set the template for this view. The template will be much shorter:
{% extends "base.html" %}
{% block title_html %}
  Create Developer
{% endblock %}
{% block h1 %}
  Create Developer
{% endblock %}
{% block article_content %}
  <form method="post" action="{% url "create_developer" %}" >
    {% csrf_token %}
    <!-- This line inserts a CSRF token. -->
    <table>
      {{ form.as_table }}
    <!-- This line displays lines of the form.-->
    </table>
    <p><input type="submit" value="Create" /></p>
  </form>
{% endblock %}
As the complete form operation is in the view, the template simply executes the as_table() method to generate the HTML form.
The previous code displays data in tabular form. The three methods to generate an HTML form structure are as follows:
So, we quickly wrote a secure form with error handling and CSRF protection through Django forms. In the Appendix, Cheatsheet, you can find the different possible fields in a form.
The view with a Django form
We will first write the view that contains the form because the template will display the form defined in the view. Django forms can be stored in other files as forms.py at the root of the project file. We include them directly in our view because the form will only be used on this page. Depending on the project, you must choose which architecture suits you best. We will create our view in the views/create_developer.py file with the following lines:
from django.shortcuts import render
from django.http import HttpResponse
from TasksManager.models import Supervisor, Developer
from django import forms
# This line imports the Django forms package
class Form_inscription(forms.Form):
# This line creates the form with four fields. It is an object that inherits from forms.Form. It contains attributes that define the form fields.
  name = forms.CharField(label="Name", max_length=30)
  login      = forms.CharField(label="Login", max_length=30)
  password   = forms.CharField(label="Password", widget=forms.PasswordInput)
  supervisor = forms.ModelChoiceField(label="Supervisor", queryset=Supervisor.objects.all())
# View for create_developer
def page(request):
  if request.POST:
    form = Form_inscription(request.POST)
    # If the form has been posted, we create the variable that will contain our form filled with data sent by POST form.
    if form.is_valid():
    # This line checks that the data sent by the user is consistent with the field that has been defined in the form.
      name          = form.cleaned_data['name']
    # This line is used to retrieve the value sent by the client. The collected data is filtered by the clean() method that we will see later. This way to recover data provides secure data.
      login         = form.cleaned_data['login']
      password      = form.cleaned_data['password']
      supervisor    = form.cleaned_data['supervisor']
      # In this line, the supervisor variable is of the Supervisor type, that is to say that the returned data by the cleaned_data dictionary will directly be a model.
      new_developer = Developer(name=name, login=login, password=password, email="", supervisor=supervisor)
      new_developer.save()
      return HttpResponse("Developer added")
    else:
      return render(request, 'en/public/create_developer.html', {'form' : form})
      # To send forms to the template, just send it like any other variable. We send it in case the form is not valid in order to display user errors:
    else:
    form = Form_inscription()
    # In this case, the user does not yet display the form, it instantiates with no data inside.
    return render(request, 'en/public/create_developer.html', {'form' : form})
This screenshot shows the display of the form with the display of an error message:
We set the template for this view. The template will be much shorter:
{% extends "base.html" %}
{% block title_html %}
  Create Developer
{% endblock %}
{% block h1 %}
  Create Developer
{% endblock %}
{% block article_content %}
  <form method="post" action="{% url "create_developer" %}" >
    {% csrf_token %}
    <!-- This line inserts a CSRF token. -->
    <table>
      {{ form.as_table }}
    <!-- This line displays lines of the form.-->
    </table>
    <p><input type="submit" value="Create" /></p>
  </form>
{% endblock %}
As the complete form operation is in the view, the template simply executes the as_table() method to generate the HTML form.
The previous code displays data in tabular form. The three methods to generate an HTML form structure are as follows:
So, we quickly wrote a secure form with error handling and CSRF protection through Django forms. In the Appendix, Cheatsheet, you can find the different possible fields in a form.
Template of a Django form
We set the template for this view. The template will be much shorter:
{% extends "base.html" %}
{% block title_html %}
  Create Developer
{% endblock %}
{% block h1 %}
  Create Developer
{% endblock %}
{% block article_content %}
  <form method="post" action="{% url "create_developer" %}" >
    {% csrf_token %}
    <!-- This line inserts a CSRF token. -->
    <table>
      {{ form.as_table }}
    <!-- This line displays lines of the form.-->
    </table>
    <p><input type="submit" value="Create" /></p>
  </form>
{% endblock %}
As the complete form operation is in the view, the template simply executes the as_table() method to generate the HTML form.
The previous code displays data in tabular form. The three methods to generate an HTML form structure are as follows:
So, we quickly wrote a secure form with error handling and CSRF protection through Django forms. In the Appendix, Cheatsheet, you can find the different possible fields in a form.
ModelForms are Django forms based on models. The fields of these forms are automatically generated from the model that we have defined. Indeed, developers are often required to create forms with fields that correspond to those in the database to a non-MVC website.
These particular forms have a save() method that will save the form data in a new record.
To broach, we will take, for example, the addition of a supervisor. For this, we will create a new page. For this, we will create the following URL:
url(r'^create-supervisor$', 'TasksManager.views.create_supervisor.page', name="create_supervisor"),
Our view will contain the following code:
from django.shortcuts import render
from TasksManager.models import Supervisor
from django import forms
from django.http import HttpResponseRedirect
from django.core.urlresolvers import reverse
def page(request):
  if len(request.POST) > 0:
    form = Form_supervisor(request.POST)
    if form.is_valid():
      form.save(commit=True)
      # If the form is valid, we store the data in a model record in the form.
      return HttpResponseRedirect(reverse('public_index'))
      # This line is used to redirect to the specified URL. We use the reverse() function to get the URL from its name defines urls.py.
    else:
      return render(request, 'en/public/create_supervisor.html', {'form': form})
  else:
    form = Form_supervisor()
    return render(request, 'en/public/create_supervisor.html', {'form': form})
class Form_supervisor(forms.ModelForm):
# Here we create a class that inherits from ModelForm.
  class Meta:
  # We extend the Meta class of the ModelForm. It is this class that will allow us to define the properties of ModelForm.
    model = Supervisor
    # We define the model that should be based on the form.
    exclude = ('date_created', 'last_connexion', )
    # We exclude certain fields of this form. It would also have been possible to do the opposite. That is to say with the fields property, we have defined the desired fields in the form.
As seen in the line exclude = ('date_created', 'last_connexion', ), it is possible to restrict the form fields. Both the exclude and fields properties must be used correctly. Indeed, these properties receive a tuple of the fields to exclude or include as arguments. They can be described as follows:
For example, we have a website selling royalty-free images with a registration form based on ModelForm. The administrator adds a credit field in the extended model of the user. If the developer has used an exclude property in some of the fields and did not add credits, the user will be able to take as many credits as he/she wants.
We will resume our previous template, where we will change the URL present in the attribute action of the <form> tag:
{% url "create_supervisor" %}This example shows us that ModelForms can save you a lot of time in development by having a form that can be customized (by modifying the validation, for example).
In the next chapter, we will see how to be faster with the class-based views.
The supervisor creation form
To broach, we will take, for example, the addition of a supervisor. For this, we will create a new page. For this, we will create the following URL:
url(r'^create-supervisor$', 'TasksManager.views.create_supervisor.page', name="create_supervisor"),
Our view will contain the following code:
from django.shortcuts import render
from TasksManager.models import Supervisor
from django import forms
from django.http import HttpResponseRedirect
from django.core.urlresolvers import reverse
def page(request):
  if len(request.POST) > 0:
    form = Form_supervisor(request.POST)
    if form.is_valid():
      form.save(commit=True)
      # If the form is valid, we store the data in a model record in the form.
      return HttpResponseRedirect(reverse('public_index'))
      # This line is used to redirect to the specified URL. We use the reverse() function to get the URL from its name defines urls.py.
    else:
      return render(request, 'en/public/create_supervisor.html', {'form': form})
  else:
    form = Form_supervisor()
    return render(request, 'en/public/create_supervisor.html', {'form': form})
class Form_supervisor(forms.ModelForm):
# Here we create a class that inherits from ModelForm.
  class Meta:
  # We extend the Meta class of the ModelForm. It is this class that will allow us to define the properties of ModelForm.
    model = Supervisor
    # We define the model that should be based on the form.
    exclude = ('date_created', 'last_connexion', )
    # We exclude certain fields of this form. It would also have been possible to do the opposite. That is to say with the fields property, we have defined the desired fields in the form.
As seen in the line exclude = ('date_created', 'last_connexion', ), it is possible to restrict the form fields. Both the exclude and fields properties must be used correctly. Indeed, these properties receive a tuple of the fields to exclude or include as arguments. They can be described as follows:
For example, we have a website selling royalty-free images with a registration form based on ModelForm. The administrator adds a credit field in the extended model of the user. If the developer has used an exclude property in some of the fields and did not add credits, the user will be able to take as many credits as he/she wants.
We will resume our previous template, where we will change the URL present in the attribute action of the <form> tag:
{% url "create_supervisor" %}This example shows us that ModelForms can save you a lot of time in development by having a form that can be customized (by modifying the validation, for example).
In the next chapter, we will see how to be faster with the class-based views.
We have studied the basics of the forms that allow you to create simple forms with little customization. Sometimes, it is useful to customize aspects such as data validation and error display, or use special graphics.
It is useful to perform specific validation of the form fields. Django makes this easy while reminding you of the advantages of the forms. We will take the example of the addition of a developer form, where we will conduct an audit of the password.
For this, we will change the form in our view (in the create_developer.py file) in the following manner:
class Form_inscription(forms.Form):
  name       = forms.CharField(label="Name", max_length=30)
  login = forms.CharField(label = "Login")
  password = forms.CharField(label = "Password", widget = forms.PasswordInput)
  # We add another field for the password. This field will be used to avoid typos from the user. If both passwords do not match, the validation will display an error message
  password_bis = forms.CharField(label = "Password", widget = forms.PasswordInput)
  supervisor = forms.ModelChoiceField(label="Supervisor", queryset=Supervisor.objects.all())
  def clean(self):
  # This line allows us to extend the clean method that is responsible for validating data fields.
    cleaned_data = super (Form_inscription, self).clean()
    # This method is very useful because it performs the clean() method of the superclass. Without this line we would be rewriting the method instead of extending it.
    password = self.cleaned_data.get('password')
    # We get the value of the field password in the variable.
    password_bis = self.cleaned_data.get('password_bis')
    if password and password_bis and password != password_bis:
      raise forms.ValidationError("Passwords are not identical.")
      # This line makes us raise an exception. This way, when the view performs the is_valid() method, if the passwords are not identical, the form is not validated .
    return self.cleaned_data
With this example, we can see that Django is very flexible in the management of forms and audits. It also allows you to customize the display of errors.
Sometimes, it may be important to display user-specific error messages. For example, a company may request for a password that must contain certain types of characters; for example, the password must contain at least one number and many letters. In such cases, it would be preferable to also indicate this in the error message. Indeed, users read more carefully the error messages than help messages.
To do this, you must use the error_messages property in the form fields and set the error message as a text string.
It is also possible to define different messages depending on the type of error. We will create a dictionary of the two most common mistakes and give them a message. We can define this dictionary as follows:
error_name = {
  'required': 'You must type a name !',
  'invalid': 'Wrong format.'
}
We will modify the name field of the Form_inscription form of create_developer.py:
name = forms.CharField(label="Name", max_length=30, error_messages=error_name)
This way, if the user doesn't fill the name field, he/she will see the following message: You must type a name!.
To apply this message to ModelForm, we have to go to the models.py file and modify the line that contains the name field.
name = models.CharField(max_length=50, verbose_name="Name", error_messages=error_name)
When editing models.py, we should not forget to specify the error_name dictionary.
These error messages improve the quality of the website by informing the user of his/her mistakes. It is very important to use custom errors on fields when validation is complex. However, do not overdo it on the basic fields as this would be a waste of time for the developer.
Widgets are an effective way to customize the display of the form elements. Indeed, in some cases, it may be helpful to specify a text area field with particular dimensions in ModelForm.
To learn the practice of using widgets and continue the development of our application, we will create the page of the creation of projects. This page will contain a Django form, and we'll set the description field in the HTML <textarea> tag.
We need to add the following URL to the urls.py file:
url(r'^create_project$', ' TasksManager.views.create_project.page', name='create_project'),
Then, create our view in the create_project.py file with the following code:
from django.shortcuts import render
from TasksManager.models import Project
from django import forms
from django.http import HttpResponseRedirect
from django.core.urlresolvers import reverse
class Form_project_create(forms.Form):
  title = forms.CharField(label="Title", max_length=30)
  description = forms.CharField(widget= forms.Textarea(attrs={'rows': 5, 'cols': 100,}))
  client_name = forms.CharField(label="Client", max_length=50)
def page(request):
  if request.POST:
    form = Form_project_create(request.POST)
    if form.is_valid():
      title = form.cleaned_data['title']
      description = form.cleaned_data['description']
      client_name = form.cleaned_data['client_name']
      new_project = Project(title=title, description=description, client_name=client_name)
      new_project.save()
      return HttpResponseRedirect(reverse('public_index'))
    else:
      return render(request, 'en/public/create_project.html', {'form' : form})
  else:
    form = Form_project_create()
  return render(request, 'en/public/create_project.html', {'form' : form})
It is possible to take one of the templates that we have created and adapted. This form will work the same way as all the Django forms that we have created. After copying a template that we have already created, we only need to change the title and URL of the action property of the <form> tag. By visiting the page, we notice that the widget works well and displays a text area more suitable for long text.
There are many other widgets to customize forms. A great quality of Django is that it is generic and totally adaptable with time.
There are two ways to declare the initial value of form fields with Django. The following examples take place in the create_developer.py file.
The following code will display new in the name field and will select the first supervisor in the <select> field that defines the supervisor. These fields are editable by the user:
form = Form_inscription(initial={'name': 'new', 'supervisor': Supervisor.objects.all()[:1].get().id})This line must replace the following line in the create_developer.py view:
form = Form_inscription()
To get the same effect as in the previous section, display new in the name field and select the first supervisor in the corresponding field; you must change the declaration name and supervisor fields with the following code:
name = forms.CharField(label="Name", max_length=30, initial="new")
supervisor = forms.ModelChoiceField(label="Supervisor", queryset=Supervisor.objects.all(), initial=Supervisor.objects.all()[:1].get().id)
Extending the validation form
It is useful to perform specific validation of the form fields. Django makes this easy while reminding you of the advantages of the forms. We will take the example of the addition of a developer form, where we will conduct an audit of the password.
For this, we will change the form in our view (in the create_developer.py file) in the following manner:
class Form_inscription(forms.Form):
  name       = forms.CharField(label="Name", max_length=30)
  login = forms.CharField(label = "Login")
  password = forms.CharField(label = "Password", widget = forms.PasswordInput)
  # We add another field for the password. This field will be used to avoid typos from the user. If both passwords do not match, the validation will display an error message
  password_bis = forms.CharField(label = "Password", widget = forms.PasswordInput)
  supervisor = forms.ModelChoiceField(label="Supervisor", queryset=Supervisor.objects.all())
  def clean(self):
  # This line allows us to extend the clean method that is responsible for validating data fields.
    cleaned_data = super (Form_inscription, self).clean()
    # This method is very useful because it performs the clean() method of the superclass. Without this line we would be rewriting the method instead of extending it.
    password = self.cleaned_data.get('password')
    # We get the value of the field password in the variable.
    password_bis = self.cleaned_data.get('password_bis')
    if password and password_bis and password != password_bis:
      raise forms.ValidationError("Passwords are not identical.")
      # This line makes us raise an exception. This way, when the view performs the is_valid() method, if the passwords are not identical, the form is not validated .
    return self.cleaned_data
With this example, we can see that Django is very flexible in the management of forms and audits. It also allows you to customize the display of errors.
Sometimes, it may be important to display user-specific error messages. For example, a company may request for a password that must contain certain types of characters; for example, the password must contain at least one number and many letters. In such cases, it would be preferable to also indicate this in the error message. Indeed, users read more carefully the error messages than help messages.
To do this, you must use the error_messages property in the form fields and set the error message as a text string.
It is also possible to define different messages depending on the type of error. We will create a dictionary of the two most common mistakes and give them a message. We can define this dictionary as follows:
error_name = {
  'required': 'You must type a name !',
  'invalid': 'Wrong format.'
}
We will modify the name field of the Form_inscription form of create_developer.py:
name = forms.CharField(label="Name", max_length=30, error_messages=error_name)
This way, if the user doesn't fill the name field, he/she will see the following message: You must type a name!.
To apply this message to ModelForm, we have to go to the models.py file and modify the line that contains the name field.
name = models.CharField(max_length=50, verbose_name="Name", error_messages=error_name)
When editing models.py, we should not forget to specify the error_name dictionary.
These error messages improve the quality of the website by informing the user of his/her mistakes. It is very important to use custom errors on fields when validation is complex. However, do not overdo it on the basic fields as this would be a waste of time for the developer.
Widgets are an effective way to customize the display of the form elements. Indeed, in some cases, it may be helpful to specify a text area field with particular dimensions in ModelForm.
To learn the practice of using widgets and continue the development of our application, we will create the page of the creation of projects. This page will contain a Django form, and we'll set the description field in the HTML <textarea> tag.
We need to add the following URL to the urls.py file:
url(r'^create_project$', ' TasksManager.views.create_project.page', name='create_project'),
Then, create our view in the create_project.py file with the following code:
from django.shortcuts import render
from TasksManager.models import Project
from django import forms
from django.http import HttpResponseRedirect
from django.core.urlresolvers import reverse
class Form_project_create(forms.Form):
  title = forms.CharField(label="Title", max_length=30)
  description = forms.CharField(widget= forms.Textarea(attrs={'rows': 5, 'cols': 100,}))
  client_name = forms.CharField(label="Client", max_length=50)
def page(request):
  if request.POST:
    form = Form_project_create(request.POST)
    if form.is_valid():
      title = form.cleaned_data['title']
      description = form.cleaned_data['description']
      client_name = form.cleaned_data['client_name']
      new_project = Project(title=title, description=description, client_name=client_name)
      new_project.save()
      return HttpResponseRedirect(reverse('public_index'))
    else:
      return render(request, 'en/public/create_project.html', {'form' : form})
  else:
    form = Form_project_create()
  return render(request, 'en/public/create_project.html', {'form' : form})
It is possible to take one of the templates that we have created and adapted. This form will work the same way as all the Django forms that we have created. After copying a template that we have already created, we only need to change the title and URL of the action property of the <form> tag. By visiting the page, we notice that the widget works well and displays a text area more suitable for long text.
There are many other widgets to customize forms. A great quality of Django is that it is generic and totally adaptable with time.
There are two ways to declare the initial value of form fields with Django. The following examples take place in the create_developer.py file.
The following code will display new in the name field and will select the first supervisor in the <select> field that defines the supervisor. These fields are editable by the user:
form = Form_inscription(initial={'name': 'new', 'supervisor': Supervisor.objects.all()[:1].get().id})This line must replace the following line in the create_developer.py view:
form = Form_inscription()
To get the same effect as in the previous section, display new in the name field and select the first supervisor in the corresponding field; you must change the declaration name and supervisor fields with the following code:
name = forms.CharField(label="Name", max_length=30, initial="new")
supervisor = forms.ModelChoiceField(label="Supervisor", queryset=Supervisor.objects.all(), initial=Supervisor.objects.all()[:1].get().id)
Customizing the display of errors
Sometimes, it may be important to display user-specific error messages. For example, a company may request for a password that must contain certain types of characters; for example, the password must contain at least one number and many letters. In such cases, it would be preferable to also indicate this in the error message. Indeed, users read more carefully the error messages than help messages.
To do this, you must use the error_messages property in the form fields and set the error message as a text string.
It is also possible to define different messages depending on the type of error. We will create a dictionary of the two most common mistakes and give them a message. We can define this dictionary as follows:
error_name = {
  'required': 'You must type a name !',
  'invalid': 'Wrong format.'
}
We will modify the name field of the Form_inscription form of create_developer.py:
name = forms.CharField(label="Name", max_length=30, error_messages=error_name)
This way, if the user doesn't fill the name field, he/she will see the following message: You must type a name!.
To apply this message to ModelForm, we have to go to the models.py file and modify the line that contains the name field.
name = models.CharField(max_length=50, verbose_name="Name", error_messages=error_name)
When editing models.py, we should not forget to specify the error_name dictionary.
These error messages improve the quality of the website by informing the user of his/her mistakes. It is very important to use custom errors on fields when validation is complex. However, do not overdo it on the basic fields as this would be a waste of time for the developer.
Widgets are an effective way to customize the display of the form elements. Indeed, in some cases, it may be helpful to specify a text area field with particular dimensions in ModelForm.
To learn the practice of using widgets and continue the development of our application, we will create the page of the creation of projects. This page will contain a Django form, and we'll set the description field in the HTML <textarea> tag.
We need to add the following URL to the urls.py file:
url(r'^create_project$', ' TasksManager.views.create_project.page', name='create_project'),
Then, create our view in the create_project.py file with the following code:
from django.shortcuts import render
from TasksManager.models import Project
from django import forms
from django.http import HttpResponseRedirect
from django.core.urlresolvers import reverse
class Form_project_create(forms.Form):
  title = forms.CharField(label="Title", max_length=30)
  description = forms.CharField(widget= forms.Textarea(attrs={'rows': 5, 'cols': 100,}))
  client_name = forms.CharField(label="Client", max_length=50)
def page(request):
  if request.POST:
    form = Form_project_create(request.POST)
    if form.is_valid():
      title = form.cleaned_data['title']
      description = form.cleaned_data['description']
      client_name = form.cleaned_data['client_name']
      new_project = Project(title=title, description=description, client_name=client_name)
      new_project.save()
      return HttpResponseRedirect(reverse('public_index'))
    else:
      return render(request, 'en/public/create_project.html', {'form' : form})
  else:
    form = Form_project_create()
  return render(request, 'en/public/create_project.html', {'form' : form})
It is possible to take one of the templates that we have created and adapted. This form will work the same way as all the Django forms that we have created. After copying a template that we have already created, we only need to change the title and URL of the action property of the <form> tag. By visiting the page, we notice that the widget works well and displays a text area more suitable for long text.
There are many other widgets to customize forms. A great quality of Django is that it is generic and totally adaptable with time.
There are two ways to declare the initial value of form fields with Django. The following examples take place in the create_developer.py file.
The following code will display new in the name field and will select the first supervisor in the <select> field that defines the supervisor. These fields are editable by the user:
form = Form_inscription(initial={'name': 'new', 'supervisor': Supervisor.objects.all()[:1].get().id})This line must replace the following line in the create_developer.py view:
form = Form_inscription()
To get the same effect as in the previous section, display new in the name field and select the first supervisor in the corresponding field; you must change the declaration name and supervisor fields with the following code:
name = forms.CharField(label="Name", max_length=30, initial="new")
supervisor = forms.ModelChoiceField(label="Supervisor", queryset=Supervisor.objects.all(), initial=Supervisor.objects.all()[:1].get().id)
Using widgets
Widgets are an effective way to customize the display of the form elements. Indeed, in some cases, it may be helpful to specify a text area field with particular dimensions in ModelForm.
To learn the practice of using widgets and continue the development of our application, we will create the page of the creation of projects. This page will contain a Django form, and we'll set the description field in the HTML <textarea> tag.
We need to add the following URL to the urls.py file:
url(r'^create_project$', ' TasksManager.views.create_project.page', name='create_project'),
Then, create our view in the create_project.py file with the following code:
from django.shortcuts import render
from TasksManager.models import Project
from django import forms
from django.http import HttpResponseRedirect
from django.core.urlresolvers import reverse
class Form_project_create(forms.Form):
  title = forms.CharField(label="Title", max_length=30)
  description = forms.CharField(widget= forms.Textarea(attrs={'rows': 5, 'cols': 100,}))
  client_name = forms.CharField(label="Client", max_length=50)
def page(request):
  if request.POST:
    form = Form_project_create(request.POST)
    if form.is_valid():
      title = form.cleaned_data['title']
      description = form.cleaned_data['description']
      client_name = form.cleaned_data['client_name']
      new_project = Project(title=title, description=description, client_name=client_name)
      new_project.save()
      return HttpResponseRedirect(reverse('public_index'))
    else:
      return render(request, 'en/public/create_project.html', {'form' : form})
  else:
    form = Form_project_create()
  return render(request, 'en/public/create_project.html', {'form' : form})
It is possible to take one of the templates that we have created and adapted. This form will work the same way as all the Django forms that we have created. After copying a template that we have already created, we only need to change the title and URL of the action property of the <form> tag. By visiting the page, we notice that the widget works well and displays a text area more suitable for long text.
There are many other widgets to customize forms. A great quality of Django is that it is generic and totally adaptable with time.
There are two ways to declare the initial value of form fields with Django. The following examples take place in the create_developer.py file.
The following code will display new in the name field and will select the first supervisor in the <select> field that defines the supervisor. These fields are editable by the user:
form = Form_inscription(initial={'name': 'new', 'supervisor': Supervisor.objects.all()[:1].get().id})This line must replace the following line in the create_developer.py view:
form = Form_inscription()
To get the same effect as in the previous section, display new in the name field and select the first supervisor in the corresponding field; you must change the declaration name and supervisor fields with the following code:
name = forms.CharField(label="Name", max_length=30, initial="new")
supervisor = forms.ModelChoiceField(label="Supervisor", queryset=Supervisor.objects.all(), initial=Supervisor.objects.all()[:1].get().id)
Setting initial data in a form
There are two ways to declare the initial value of form fields with Django. The following examples take place in the create_developer.py file.
The following code will display new in the name field and will select the first supervisor in the <select> field that defines the supervisor. These fields are editable by the user:
form = Form_inscription(initial={'name': 'new', 'supervisor': Supervisor.objects.all()[:1].get().id})This line must replace the following line in the create_developer.py view:
form = Form_inscription()
To get the same effect as in the previous section, display new in the name field and select the first supervisor in the corresponding field; you must change the declaration name and supervisor fields with the following code:
name = forms.CharField(label="Name", max_length=30, initial="new")
supervisor = forms.ModelChoiceField(label="Supervisor", queryset=Supervisor.objects.all(), initial=Supervisor.objects.all()[:1].get().id)
When instantiating the form
The following code will display new in the name field and will select the first supervisor in the <select> field that defines the supervisor. These fields are editable by the user:
form = Form_inscription(initial={'name': 'new', 'supervisor': Supervisor.objects.all()[:1].get().id})This line must replace the following line in the create_developer.py view:
form = Form_inscription()
To get the same effect as in the previous section, display new in the name field and select the first supervisor in the corresponding field; you must change the declaration name and supervisor fields with the following code:
name = forms.CharField(label="Name", max_length=30, initial="new")
supervisor = forms.ModelChoiceField(label="Supervisor", queryset=Supervisor.objects.all(), initial=Supervisor.objects.all()[:1].get().id)
When defining fields
To get the same effect as in the previous section, display new in the name field and select the first supervisor in the corresponding field; you must change the declaration name and supervisor fields with the following code:
name = forms.CharField(label="Name", max_length=30, initial="new")
supervisor = forms.ModelChoiceField(label="Supervisor", queryset=Supervisor.objects.all(), initial=Supervisor.objects.all()[:1].get().id)