

One of the first projects every programmer creates when learning a new language is a to-do list. Doing this allows us to learn more about the language process that's followed when it comes to manipulating states and data.
We are going to make our to-do list using Vue. We'll use what we have learned and created in the previous recipes.
Getting ready
The prerequisite for this recipe is Node.js 12+.
The Node.js global objects that are required for this recipe are as follows:
- @vue/cli
- @vue/cli-service-global
To start our component, we can create our Vue project with the Vue CLI, as we learned in the Creating your first project with Vue CLI recipe, or use the project from the Removing the v-model directive from the input recipe.
How to do it...
There are some basic principles involved in making a to-do application – it must contain a list of tasks, the tasks can be marked as done and undone, and the list can be filtered and sorted. Now, we are going to learn how to take the tasks and add them to the task list.
Follow these steps to create a dynamic to-do list with Vue and the information you've gained from the previous recipes:
- In the App.vue file, we will create our array of tasks. This task will be filled every time the TaskInput.vue component emits a message. We will add an object to this array with the task, as well as the current date when the task was created. The date when the task was finished will be left undefined for now. To do this, in the <script> part of the component, we need to create a method that receives a task and add this task, along with the current date, to the taskList array:
<script>
import CurrentTime from './components/CurrentTime.vue';
import TaskInput from './components/TaskInput.vue';

export default {
  name: 'TodoApp',
  components: {
    CurrentTime,
    TaskInput,
  },
  data: () => ({
    taskList: [],
  }),
  methods:{
    addNewTask(task){
      this.taskList.push({
        task,
        createdAt: Date.now(),
        finishedAt: undefined,
      })
    },
  },
}
</script>
- Now, we need to render this list on the <template> part. We will iterate the list of tasks using the v-for directive of Vue. This directive, when we use it with an array, gives us access to two properties – the item itself and the index of the item. We will use the item to render it and the index to make the key of the element for the rendering process. We need to add a checkbox that, when marked, calls a function that changes the status of the task and displays when the task was done:
<template>
  <div id='app'>
    <current-time class='col-4' />
    <task-input class='col-6' @add-task='addNewTask' />
    <div class='col-12'>
      <div class='cardBox'>
        <div class='container'>
          <h2>My Tasks</h2>
          <ul class='taskList'>
            <li
              v-for='(taskItem, index) in taskList'
              :key='`${index}_${Math.random()}`'
            >
              <input type='checkbox'
                :checked='!!taskItem.finishedAt'
                @input='changeStatus(index)'
              />
              {{ taskItem.task }}
              <span v-if='taskItem.finishedAt'>
                {{ taskItem.finishedAt }}
              </span>
            </li>
          </ul>
        </div>
      </div>
    </div>
  </div>
</template>
- We need to create the changeStatus function on the methods property of the App.vue file. This function will receive the index of the task as a parameter, then go to the array of tasks and change the finishedAt property, which is our marker for when a task is complete:
changeStatus(taskIndex){
  const task = this.taskList[taskIndex];
    if(task.finishedAt){
      task.finishedAt = undefined;
    } else {
      task.finishedAt = Date.now();
    }
}
- Now, we need to add the task text to the left-hand side of the screen. On the <style> part of the component, we will make it scoped and add the custom class:
<style scoped>
  .taskList li{
    text-align: left;
  }
</style>
- To run the server and see your component, you need to open a Terminal (macOS or Linux) or Command Prompt/PowerShell (Windows) and execute the following command:
> npm run serve
Here is the component rendered and running:
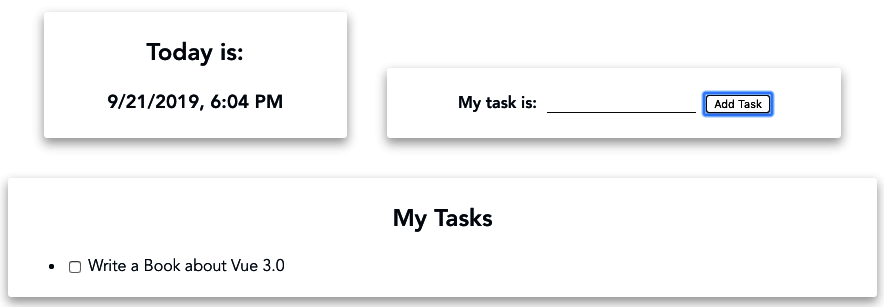
How it works...
When we received the emitted message from the component, we hydrated the message with more data and pushed it to a local array variable.
In the template, we iterate this array, turning it into a list of tasks. This displays the tasks we need to complete, the checkbox to mark when the task is complete, and the time that a task was completed by.
When the user clicks on the checkbox, it executes a function, which marks the current task as done. If the task is already done, the function will set the finishedAt property to undefined.
See also
- You can find out more information about list rendering at https://v3.vuejs.org/guide/list.html#mapping-an-array-to-elements-with-v-for.
- You can find out more information about conditional rendering at https://v3.vuejs.org/guide/conditional.html#v-if.
- You can find out more information about Math.random at https://developer.mozilla.org/en-US/docs/Web/JavaScript/Reference/Global_Objects/Math/random.