Adding styles to your components is a good practice as it allows you to show your user what is happening more clearly. By doing this, you can show a visual response to the user and also give them a better experience of your application.
In this recipe, we will learn how to add a new kind of conditional class binding. We will use CSS effects mixed with the rerendering that comes with each new Vue update.
Getting ready
The prerequisite for this recipe is Node.js 12+.
The Node.js global objects that are required for this recipe are as follows:
- @vue/cli
- @vue/cli-service-global
We can continue with our to-do list project or create a new Vue project with the Vue CLI, as we learned in the Creating your first project with the Vue CLI recipe.
How to do it...
Follow these steps to add custom styles and transitions to your component:
- In the App.vue file, we will add a conditional class to the list items for the tasks that have been completed:
<template>
  <div id="app">
    <current-time class="col-4" />
    <task-input class="col-6" @add-task="addNewTask" />
    <div class="col-12">
      <div class="cardBox">
        <div class="container">
          <h2>My Tasks</h2>
          <hr />
          <div class="col-4">
            <input
              v-model="hideDone"
              type="checkbox"
              id="hideDone"
              name="hideDone"
            />
            <label for="hideDone">
              Hide Done Tasks
            </label>
          </div>
          <div class="col-4">
            <input
              v-model="reverse"
              type="checkbox"
              id="reverse"
              name="reverse"
            />
            <label for="reverse">
              Reverse Order
            </label>
          </div>
          <div class="col-4">
            <input
              v-model="sortById"
              type="checkbox"
              id="sortById"
              name="sortById"
            />
            <label for="sortById">
              Sort By Id
            </label>
          </div>
          <ul class="taskList">
            <li
              v-for="(taskItem, index) in displayList"
              :key="`${index}_${Math.random()}`"
              :class="!!taskItem.finishedAt ? 'taskDone' : ''"
            >
              <input type="checkbox"
                :checked="!!taskItem.finishedAt"
                @input="changeStatus(taskItem.id)"
              />
              #{{ taskItem.id }} - {{ taskItem.task }}
              <span v-if="taskItem.finishedAt"> |
                Done at:
                {{ formatDate(taskItem.finishedAt) }}
              </span>
            </li>
          </ul>
        </div>
      </div>
    </div>
  </div>
</template>
- For the <style> part of the component, we will create the CSS style sheet classes for the taskDone CSS class. We need to make the list have a separator between the items; then, we will make the list have a striped style. When they get marked as done, the background will change with an effect. To add the separator between the lines and the striped list or zebra style, we need to add a CSS rule that applies to each even nth-child of our list:
<style scoped>
  .taskList li {
    list-style: none;
    text-align: left;
    padding: 5px 10px;
    border-bottom: 1px solid rgba(0,0,0,0.15);
  }

  .taskList li:last-child {
    border-bottom: 0px;
  }

  .taskList li:nth-child(even){
    background-color: rgba(0,0,0,0.05);
  }
</style>
- To add the effect to the background when the task has been completed, at the end of the <style> part, we will add a CSS animation keyframe that indicates the background color change and applies this animation to the .taskDone CSS class:
<style scoped>
  .taskList li {
    list-style: none;
    text-align: left;
    padding: 5px 10px;
    border-bottom: 1px solid rgba(0,0,0,0.15);
  }

  .taskList li:last-child {
    border-bottom: 0px;
  }

  .taskList li:nth-child(even){
    background-color: rgba(0,0,0,0.05);
  }

  @keyframes colorChange {
    from{
      background-color: inherit;
    }
    to{
      background-color: rgba(0, 160, 24, 0.577);
    }
  }

  .taskList li.taskDone{
    animation: colorChange 1s ease;
    background-color: rgba(0, 160, 24, 0.577);
  }
</style>
- To run the server and see your component, you need to open a Terminal (macOS or Linux) or Command Prompt/PowerShell (Windows) and execute the following command:
> npm run serve
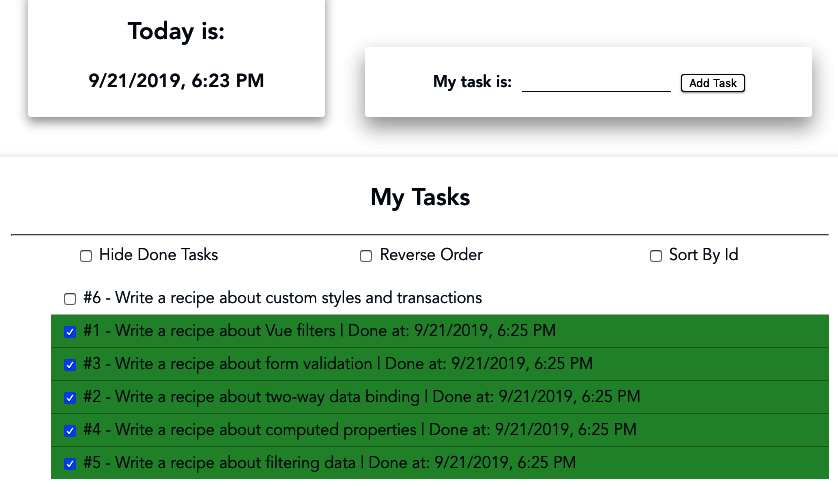
Here is the component rendered and running:

How it works...
Each time a new item in our application is marked as done, the displayList property gets updated and triggers the rerendering of the component.
Because of this, our taskDone CSS class has an animation attached to it that is executed on rendering, showing a green background.
See also
- You can find more information about CSS animations at https://developer.mozilla.org/en-US/docs/Web/CSS/CSS_Animations/Using_CSS_animations.
- You can find more information about class and style bindings at https://v3.vuejs.org/guide/class-and-style.html


