Using .NET for web development is a powerful way to build professional-grade websites and services. But moving from a basic project to a full-scale, production-ready system takes more than just business logic and views—it requires a deep understanding of architecture, maintainability, and scalability. Real-World Web Development with .NET 10 bridges that gap, guiding developers who want to build robust, secure, and maintainable web solutions using battle-tested .NET technologies.
You’ll start by designing structured websites using ASP.NET Core MVC, separating concerns, managing dependencies, and writing clean, testable code. From there, you’ll build RESTful services with Web API and use OData for rich, queryable endpoints. The book walks you through testing strategies and containerizing your applications. The final section introduces Umbraco CMS, showing you how to integrate content management into your site so end users can manage content independently.
By the end of the book, you'll be ready to build controller-based websites and services that are scalable, secure, and ready for real-world use while mastering Umbraco’s flexible, content-driven solutions—skills that are increasingly in demand across organizations and industries.
*Email sign-up and proof of purchase required
Building an entity model for use in the rest of the book
Websites and web services usually need to work with data in a relational database or another data store. There are several technologies that could be used, from lower-level ADO.NET to higher-level EF Core, but we will use EF Core since it is flexible and more familiar to .NET developers.
In this section, we will define an EF Core entity data model for a database named Northwind stored in SQL Server. It will be used in most of the projects that we create in subsequent chapters.
Northwind database SQL scripts
The script for SQL Server creates 13 tables as well as related views and stored procedures. The SQL scripts are found at the following link:
I recommend that in your web-dev-net10 folder, you create a sql-scripts folder and copy all the SQL scripts to that local folder.
There are multiple SQL scripts to choose from, as described in the following list:
Northwind4SqlServerContainer.sql script: To use SQL Server on a local computer in a container system like Docker. The script creates the Northwind database. It does not drop the database if it already exists because the Docker container should be empty anyway, as a fresh one can be spun up each time. Instructions to install Docker and set up a SQL Server image and container are in the next section of this book. This is my recommendation for using SQL Server in this book.
Northwind4SqlServerLocal.sql script: To use SQL Server on a local Windows or Linux computer. The script checks if the Northwind database already exists and, if necessary, drops (deletes) it before creating it. Instructions to install SQL Server Developer Edition (free) on your local Windows computer can be found in the GitHub repository for this book at the following link: https://github.com/markjprice/web-dev-net10/blob/main/docs/sql-server/README.md.
Northwind4SqlServerCloud.sql script: To use SQL Server with an Azure SQL Database resource created in the Azure cloud. You will need an Azure account; these resources cost money as long as they exist! The script does not drop or create the Northwind database because you should manually create the Northwind database using the Azure portal user interface. The script only creates the database objects, including the table structure and data.
Before you can execute any of these SQL scripts, you need a SQL Server instance. My recommendation is to use Docker and a container, so that’s what we will cover in the next section. If you prefer a local or cloud SQL Server, then you can skip this next section.
Installing Docker and an SQL Server container image
Docker provides a consistent environment across development, testing, and production, minimizing the “it works on my machine” issue. Docker containers are more lightweight than traditional virtual machines, making them faster to start up and less resource-intensive.
Docker containers can run on any system with Docker installed, making it easy to move databases between environments or across different machines. You can quickly spin up a SQL database container with a single command, making setup faster and more reproducible. Each database instance runs in its own container, ensuring that it is isolated from other applications and databases on the same machine.
You can install Docker on any operating system and use a container that has SQL Server installed. For personal, educational, and small business use, Docker Desktop is free to use. It includes the full set of Docker features, including container management and orchestration. The Docker CLI and Docker Engine are open source and free to use, allowing developers to build, run, and manage containers.
Docker also has paid tiers that offer additional features, such as enhanced security, collaboration tools, more granular access control, priority support, and higher rate limits on Docker Hub image pull.
The Docker image we will use has SQL Server 2025 hosted on Ubuntu 22.04. It is supported with Docker Engine 1.8 or later.
Let’s install Docker and set up the SQL image and container now:
Unfortunately, the recent SQL Server images from Microsoft only support x64 architecture. If you want to use an image that runs without emulation on ARM CPUs, for example, if you have a Surface Laptop 7 or Mac, then you can use a minimal edition of SQL Server known as Azure SQL Edge that runs on either x64 or ARM64, with a minimum of 1 GB RAM on the host. But Azure SQL Edge is no longer supported by Microsoft, so use it at your own risk. I think that it’s fine for learning purposes, but do not use unsupported software in production. To pull the Azure SQL Edge image, enter the following command: docker pull mcr.microsoft.com/azure-sql-edge:latest
Wait for the image as it is downloading, and then note the results, as shown in the following output:
You can create a container from the image and run it in a single docker run command with the following options:
--cap-add SYS_PTRACE: This grants the container the SYS_PTRACE capability allows debugging tools (like strace or certain profilers) to attach to processes within the container. Microsoft recommends this for enabling debugging or diagnostic tools inside the container, but it’s not strictly necessary for normal SQL Server operation.
-e 'ACCEPT_EULA=1' or -e "ACCEPT_EULA=1": This sets an environment variable to accept the SQL Server End User License Agreement (EULA). If you don’t provide this, the container will exit immediately with a message saying you must accept the EULA.
-e 'MSSQL_SA_PASSWORD=s3cret-Ninja' or -e "MSSQL_SA_PASSWORD=s3cret-Ninja": This sets an environment variable to set the SQL Server sa (system administrator) account’s password. The password must be at least eight characters long and contain characters from three of the following four sets: uppercase letters, lowercase letters, digits, and symbols. Otherwise, the container cannot set up the SQL Server engine and will fail. s3cret-Ninja satisfies those rules (lowercase, number, hyphen, uppercase), but feel free to use your own password if you wish.
-p 1433:1433: This maps a port from the container to the host. 1433 is the default port for SQL Server. This allows applications on the host to connect to SQL Server inside the container as if it were running natively.
--name nw-container: This gives the container a custom name. This is optional, but if you don’t set a name, a random one will be assigned for you, like frosty_mirzakhani.
-d: This runs the container in detached mode (in the background). Without it, Docker would run the container in the foreground, tying up your terminal or command prompt window.
mcr.microsoft.com/mssql/server:2025-latest: This specifies the image to run. mcr.microsoft.com is Microsoft’s official container registry. mssql/server is the SQL Server on Linux container image. 2025-latest is the tag for the latest build of SQL Server 2025.
Now that you understand what you are about to do, we can run the image:
At the command prompt or terminal, run the container image for SQL Server with a strong password, and name the container nw-container, as shown in the following command:
Warning! The preceding command must be entered all on one line, or the container will not be started up correctly. In particular, the container might start up, but without a password set, and therefore, later, you won’t be able to connect to it! All command lines used in this book can be found and copied from the following link: https://github.com/markjprice/web-dev-net10/blob/main/docs/command-lines.md. Also, different operating systems may require different quote characters, or none at all. To set the environment variables, you should be able to use either straight single-quotes or straight double-quotes. If the logs show that you did not accept the license agreement, then try the other type of quotes.
If running the container image at the command prompt fails for you, see the next section, titled Running a container using the user interface.
If your operating system firewall blocks access, then allow access.
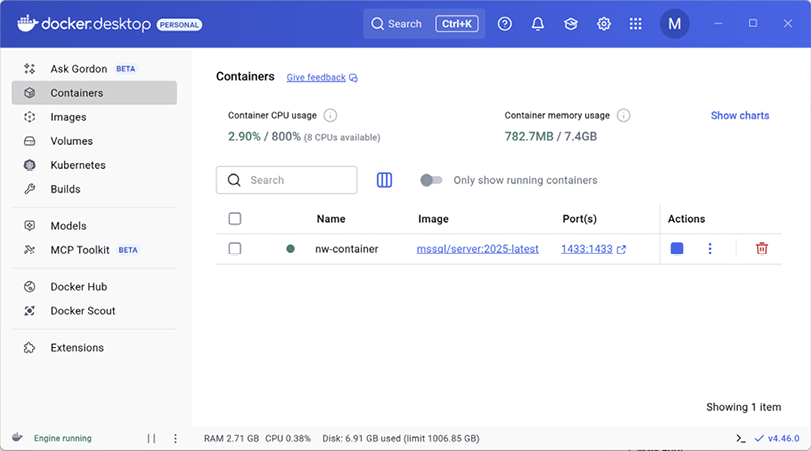
In Docker Desktop, in the Containers section, confirm that the image is running, as shown in Figure 1.9:
Figure 1.9: SQL Server container running in Docker Desktop on Windows
You might assume that the link in the Port(s) column is clickable and will navigate to a working website. But that container image only has SQL Server in it. SQL Server is listening on that port and can be connected to using a TCP address, not an HTTP address, so Docker is misleading you! There is no web server listening on port 1433, so a web browser that makes a request to http://localhost:1433 will get a This page isn’t working error. This is expected behavior because a database server is not a web server. Many containers in Docker do host a web server, and in those scenarios, having a convenient clickable link is useful. But Docker has no idea which containers have web servers and which do not. All it knows is what ports are mapped from internal ports to external ports. It is up to the developer to know if those links are useful.
At the command prompt or terminal, ask Docker to list all containers, both running and stopped, as shown in the following command:
docker ps -a
Note the container STATUS is Up 53 seconds and listening externally on port 1433, which is mapped to its internal port 1433, as shown highlighted in the following output:
CONTAINER ID   IMAGE                              COMMAND                  CREATED         STATUS         PORTS                              NAMES
183f02e84b2a   mcr.microsoft.com/ mssql/server:2025-latest   "/opt/mssql/bin/perm…"   8 minutes ago   Up 53 seconds   1401/tcp, 0.0.0.0:1433->1433/tcp   nw-container
You can learn more about the dockerps command at https://docs.docker.com/engine/reference/commandline/ps/.
Running a container using the user interface
If you successfully ran the SQL Server container, then you can skip this section and continue with the next section, titled Connecting to SQL Server in a Docker container.
If entering a command at the prompt or terminal fails for you, try following these steps to use the user interface:
In Docker Desktop, navigate to the Images tab.
In the mcr.microsoft.com/mssql/server row, in the Actions column, click the Run button.
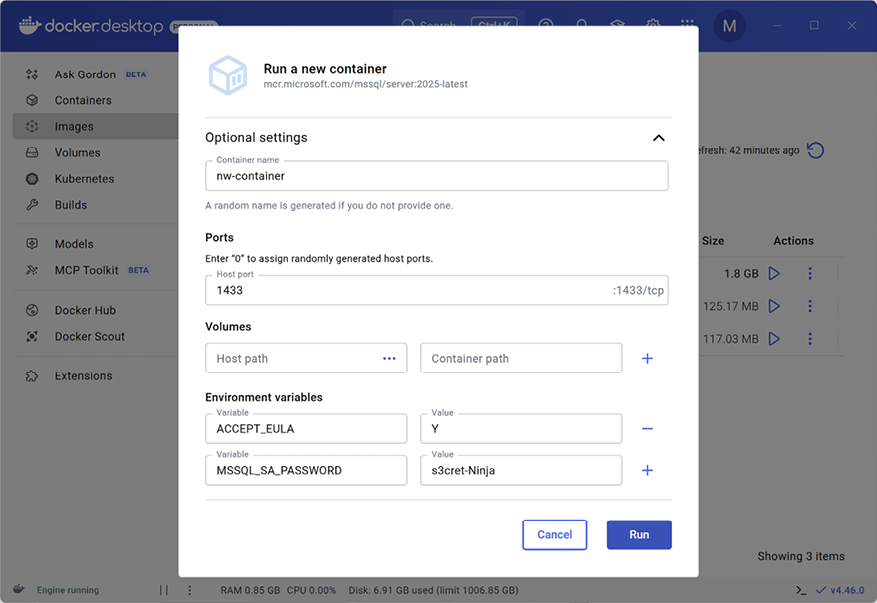
In the Run a new container dialog box, expand Optional settings, and complete the configuration, as shown in Figure 1.10 and in the following items:
Container name: nw-container, or leave blank to use a random name.
Ports: Enter 1433 to map to :1433/tcp.
Volumes: Leave empty.
Environment variables (click + to add a second one):
Enter ACCEPT_EULA with the value Y (or 1).
Enter MSSQL_SA_PASSWORD with the value s3cret-Ninja.
Click Run.
Figure 1.10: Running a container for SQL Server with the user interface
Connecting to SQL Server in a Docker container
Use your preferred database tool to connect to SQL Server in the Docker container. Some common database tools are shown in the following list:
Windows only:
SQL Server Management Studio (SSMS): The most popular and comprehensive tool for managing SQL Server databases. Free to download from Microsoft.
SQL Server Data Tools (SSDT): Integrated into Visual Studio and free to use, SSDT provides database development tools for designing, deploying, and managing SQL Server databases.
Cross-platform for Windows, macOS, Linux:
VS Code’s MS SQL extension: Query execution, IntelliSense, database browsing, and connection to SQL Server databases.
Some notes about the database connection string for SQL Server in a container:
Data Source, a.k.a. Server Name: tcp:127.0.0.1,1433
Authentication: You must use SQL Server Authentication, a.k.a. SQL Login. That is, you must supply a username and password. The SQL Server image has the sa user already created, and you had to give it a strong password when you ran the container. We chose the password s3cret-Ninja.
You must select the Trust server certificate checkbox.
Optionally, you might want to save your password for future use.
Initial Catalog, a.k.a. database: master or leave blank. (We will create the Northwind database using a SQL script, so we do not specify that as the database name yet.)
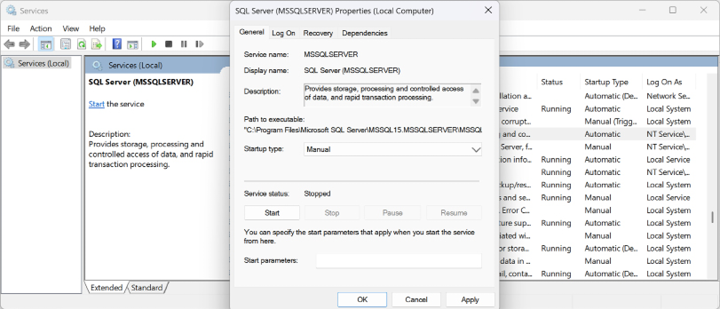
Warning! If you already have SQL Server installed locally, and its services are running, then it will be listening to port 1433, and it will take priority over any Docker-hosted SQL Server services that are also trying to listen on port 1433. You will need to stop the local SQL Server before being able to connect to any Docker-hosted SQL Server services. You can do this using Windows Services: in the Services (Local) list, right-click SQL Server (MSSQLSERVER) and choose Stop. (This can take a few minutes, so be patient.) You can also right-click and choose Properties and then set Startup type to Manual, as shown in Figure 1.11 (it defaults to Automatic, so if you restart Windows, it will be running again). Or change the port number(s) for either the local or Docker-hosted SQL Server services so that they do not conflict.
In Visual Studio, navigate to View | Server Explorer.
In the Server Explorer mini-toolbar, click the Connect to Database... button.
If prompted to Change Data Source, then choose Microsoft SQL Server.
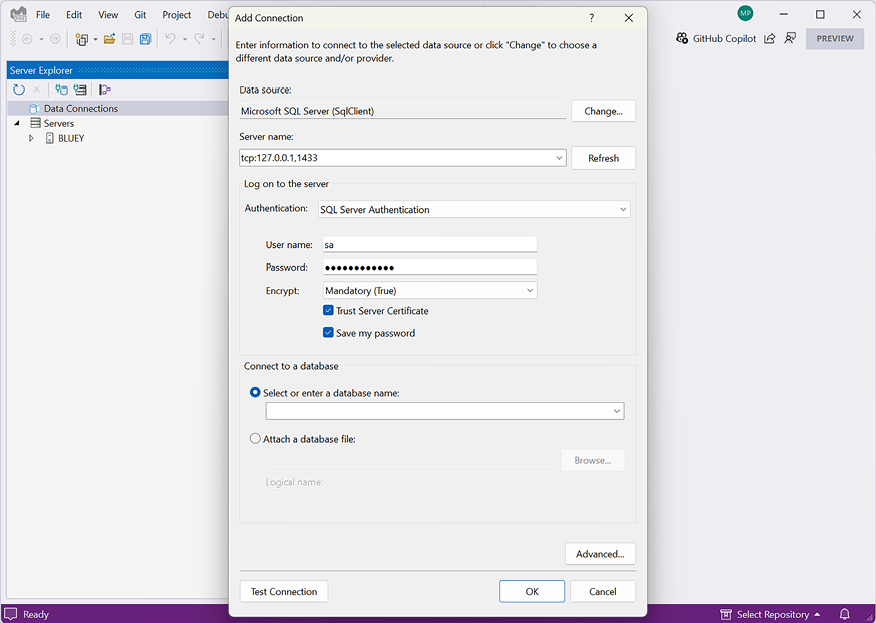
Enter the connection details, as shown in Figure 1.12:
Figure 1.12: Connecting to your SQL Server in a container from Visual Studio
Warning! If you get the error Login failed for user ‘sa’, then the most likely causes are either that the password was not set correctly when you ran the Docker container, or you are connecting to a different SQL Server, for example, a local one instead of the one in the container.
Connecting from VS Code
To connect to SQL Server in a container using VS Code, follow these steps:
In VS Code, navigate to the SQL Server extension. Note that the mssql extension might take a few minutes to initialize the first time.
In the SQL extension, click Add Connection....
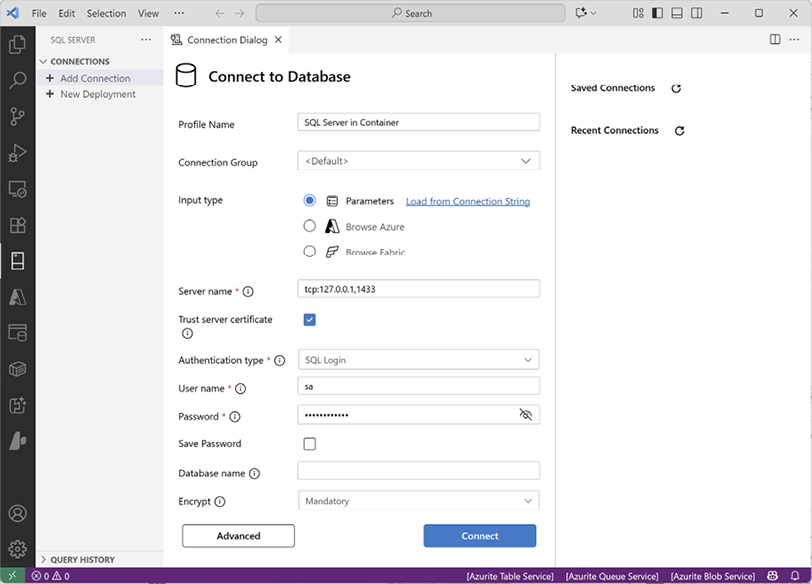
In the Connect to Database pane, enter the connection details, as shown in Figure 1.13:
Profile Name: SQL Server in Container
Connection Group: <Default>
Input type: Parameters
Server name: tcp:127.0.0.1,1433
Trust server certificate: Selected
Authentication type: SQL Login
User name: sa
Password: s3cret-Ninja
Save Password: Cleared (or selected for convenience during learning)
Database name: master or leave blank (we will create the Northwind database using a SQL script, so we do not specify that as the database name yet)
Encrypt: Mandatory
Figure 1.13: Connecting to your SQL Server in a container from VS Code
Click Connect and then note the success notification message.
Creating the Northwind database using a SQL script
Now you can use your preferred code editor (or database tool) to execute the SQL script to create the Northwind database in SQL Server in a container:
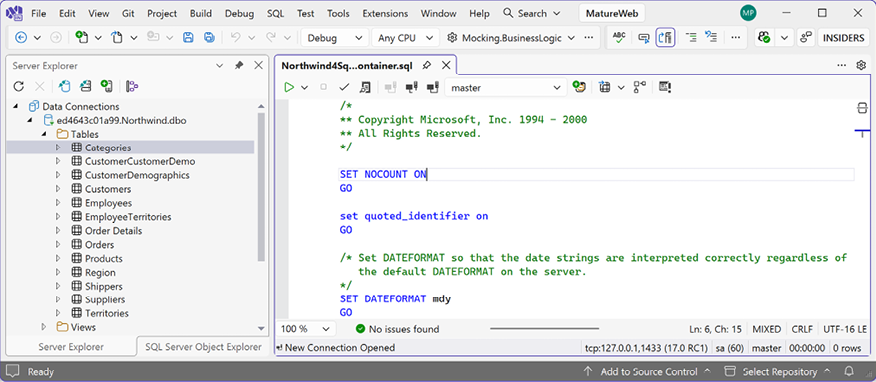
Open the Northwind4SqlServerContainer.sql file. Note that this file does not know about the Server Explorer connection to the SQL Server database.
Connect the file to the SQL Server database. For example, in Visual Studio, right-click in the script file, navigate to Connection | Connect..., and then fill in the dialog box as before.
Execute the SQL script:
If you are using Visual Studio, right-click in the script file, select Execute, and then wait to see the Command completed successfully message.
If you are using VS Code, right-click in the script file, select Execute Query, select the SQL Server in a Container connection profile, and then wait to see the Commands completed successfully message.
Refresh the data connection:
If you are using Visual Studio, then in Server Explorer, right-click Tables and select Refresh.
If you are using VS Code, then right-click the SQL Server in a Container connection profile and choose Refresh.
Expand Databases, expand Northwind, and then expand Tables.
Note that 13 tables have been created, for example, Categories, Customers, and Products. Also note that dozens of views and stored procedures have also been created, as shown in Figure 1.14:
Figure 1.14: Northwind database created by SQL script in Visual Studio Server Explorer
You now have a running instance of SQL Server containing the Northwind database that you can connect to from your ASP.NET Core projects.
You will want to keep the container while you work through all the chapters in this book. You can stop and start the container whenever you want, and the database will persist. Eventually, once you have finished this book, you might want to delete the container. This will also delete the database, so if you recreate the container, you will need to rerun the SQL script to recreate the Northwind database.
Removing Docker resources
When you have completed all the chapters in the book, or you plan to use a local SQL Server or Azure SQL Database in the cloud instead of a SQL Server container, and you want to remove all the Docker resources that it uses, then either use the Docker Desktop user interface or follow these steps at the command prompt or terminal:
At the command prompt or terminal, stop the nw-container container, as shown in the following command:
docker stop nw-container
At the command prompt or terminal, remove the nw-container container, as shown in the following command:
docker rm nw-container
Warning! Removing the container will delete all data inside it.
At the command prompt or terminal, remove the image to release its disk space, as shown in the following command:
The .NET CLI tool named dotnet can be extended with capabilities useful for working with EF Core. It can perform design-time tasks like creating and applying migrations from an older model to a newer model and generating code for a model from an existing database.
The dotnet-ef command-line tool is not automatically installed. You must install this package as either a global or local tool. If you have already installed an older version of the tool, then you should update it to the latest version:
At a command prompt or terminal, check if you have already installed dotnet-ef as a global tool, as shown in the following command:
dotnet tool list --global
Check in the list if an older version of the tool has been installed, like the one for .NET 9, as shown in the following output:
Package Id      Version     Commands
-------------------------------------
dotnet-ef       9.0.0       dotnet-ef
If an old version is installed, then update the tool, as shown in the following command:
dotnet tool update --global dotnet-ef
If it is not already installed, then install the latest version, as shown in the following command:
dotnet tool install --global dotnet-ef
If necessary, follow any OS-specific instructions to add the dotnet tools directory to your PATH environment variable, as described in the output of installing the dotnet-ef tool.
By default, the latest general availability (GA) release of .NET will be used to install the tool. To explicitly set a version, for example, to use a preview, add the --version switch. For example, to update to the latest .NET 11 preview or release candidate version (which will be available from February 2026 to October 2026), use the following command with a version wildcard:
Once the .NET 11 GA release happens in November 2026, you can just use the command without the --version switch to upgrade.
You can also remove the tool, as shown in the following command:
dotnet tool uninstall --global dotnet-ef
Creating a class library for entity models
You will now define entity data models in a class library so that they can be reused in other types of projects, including client-side app models.
Good practice: You should create a separate class library project for your entity data models from the class library for your database context. This allows easier sharing of the entity models between backend web servers and frontend desktop, mobile, and Blazor clients, while only the backend needs to reference the database context class library.
We will automatically generate some entity models using the EF Core command-line tool:
Use your preferred code editor to create a new project and solution, as defined in the following list:
Project template: Class Library / classlib
Project file and folder: Northwind.EntityModels
Solution file and folder: MatureWeb
Good practice: You should target .NET 10 (LTS) or a later version for all the projects in this book, but you should be consistent. If you choose to target later versions like .NET 11 for the class libraries, then target .NET 11 for the later MVC and Web API projects too. This does not mean that you can download or clone the solution projects and then only change the target framework from net10.0 to net11.0 and it will work. What I mean is that you can choose to target .NET 11 when you create all the projects. Some of the project templates will change between .NET 10 and .NET 11, especially the Aspire templates. Just changing the target version after project creation might not be enough.
In the Northwind.EntityModels.csproj project file, add package references for the SQL Server database provider and EF Core design-time support, as shown in the following markup:
Build the Northwind.EntityModels project to restore packages.
Make sure that the SQL Server container is running because you are about to connect to the server and its Northwind database.
At a command prompt or terminal, in the Northwind.EntityModels project folder (the folder that contains the .csproj project file), generate entity class models for all tables, as shown in the following command:
The connection string: "Data Source=tcp:127.0.0.1,1433;Initial Catalog=Northwind;User Id=sa;Password=s3cret-Ninja;TrustServerCertificate=true;"
The database provider: Microsoft.EntityFrameworkCore.SqlServer
The namespace: --namespace Northwind.EntityModels
To use data annotations as well as the Fluent API: --data-annotations
Warning!dotnet-ef commands must be entered all on one line and in a folder that contains a project, or you will see the following error: No project was found. Change the current working directory or use the --project option. Remember that all command lines can be found at and copied from the following link: https://github.com/markjprice/web-dev-net10/blob/main/docs/command-lines.md.
If you are using a local instance of SQL Server, then you can use the following command:
Note the different data source and authentication in the connection string: "Data Source=.;Initial Catalog=Northwind;Integrated Security=true;TrustServerCertificate=true;"
Creating a class library for a database context
You will now define a database context class library:
Add a new project to the solution, as defined in the following list:
Project template: Class Library / classlib
Project file and folder: Northwind.DataContext
Solution file and folder: MatureWeb
In the Northwind.DataContext project, statically and globally import the Console class, add a package reference to the EF Core data provider for SQL Server, and add a project reference to the Northwind.EntityModels project, as shown in the following markup:
<ItemGroupLabel="To simplify use of WriteLine."><UsingInclude="System.Console"Static="true" /></ItemGroup><ItemGroupLabel="Versions are set at solution-level."><PackageReferenceInclude="Microsoft.EntityFrameworkCore.SqlServer" /></ItemGroup><ItemGroup><ProjectReferenceInclude="..\Northwind.EntityModels\Northwind.EntityModels.csproj" /></ItemGroup>
Warning! The path to the project reference should not have a line break in your project file.
In the Northwind.DataContext project, delete the Class1.cs file.
Build the Northwind.DataContext project to restore packages.
In the Northwind.DataContext project, add a class named NorthwindContextLogger.cs.
Modify its contents to define a static method named WriteLine that appends a string to the end of a text file named northwindlog-<date_time>.txt on the desktop, as shown in the following code:
Although the project name (and therefore default assembly name) is Northwind.DataContext, to simplify usage of the data context class, we have defined it in the same namespace as the related models: Northwind.EntityModels.
Move the NorthwindContext.cs file from the Northwind.EntityModels project/folder to the Northwind.DataContext project/folder.
Warning! In Visual Studio Solution Explorer, if you drag and drop a file between projects, it will be copied. If you hold down Shift while dragging and dropping, it will be moved. In VS Code EXPLORER, if you drag and drop a file between projects, it will be moved. If you hold down Ctrl while dragging and dropping, it will be copied.
In NorthwindContext.cs, note that the second constructor can have options passed as a parameter, which allows us to override the default database connection string in any projects, such as websites, that need to work with the Northwind database, as shown in the following code:
In NorthwindContext.cs, both constructors give dozens of warnings, one for each of its DbSet<T> properties that represent tables and views, because they are marked as not nullable, and the compiler does not know that EF Core will automatically instantiate them all, so they will never actually be null. We can hide these warnings by disabling warning code CS8618 just for those two constructors, as shown in the following code:
Good practice: We could simplify the code by disabling that warning code once at the top of the file and not restoring it anywhere in that file, but it is safer to re-enable warning codes in case you encounter more instances that you do need to handle differently.
In NorthwindContext.cs, in the OnConfiguring method, remove the compiler #warning about the connection string and then add statements to dynamically build a database connection string for SQL Server in a container, as shown in the following code:
protectedoverridevoidOnConfiguring( DbContextOptionsBuilder optionsBuilder)
{
if (!optionsBuilder.IsConfigured)
{
SqlConnectionStringBuilder builder = new();
builder.DataSource = "tcp:127.0.0.1,1433"; // SQL Server in container.
builder.InitialCatalog = "Northwind";
builder.TrustServerCertificate = true;
builder.MultipleActiveResultSets = true;
// Because we want to fail faster. Default is 15 seconds.
builder.ConnectTimeout = 3;
// SQL Server authentication.
builder.UserID = Environment.GetEnvironmentVariable("MY_SQL_USR");
builder.Password = Environment.GetEnvironmentVariable("MY_SQL_PWD");
optionsBuilder.UseSqlServer(builder.ConnectionString);
optionsBuilder.LogTo(NorthwindContextLogger.WriteLine,
new[] { Microsoft.EntityFrameworkCore
.Diagnostics.RelationalEventId.CommandExecuting });
}
}
In the Northwind.DataContext project, add a class named NorthwindContextExtensions.cs. Modify its contents to define an extension method that adds the Northwind database context to a collection of dependency services, as shown in the following code:
using Microsoft.Data.SqlClient;// To use SqlConnectionStringBuilder.using Microsoft.EntityFrameworkCore; // To use UseSqlServer.using Microsoft.Extensions.DependencyInjection; // To use IServiceCollection.namespaceNorthwind.EntityModels;
publicstaticclassNorthwindContextExtensions
{
/// <summary>/// Adds NorthwindContext to the specified IServiceCollection. Uses the SqlServer database provider. /// </summary> /// <param name="services">The service collection.</param> /// <param name="connectionString">Set to override the default.</param> /// <returns>An IServiceCollection that can be used to add more services.</returns>publicstatic IServiceCollection AddNorthwindContext(this IServiceCollection services, // The type to extend.string? connectionString = null)
{
if (connectionString is null)
{
SqlConnectionStringBuilder builder = new();
builder.DataSource = "tcp:127.0.0.1,1433"; // SQL Server in container.
builder.InitialCatalog = "Northwind";
builder.TrustServerCertificate = true;
builder.MultipleActiveResultSets = true;
// Because we want to fail faster. Default is 15 seconds.
builder.ConnectTimeout = 3;
// SQL Server authentication.
builder.UserID = Environment.GetEnvironmentVariable("MY_SQL_USR");
builder.Password = Environment.GetEnvironmentVariable("MY_SQL_PWD");
connectionString = builder.ConnectionString;
}
services.AddDbContext<NorthwindContext>(options =>
{
options.UseSqlServer(connectionString);
options.LogTo(NorthwindContextLogger.WriteLine,
new[] { Microsoft.EntityFrameworkCore
.Diagnostics.RelationalEventId.CommandExecuting });
},
// Register with a transient lifetime to avoid concurrency// issues with Blazor Server projects.
contextLifetime: ServiceLifetime.Transient,
optionsLifetime: ServiceLifetime.Transient);
return services;
}
}
Build the two class libraries and fix any compiler errors.
There is duplicate code in these two classes because the NorthwindContext class and its extensions are written to allow developers to instantiate the context class directly as well as via the extension method. They can also override the connection string or choose to accept defaults.
Setting the user and password for SQL Server authentication
If you are using SQL Server authentication (i.e., you must supply a user and password), then complete the following steps:
In the Northwind.DataContext project, note the statements that set UserId and Password, as shown in the following code:
// SQL Server authentication.
builder.UserId = Environment.GetEnvironmentVariable("MY_SQL_USR");
builder.Password = Environment.GetEnvironmentVariable("MY_SQL_PWD");
Set the two environment variables at the command prompt or terminal, as shown in the following commands:
Unless you set a different password, <your_user_name> will be sa, and <your_password> will be s3cret-Ninja.
You must restart any command prompts, terminal windows, and applications like Visual Studio for this change to take effect.
Good practice: Although you could define the two environment variables in the launchSettings.json file of an ASP.NET Core project, you must then be extremely careful not to include that file in a GitHub repository! You can learn how to ignore files in Git at https://docs.github.com/en/get-started/getting-started-with-git/ignoring-files.
Registering dependency services
You can register dependency services with different lifetimes, as shown in the following list:
Transient: These services are created each time they’re requested. Transient services should be lightweight and stateless.
Scoped: These services are created once per client request and are disposed of; then the response returns to the client.
Singleton: These services are usually created the first time they are requested and then shared, although you can provide an instance at the time of registration, too.
In this book, you will use all three types of lifetime.
By default, a DbContext class is registered using the Scope lifetime, meaning that multiple threads can share the same instance. But DbContext does not support multiple threads. If more than one thread attempts to use the same NorthwindContext class instance at the same time, then you will see the following runtime exception thrown: A second operation started on this context before a previous operation completed. This is usually caused by different threads using the same instance of a DbContext. However, instance members are not guaranteed to be thread-safe.
This happens in Blazor projects with components set to run on the server side because, whenever interactions on the client side happen, a SignalR call is made back to the server, where a single instance of the database context is shared between multiple clients. This issue does not occur if a component is set to run on the client side.
Improving the class-to-table mapping
We will make some small changes to improve the entity model mapping and validation rules for SQL Server.
Remember that all code is available in the GitHub repository for the book. Although you will learn more by typing the code yourself, you never have to. Go to the following link and press . (or change .com to .dev manually) to get a live code editor in your browser: https://github.com/markjprice/web-dev-net10.
We will add a regular expression to validate that a CustomerId value is exactly five uppercase letters:
In Customer.cs, add a regular expression to validate its primary key, CustomerId, to only allow five uppercase Western characters, as shown highlighted in the following code:
In Customer.cs, add the [Phone] attribute to its Phone property, as shown highlighted in the following code:
[StringLength(24)]
[Phone]
public string? Phone { get; set; }
The [Phone] attribute adds the following to the rendered HTML: type="tel". On a mobile phone, this makes the keyboard use the phone dialer instead of the normal keyboard.
In Order.cs, decorate the CustomerId property with the same regular expression to enforce five uppercase characters.
Testing the class libraries using xUnit
xUnit is a popular unit testing framework for .NET applications. It was created by the original inventor of NUnit and is designed to be more modern, extensible, and aligned with .NET development practices.
Several benefits of using xUnit are shown in the following list:
xUnit is open source and has a strong community and active development team behind it. This makes it more likely that it will stay up to date with the latest .NET features and best practices. xUnit benefits from a large and active community, which means many tutorials, guides, and third-party extensions are available for it.
xUnit uses a more simplified and extensible approach compared to older frameworks. It encourages the use of custom test patterns and less reliance on setup and teardown methods, leading to cleaner test code.
Tests in xUnit are configured using .NET attributes, which makes the test code easy to read and understand. It uses [Fact] for standard test cases and [Theory] with [InlineData], [ClassData], or [MemberData] for parameterized tests, enabling data-driven testing. This makes it easier to cover many input scenarios with the same test method, enhancing test thoroughness while minimizing effort.
xUnit includes an assertion library that allows for a wide variety of assertions out of the box, making it easier to test a wide range of conditions without having to write custom test code. It can also be extended with popular assertion libraries, like FluentAssertions, that allow you to articulate test expectations with human-readable reasons.
By default, xUnit supports parallel test execution within the same test collection, which can significantly reduce the time it takes to run large test suites. This is particularly beneficial in continuous integration environments where speed is critical. However, if you run your tests in a memory-limited Virtual Private Server (VPS), then that impacts how much data the server can handle at any given time and how many applications or processes it can run concurrently. In this scenario, you might want to disable parallel test execution. Memory-limited VPS instances are typically used as cheap testing environments.
xUnit offers precise control over the test lifecycle with setup and teardown commands through the use of the constructor and destructor patterns and the IDisposable interface, as well as with the [BeforeAfterTestAttribute] for more granular control.
Now let’s build some unit tests to ensure the class libraries are working correctly.
Let’s write the tests:
Use your preferred coding tool to add a new xUnit Test Project [C#] / xunit project named Northwind.UnitTests to the MatureWeb solution.
In the Northwind.UnitTests project, make changes as described in the following bullets, and as shown in the following configuration:
Delete the version numbers specified for the testing packages in the project file. (Visual Studio and other code editors will give errors if you have projects that should use CPM but specify their own package versions without using the VersionOverride attribute.)
Add a project reference to the Northwind.DataContext project:
Warning! The project reference must go all on one line with no line break.
Build the Northwind.UnitTests project to build referenced projects.
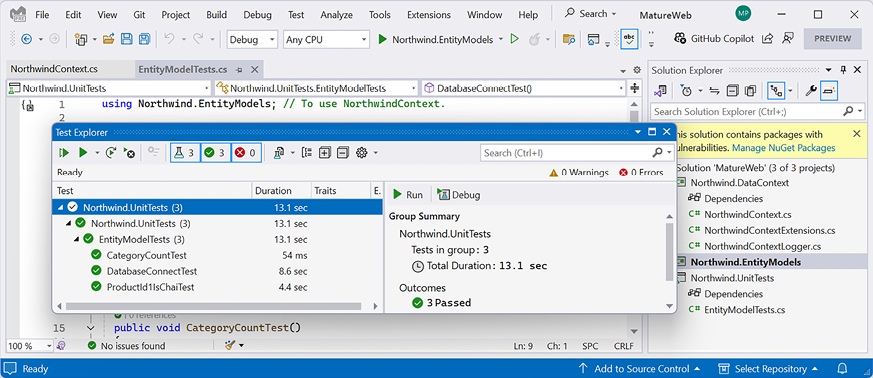
Rename UnitTest1.cs to EntityModelTests.cs.
Modify the contents of the file to define two tests, the first to connect to the database and the second to confirm there are eight categories in the database, as shown in the following code:
using Northwind.EntityModels; // To use NorthwindContext.namespaceNorthwind.UnitTests;publicclassEntityModelTests
{
[Fact]
publicvoidDatabaseConnectTest()
{
using NorthwindContext db = new();
Assert.True(db.Database.CanConnect());
}
[Fact]
publicvoidCategoryCountTest()
{
using NorthwindContext db = new();
int expected = 8;
int actual = db.Categories.Count();
Assert.Equal(expected, actual);
}
[Fact]
publicvoidProductId1IsChaiTest()
{
using NorthwindContext db = new();
string expected = "Chai";
Product? product = db.Products.Find(keyValues: 1);
string actual = product?.ProductName ?? string.Empty;
Assert.Equal(expected, actual);
}
}
Run the unit tests:
If you are using Visual Studio, then navigate to Test | Run All Tests, and then view the results in Test Explorer.
If you are using VS Code, then in the Northwind.UnitTests project’s TERMINAL window, run the tests, as shown in the following command: dotnet test. Alternatively, use the TESTING window if you have installed the C# Dev Kit.
Note that the results should indicate that three tests were run, and all passed, as shown in Figure 1.15:
Figure 1.15: Three successful unit tests ran
If any of the tests fail, then try to fix the issue.
For example, you might see the following exception:
System.ArgumentNullException : Value cannot be null. (Parameter 'User ID')
This occurs when the code tries to read the environment variable, but it has not been set. If you executed the commands to set the environment variables, then to fix the problem, restart Visual Studio and any terminal and command prompt windows. This will allow them to access the environment variables.
Now that we have built an entity model to use to work with sample data in all the projects in this book, let’s end this chapter by looking at where you can get help when you get stuck.
Read this chapter and the full book FREE of cost - No Credit card required!
Plus access over 8,000 other expert tech books and videos just by signing up - No commitment!
CONTINUE READING
83
Tech Concepts
36
Programming languages
73
Tech Tools
Unlimited access to the largest independent learning library in tech of over 8,000 expert-authored tech books and videos.
Innovative learning tools, including AI book assistants, code context explainers, and text-to-speech.
50+ new titles added per month and exclusive early access to books as they are being written.


 Free Chapter